

제조공정

산업 제조
 |
| × | 1 | |||
 |
| × | 1 | |||
 |
| × | 1 | |||
 |
| × | 1 | |||
| × | 1 | ||||
| × | 1 |
 |
| |||
 |
| |||
 |
|
 |
| |||
 |
|
오래전부터 인터넷을 사용하지 않고 기상 관측소를 만들고 싶었습니다. 주변의 날씨 데이터를 측정하고 필요할 때 데이터를 살펴보는 것이 좋습니다. 그래서 주변 기압, 온도, 습도, 오늘의 UV 지수(창문 근처에 놓으면)를 측정할 수 있는 시원해 보이는 지역 기상 관측소를 만듭니다. 더 많은 것이 있습니다! 😉 시간, 날짜 및 요일을 표시하는 시계 화면도 있습니다.
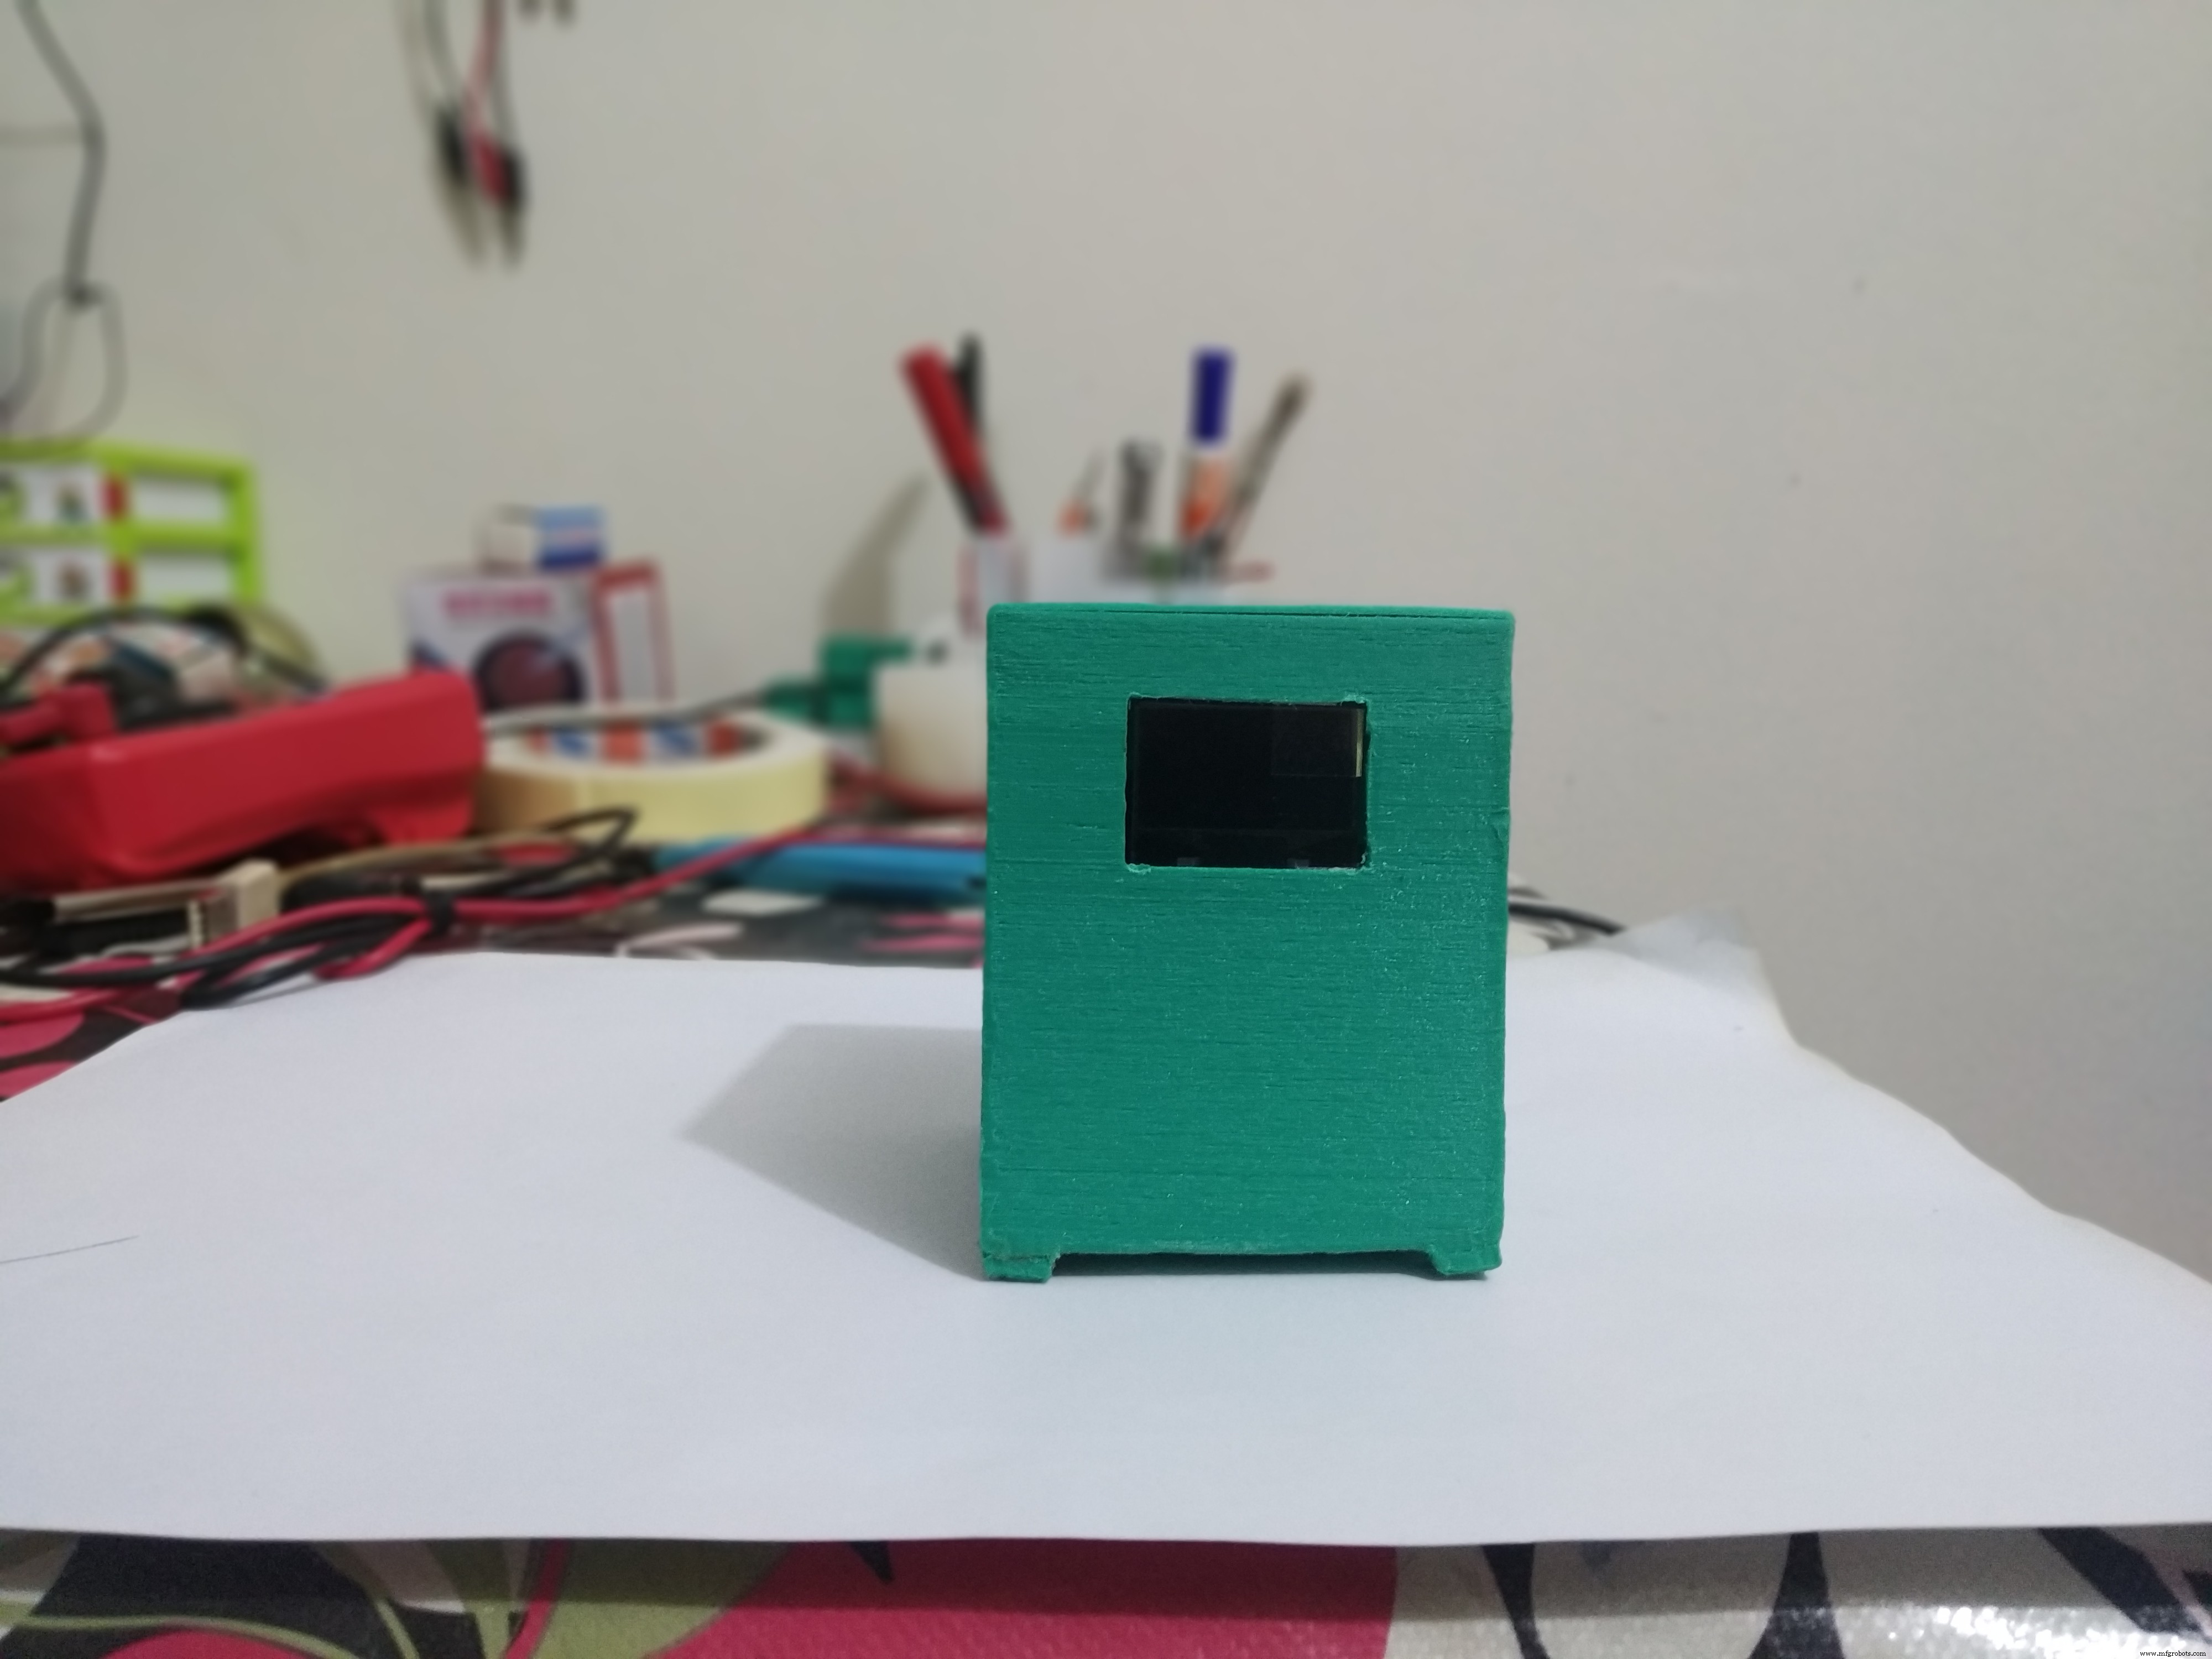


이 튜토리얼에서는 이러한 단계에서 이 선선한 기상 관측소를 만드는 방법을 보여 드리겠습니다.
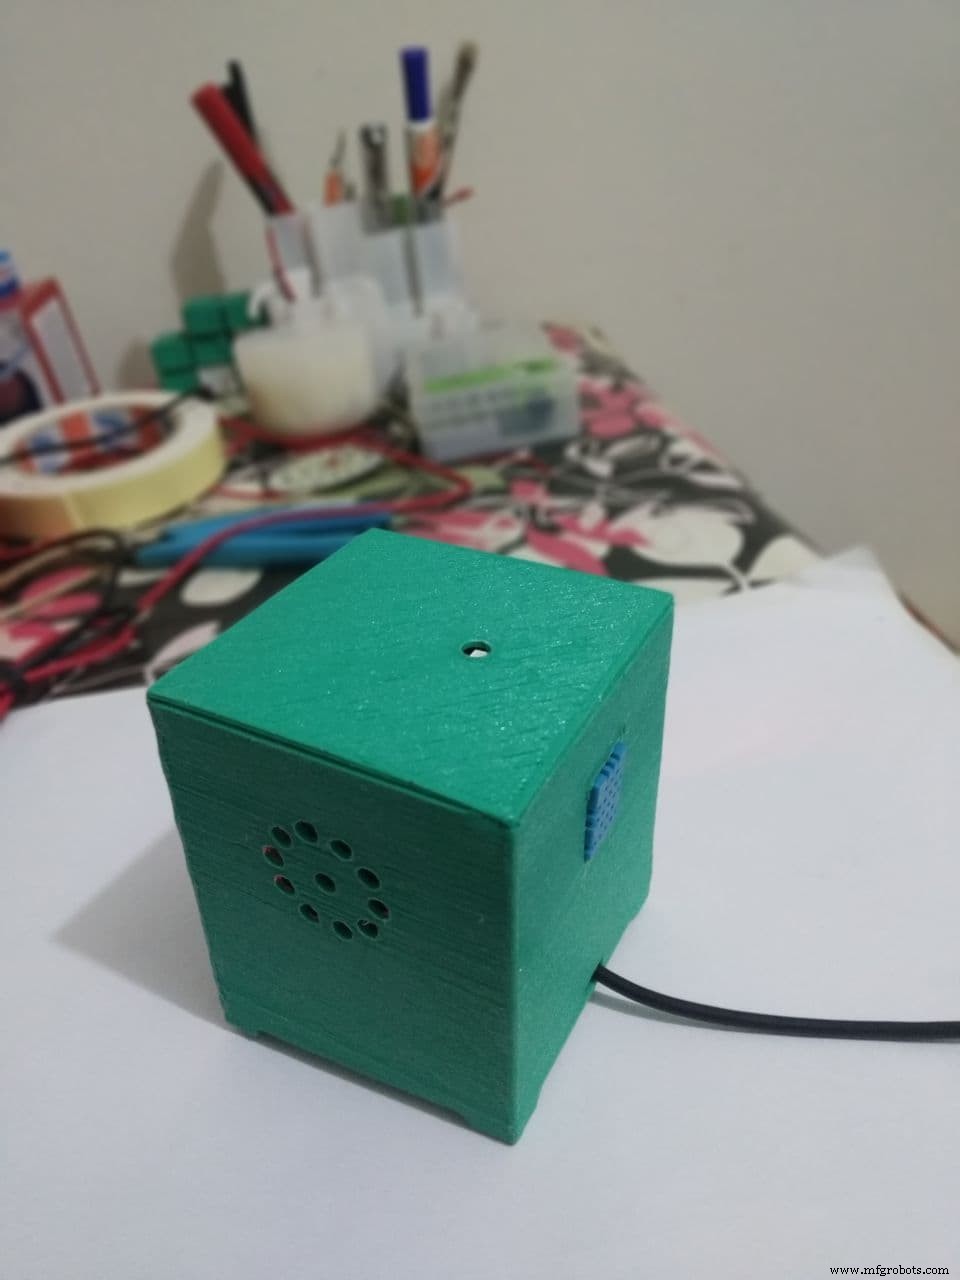
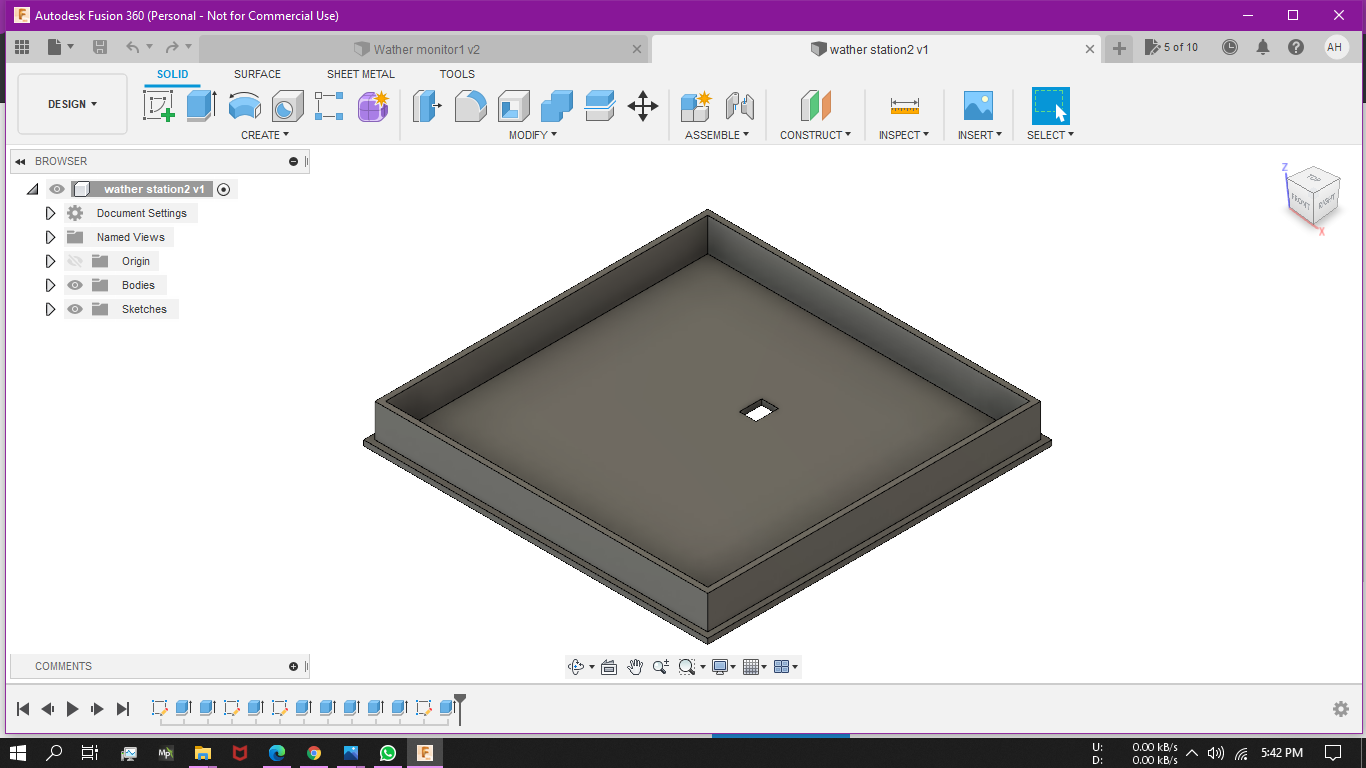
1단계:인클로저 구축
Autodesk fusion 360을 사용합니다. 인클로저를 만들고 녹색 PLA로 인쇄합니다. 지지대가 필요하고 Ender 3에서 70mm/s 속도로 20% 채우기로 인쇄합니다. 이 프로젝트에서 인클로저용 STL 파일을 찾을 수 있습니다.

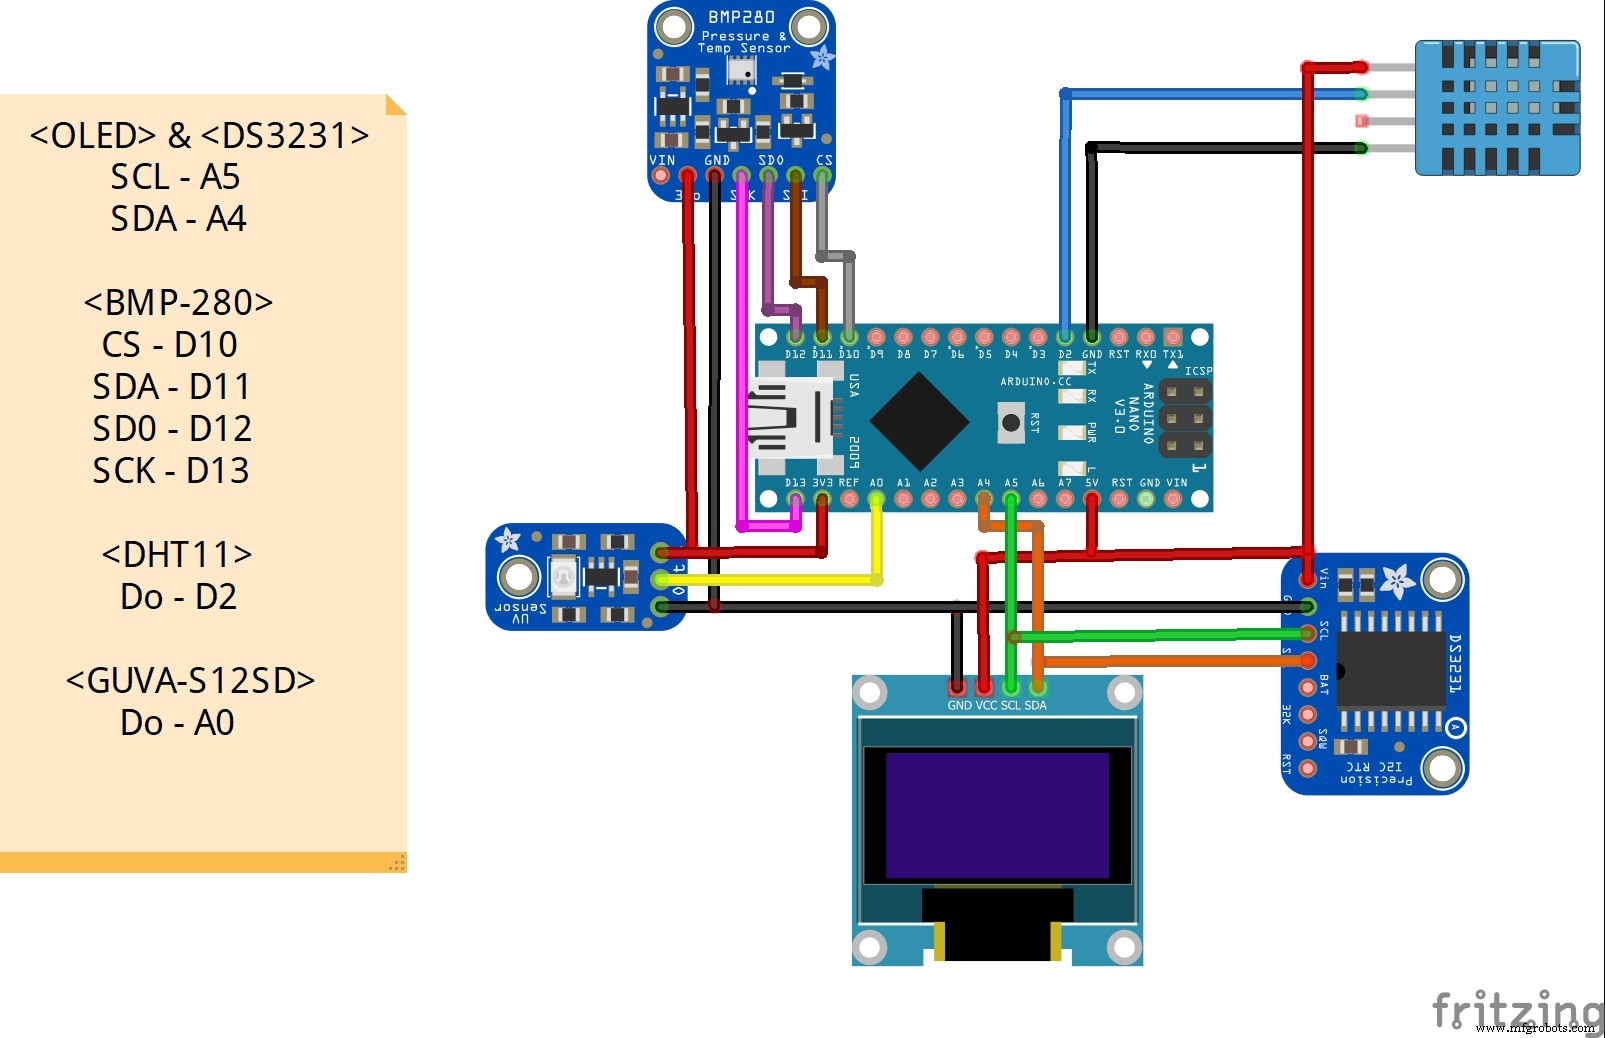
2단계:BMP280
BMP280은 대기압 및 온도 센서이며 I2C 또는 SPI 프로토콜을 사용하여 Arduino와 통신합니다. 여기서는 SPI를 사용합니다. SPI를 사용하려면 연결-
<울>
코드 부분에서 이 센서를 사용하려면 라이브러리가 필요합니다. 먼저 #include 코드에 라이브러리를 포함합니다. . 여기에서 라이브러리를 다운로드할 수 있습니다.
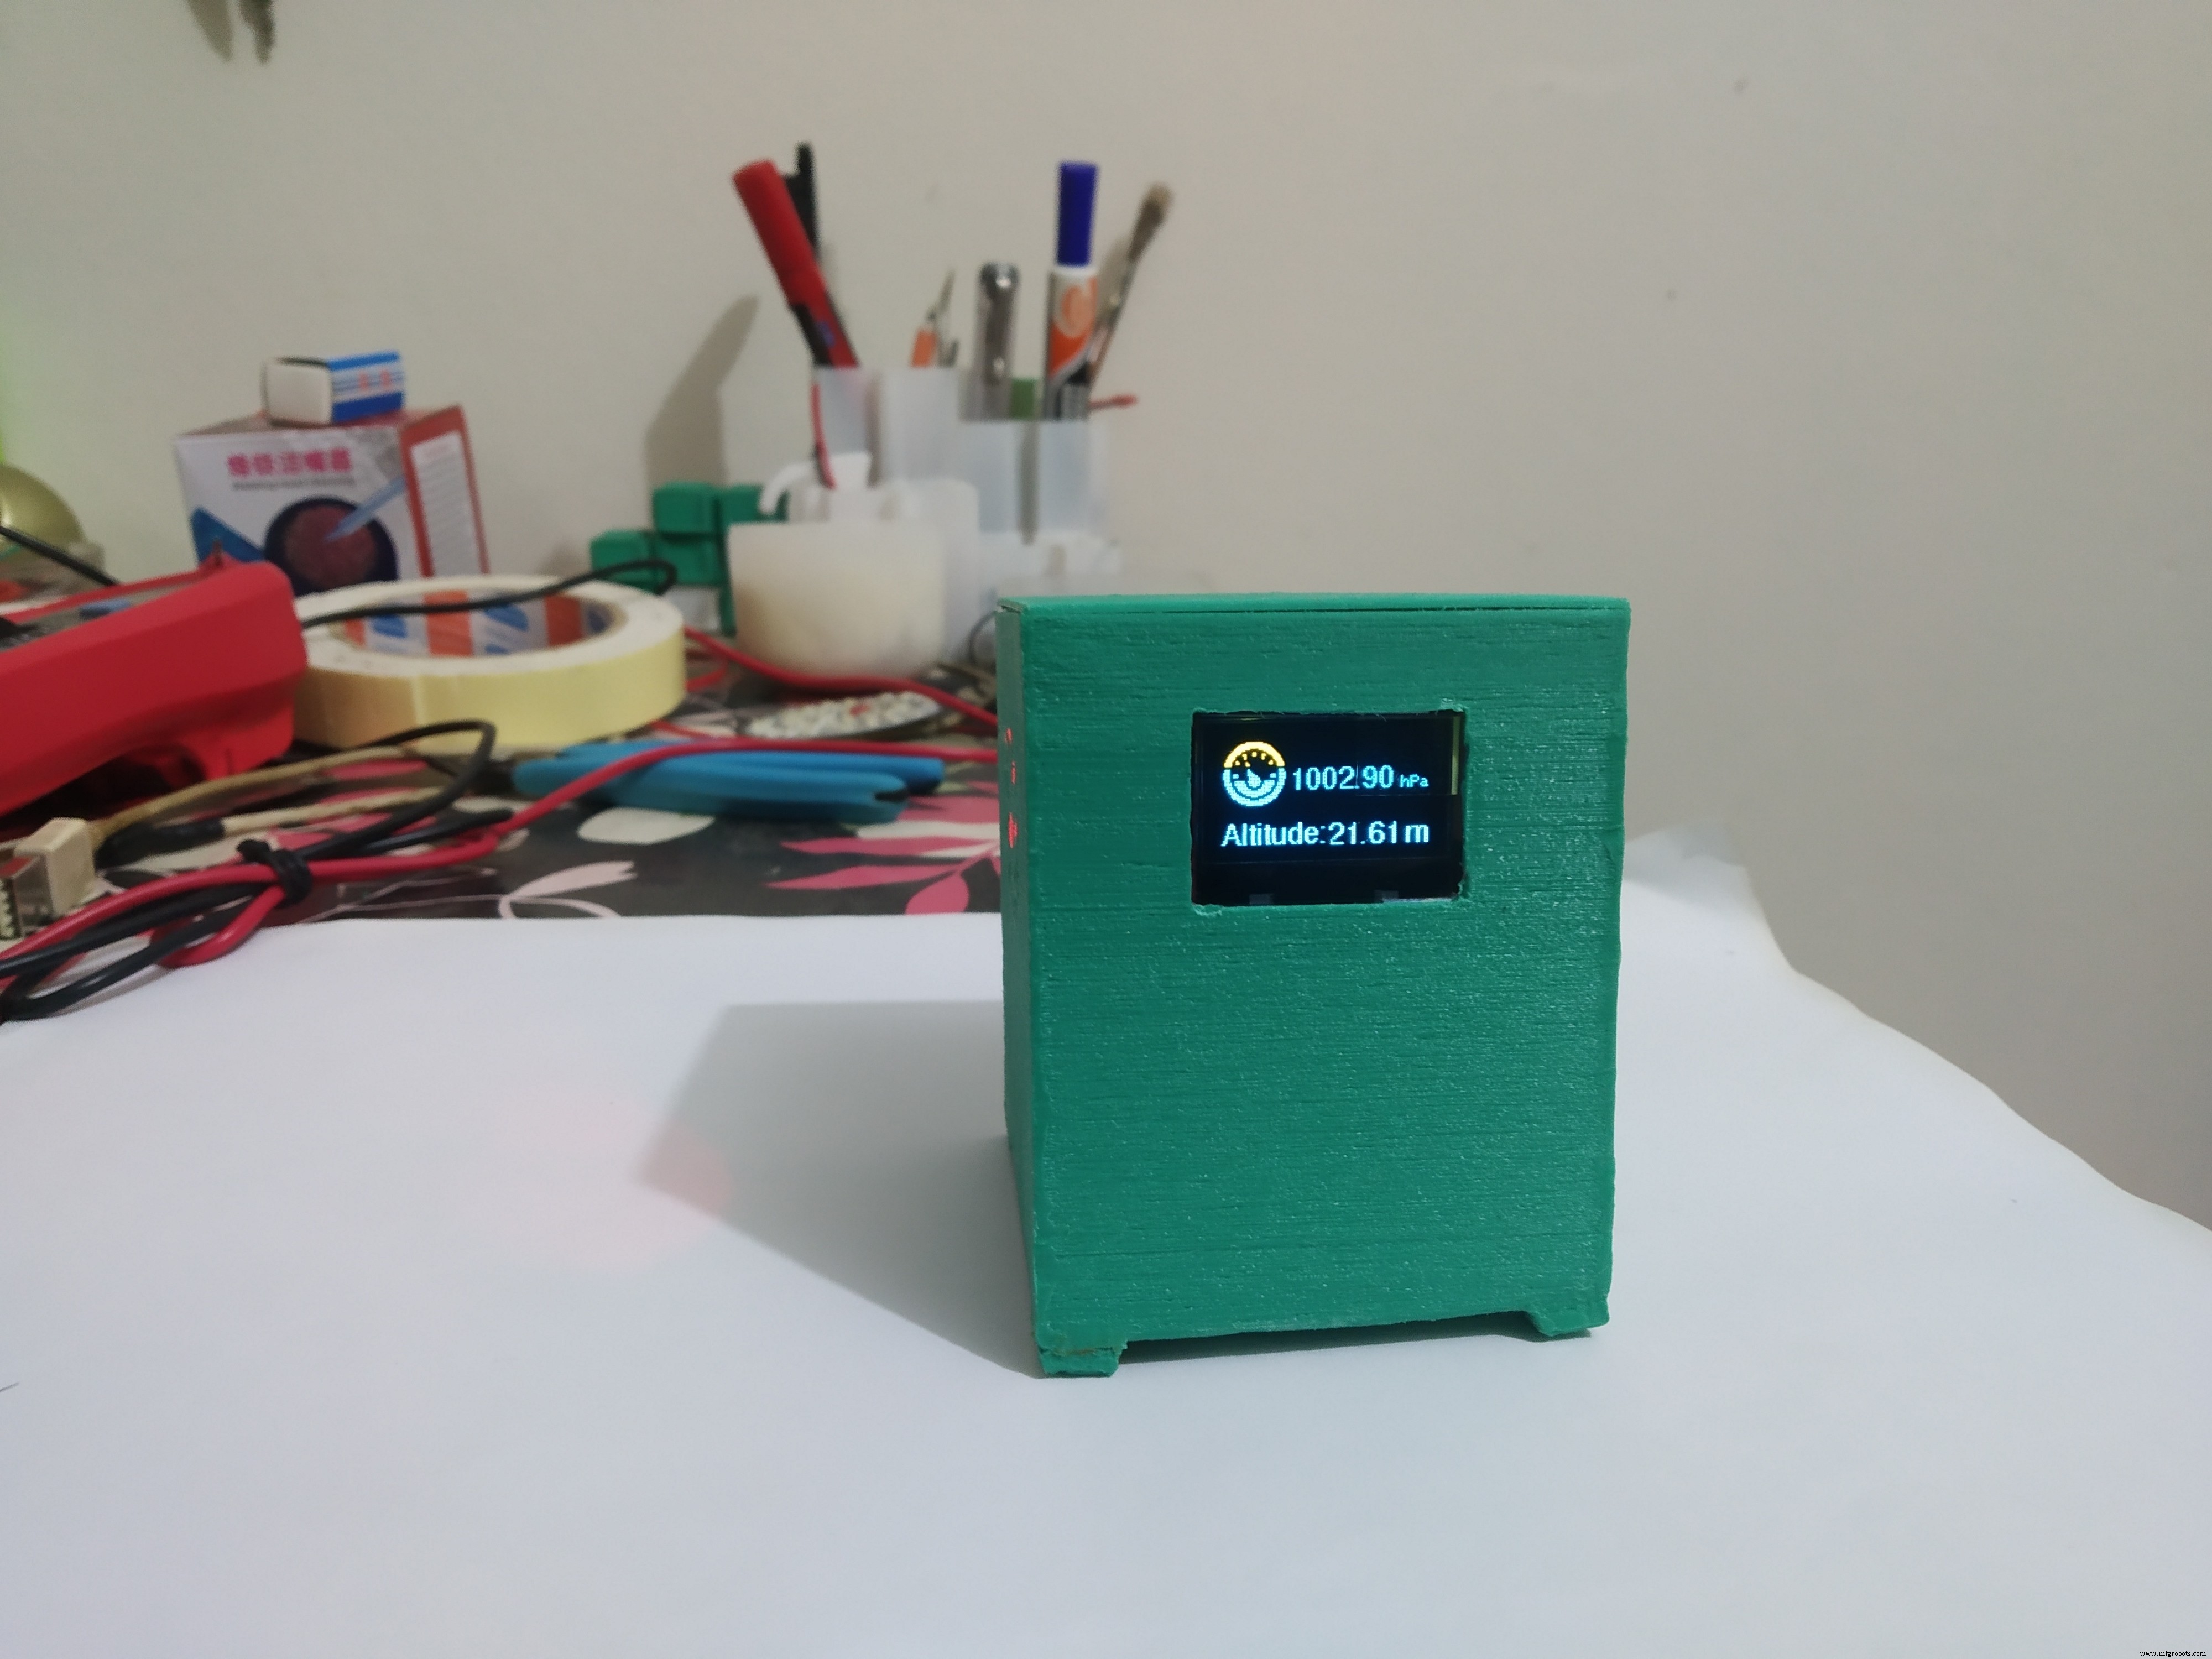
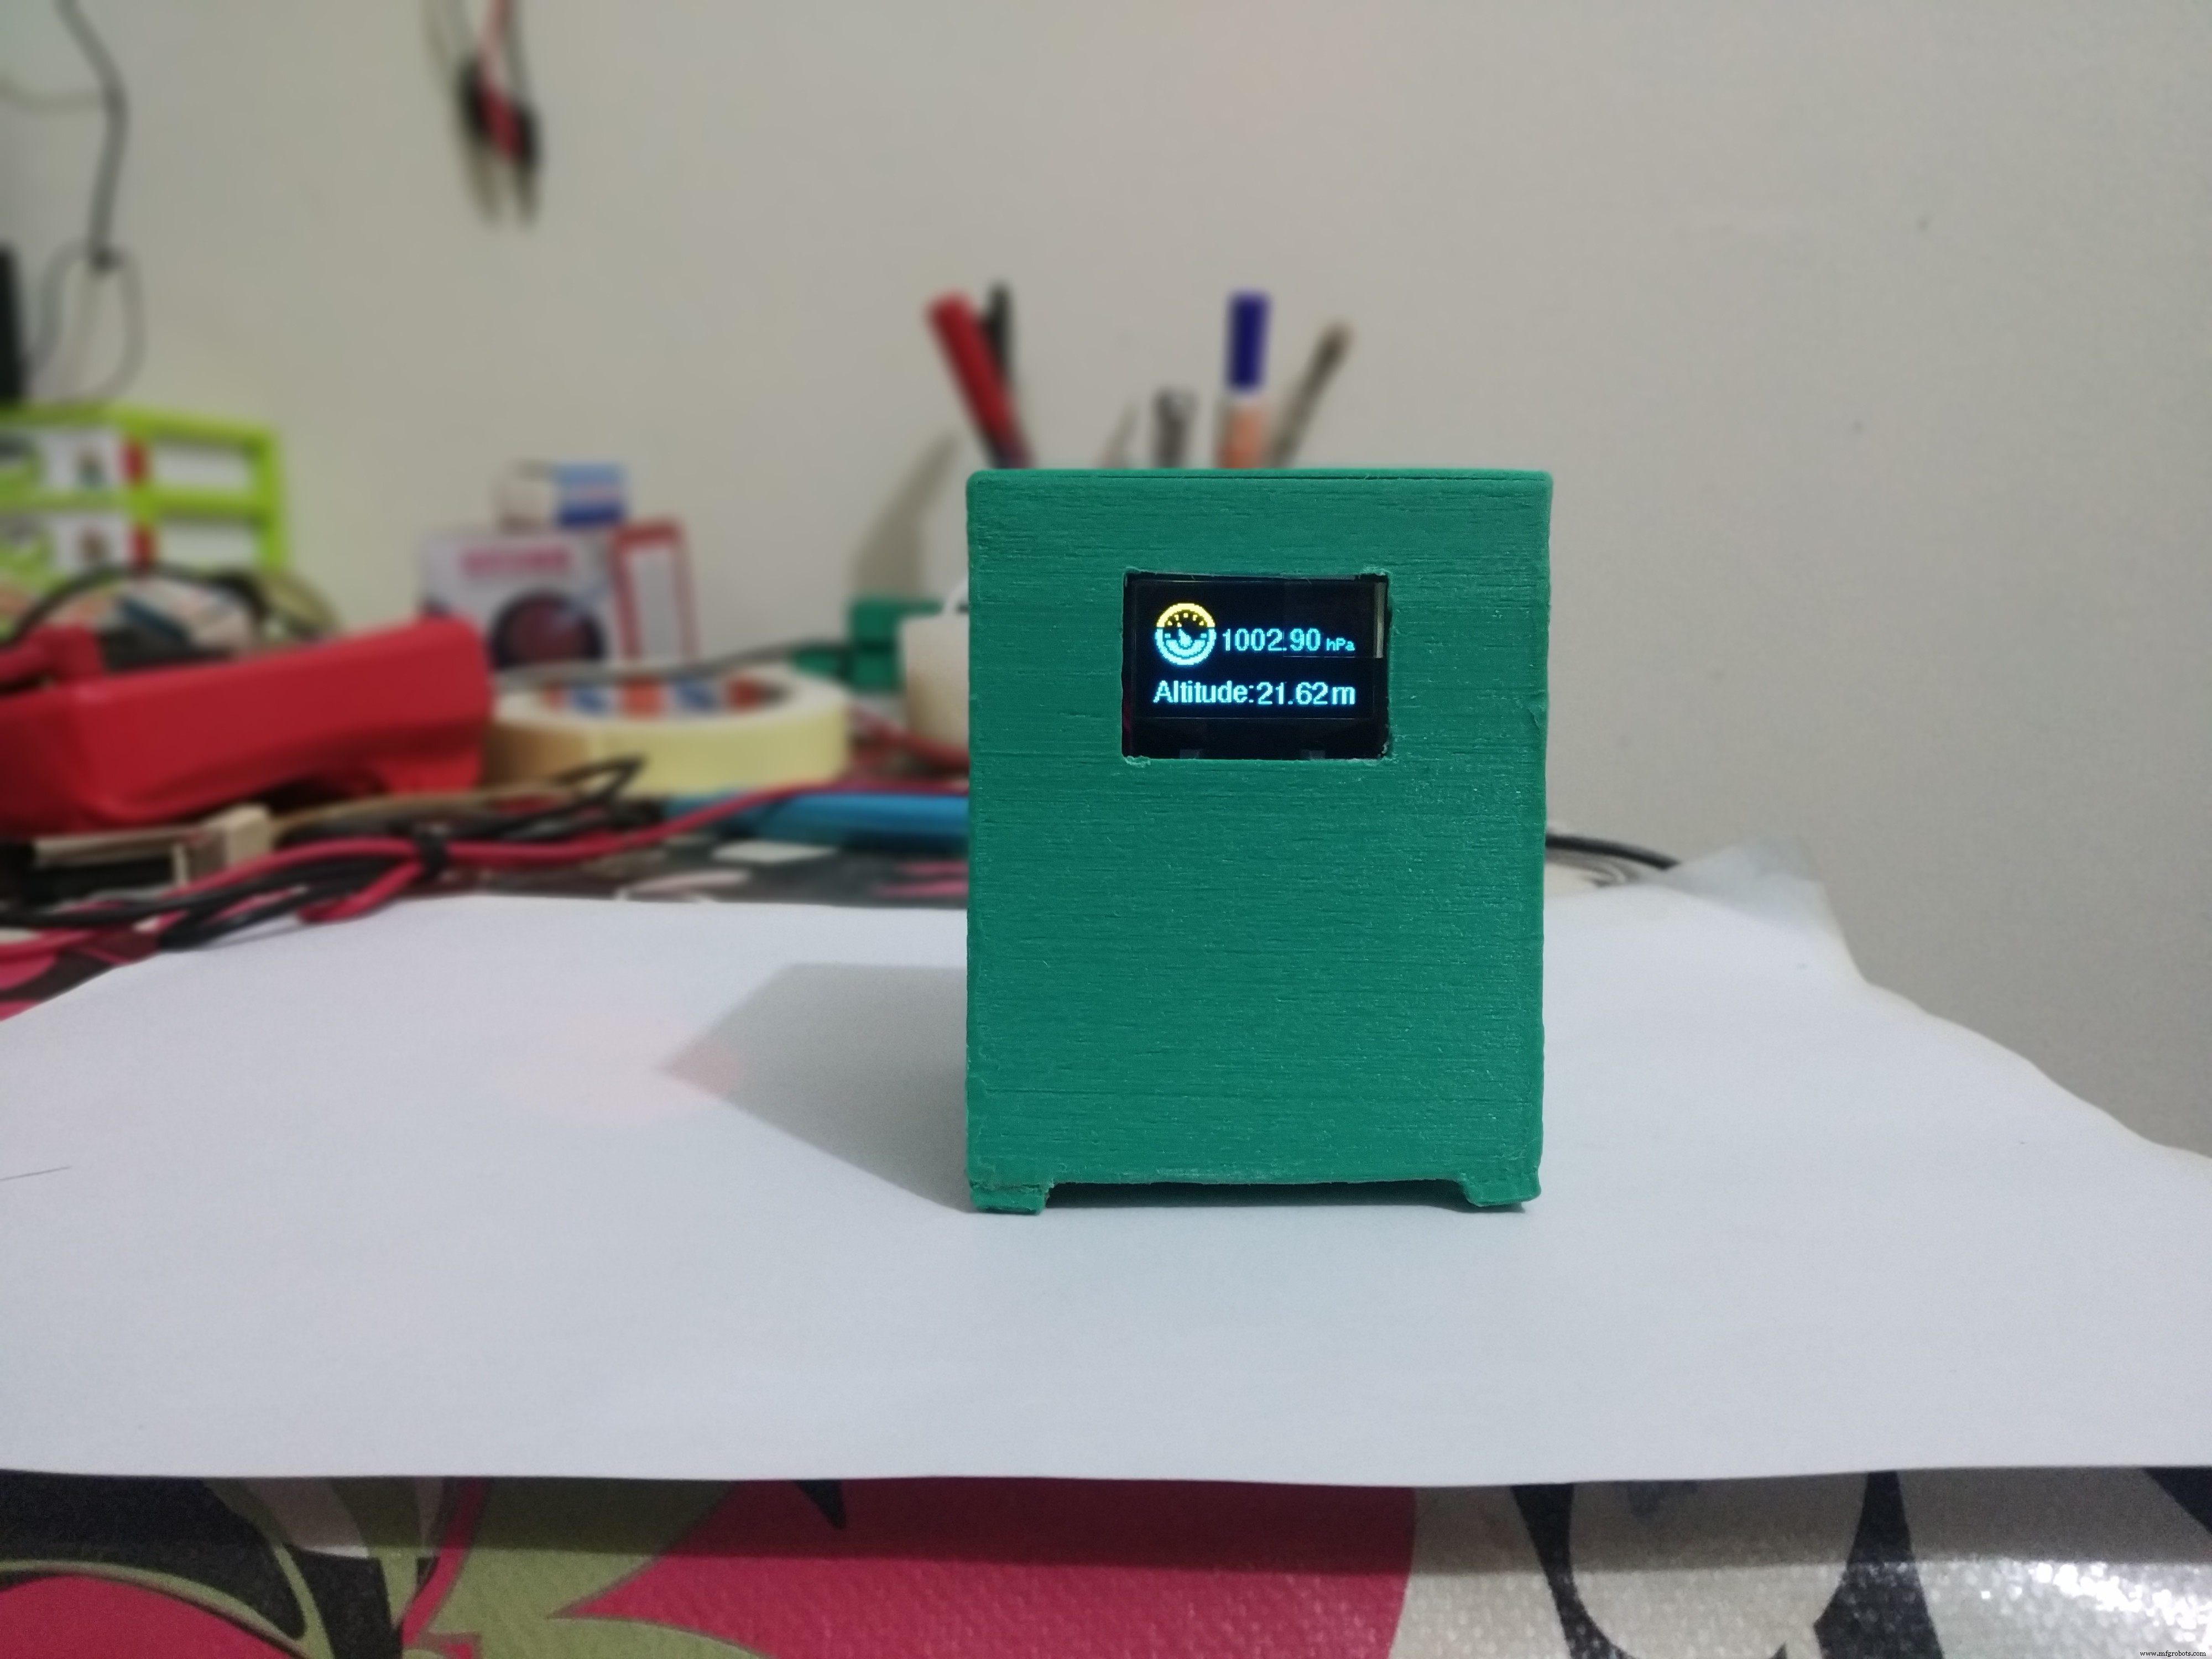
그런 다음 센서의 SPI 핀을 정의합니다. 설정 함수에서 BMP 센서를 초기화하고 루프 함수에서 bmp.readPressure()를 사용하여 압력 및 온도 데이터를 읽습니다. 및 bmp.readTemperature() 명령. 압력 값을 100으로 나누어 hPa 단위로 압력을 측정합니다. 고도를 측정하려면 bmp.readAltitude(1005.47)를 사용합니다. 명령. 여기서 (1005.47) 값을 변경해야 합니다. 해당 지역의 평균 기압에 따라
3단계:DS3231 RTC
이 기상 관측소에는 약한 자의 현재 시간, 날짜 및 요일을 표시할 수 있는 시간 화면도 있습니다. 이를 위해 I2C 프로토콜을 사용하여 통신하는 DS231 RTC 모듈을 사용합니다. 이를 사용하려면 연결-
<울>우선 DS3231_set.ino 를 사용하여 RTC의 시간과 날짜를 설정해야 합니다. 라이브러리 예제의 프로그램입니다.
기본 프로그램에서 라이브러리 #include 를 포함합니다. 라이브러리의 지시에 따라 시간 데이터를 읽습니다. 여기서는 라이브러리의 예제를 코드에 대한 참조로 사용합니다. 요일을 찾기 위해 요일별로 케이스를 만들었습니다.
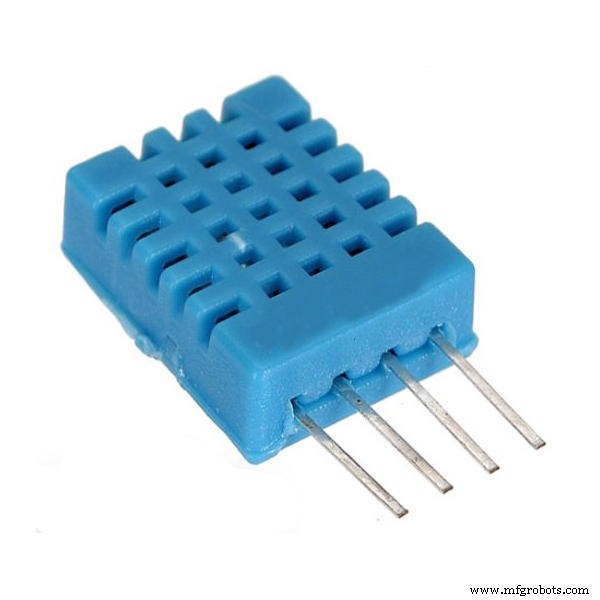
4단계:DHT11
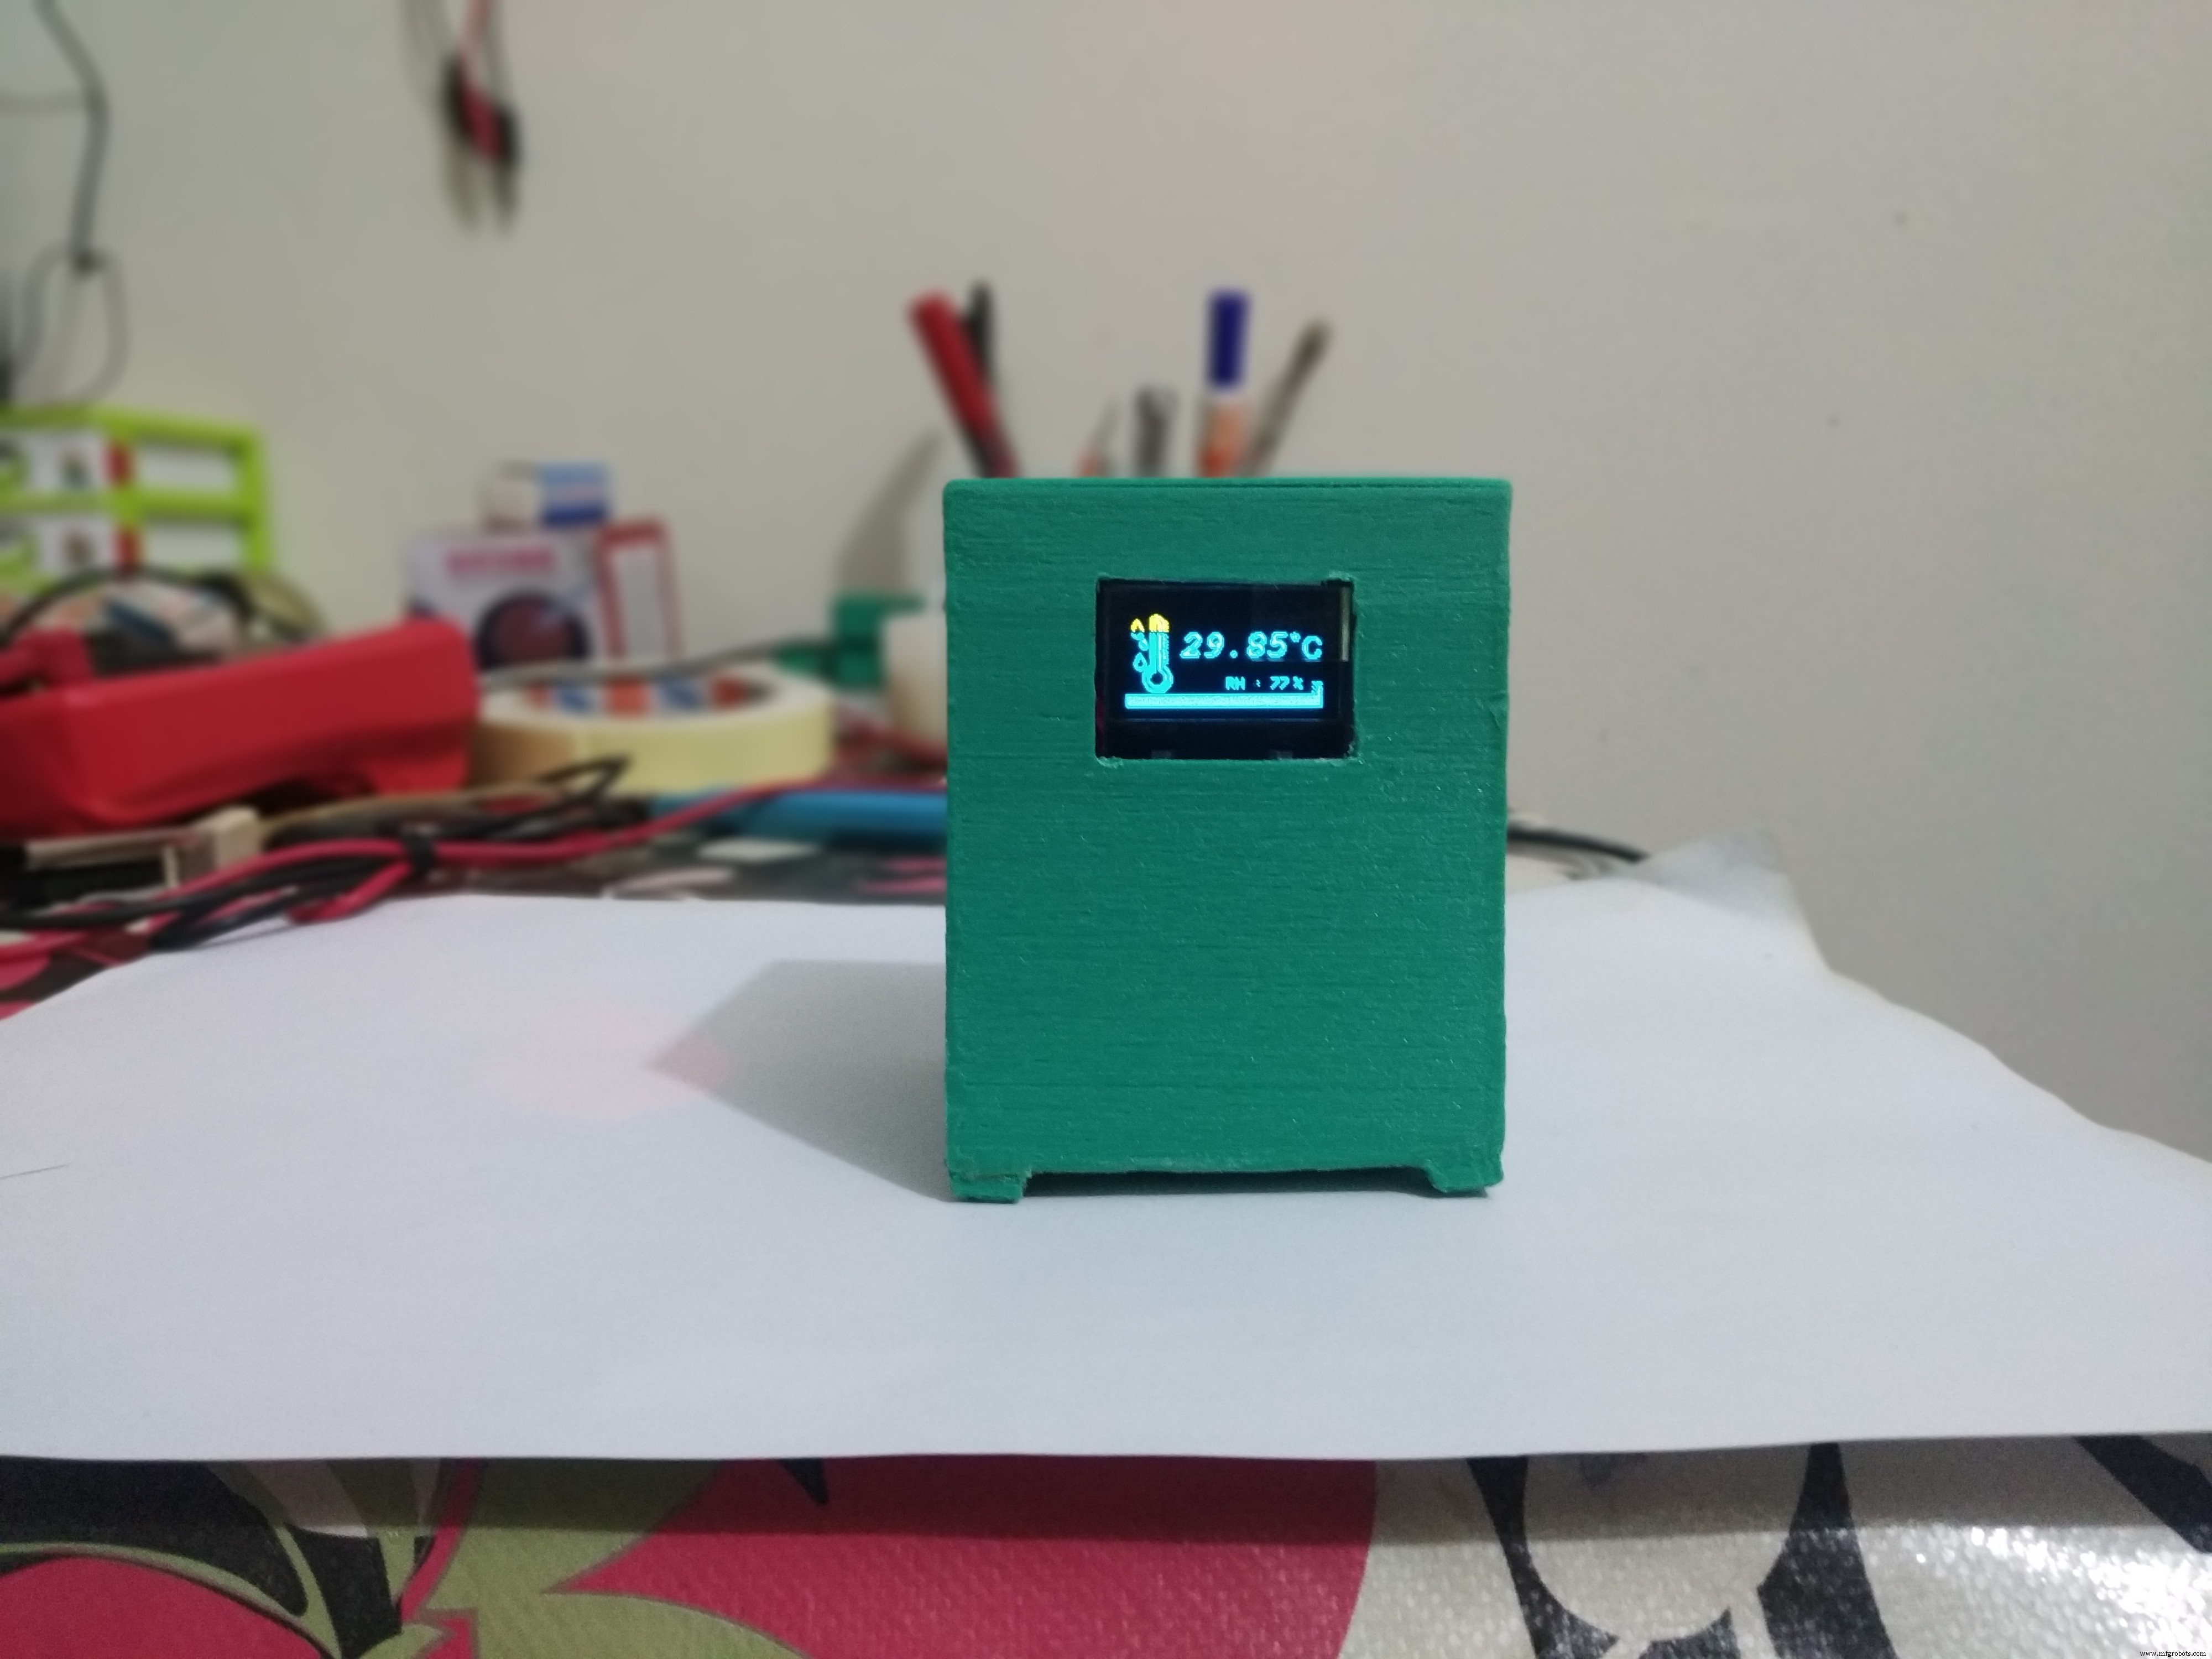
이 센서를 사용하여 습도를 측정합니다. 이를 위해 데이터 출력을 연결합니다. Arduino D2로 . 그리고 프로그램에 DHT 라이브러리 #include 를 포함합니다. 그런 다음 설정에서 센서를 초기화하고 루프에서 dht.readHumidity()를 사용하여 습도 값을 읽습니다. 명령.
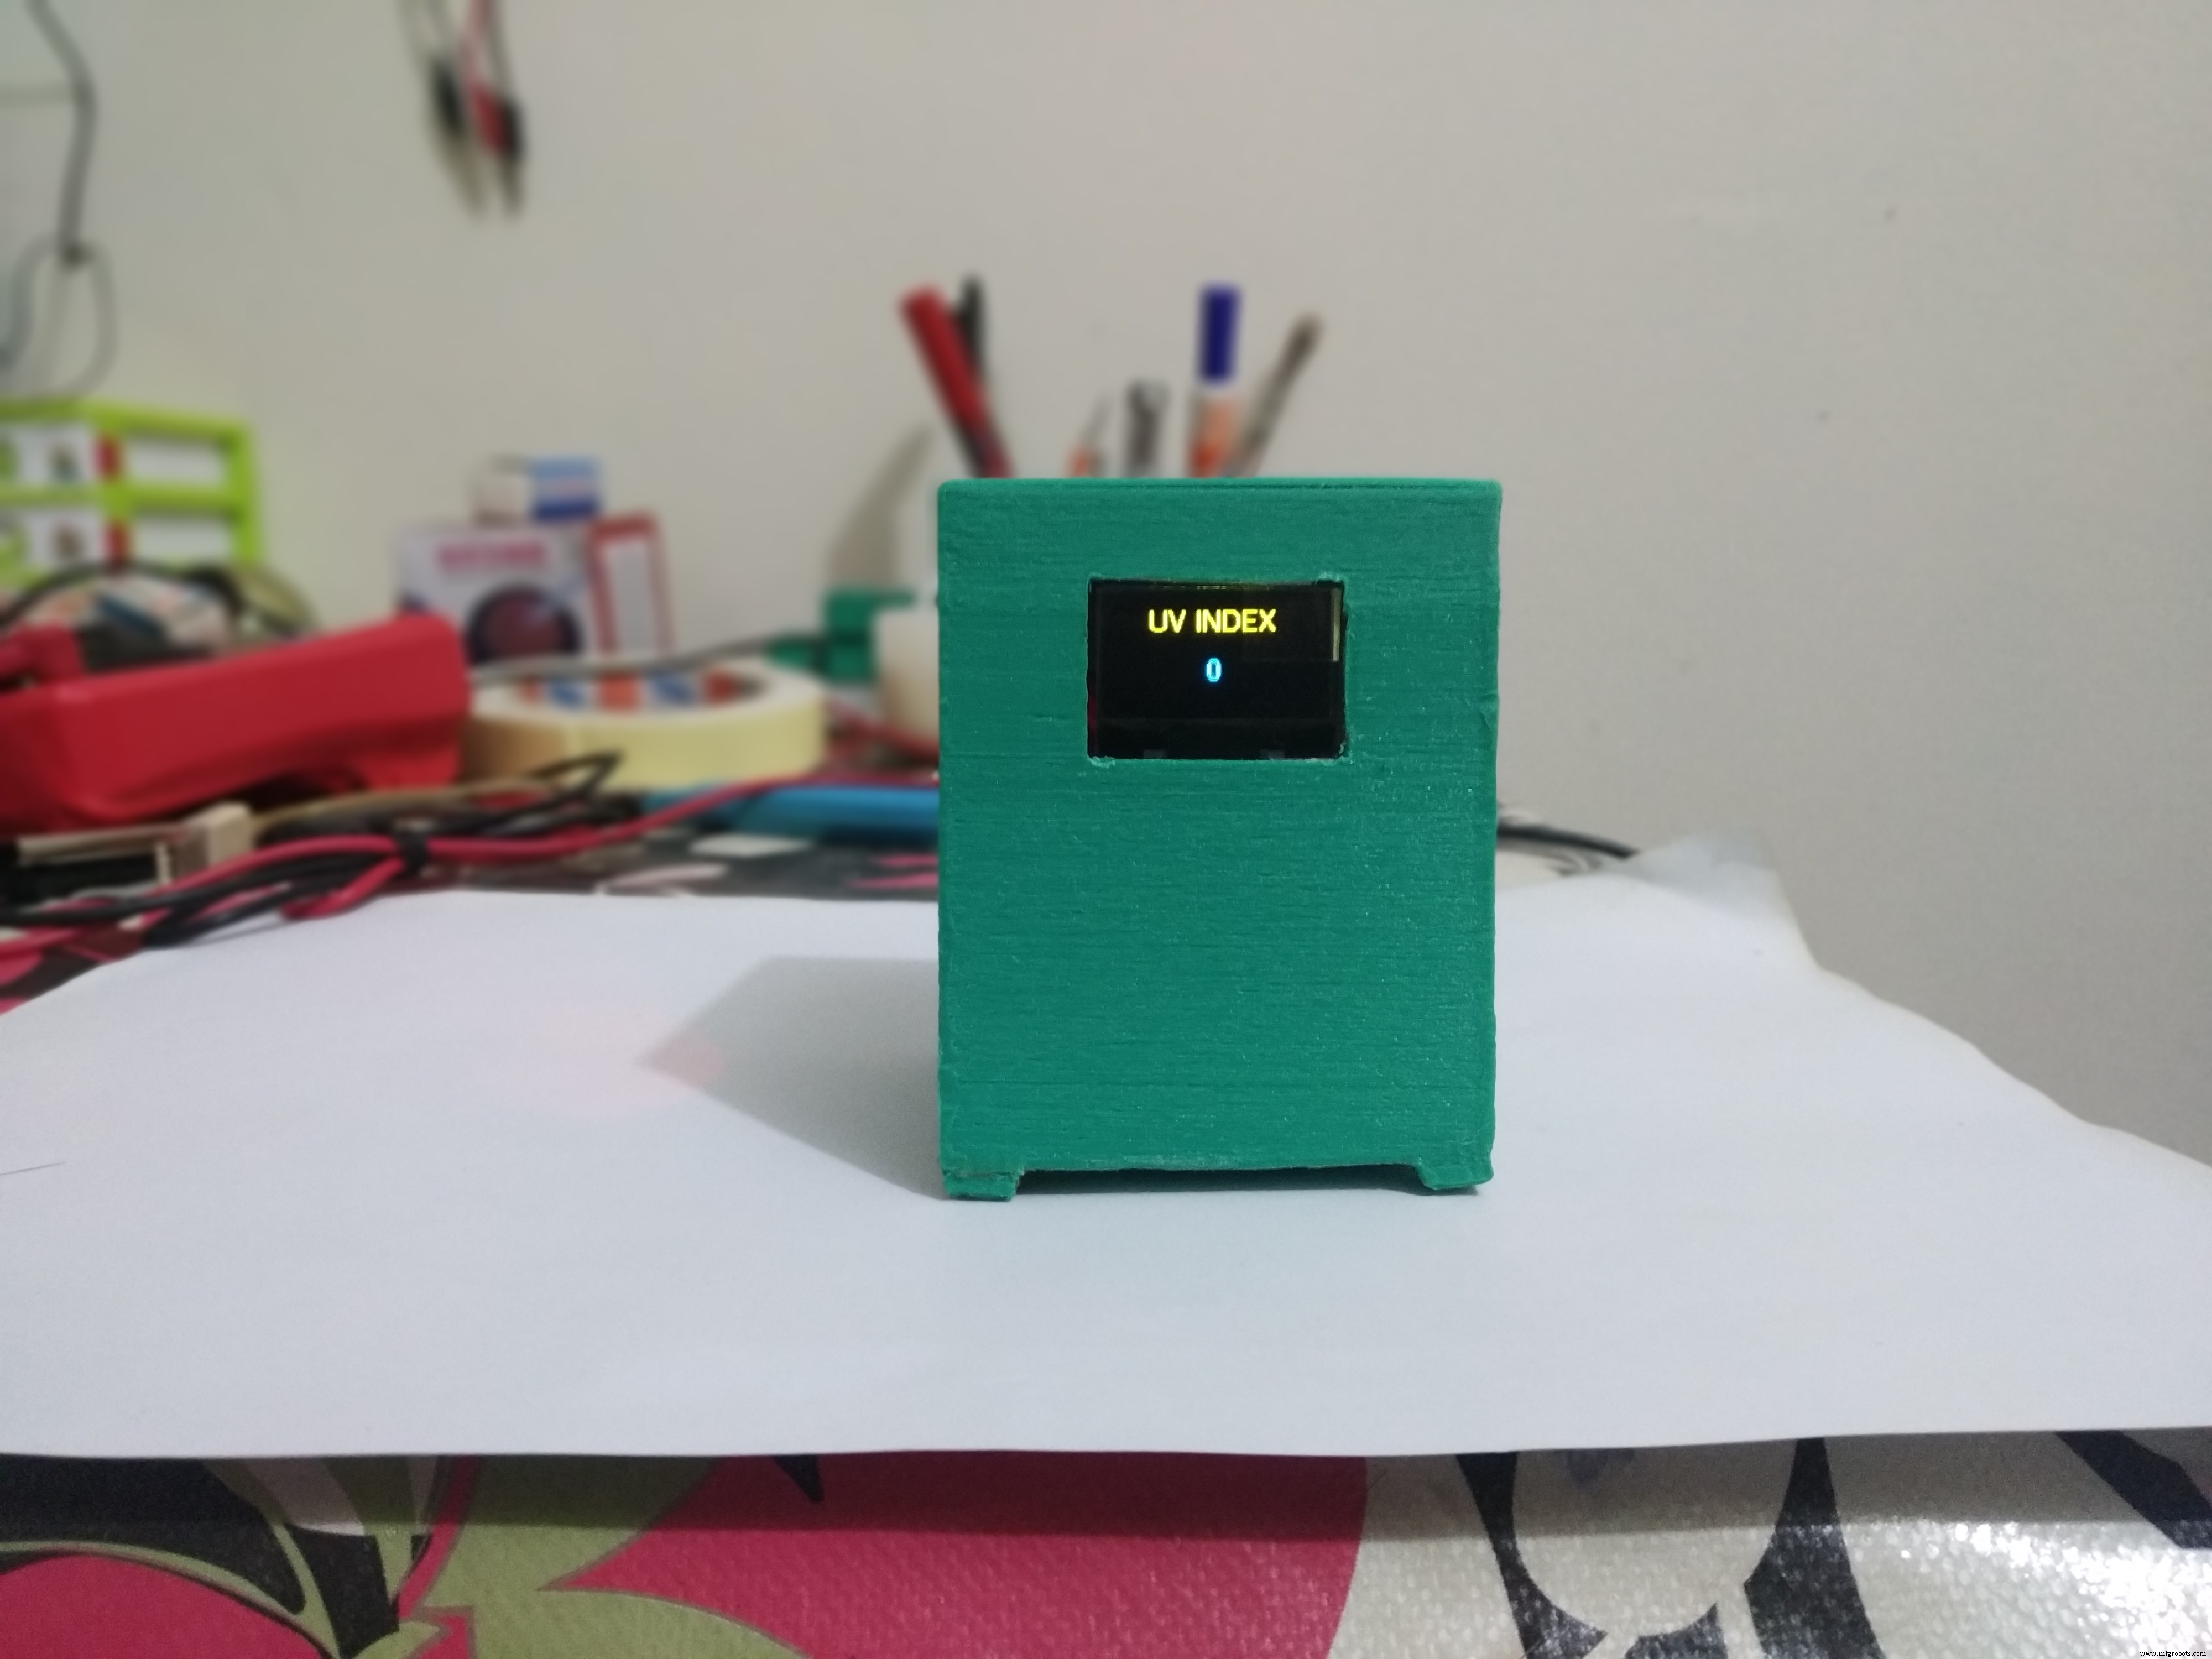
5단계:GUVA-S12SD UV 센서
GUVA-S12SD 질화갈륨 기반 쇼트키형 포토다이오드입니다. 그것은 240-370nm의 일반적인 UV 검출 파장을 가지고 있습니다(UVB 및 UVA 스펙트럼의 대부분을 커버함). UV 광도에 따라 달라지는 보정된 아날로그 전압을 출력합니다. 따라서 Arduino ADC를 통해 아날로그 값을 읽을 수 있습니다.
루프 기능에서 아날로그 센서 값을 읽고 UV 지수를 계산합니다.
float sensorValue =analogRead(A0);
float sensorVoltage =sensorValue / 1024 * 5.0;
int UV_index =sensorVoltage / 0.1;
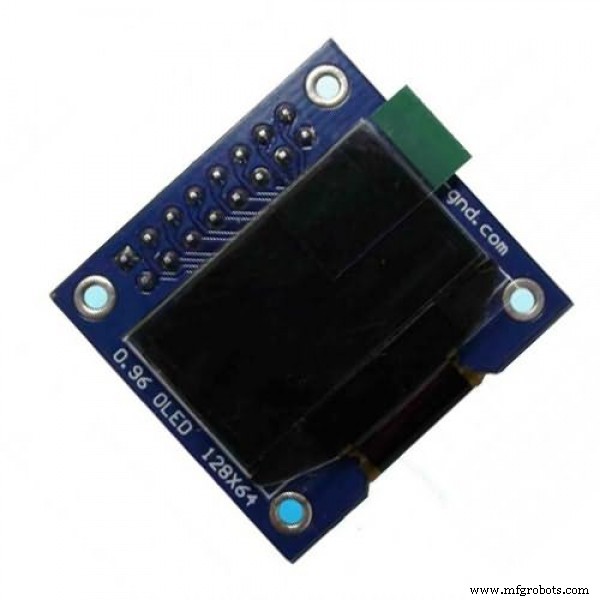
6단계:OLED 디스플레이
이 프로젝트에 0.96" 128*64 OLED 디스플레이를 사용합니다. I2C 프로토콜을 사용하므로 다음과 같이 Arduino에 연결합니다.
<울>프로그램에서 처음에는 Adafruit_SSD1306 및 Adafruit_GFX 라이브러리를 포함합니다.
#include
#include
그런 다음 디스플레이 변수를 만들고 일부 이미지를 표시하기 위한 비트맵을 추가합니다. 설정에서 디스플레이를 초기화합니다. 그런 다음 루프에서 display.print()를 사용하여 모든 데이터를 표시합니다. 기능. 시간, 기압, 온도 및 습도, UV_index의 네 페이지에 데이터를 표시합니다. 모든 페이지 사이에는 5초의 지연이 있습니다.
비디오 클립
<섹션 클래스="섹션 컨테이너 섹션 축소 가능" id="코드">
#include#include #include #include #include #include #include #include #include //#include #define SCREEN_WIDTH 128#define SCREEN_WIDTH 128#define SCREEN_HEIGHT OLED 64_define SCREEN_HEIGHT , OLED_RESET);#define BMP_SCK(13)#define BMP_MISO(12)#define BMP_MOSI(11)#define BMP_CS(10)DS3231 clock;bool Century =false;bool h12Flag;bool pmFlag;Adafruit_BMP280, BMP_MISO , BMP_SCK);#define DHTPIN 2#define DHTTYPE DHT11DHT dht(DHTPIN, DHTTYPE); const unsigned char PROGMEM frame0 [] ={0x00, 0x00,0,0,0,0,0x00,0x00,0x00,0x00,000 0x01, 0xFF, 0x80, 0x00, 0x00, 0x0F, 0xFF, 0xF0, 0x00, 0x00, 0x3F, 0xFF, 0xFC, 0x00, 0x00, 0x7F, 00x81 0xF0, 0x00, 0x0F, 0x80, 0x03, 0xE0, 0x18, 0x07, 0xC0, 0x07, 0x86, 0 x18, 0x61, 0xE0, 0x0F, 0x02, 0x00, 0x40, 0xF0, 0x0F, 0x02, 0x00, 0x40, 0x00, 0x40, 0xF0, 0x1E, 0x00, 0x00, 0x 0x00으로,이 0x06, 0x3C, 0x3C,하는 0x01, 0x80으로, 0 × 00, 0x3C, 0x38로,하는 0x00을 0x80, 0x00으로,가 0x1c, 0x38로, 0 × 00, 0xc0과, 0x00으로,가 0x1c, 0x78로, 0 × 00, 0xE0, 0 × 00,에 0x1E, 0x79, 0xc0과, 0xF0, 0x03, 0x9E, 0x79, 0xC0, 0x7C, 0x03, 0x9E, 0x78, 0x00, 0x7E, 0x00, 0x7E, 0x00, 0x1E, 0x38, 0x00, 0x1000x 0x7E, 0x3F, 0x3C, 0x3C, 0xFE, 0x7E, 0x7F, 0x3C, 0x1C, 0x7E, 0x18, 0x7E, 0x38, 0x1E, 0x3F, 0x8,0,0x 0xFF, 0xF8, 0xF0, 0x07, 0x87, 0xFF, 0xE1, 0xE0, 0x03, 0xC1, 0xFF, 0x83, 0xC0, 0x03, 0xF0, 0x3C, 00x0 0x81, 0xFE, 0x00, 0x00, 0x3F, 0xFF, 0xFC, 0x00, 0x00, 0x0F, 0xFF, 0xF0, 0x00, 0x00, 0x01, 0xFF, 0x00,0 0x00, 0x00, 0x00, 0x00, 0x00, 0x00, 0x00, 0x00}; const unsigned char PROGMEM 프레임1 [] ={0x00, 0x00, × 00, 0 × 00, 0 × 00, 0 × 00, 0 × 00, 0x18, 0x00으로, 0 × 00, 0 × 00, 0 × 00, 0x7E가, 0 × 00, 0 × 00, 0 × 00, 0 × 00, 0xC3, 0 × 00, 0 × 00,하는 0x01, 0x00으로, 0x9D, 0x80으로, 0 × 00,은 0x03, 0x80으로, 0xB4, 0xE0, 0x00으로,이 0x06, 0x80으로, 0xA6, 0x80으로, 0 × 00,은 0x04, 0xc0과, 0xA6, 0xE0, 0 × 00, 0x0C, 0x40으로, 0xA6, 0xE0,하는 0x00을 0x08, 0x60으로, 0xA6, 0x80으로,하는 0x00을 0x08, 0x20에, 0xA6, 0xE0,하는 0x00을 0x08, 0x60으로, 0xA6, 0x80으로, 0 × 00, 0x0E, 0xc0과, 0xA6, 0xE0, 0 × 00,은 0x03, 0x80으로, 0xA6, 0x80으로, 0 × 00, 0 × 00, 0x10, 명령 0xA6, 0xc0과, 0 × 00, 0 × 00, 0x38로, 0xA6, 0xE0, 0 × 00, 0 × 00, 0x38로, 0xA6, 0x80으로, 0 × 00, 0 × 00, 0x6C, 0xA6, 0xE0, 0 × 00, 0 × 00, 0x44, 0xA6, 0x80으로, 0 × 00, 0 × 00, 0x6C, 0xA6, 0xE0, 0 × 00, 0 × 00, 0x38로, 0xA6, 0x80으로, 0 × 00, 0 × 00, 0 × 00, 0xA6, 0x80으로, 0 × 00, 0 × 00, 0 × 00, 0xA4, 0xE0, 0 × 00, 0 × 00, 0 × 00, 0xA6, 0x80으로, 0 × 00, 0 × 00, 0 × 40, 0xA6, 0xE0, 0 × 00, 0 × 00, 0xc0과, 0xA6, 0x80으로, 0 × 00, 0x01로, 내지 0xA0, 0xA6, 0xE0, 0 × 00,하는 0x01, 0x30에, 0xA6, 0xE0, 0 × 00,은 0x03, 0x10, 명령 0xA6, 0x80으로, 0 × 00,는 0x02, 0x18, 0xA6, 0xE0, 0x00으로,이 0x06, 0x08에서, 0xA6, 0x80, 0x00, 0x06, 0x08, 0xA6, 0x80, 0x00, 0x02, 0x19, 0xA6, 0xC0, 0x00, 0x03, 0xF3, 0x606, , 0 × 00, 0 × 00,에는 0xC6, 0x26, 0x30에, 0 × 00, 0 × 00, 0x0C, 0xE3, 0x10, 명령 × 00, 0 × 00,은 0x09, 0x80으로, 0x98, 0x00으로, 0 × 00,의 0x19, 0x00으로, 0xC8, 0 × 00, 0 × 00, 0x13, 명령하는 0x00 0x6C , 0 × 00, 0 × 00,는 0x12, 0x00으로, 0x6C, 0 × 00, 0 × 00,는 0x12, 0x00으로, 0x6C, 0 × 00, 0 × 00,는 0x12, 0x00으로, 0x6C, 0 × 00, 0 × 00, 0x1B, 0x00으로, 0x4C, 0 × 00, 0 × 00,은 0x09, 0x80으로, 0xC8 , 0 × 00, 0 × 00, 0x0C, 0xC1, 0x98, 0x00으로, 0 × 00,은 0x04, 0x7F의, 0x30에, × 00, 0 × 00, 0x06 일,가 0x1c, 0x60으로, 0 × 00, 0 × 00,은 0x03, 0x81 등, 0xc0과, 0 × 00, 0 × 00, 0 × 00, 0xFF로, 0x80으로 , 0x00, 0x00, 0x00, 0x00, 0x00, 0x00, 0x00, 0x00, 0x00, 0x00, 0x00}; const unsigned char PROGMEM 프레임2 [] ={0xFF, ,FF,0x0,FFx0 , 0xFF, 0xFF, 0xFF, 0xFF, 0xFF, 0xFF, 0xFF, 0xFF, 0xFF, 0xFF, 0xFF, 0xFF, 0xFF, 0xFF, 0xFF, 0xFF, 0xFF, 0xFF, 0xFF, FF, 0xFF, 0xFF, , 0xFF, 0xFF, 0xFF, 0xFF, 0xFF, 0xFF, 0xFF, 0xFF, 0xFF, 0xFF, 0xFF, 0xFF, 0xFF, 0xFF, 0xFF, 0xFF, 0xFF, 0xFF, 0xFF, FF, 0xFF, 0xFF, , 0xFF, 0xFF, 0xFF, 0xFF, 0xFF, 0xFF, 0xFF, 0xFF, 0xFF, 0xFF, 0xFF, 0xFF, 0xFF, 0xFF, 0xF 에프, 0xFF, 0xFF, 0xFF, 0xFF, 0xFF, 0xFF, 0xFF, 0xFF, 0xFF, 0xFF, 0xFF, 0xFF, 0xFF, 0xFF, 0xFF, 0xFF, 0xFF, 0xFF, 0xFF, FFx, 0xFF, 0xFF, 0xFF, 0xFF, 0xFF, 0xFF, 0xFF, 0xFF, 0xFF, 0xFF, 0xFF, 0xFF, 0xFF, 0xFF, 0xFF, 0xFF, 0xFF, 0xFF, 0xFF, 0xFF, 0xFF, 0xFF, 0xFF, 0x 0xFF, 0xFF, 0xFF, 0xFF, 0xFF, 0xFF, 0xFF, 0xFF, 0xFF, 0xFF, 0xFF, 0xFF, 0xFF, 0xFF, 0xFF, 0xFF, 0xFF, 0xFF, 0xFF, 0xFF, 0xFF, 0x 0xFF, 0xFF, 0xFF, 0xFF, 0xFF, 0xFF, 0xFF, 0xFF, 0xFF, 0xFF, 0xFF, 0xFF, 0xFF, 0xFF, 0xFF, 0xFF, 0xFF, 0xFF, 0xFF, 0xFF, 0xFF, 0x 0xFF, 0xFF, 0xFF, 0xFF, 0xFF, 0xFF, 0xFF, 0xFF, 0xFF, 0xFF, 0xFF, 0xFF, 0xFF, 0xFF, 0xFF, 0xFF, 0xFF, 0xFF, 0xFF, 0xFF, 0xFF, 0x 0xFF, 0xFF, 0xFF, 0xFF, 0xFF, 0xFF, 0xFF, 0xFF, 0xFF, 0xFF, 0xFF, 0xFF, 0xFF, 0xFF, 0xFF, 0xFF, 0xFF, 0xFF, 0xFF, 0xFF, 0xFF, 0x 0xFF, 0xFF, 0xFF, 0xFF, 0xFF, 0xFF, 0xFF, 0xFF, 0xFF, 0xFF, 0xFF, 0xFF, 0xFF, 0xFF, 0xFF, 0xFF, 0xFF, 0 xFF, 0xFF, 0xFF, 0xFF, 0xFF, 0xFF, 0xFF, 0xFF, 0xFF, 0xFF, 0xFF, 0xFF, 0xFF, 0x80}; 무효 설정() { Serial.begin(57600); if (!display.begin(SSD1306_SWITCHCAPVCC, 0x3C)) { Serial.println(F("SSD1306 실패")); } Wire.begin(); dht.begin(); if (!bmp.begin()) { Serial.println(F("Problem.bmp")); 동안 (1) 지연(10); } 디스플레이.clearDisplay(); display.setTextColor(흰색); display.setTextSize(1); display.setCursor(0, 9); display.setFont(&FreeSans9pt7b); display.println("**** 로컬 ****"); display.setCursor(0, 38); display.setFont(&FreeMonoBoldOblique12pt7b); display.println("물"); display.setCursor(27, 58); display.println("역"); 디스플레이.디스플레이(); 지연(2000); bmp.setSampling(Adafruit_BMP280::MODE_NORMAL, /* 작동 모드. */ Adafruit_BMP280::SAMPLING_X2, /* 온도 오버샘플링 */ Adafruit_BMP280::SAMPLING_X16, /* 압력 오버샘플링 */ Adafruit_16/,* 압력 오버샘플링 */ Adafruit_BMP Adafruit_BMP280::STANDBY_MS_500); /* 대기 시간. */}void loop() { //시간 display.clearDisplay(); display.setTextColor(흰색); display.setTextSize(1); display.setCursor(13, 15); display.setFont(&FreeMonoBoldOblique12pt7b); display.print(clock.getHour(h12Flag, pmFlag)); display.setCursor(38, 15); display.println(":"); display.setCursor(50, 15); display.println(clock.getMinute()); display.setCursor(70, 15); if (pmFlag) { display.println("오후"); } else { display.println(" 오전 "); } display.setFont(&FreeSans9pt7b); display.setCursor(20, 60); display.println(시계.getDate()); display.setCursor(40, 60); display.println("/"); display.setCursor(46, 60); display.println(clock.getMonth(세기)); display.setCursor(65, 60); display.println("/"); display.setCursor(70, 60); display.println("20"); display.setCursor(90, 60); display.println(시계.getYear()); display.setCursor(30, 30); display.setFont(&FreeSans9pt7b); switch (clock.getDoW()) { 사례 1:display.println("토요일"); 부서지다; 사례 2:display.println("일요일"); 부서지다; 사례 3:display.println("월요일"); 부서지다; 사례 4:display.println("화요일"); 부서지다; 사례 5:display.println("수요일"); 부서지다; 사례 6:display.println("목요일"); 부서지다; 사례 7:display.println("금요일"); 부서지다; } 디스플레이.디스플레이(); 지연(5000); //P display.clearDisplay(); display.drawBitmap(0, 0, 프레임0, 40, 40, 1); display.setFont(&FreeSans9pt7b); display.setCursor(41, 28); display.println(bmp.readPressure() / 100); display.setCursor(110, 28); display.setFont(); display.println("hPa"); display.setCursor(0, 55); display.setFont(&FreeSans9pt7b); display.println("고도:"); display.setCursor(65, 62); display.println(bmp.readAltitude(1005.47)); display.setCursor(113, 62); display.println("m"); 디스플레이.디스플레이(); 지연(5000); //T&RH display.clearDisplay(); display.setFont(&FreeMonoBoldOblique12pt7b); display.drawBitmap(0, 5, 프레임1, 40, 51, 1); display.setCursor(35, 30); display.print(bmp.readTemperature()); display.setFont(&FreeSans9pt7b); display.setCursor(102, 28); display.println(" *"); display.setCursor(110, 31); display.println("C"); display.setFont(); display.setCursor(66, 45); display.println("RH :"); 바이트 RH =dht.readHumidity(); display.setCursor(95, 45); display.println(RH); display.setCursor(110, 45); display.println("%"); display.drawBitmap(0, 56, 프레임2, 135, 15, 1); 디스플레이.디스플레이(); 지연(5000); //UV display.clearDisplay(); float sensorValue =analogRead(A0); float sensorVoltage =sensorValue / 1024 * 5.0; 정수 UV_index =sensorVoltage / 0.1; display.setFont(&FreeSans9pt7b); display.setCursor(0, 15); display.print("자외선 지수 "); display.setCursor(58, 45); display.println(UV_index); 디스플레이.디스플레이(); 지연(5000);}
제조공정
구성품 및 소모품 Arduino UNO × 1 Espressif ESP8266 ESP-01 × 1 Arduino Proto Shield 일반 브레드보드 × 1 DHT22 온도 센서 × 1 씨드 그로브 - 광 센서 × 1 씨드 그로브 - UV 센서 × 1 씨드 그로브 - 기압계 센서 × 1 씨드 그로브 - 먼지 센서 × 1 저항 1k 옴 × 2 저항 10k 옴
이 튜토리얼에서는 Arduino 기반의 무선 기상 관측소를 만드는 방법을 배웁니다. 다음 비디오를 보거나 아래에 작성된 튜토리얼을 읽을 수 있습니다. 개요 실외 온도와 습도는 DHT22 센서를 사용하여 측정되며 이 데이터는 NRF24L01 송수신기 모듈을 사용하여 무선으로 실내기로 전송됩니다. 실내기에는 실내 온습도를 측정하는 또 다른 DHT22 센서와 아두이노 전원이 꺼지더라도 시간을 추적할 수 있는 DS3231 Real Time Clock 모듈이 있다. 이 모든 데이터는 0.96인치 OLED 디스플레이에 인쇄됩니다. Ar