

python

산업 제조
모듈은 파이썬 코드가 있는 파일입니다. 코드는 정의된 변수, 함수 또는 클래스의 형태일 수 있습니다. 파일 이름이 모듈 이름이 됩니다.
예를 들어 파일 이름이 guru99.py이면 모듈 이름은 guru99가 됩니다. . 모듈 기능을 사용하면 한 파일 안에 모든 것을 작성하는 대신 코드를 여러 파일로 나눌 수 있습니다.
이 자습서에서는 다음을 배우게 됩니다.
파일은 파이썬에서 모듈로 간주됩니다. 모듈을 사용하려면 가져오기를 사용하여 모듈을 가져와야 합니다. 예어. 파일 내부에 있는 함수 또는 변수는 모듈을 가져와서 다른 파일에서 사용할 수 있습니다. 이 기능은 typescript, JavaScript, java, ruby 등과 같은 다른 언어에서 사용할 수 있습니다.
이제 모듈을 만들고 다른 파일로 가져올 것입니다.
다음은 스크린샷과 같이 모듈을 만들고 가져오는 흐름입니다.
파이썬에서 모듈을 생성하기 위해 주어진 단계를 따르십시오.
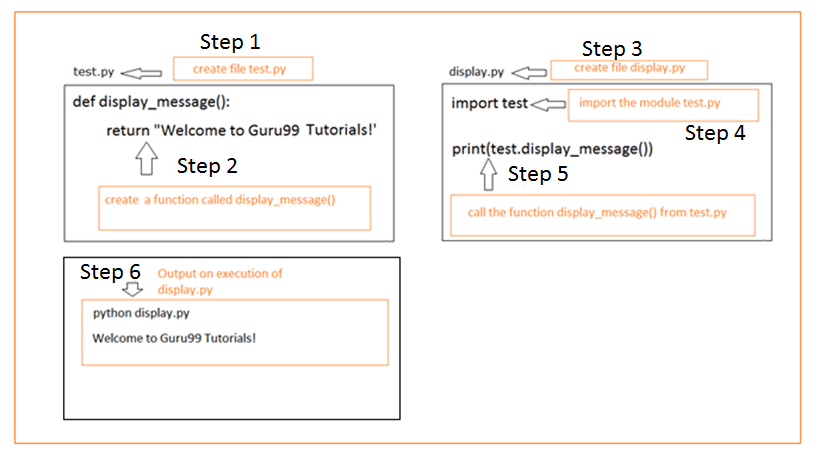
코드 테스트에 사용된 폴더 구조는 다음과 같습니다.
modtest/
	test.py
	display.py
1단계) 파일을 만들고 이름을 test.py로 지정합니다.
2단계) test.py 내부에서 display_message()라는 함수를 만듭니다.
Def display_message():
    return "Welcome to Guru99 Tutorials!"
3단계) 이제 다른 파일 display.py를 만듭니다.
4단계) display.py 내부에서 아래와 같이 moduletest.py 파일을 가져옵니다.
import test
가져올 때 test.py는 언급하지 않고 파일 이름만 언급하면 됩니다.
5단계)
그런 다음 display.py 내부의 test.py에서 display_message() 함수를 호출할 수 있습니다. module_name.function_name을 사용해야 합니다.
예를 들어 test.display_message().
Import test
print(test.display_message())
6단계)
display.py를 실행하면 다음과 같은 출력이 표시됩니다.
Welcome to Guru99 Tutorials!
이전에 함수가 있는 간단한 모듈을 보았습니다. 여기에서 클래스를 만들고 다른 파일 내에서 클래스를 참조합니다.
코드를 테스트할 폴더 구조는 다음과 같습니다.
myproj/
	Car.py
	display.py
다음 코드를 사용하여 Car.py라는 파일을 만듭니다.
파일명 :Car.py
class Car:
	brand_name = "BMW"
	model = "Z4"
	manu_year = "2020"

	def __init__(self, brand_name, model, manu_year):
		self.brand_name = brand_name
		self.model = model
		self.manu_year = manu_year

	def car_details(self):
		print("Car brand is ", self.brand_name)
		print("Car model is ", self.model)
		print("Car manufacture year is ", self.manu_year)


	def get_Car_brand(self):
		print("Car brand is ", self.brand_name)

	def get_Car_model(self):
		print("Car model is ", self.model)
Car.py 파일에는 brand_name, model 및 manu_year 속성이 있습니다. 클래스 내부에 정의된 함수는 car_details(), get_Car_brand(), get_Car_model()입니다.
이제 display.py라는 다른 파일의 모듈로 Car.py 파일을 사용하겠습니다.
파일명 :display.py
import Car
car_det = Car.Car("BMW","Z5", 2020)
print(car_det.brand_name)
print(car_det.car_details())
print(car_det.get_Car_brand())
print(car_det.get_Car_model())
출력:
BMW
Car brand is  BMW
Car model is  Z5
Car manufacture year is  2020
Car brand is  BMW
Car model is  Z5
따라서 Car 모듈을 사용하여 Car.py의 모든 변수와 함수에 액세스할 수 있습니다.
전체 코드를 가져오는 대신 모듈의 일부만 가져올 수 있습니다. 즉, 필요한 함수와 변수 이름만 모듈에서 가져올 수 있습니다.
특정 항목만 가져오려면 "from" 키워드를 사용하여 원하는 항목을 가져올 수 있습니다.
따라서 구문은
from module import your function_name , variables,... etc.
코드 테스트에 사용된 폴더 구조는 다음과 같습니다.
modtest/
	test.py
	display.py
test.py에는 다음과 같이 2개의 함수가 있습니다.
파일명 :test.py
defdisplay_message():
	return "Welcome to Guru99 Tutorials!"

def display_message1():
	return "All about Python!"
이제 display_message() 함수를 원합니다. 가져오는 함수 또는 변수는 아래와 같이 직접 액세스할 수 있습니다.
파일명 :display.py
from test import display_message
print(display_message())
출력:
Welcome to Guru99 Tutorials!
이제 display_message1() 함수를 사용하면 아래와 같이 함수가 정의되지 않았다는 오류가 발생합니다.
from test import display_message
print(display_message1())
출력:
Traceback (most recent call last):
File "display.py", line 3, in <module>
print(display_message1())
Name Error: name 'display_message1' is not defined
가져오기를 사용하면 import 다음에 모듈 이름, 즉 사용할 파일 이름이나 라이브러리를 사용하여 전체 모듈을 가져올 수 있습니다.
구문:
Import module
또는 사용하여
from module import *
코드 테스트에 사용된 폴더 구조는 다음과 같습니다.
modtest/
	test.py
	display.py
다음은 test.py 내부의 코드 세부정보입니다.
my_name = "Guru99"
my_address = "Mumbai"

defdisplay_message():
	return "Welcome to Guru99 Tutorials!"


def display_message1():
	return "All about Python!"
import 모듈 이름만 사용하여 모듈 내부의 변수와 함수를 참조하려면 모듈 이름을 접두사로 붙여야 합니다.
예
파일명 :display.py
Import test
print(test.display_message())
print(test.display_message1())
print(test.my_name)
print(test.my_address)
모듈 이름 테스트는 모듈 테스트 내부의 함수 및 변수를 참조하는 데 사용됩니다.
출력:
Welcome to Guru99 Tutorials!
All about Python!
Guru99
Mumbai
import *를 사용하는 예를 살펴보겠습니다. . 가져오기 * 사용 , 아래 예와 같이 함수 및 변수에 직접 액세스할 수 있습니다.
from test import *

print(display_message())
print(display_message1())
print(my_name)
print(my_address)
출력:
Welcome to Guru99 Tutorials!
All about Python!
Guru99
Mumbai
dir()은 파이썬의 내장 함수입니다. dir()은 주어진 객체의 내장 속성을 포함하여 모든 속성과 메서드를 반환합니다.
따라서 모듈에서 dir()을 사용하면 모듈 내부에 있는 변수, 함수를 제공합니다.
다음은 모듈에서 dir()의 작업 예입니다. Car.py라는 클래스가 있습니다. Car를 가져와서 dir()에 할당하여 출력을 확인하겠습니다.
코드를 테스트할 폴더 구조는 다음과 같습니다.
test prop/
	Car.py
	test.py
파일 이름:Car.py
class Car:
	brand_name = "BMW"
	model = "Z4"
	manu_year = "2020"

	def __init__(self, brand_name, model, manu_year):
		self.brand_name = brand_name
		self.model = model
		self.manu_year = manu_year

	def car_details(self):
		print("Car brand is ", self.brand_name)
		print("Car model is ", self.model)
		print("Car manufacture year is ", self.manu_year)


	def get_Car_brand(self):
		print("Car brand is ", self.brand_name)

	def get_Car_model(self):
		print("Car model is ", self.model)
파일 이름:test.py
import Car

class_contents = dir(Car)
print(class_contents)
출력은 클래스 이름과 Car.py에 정의된 모든 함수를 제공합니다.
Python에서 사용할 수 있는 내장 모듈에서 dir()을 사용해 볼 수도 있습니다. json 에서도 동일하게 시도해 보겠습니다. 아래 예제와 같이 모듈. json 에서 사용할 수 있는 모든 속성과 메서드가 표시됩니다. 모듈.
Import json
json_details = dir(json)
print(json_details)
출력:
['JSONDecodeError', 'JSONDecoder', 'JSONEncoder', '__all__', '__author__', '__bu
iltins__', '__cached__', '__doc__', '__file__', '__loader__', '__name__', '__pac
kage__', '__path__', '__spec__', '__version__', '_default_decoder', '_default_en
coder', 'codecs', 'decoder', 'detect_encoding', 'dump', 'dumps', 'encoder', 'loa
d', 'loads', 'scanner']
패키지는 그 안에 정의된 모든 모듈이 있는 디렉토리입니다. Python 인터프리터가 이를 패키지로 취급하게 하려면 디렉토리에 init.py 파일이 있어야 합니다. init.py는 디렉토리를 패키지로 만듭니다. 다음은 우리가 작업할 패키지의 레이아웃입니다.
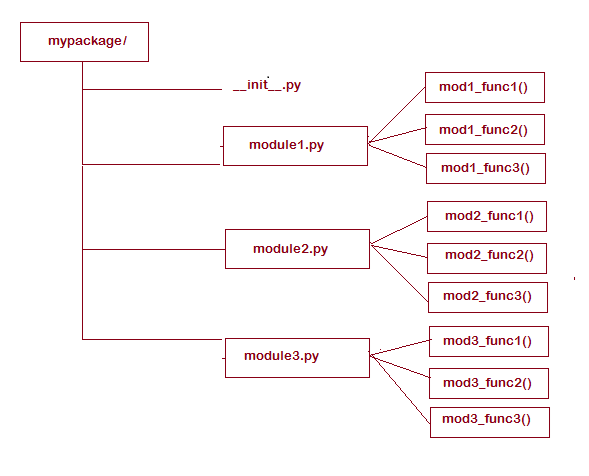
패키지 이름은 내 패키지입니다. . 패키지 작업을 시작하려면 package/라는 디렉토리를 만드십시오. 디렉토리 안에 __init__.py라는 빈 파일을 만듭니다. module1.py, module2.py, module3.py 3개 파일을 더 만들고 스크린샷과 같이 함수를 정의합니다. module1.py,module2.py 및 module3.py에 대한 세부 정보는 다음과 같습니다.
module1.py
def mod1_func1():
print("Welcome to Module1 function1")

def mod1_func2():
print("Welcome to Module1 function2")

def mod1_func3():
print("Welcome to Module1 function3")
module2.py
def mod2_func1():
print("Welcome to Module2 function1")

def mod2_func2():
print("Welcome to Module2 function2")

def mod2_func3():
print("Welcome to Module2 function3")
module3.py
def mod3_func1():
print("Welcome to Module3 function1")

def mod3_func2():
print("Welcome to Module3 function2")

def mod3_func3():
print("Welcome to Module3 function3")
패키지 사용할 준비가 되었습니다. 이제 아래와 같이 파일 내에서 패키지를 호출합니다.test.py:
여기에서 mypackage.module1을 가져오고 별칭 이름을 mod1로 지정합니다. 마찬가지로 내 패키지의 다른 모듈 module2.py 및 module3.py를 사용할 수 있습니다.
import mypackage.module1 as mod1

print(mod1.mod1_func1())
print(mod1.mod1_func2())
print(mod1.mod1_func2())
출력:
Welcome to Module1 function1
None
Welcome to Module1 function2
None
Welcome to Module1 function2
None
내부에 기능이 있는 간단한 모듈이 있는 패키지를 방금 시연했습니다. 프로젝트에 따라 하위 패키지를 포함하여 패키지할 수도 있습니다. 하위 폴더/ 클래스가 정의된 모듈이 있습니다.
실행 중에 python이 모듈 이름 가져오기를 발견할 때 , 인터프리터는 모듈을 찾으려고 합니다. 내장 모듈 목록에서 해당 모듈을 검색합니다. 나중에 모두 sys.path 내부에 정의된 디렉터리입니다.
요약하자면 인터프리터는 모듈을 찾기 위해 다음 검색을 수행합니다.
sys 모듈을 가져오고 sys.path를 인쇄하여 sys.path의 세부 정보를 얻을 수 있습니다. 아래와 같이 디렉토리 목록이 표시됩니다.
importsys
print(sys.path)
출력:
['Python Latest\\task2', 'Users\\AppData\\Local\\Programs\\Python\
\Python37\\python37.zip', 'Users\\AppData\\Local\\Programs\\Python\\P
ython37\\DLLs']
요구 사항에 따라 경로를 수정하고 디렉토리를 유지할 수도 있습니다.
별칭 이름을 지정하여 모듈 이름을 더 짧은 형식으로 변환할 수도 있습니다. 별칭은 키워드를 사용하여 수행할 수 있습니다.
구문:
import filename as alias name
코드를 테스트할 폴더 구조는 다음과 같습니다.
Mod test/
	test.py
	display.py
다음은 test.py 내부의 코드입니다.
my_name = "Guru99"
my_address = "Mumbai"

def display_message():
	return "Welcome to Guru99 Tutorials!"

def display_message1():
	return "All about Python!"
이제 display.py에서 test.py에 대한 별칭을 사용합니다.
Import test as t

print(t.display_message())
print(t.display_message1())
print(t.my_name)
print(t.my_address)
테스트 모듈에 사용되는 별칭은 t 입니다. 따라서 test.py의 함수와 변수는 별칭 t를 사용하여 참조할 수 있습니다.
출력:
Welcome to Guru99 Tutorials!
All about Python!
Guru99
Mumbai
이제 파일을 다른 파일 내부의 모듈로 가져오는 방법을 알게 되었습니다. 이제 폴더에서 사용 가능한 파일을 관리하는 방법을 살펴보겠습니다. 폴더의 파일은 절대 또는 상대 가져오기를 사용하여 가져올 수 있습니다.
아래와 같이 프로젝트 폴더 구조가 있다고 가정합니다.
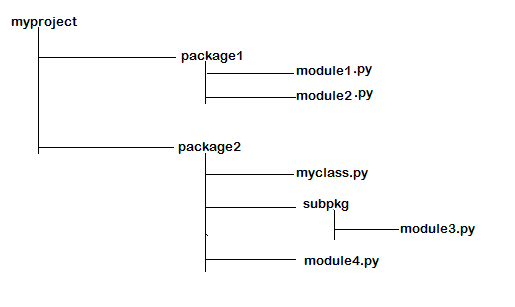
루트 폴더는 내 프로젝트/입니다. 여기에는 package1 및 package2 두 개의 하위 폴더가 있습니다.
package1 폴더에는 module1.py와 module2.py라는 두 개의 모듈이 있습니다.
package2 폴더에는 myclass.py 클래스 하나, module3.py가 있는 하위 패키지 subpkg 및 마지막 module4.py가 있습니다.
절대 가져오기의 경우 프로젝트 루트 폴더에서 바로 모듈의 전체 경로를 추가해야 합니다.
이제 절대 가져오기를 사용하여 각 모듈에 있는 기능을 참조하는 방법을 살펴보겠습니다.
myfunc1 기능을 사용하려면 다음과 같이 가져와야 합니다.
from package1.module1  import  myfunc1
or
from package1 import module1
module1.myfunc1()
myfunc3 기능을 사용하려면 다음과 같이 가져와야 합니다.
from package1.subpkg.module3  import  myfunc3
or
from package1.subpkg import module3
module3.myfunc3()
절대 가져오기를 사용하면 다음과 같은 이점이 있습니다.
다음은 절대 가져오기를 사용할 때의 단점입니다.
단점:
아래에 언급된 동일한 폴더 구조를 고려하여 상대 가져오기를 사용하여 동일한 폴더를 가져오는 방법을 살펴보겠습니다.
상대 가져오기에서 가져올 모듈은 가져오기 문이 있는 위치인 현재 위치를 기준으로 합니다.
상대 가져오기에서는 from을 사용하여 가져올 때 모듈 이름 앞에 마침표(.)를 추가해야 합니다. .
모듈이 현재 위치에서 한 단계 위인 경우 모듈 이름 앞에 마침표 2개(..)가 옵니다.
위에서 언급한 폴더 구조 그림을 참조하면 다음과 같은 기능이 있는 모듈이 있으므로 참조해야 합니다.
myfunc1 기능을 사용하려면 다음과 같이 가져와야 합니다.
from .module1 import myfunc1
myfunc3 기능을 사용하려면 다음과 같이 가져와야 합니다.
from .subpkg.module3 import myfunc3
장점:
단점:
python
Python 생태계에서 생각할 수 있는 거의 모든 것을 위한 패키지가 있으며, 모두 간단한 pip 명령으로 설치할 수 있습니다. 따라서 Python에도 이모티콘을 사용할 수 있는 패키지가 있다는 사실에 놀라지 마세요. 다음을 사용하여 이모티콘 패키지를 설치할 수 있습니다. $ pip3 install emoji 이 패키지를 사용하면 유니코드 이모티콘을 문자열 버전으로 또는 그 반대로 변환할 수 있습니다. import emoji result = emoji.emojize(Python is :thumbs_up:) print(result
구성품 및 소모품 Arduino UNO UART 통신 포트를 지원하는 모든 Arduino 모듈을 사용할 수 있습니다. × 1 GPS 수신기(일반) 저는 Ublox LEA 6h 02를 사용했지만 UART 통신을 지원하는 모든 모듈을 사용할 수 있습니다. × 1 점퍼 와이어(일반) × 1 USB-A-B 케이블 × 1 앱 및 온라인 서비스 Arduino IDE 이 프로젝트 정보 Arduino UNO(또는 다른 Ardu