

제조공정

산업 제조
 |
| × | 1 | |||
 |
| × | 1 | |||
 |
| × | 1 | |||
 |
| × | 1 | |||
| × | 1 | ||||
| × | 1 | ||||
| × | 1 | ||||
 |
| × | 1 | |||
 |
| × | 1 | |||
 |
| × | 2 | |||
 |
| × | 1 |
 |
| |||
| ||||
 |
| |||
| ||||
| ||||
|
문제 설명
아시아에서는 2003년 무더위와 중증급성호흡기증후군(SARS) 사태로 초중고 학생들의 건강을 위해 매 분기마다 체온 측정을 실시해야 했다. 학교에서 예정된 체온 측정 운동이 있을 때마다 학생들은 이 운동을 위해 자신의 디지털 체온계를 가져와야 합니다. 그러나 일부 학생들은 체온계를 잘못 배치하거나 파손하는 등의 사유로 운동 중 참여하지 못하고 장치를 가져오는 것을 잊어버릴 수 있습니다. 개인 위생 때문에 학생들은 체온계를 공유할 수 없으며 새 옷을 살 돈이 없을 수도 있습니다. 따라서 체온 측정 운동의 성공률에 영향을 미칩니다. 온도 측정 연습 후 직원은 모든 학생의 온도 데이터와 특정 학생의 데이터베이스에 수동으로 키를 지정해야 합니다. 이 작업은 각 양식 교사가 약 40명의 학생에 대한 항목을 수행해야 하므로 매우 지루하고 시간이 많이 걸립니다.
해결책은 무엇입니까?
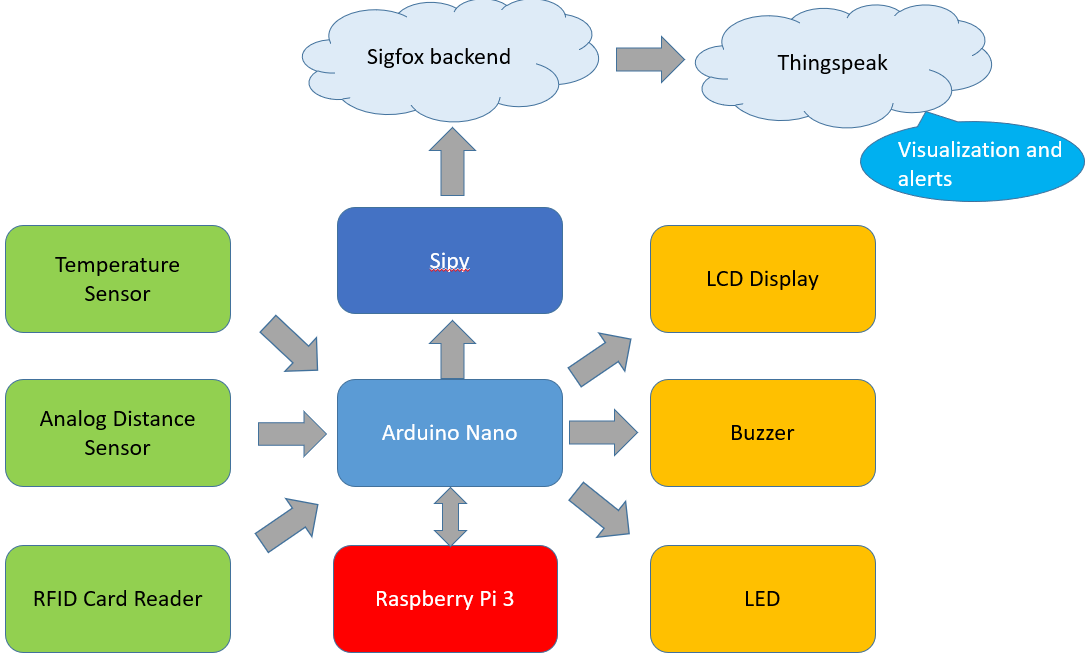
우리 프로젝트의 주제는 SqwidNet의 사회적 영향이며 지속 가능한 개발 목표(SDG)의 건강 및 웰빙 영역입니다. 그 이유는 우리 시스템이 유효한 사용자의 온도를 자동으로 측정하도록 배포하여 온도를 모니터링하고 특정 임계값 수준을 초과할 때마다 경고를 보낼 수 있기 때문입니다.
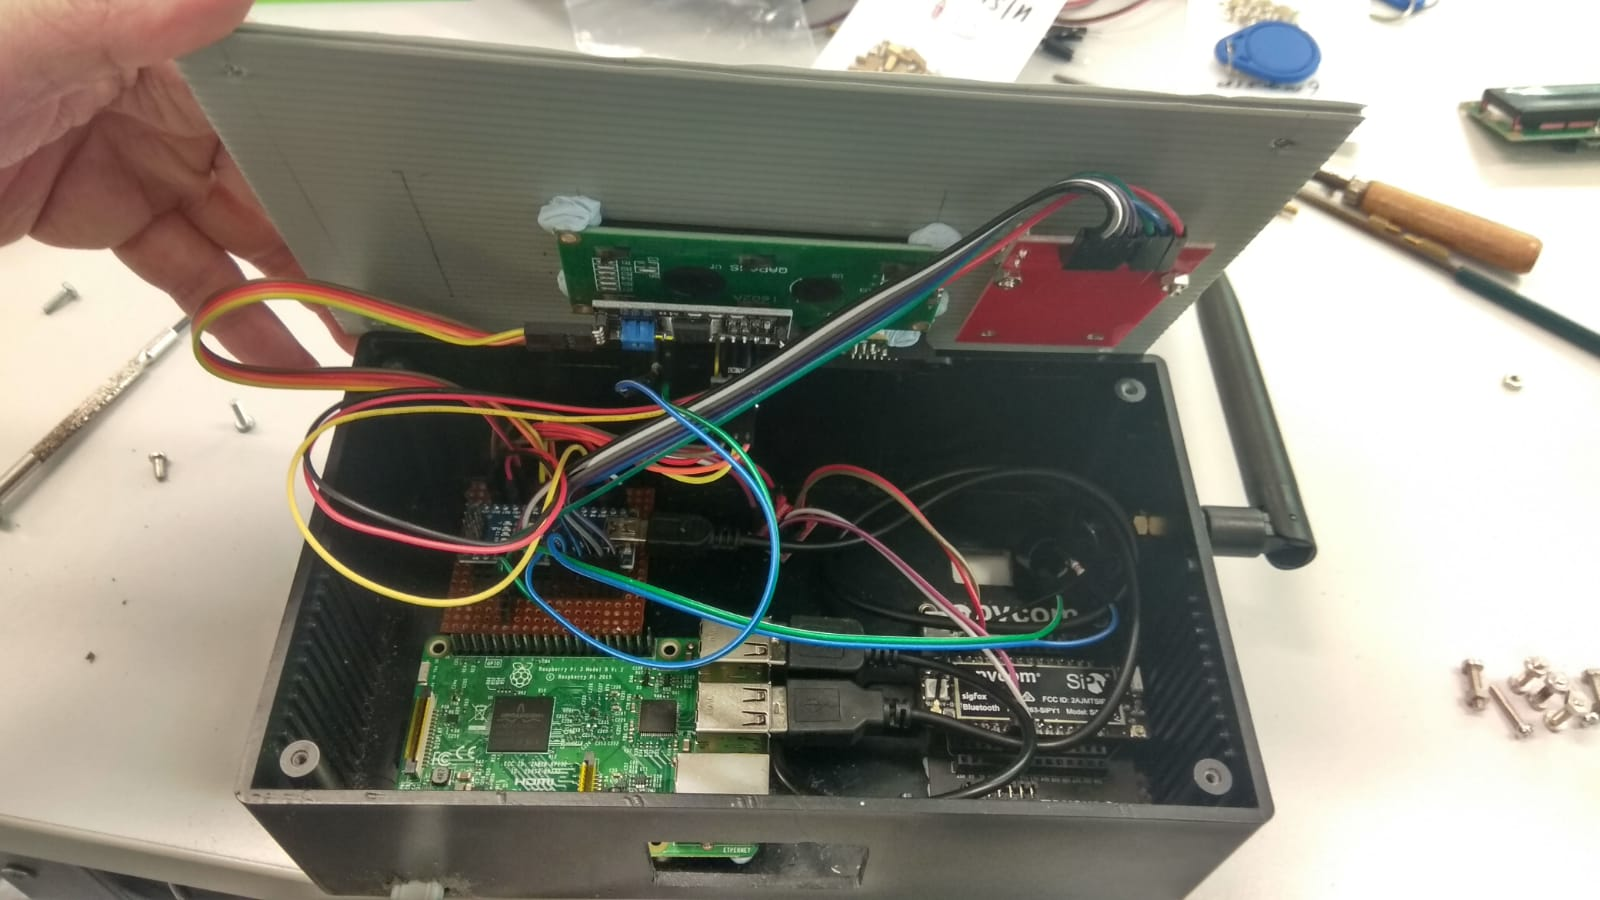
작동 원리:RaspberryPi 및 Arduino
RaspberryPi는 Python 프로그램 및 MySQL 데이터베이스를 보유하고 있습니다.
Python 프로그램을 시작하면 데이터베이스가 이미 생성되어 있는지 자동으로 확인하고, 그렇지 않으면 자동으로 생성됩니다. 필요한 경우 내부 테이블도 자동으로 확인 및 생성됩니다. 이것은 학교에서 교사/행정 직원의 육체 노동을 줄여줍니다.
그런 다음 쿼리 연결을 설정하여 데이터베이스를 확인하고 Arduino가 직렬 통신 포트를 통해 관련 정보를 보낼 때까지 기다립니다.
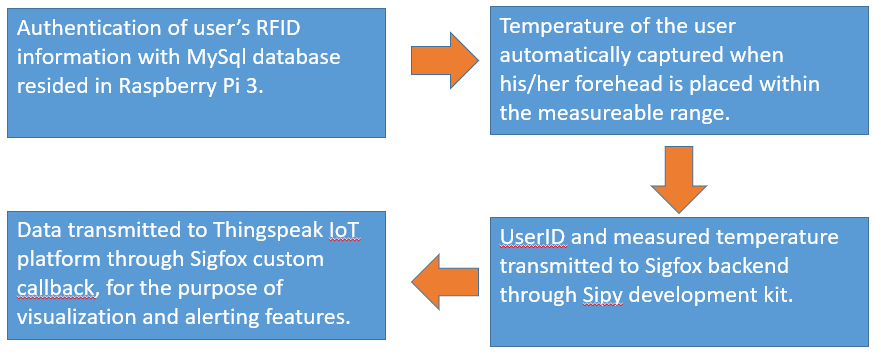
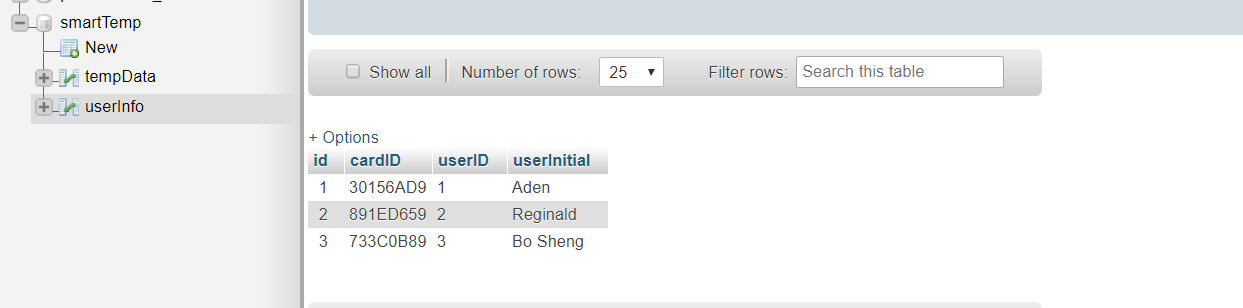
Arduino에 RFID 카드를 탭하면 카드 정보가 Arduino에 저장되고 직렬 통신을 통해 RaspberryPi로 전송됩니다. 이후 RaspberryPi는 해당 카드가 유효한 사용자인지 데이터베이스로 확인하고, 유효한 경우 Arduino에 확인 메시지를 보내고 Arduino는 LCD 화면에 "Welcome, name"을 출력합니다. 유효한 사용자가 아니면 "오류! 잘못된 사용자입니다!"라고만 표시됩니다.
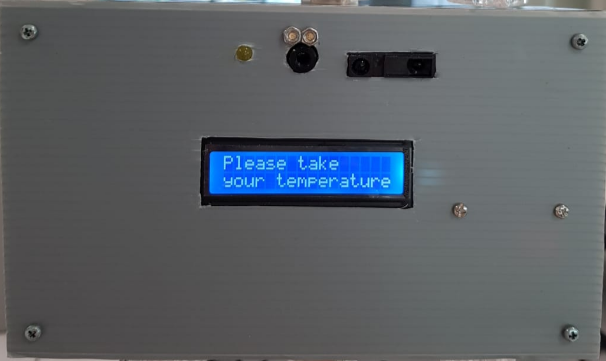
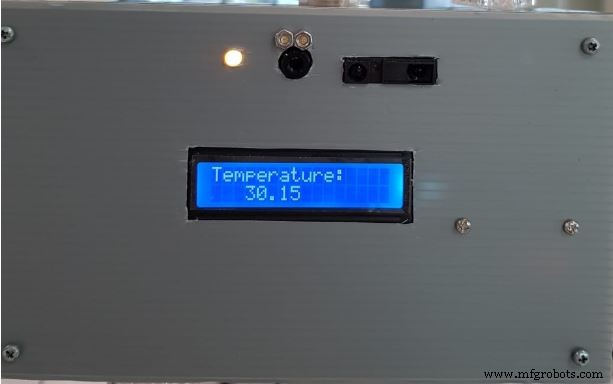
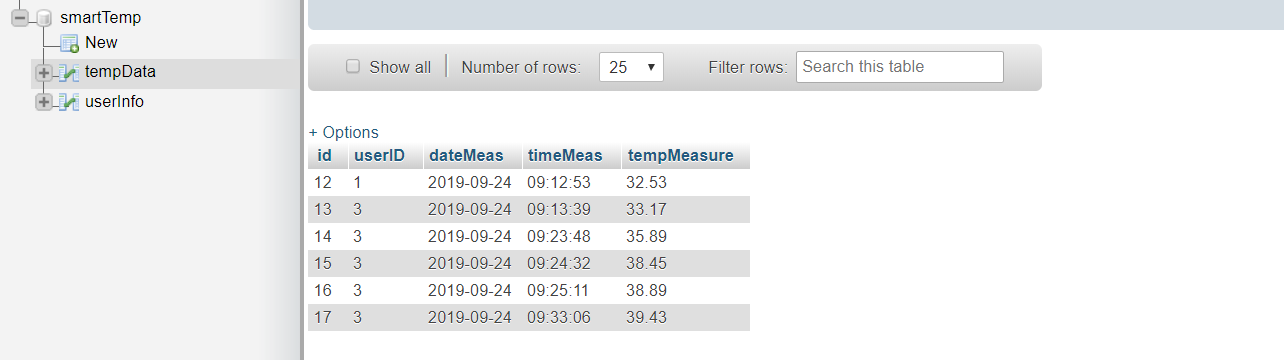
이제 막 탭한 유효한 사용자가 있다고 가정해 보겠습니다. 다음으로 Arduino는 사용자에게 온도를 측정하라는 메시지를 표시합니다. 그러면 거리 센서가 사용자가 체온을 측정할 준비가 되었는지 감지합니다. 그렇다면 온도를 측정하여 LCD 화면에 온도를 출력합니다. 유효한 온도(28*C - 42*C)인 경우 이 정보는 데이터 저장을 위해 RaspberryPi(MySQL)와 Sigfox(ThingSpeak)에 모두 전송됩니다. MySQL 데이터베이스는 사용자 ID, 날짜, 타임스탬프 및 각 촬영의 온도를 저장합니다.
Arduino에서 온도 데이터를 수신할 때 RaspberryPi는 다른 작업을 진행하기 전에 온도가 제대로 전달되는지 지속적으로 확인합니다. 이는 Python 프로그램이 온도 데이터를 한 번만 확인하는 경우 두 코드가 서로 다른 타이밍에 실행되기 때문에 Arduino에서 아직 전송하지 않았을 수 있기 때문입니다. 따라서 동기화를 위해 나머지 프로그램을 진행하기 전에 Python 코드에서 온도 데이터를 지속적으로 확인합니다.
참고: RaspberryPi의 Python 코드와 Arduino 코드는 모두 Handshaking이라는 동기화 방법을 사용합니다. RaspberryPi가 다른 온도/사용자 정보를 수신할 준비가 되지 않은 경우 Arduino는 사용자가 카드를 탭하는 것을 허용하지 않습니다. 반대의 경우도 마찬가지입니다. .
내가 한 간단한 방법은 상대방이 "RECEIVE" 신호를 다시 보낼 때까지 지속적으로 "READY" 신호를 보내서 둘 다 준비되었음을 알리는 것입니다.
아두이노 -
부울 readySignal =Serial.readString() =="READY";


if(readySignal)
{

도청됨 =true;

Serial.println("RECEIVED");

}
파이썬 -
while(readySignal ==True):

ser.write(b'' + "READY")


 ReceivedSignal =ser.readline().strip() =="RECEIVED"


if(receivedSignal ==True):

readySignal =False
쿼리를 완료할 때마다 쿼리 연결을 닫아야 합니다. 이는 가능한 메모리 누수를 제거하기 위한 것이며 전반적으로 좋은 방법입니다.
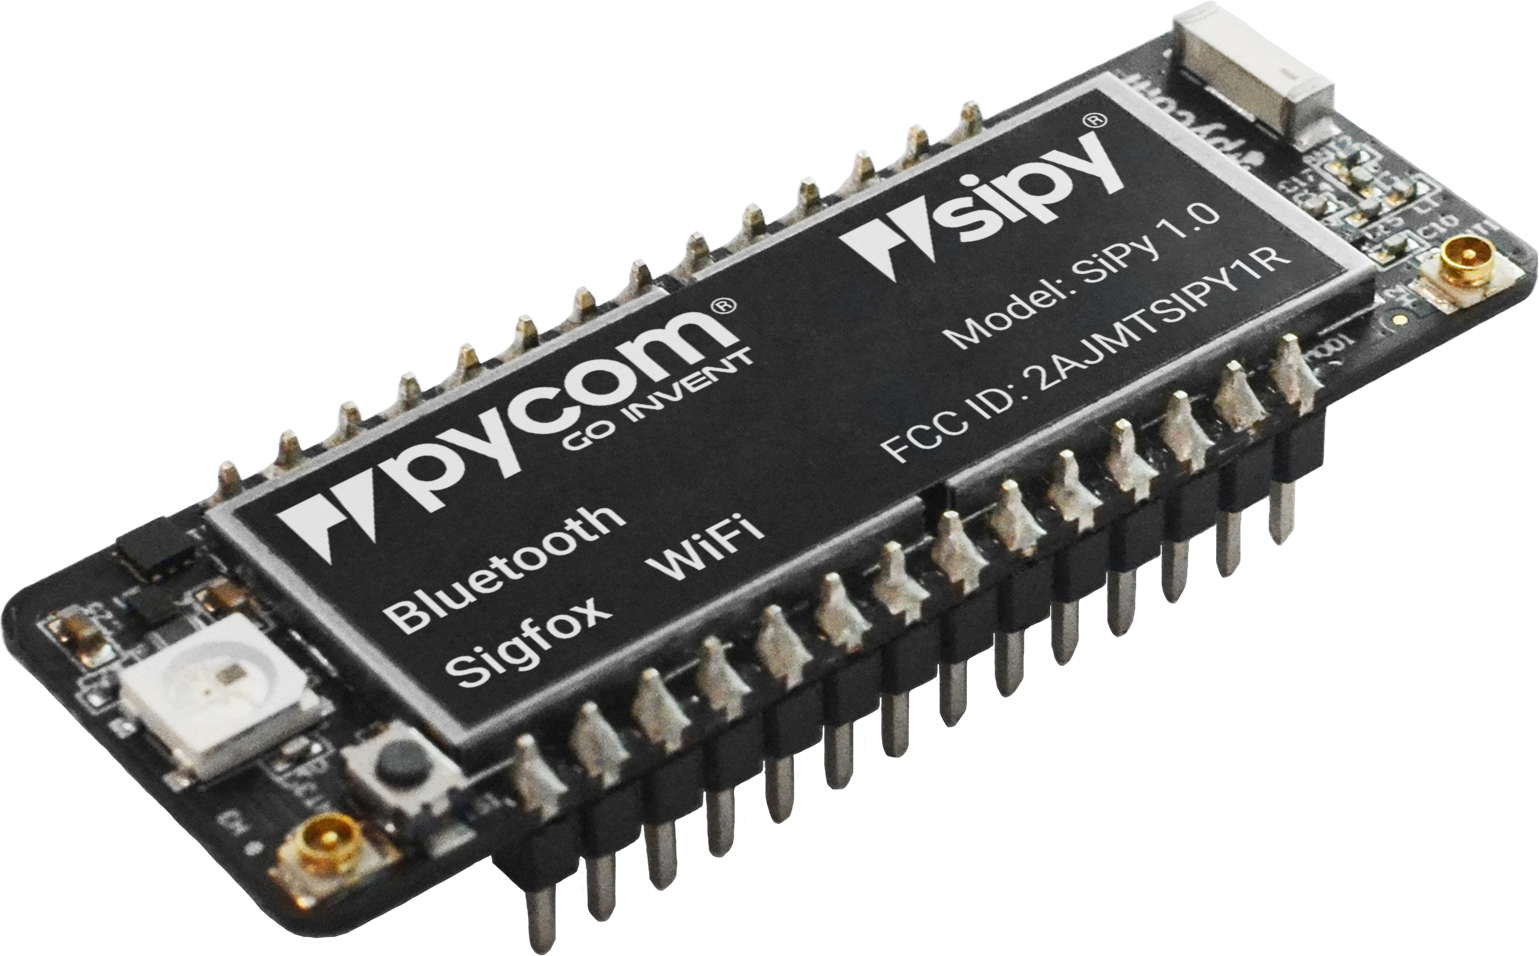
작동 원리:Sigfox(SiPy)
Arduino에서 온도 데이터를 수신한 후 SiPy는 사용자 ID와 온도를 정수와 소수 자릿수로 구분합니다. 이렇게 하면 모든 데이터가 바이트를 통해 Sigfox 백엔드로 전송되고(Ubidots 및 ThingSpeak로 전송될 수 있도록) 다음 그림과 같아야 합니다.

이를 수신한 후 Sigfox 백엔드는 이 데이터를 다시 코딩하여 ThingSpeak로 전송하여 저장합니다. 다음은 데이터를 thingspeak로 보내기 위한 백엔드를 코딩하는 방법을 보여줍니다.
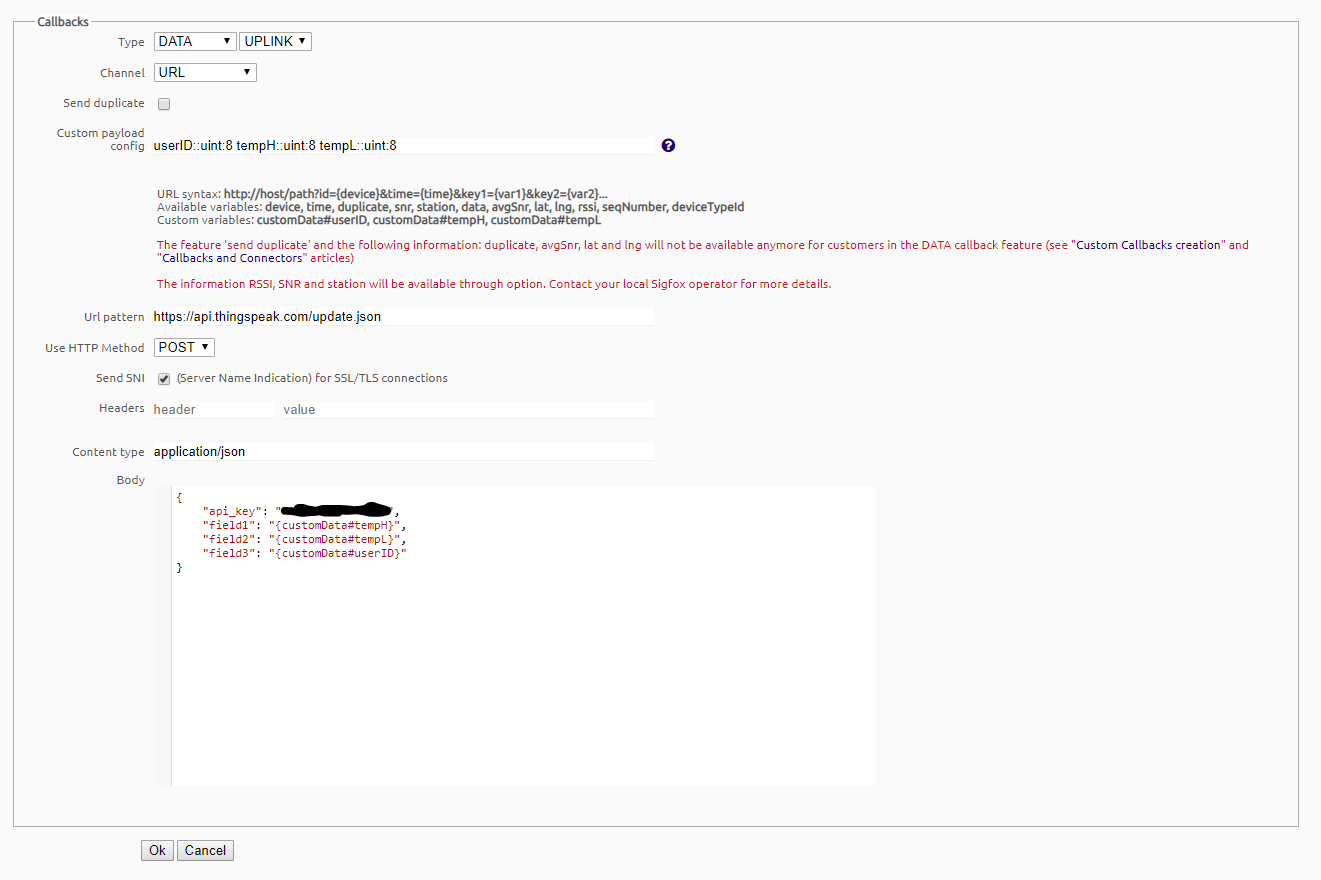
장치 유형> 장치 이름> 콜백 아래의 Sigfox 백엔드에서 사용자 정의 페이로드를 정확히 입력해야 합니다. 이다 사용자 정의 페이로드로 SiPy의 코딩을 변경하지 않는 한 사용자 ID로 먼저 수신된 항목을 설정합니다. 따라서 예를 들어 온도를 먼저 전송하면 백엔드에서 해당 온도를 온도 대신 사용자 ID로 변환합니다. 본문에서 쓰기 API 키는 맨 위에 있어야 하며 필드는 사용자 정의 페이로드에서 생성한 사용자 정의 데이터와 함께 배치될 수 있습니다.
작동 원리:클라우드
데이터가 ThingSpeak로 성공적으로 전송된 후 MATLAB Analysis 스크립트가 데이터를 분석하고 정수 값과 소수 값을 분리하는 대신 온도 데이터를 하나의 값으로 결합하는 비공개 보기 채널에서 먼저 수신합니다.
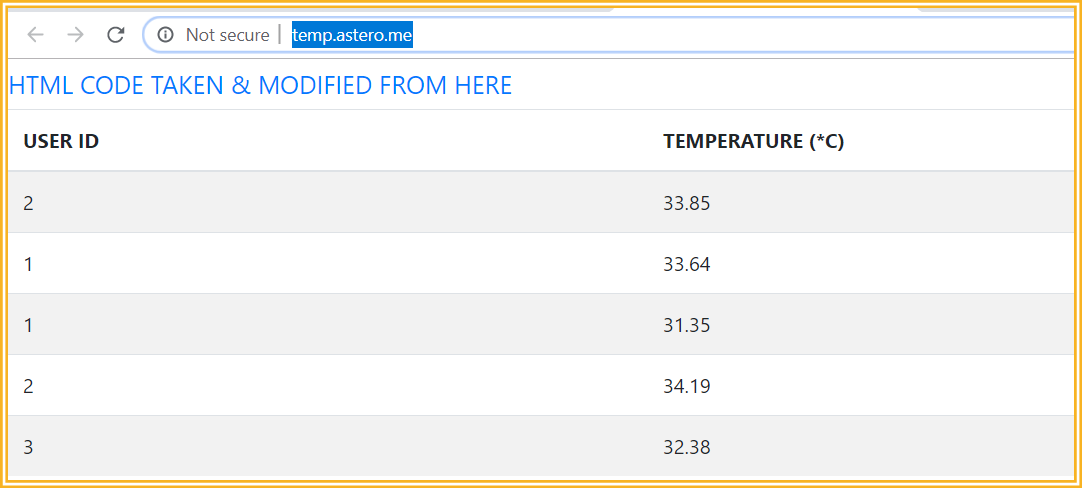
테이블 코드는 오픈 소스 프로젝트에서 가져왔고 우리의 요구에 맞게 수정되었습니다. 새로운 데이터가 전송될 때마다 테이블이 자동으로 업데이트되므로 매우 유용합니다. 사용하기에 적합합니다.
동시에 온도가 위험한 수준(발열)인지 확인하고, 위험 수준(발열)에 도달하면 직원/교사에게 이메일을 보내 알려줍니다.
요약하자면 온도 값이 정수와 십진수로 구분된 첫 번째 채널은 보기용이 아닌 백엔드 채널입니다. 두 번째 채널의 경우 온도 값을 결합하여 직원/관리자/관리자가 보기 좋게 만들었으며 데이터 분석을 쉽게 하기 위해 Excel과 같은 표를 제공합니다.
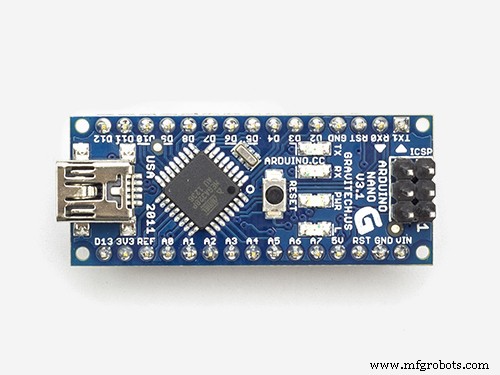
1. Arduino Nano 연결 설정
다음은 Arduino Nano의 경우 모듈과 연결한 것입니다.
Nano와 Uno는 핀 배치가 동일합니다.
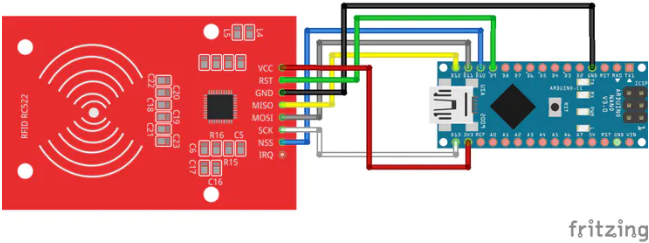
RFID - RC522

SDA D10
SCK D13
MOSI D11
MISO D12
IRQ 연결되지 않음
GND GND
RST D9
3.3V 3.3V
RFID 테스트 방법
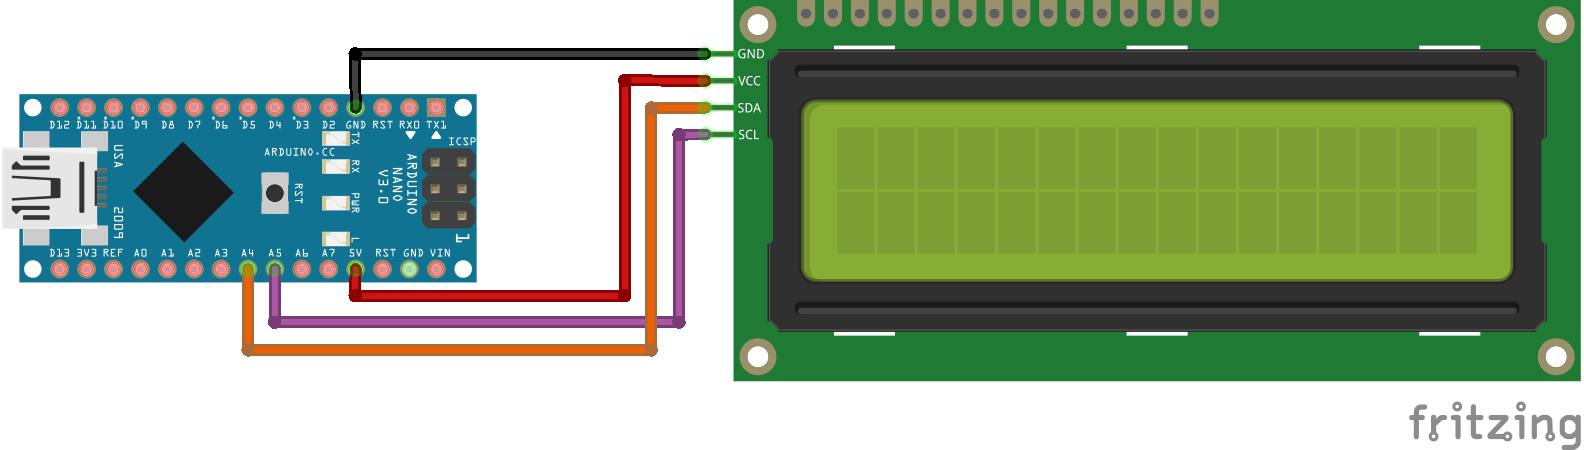
LCD

SDA A4
SCL A5
GND GND
5V 5V
I2C LCD 테스트 방법
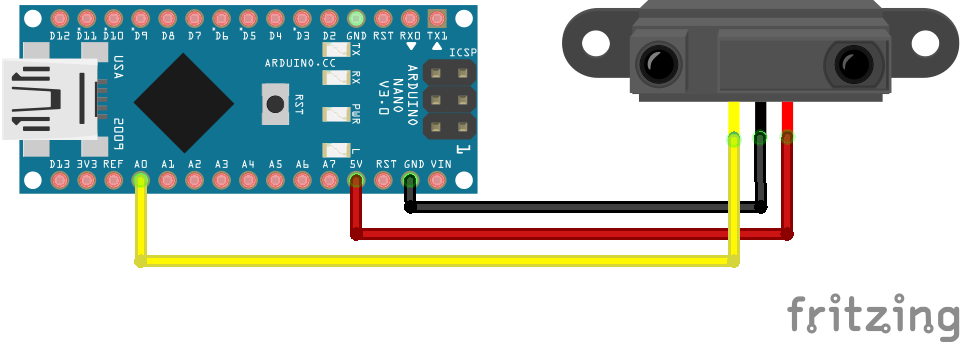
거리 센서

5V 5V
GND GND
입력 A0
샤프 IR 거리 센서 테스트 방법
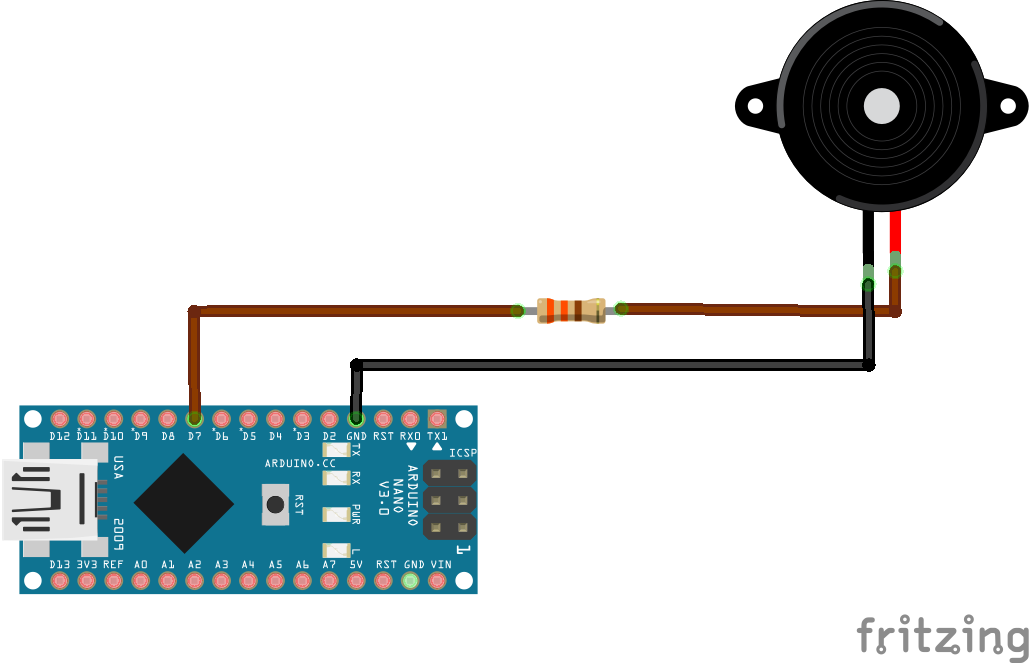
부저

GND GND
출력 D6
부저 테스트 방법
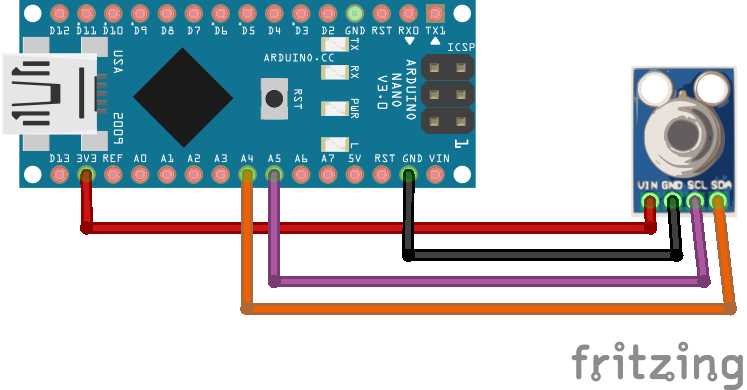
IR 온도 센서

SDA A4
SCL A5
GND GND
5V 5V
IR 온도 센서를 테스트하는 방법,
LED

평면(음극) GND
비평면(음극) D7
좋아요! Arduino 연결을 위해 지금 가도 좋습니다.
2. 라즈베리파이 설정
Raspberry Pi 3 컴퓨터에 설치해야 하는 것은 주로 두 가지입니다.
1. 라즈비안 운영 시스템 -
Raspbian 운영 체제 설치는 매우 간단합니다.
방법에 대한 간단한 대답은 이미지 파일을 SD 카드에 플래시(쓰기)하고 이 SD 카드를 Raspberry Pi 3에 삽입하는 것입니다.
그러나 단계별 긴 답변 자습서를 찾고 있다면 다음과 같이 하십시오. -
먼저 flash.img 파일을 스토리지 드라이브에 저장할 수 있는 소프트웨어를 다운로드해야 합니다. balenaEtcher라는 소프트웨어를 사용할 수 있습니다.
그런 다음 Raspberry Pi - Raspbian 페이지로 이동하여 필요에 맞는 것을 선택하십시오. 저는 "Raspbian Buster with Desktop 및 권장 소프트웨어"를 선택했습니다. 이름에서 알 수 있듯이 권장 소프트웨어와 함께 제공되며 소프트웨어를 다운로드해야 하는 번거로움을 덜어주기 때문입니다.
완료되면 앞서 언급한 단계에 따라 balenaEtcher 소프트웨어를 실행하기만 하면 됩니다. 이 단계는 매우 간단합니다. 이미지(your.img Raspbian 파일)를 선택한 다음 SD 카드를 선택하고 플래시를 누릅니다. 이제 기다리기만 하면 됩니다. 완료되면 메시지가 표시되며 이제 새로 플래시된 SD 카드를 Raspberry Pi에 삽입할 수 있습니다.

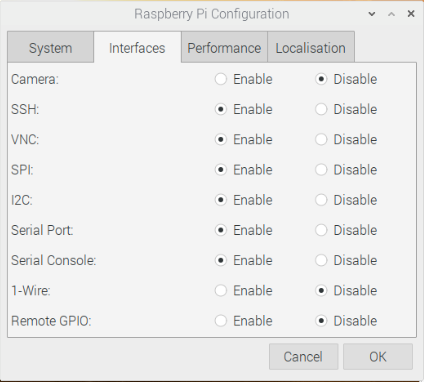
그런 다음 HDMI를 통해 Raspberry Pi 머신을 모니터에 연결하고 초기 설정을 수행합니다. 마지막으로 환경 설정 -> Raspberry Pi 구성으로 이동합니다. 이 메뉴에 있어야 합니다. -
옵션을 따르십시오. 이 단계에서는 SSH, VNC와 같은 인터페이스를 활성화하여 eth0 또는 wlan0을 통해 IP 주소에 연결할 수 있습니다(따라서 더 이상 HDMI 케이블이 필요하지 않으며 SSH를 통해 모든 작업을 수행할 수 있음).
(선택 단계) - 터미널을 열고 dhcpcd.conf 파일(sudo nano /etc/dhcpcd.conf)을 편집하고 다음 명령줄을 추가합니다.
인터페이스 eth0
정적 ip_address=192.168.0.11/24
위의 내용을 통해 이더넷 케이블을 통해 고정 주소 192.168.0.11을 사용하여 Raspberry Pi에 연결할 수 있으므로 매번 그것이 내 Raspberry Pi의 주소라는 것을 알 수 있습니다.
Wi-Fi에 연결되면 이더넷 케이블 없이 라즈베리 파이에 연결할 수 있는 wlan0 IP 주소를 얻게 되므로 동일한 네트워크에 연결되어 있는 한 위치 어디에서나 사용할 수 있습니다. 와이파이. wlan0 IP 주소가 무엇인지 확인하려면 오른쪽 상단에 있는 WiFI 기호 위로 마우스를 가져가기만 하면 됩니다.
좋습니다! 초기 Raspberry Pi 설정이 완료되었습니다!
3. MySQL 데이터베이스 설정
이 단계는 조금 어렵다고 생각합니다. 특히 MySQL 루트 사용자를 설정해야 하는 부분은 오류를 수정하는 것이 매우 어렵기 때문에 주의해서 따르십시오.
먼저 시스템이 최신 펌웨어로 업그레이드되고 업데이트되었는지 확인해야 합니다. 다음 명령을 입력하여 확인할 수 있습니다.
sudo apt 업데이트
sudo apt 업그레이드
이 작업이 완료되면 apache2를 설치합니다.
sudo apt install apache2 Apache2를 사용하면 나중에 만든 웹사이트에 액세스할 수 있도록 웹 서버를 만들 수 있습니다.
apache2가 설치되면 PHP를 설치해야 합니다.
sudo apt install php php-mbstring PHP를 사용하면 자신만의 PHP 웹사이트를 만들고 볼 수 있습니다.
중지하고 방금 설치한 모든 것이 작동하는지 확인하고 웹 브라우저에 Raspberry Pi의 IP를 입력하거나 HDMI를 통해 연결되어 있는 경우 "localhost"를 입력하면 Apache 색인 페이지가 표시됩니다.

이제 데이터베이스를 설치해야 합니다. 이를 위해 MySQL과 mariadb를 사용할 것입니다.
sudo apt install mariadb-server php-mysql 중요 - 아래 내용을 잘 읽어보시기 바랍니다.
이제 MySQL 루트 사용자를 생성하여 데이터베이스에 액세스하는 데 사용할 수 있습니다.
sudo mysql --user=root 이제 MySQL 코드를 입력할 수 있는 MySQL 세션에 들어가고 한 줄씩 입력합니다(비밀번호를 자신의 비밀번호로 바꿀 수 있음)
DROP USER 'root'@'localhost';
CREATE USER 'root'@'localhost' IDENTIFIED BY 'password';
'root'에 *.*에 대한 모든 권한 부여 부여 옵션이 있는 @'localhost',
권한 제거,
종료,
이제 로그인하여 MySQL 루트 사용자를 테스트할 수 있습니다.
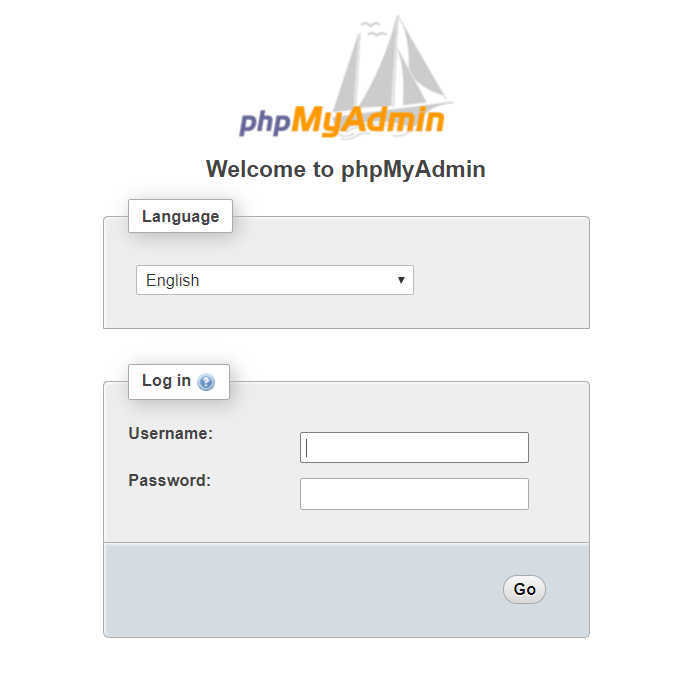
mysql --user=root --password=yourmysqlpassword 모든 것이 작동하면 이제 MySQL 데이터베이스에 액세스(보기) 및 수정할 수 있는 관리자 제어판인 PHPMyAdmin을 설치할 수 있습니다.
sudo apt install phpmyadmin

(설치 후)
sudo phpenmod mysqli
sudo /etc/init.d/apache2 restart
축하합니다! 이제 http://your_raspberrypi_ip_address/phpmyadmin을 사용하여 새로 만든 데이터베이스에 액세스할 수 있습니다.
4. SiPy 확장 보드 2.0 설치 및 소프트웨어 가이드
먼저 리셋 버튼이 USB 커넥터를 향하도록 하여 SiPy 모듈을 확장 보드에 삽입해야 하며 핀이 더 이상 보이지 않는 상태에서 제자리에 단단히 고정되어야 합니다.
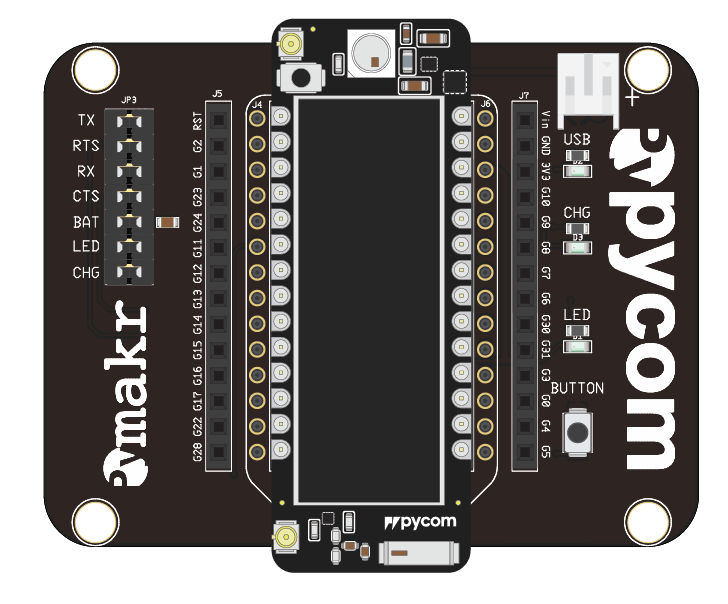
출처:파이콤 문서
그렇게 한 후 SiPy에서 펌웨어를 업데이트해야 프로그램을 업로드 및 실행할 수 있을 뿐만 아니라 Sigfox 백엔드에 등록하는 데 사용할 Sigfox 장치 ID 및 PAC 번호를 얻을 수 있습니다. 사용 중인 OS(운영 체제)에 따라 펌웨어 업데이터를 다운로드하십시오.
<울>대화상자 필요 및 python-serial 패키지)
pycom 펌웨어 업그레이드를 다운로드한 후 업데이터를 처음 시작하면 다음 그림이 한 번만 나타납니다. 따라서 올바른 Sigfox 지역, 보드를 선택했는지 확인하십시오.

펌웨어 업데이트의 지침을 주의 깊게 따르십시오. Sigfox 장치 ID와 PAC 번호가 모두 "F"(아래와 같이) 대신 숫자와 알파벳이 혼합된 것처럼 제대로 작동하지 않을 수 있습니다.
b 'FFFFFFFF'
b 'FFFFFFFFFFFFFFFF'
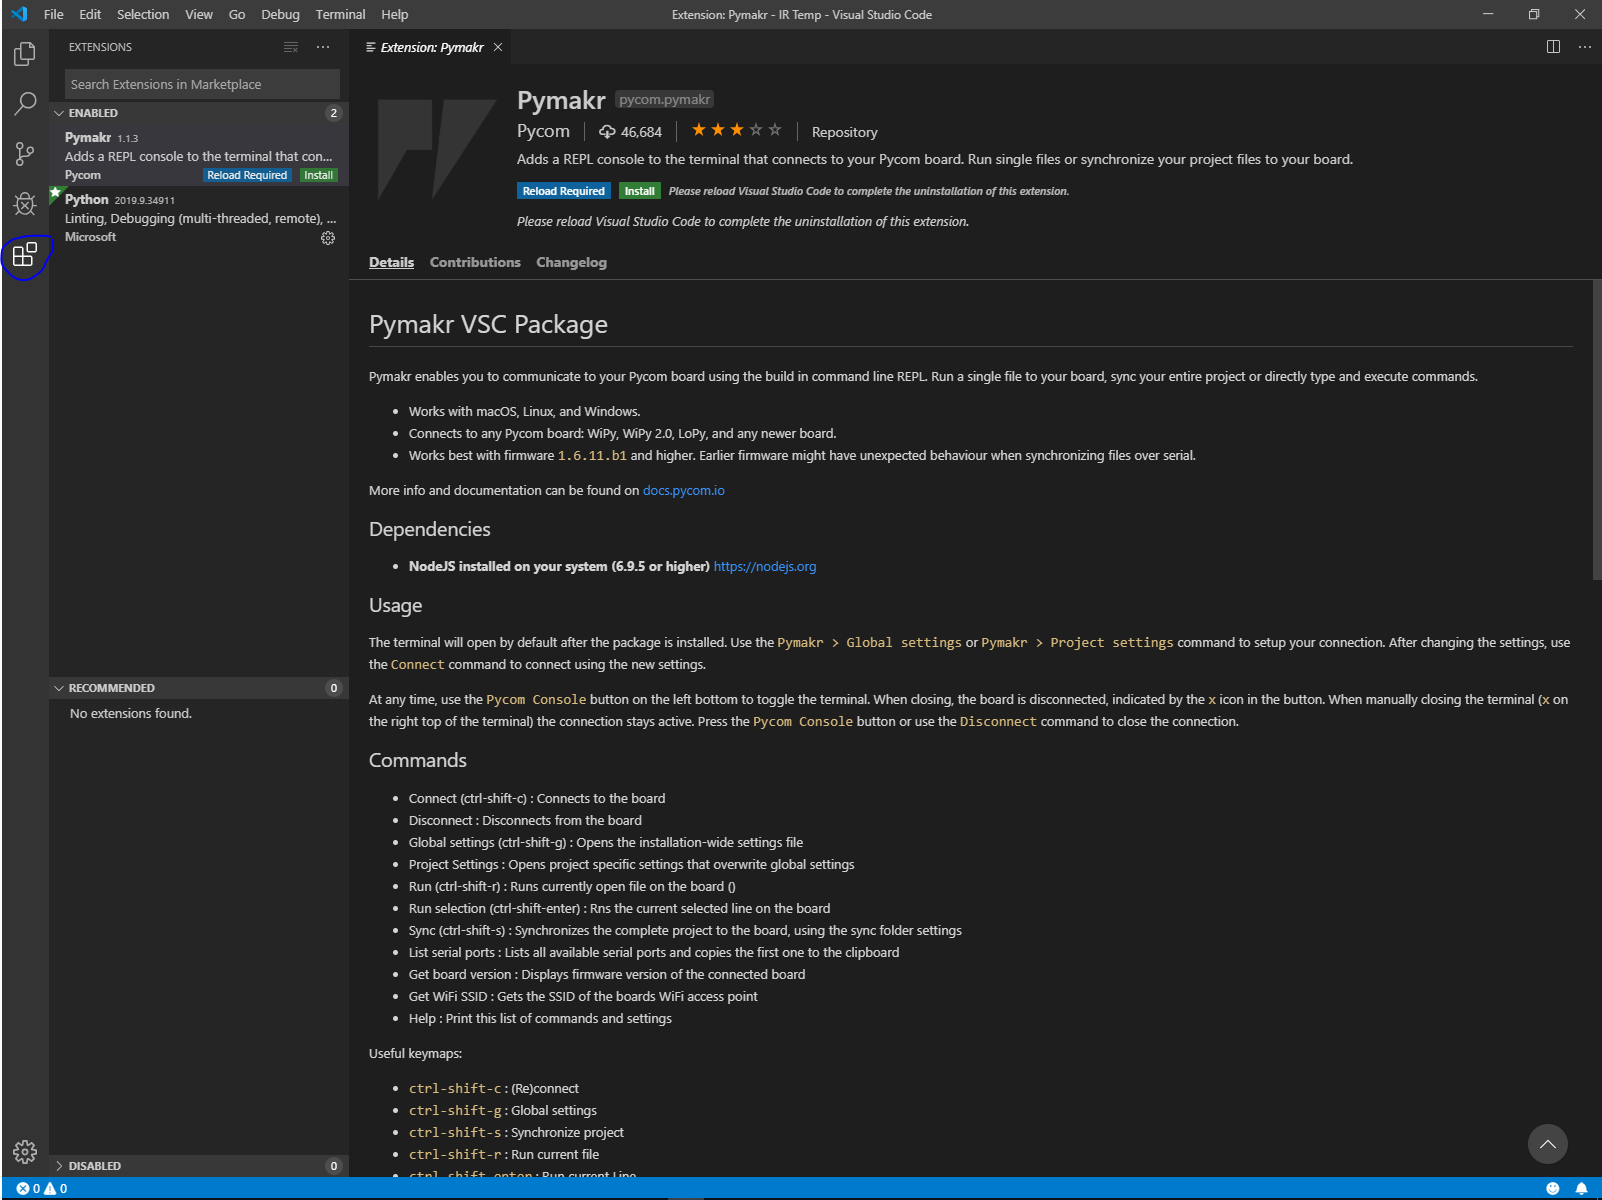
펌웨어가 업데이트되면 SiPy에서 프로그램 업로드 및 실행을 시작하기 전에 Visual Studio Code를 다운로드하고 확장 Pymkr과 nodejs를 설치해야 합니다.
먼저, 나중에 SiPy에 업로드할 모든 파일을 저장하거나 실행할 모든 프로그램을 저장하기 위해 새 폴더를 만들어야 합니다. 왼쪽 상단 모서리에 있는 파일을 누르고 폴더 열기 또는 Ctrl+K+O를 누릅니다. 그런 다음 이 폴더를 넣을 위치를 선택하고 마우스 오른쪽 버튼을 클릭하여 새 폴더를 만듭니다. 그런 다음 새 파일을 생성하거나 Ctrl+N 새 파일을 열려면. 새 파일을 만든 후에는 새 파일을 파이썬으로 저장하고 파일 형식을 파이썬 파일로 변경해야 나중에 SiPy에서 코드를 실행하고 생성한 새 폴더에 저장할 수 있습니다. 
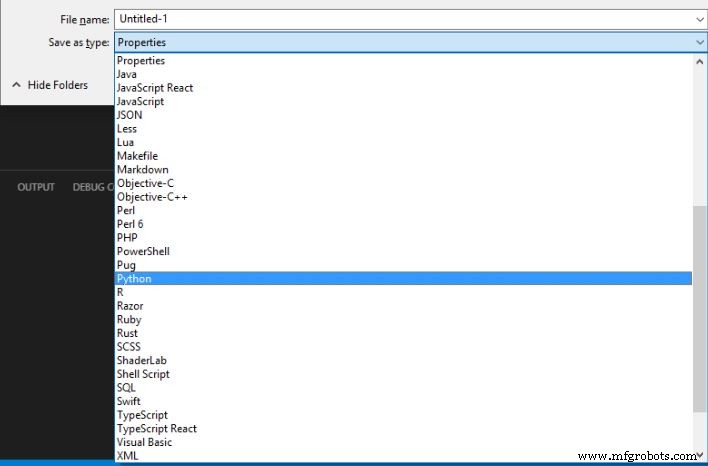
참고: 파일 이름은 Test, Trial 등을 사용할 수 있습니다. 그러나 SiPy에 업로드하는 경우 파일 이름을 main으로 지정해야 합니다. .
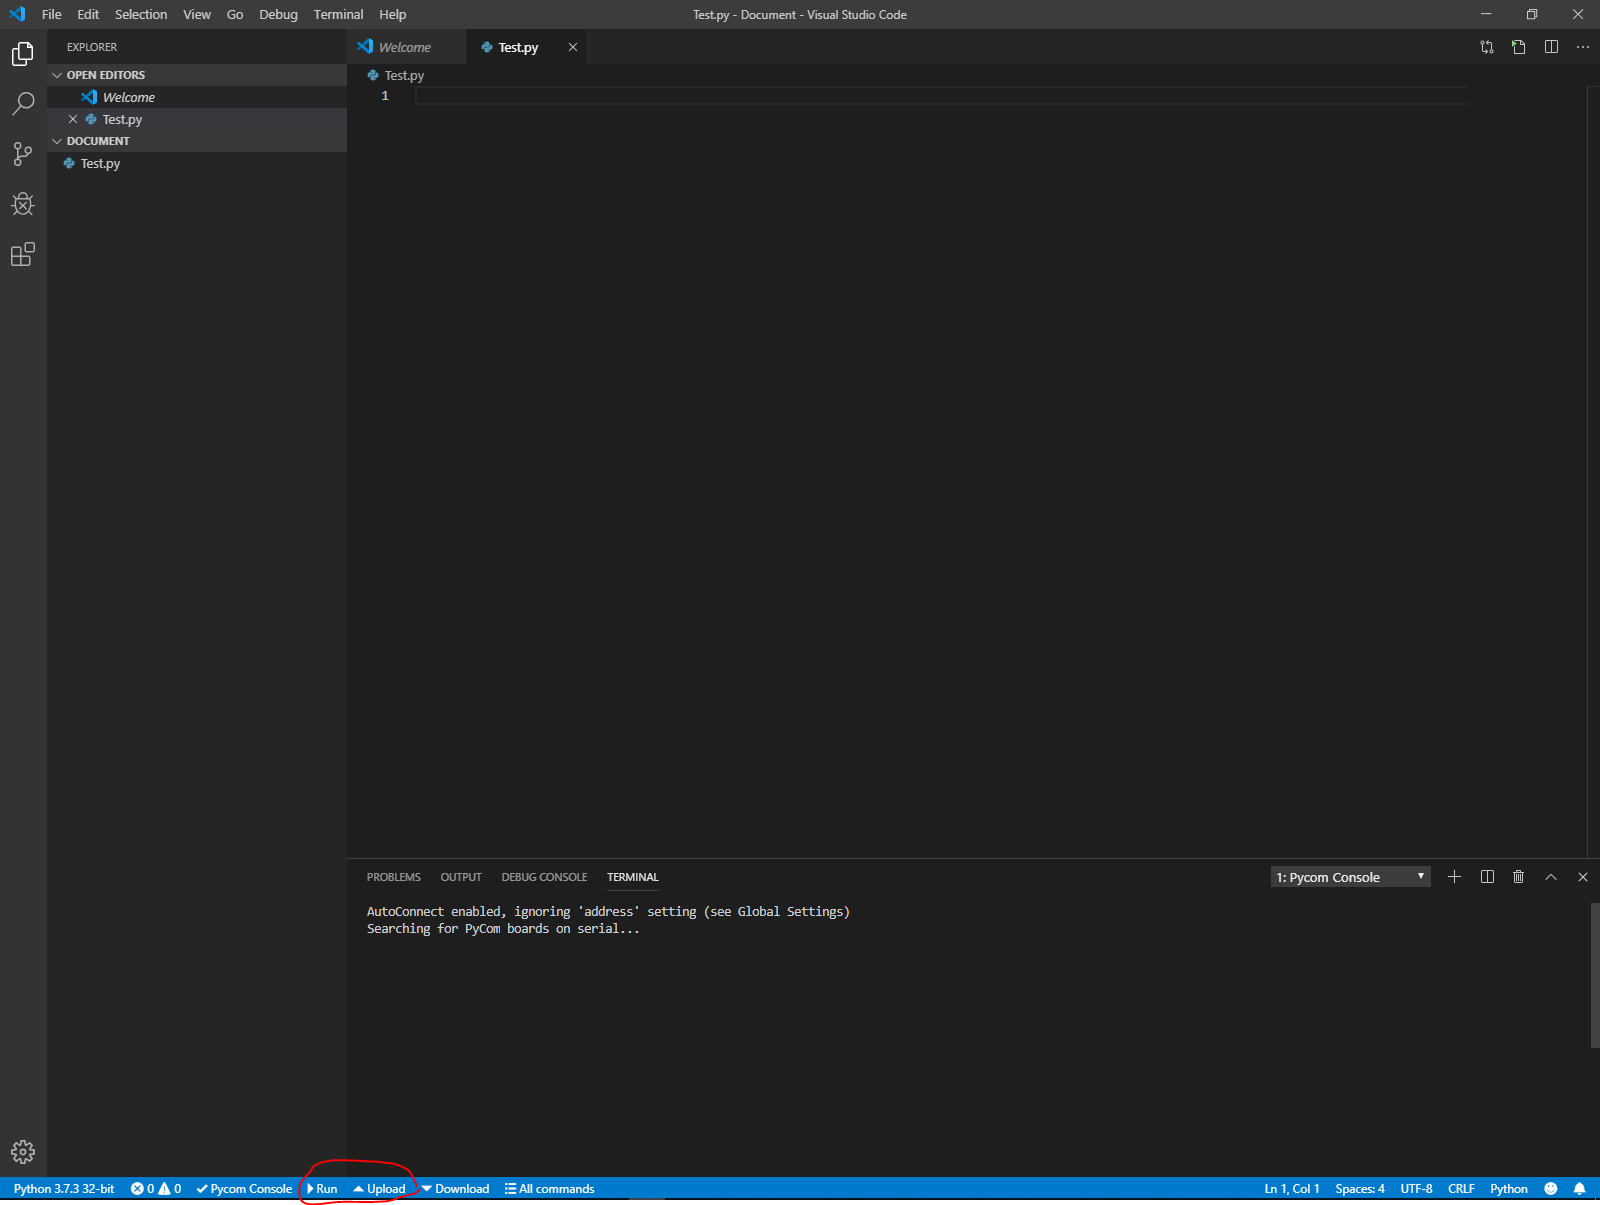
코드를 Sipy 모듈에 업로드하지 않고 실행하려면 프로그램 하단에 있는 실행 버튼을 누르기만 하면 됩니다. 그 옆에 있는 업로드는 현재 폴더를 SiPy 모듈에 업로드합니다. 한 번 SiPy 모듈에 업로드된 while 1 루프를 사용할 때 주의하십시오. SiPy 모듈에 다시 액세스하는 유일한 방법은 FTP를 플래시에 넣고 SiPy에서 main.py 파일을 제거하는 것입니다. 모듈.
실수로 무한 루프를 추가한 경우에도 프로그램을 업로드하거나 FTP를 통해 이전 루프를 제거할 수 있으므로 걱정할 필요가 없습니다. 먼저 filezilla 무료 버전을 다운로드하여 설치합니다.
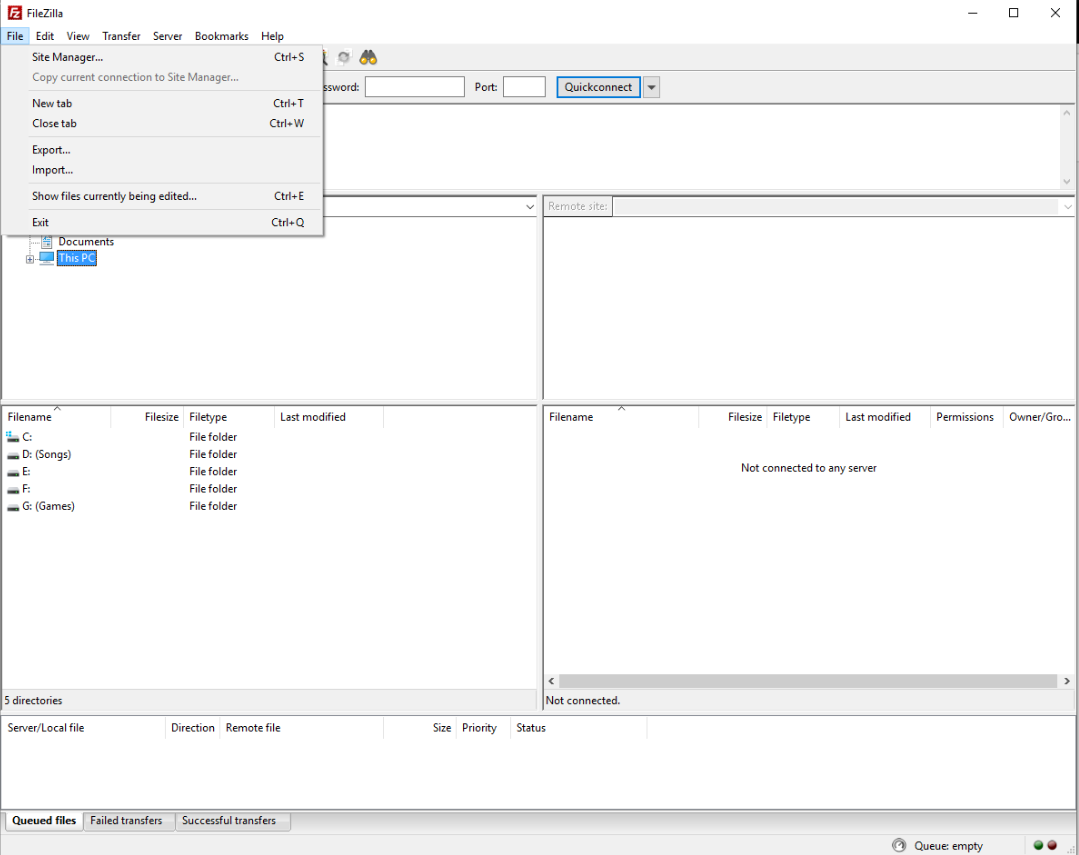
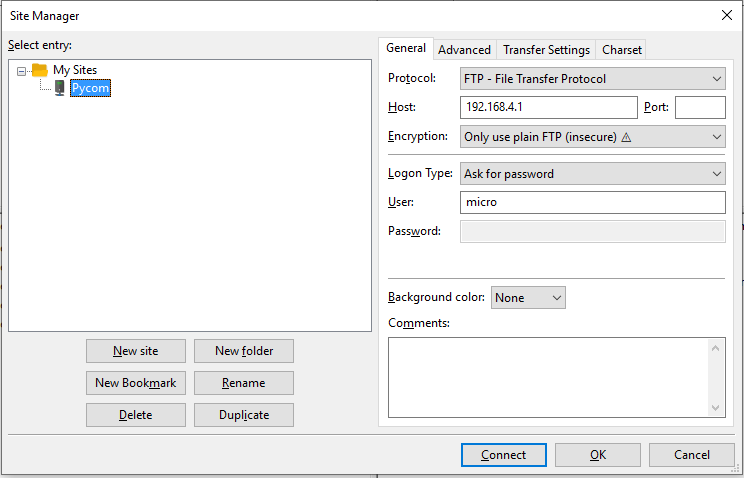
설치 후 연결을 설정해야 합니다. 먼저 filezilla를 열고 파일 아래에 있는 사이트 관리자로 이동하거나 Ctrl+S를 누르고 새 사이트를 누릅니다.
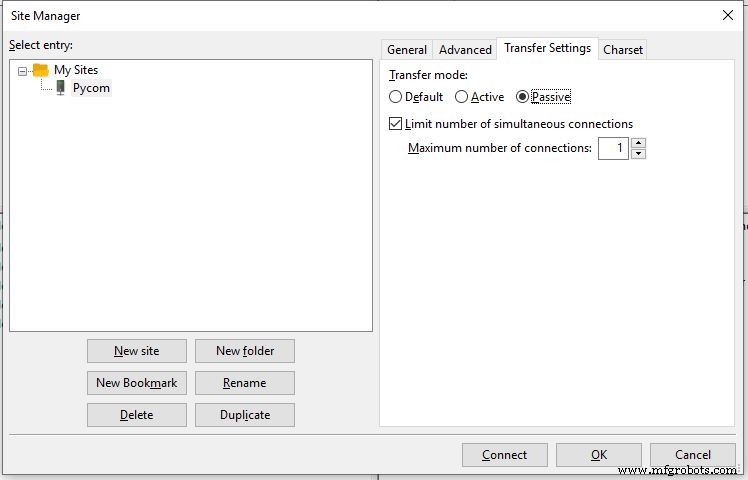
사이트 이름을 SiPy로 바꾸거나 이 연결을 호출할 이름으로 변경하고 암호화 설정을 일반 FTP만 사용(안전하지 않음)으로 변경할 수 있습니다. 설정을 수동으로 전송하고 활성 연결 수를 1로 제한
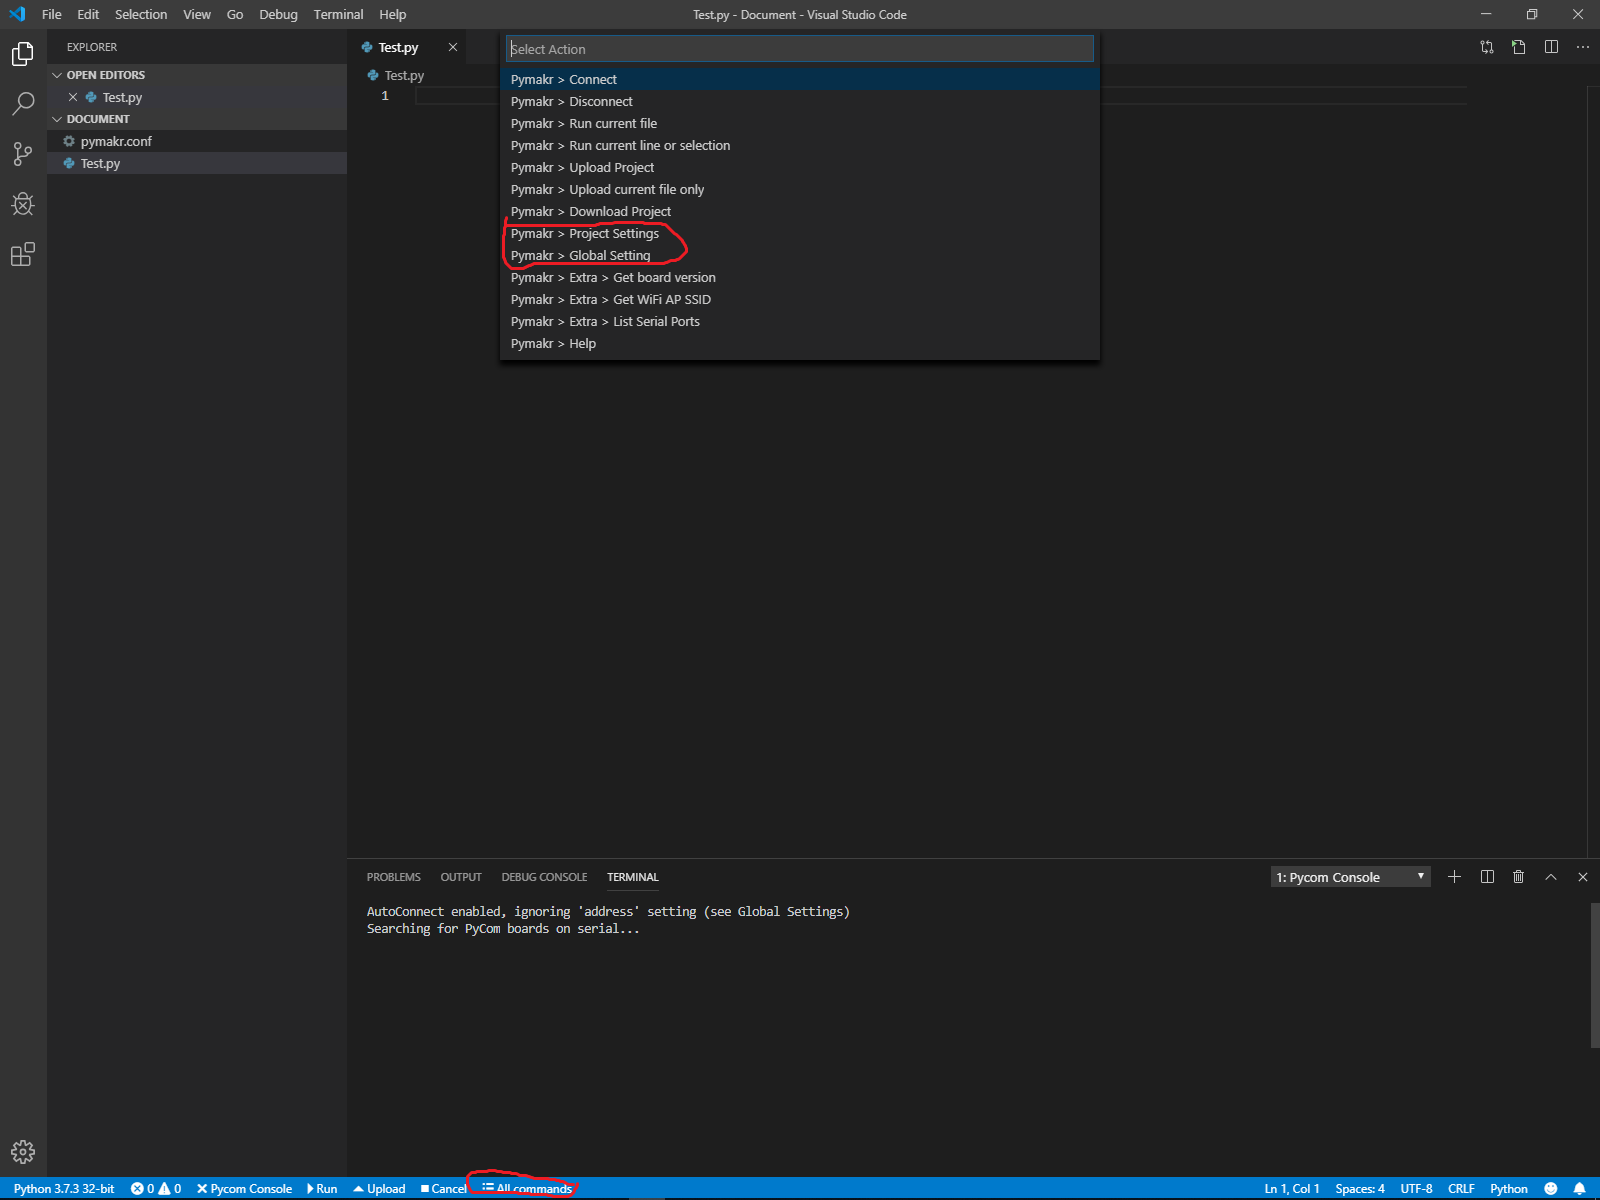
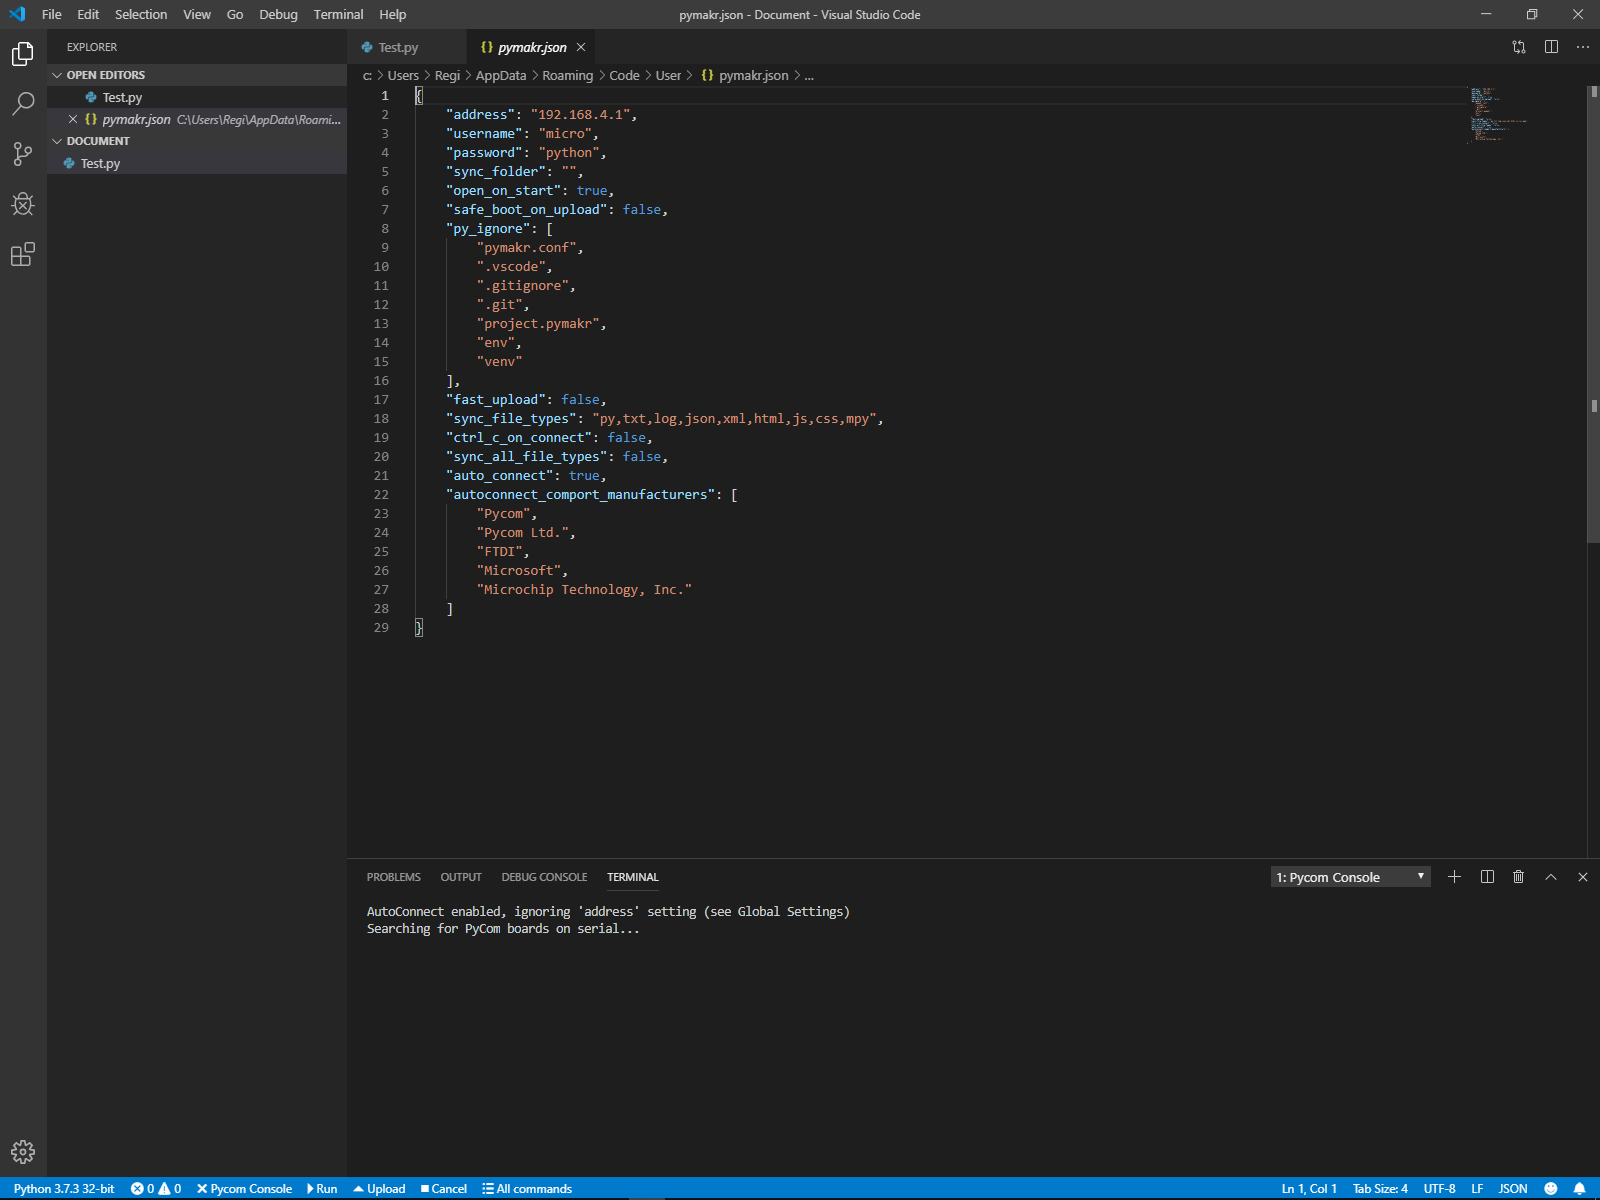
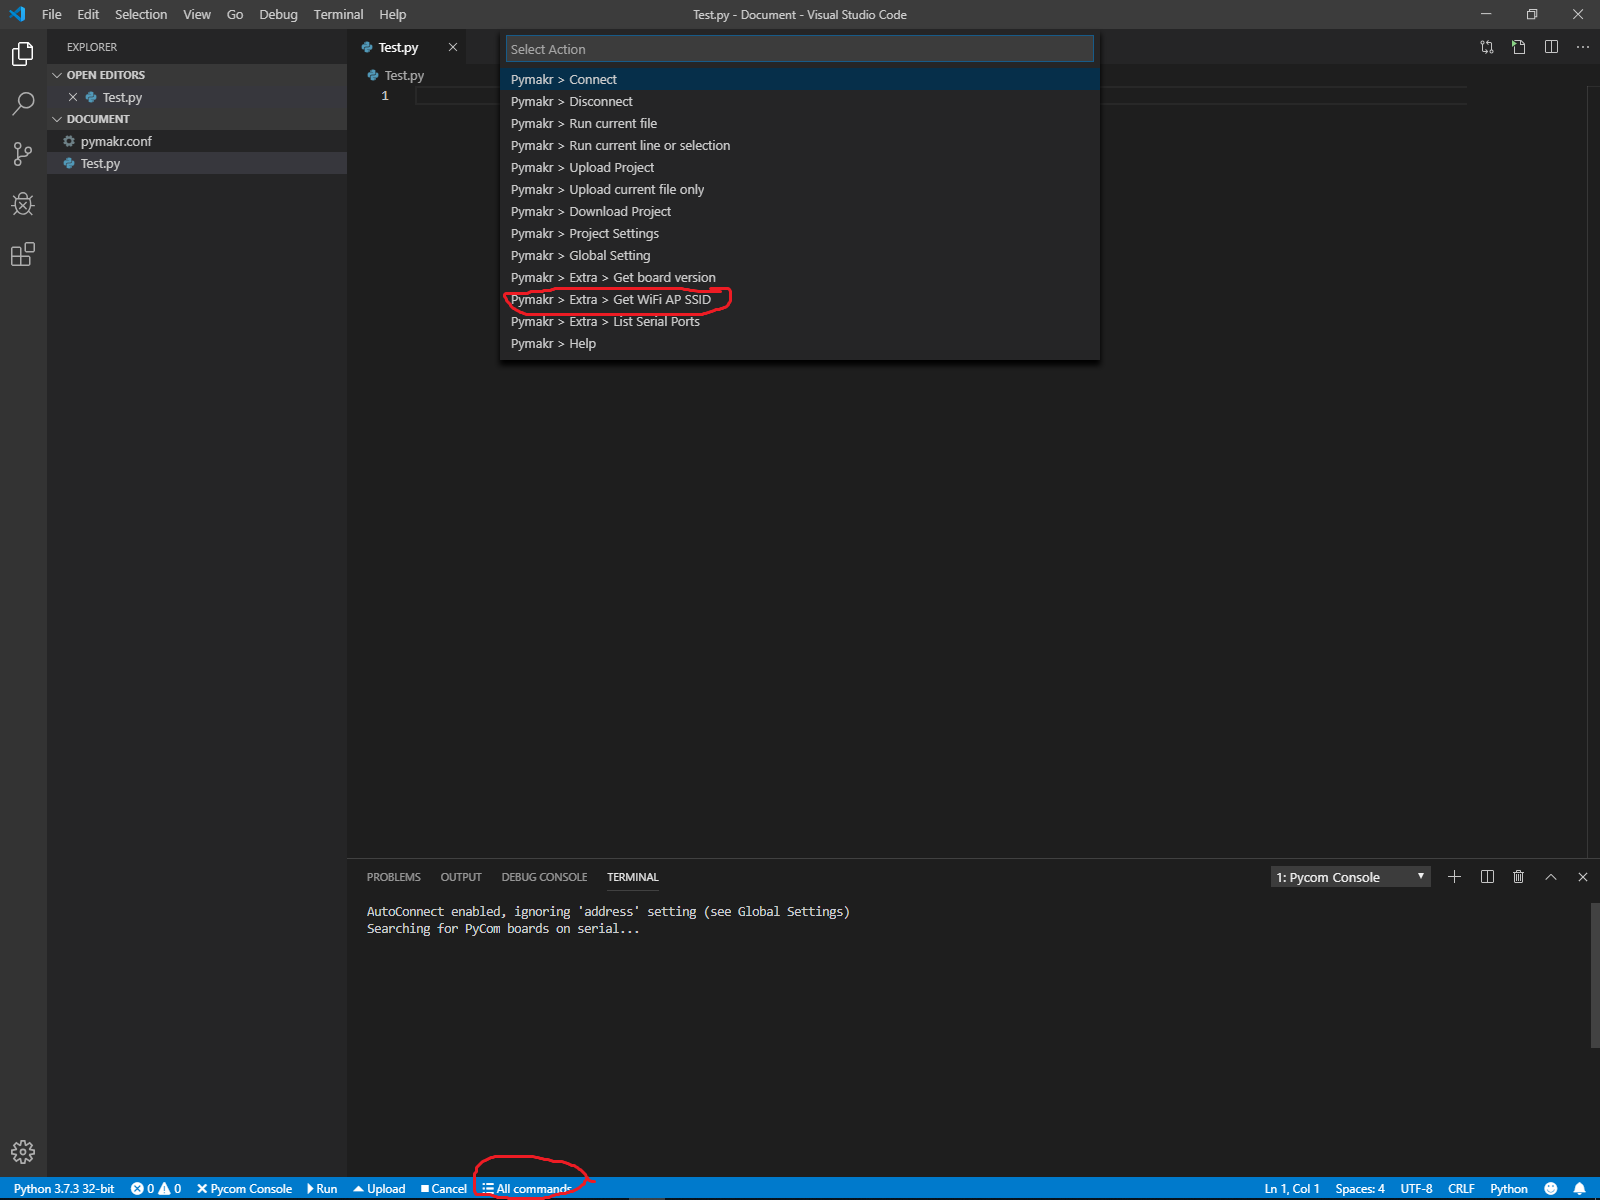
모든 명령을 누르고 전역 설정을 선택하면 Visual Studio Code를 통해 호스트(주소), 사용자 및 암호를 찾을 수 있습니다. 그러면 호스트(주소), 사용자(사용자 이름) 및 암호에 대한 기본 설정이 표시됩니다. 프로젝트 설정을 눌러 변경할 수 있습니다. 모든 명령에서.

다음으로 모든 명령을 사용하고 WiFI AP SSID 가져오기를 눌러 찾을 수 있는 SiPy 모듈 SSID를 알아야 합니다. 각 SiPy 모듈 SSID는 고유하지만 암호는 전체적으로 동일하며 변경할 수 없습니다. SiPy 모듈 SSID의 비밀번호는 www.pycom.io입니다.
참고: 데스크탑 사용자는 WiFi 어댑터가 필요합니다.
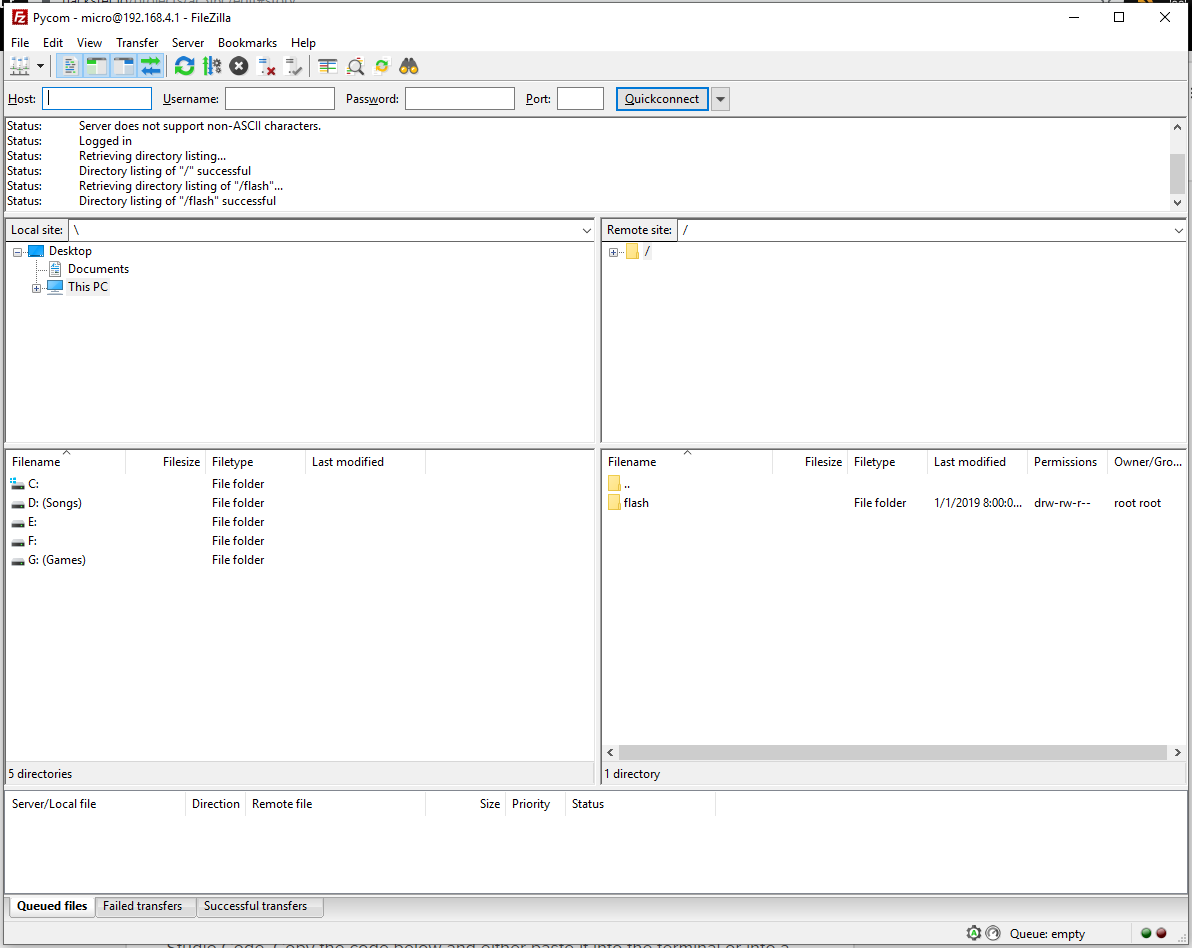
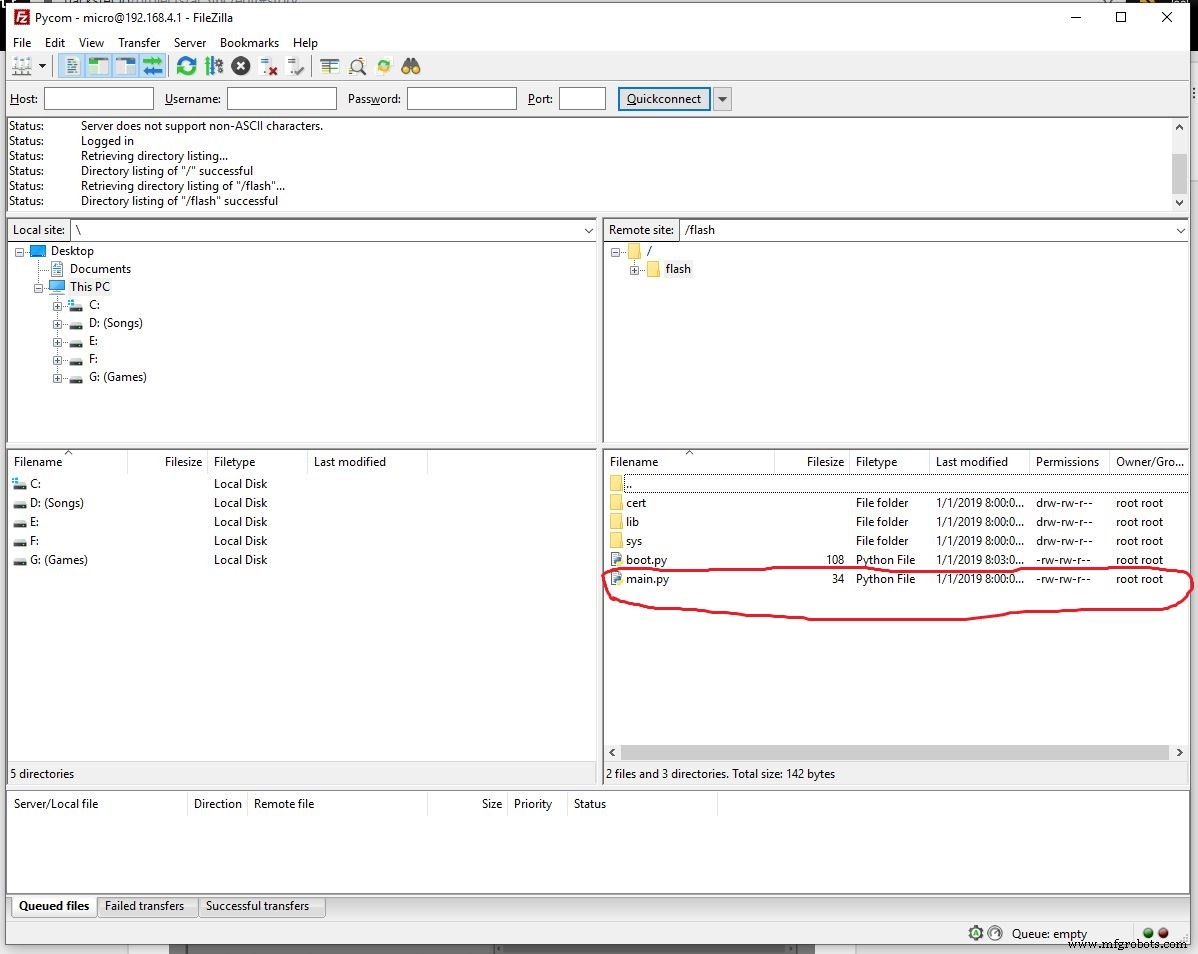
이제 filezilla를 사용하여 SiPy Flash에 액세스할 수 있습니다! 먼저 SiPy SSID에 연결한 다음 filezilla 사이트 관리자로 이동하여 생성한 새 사이트에 연결하고 비밀번호를 입력합니다. 이제 플래시 폴더를 열고 main.py ONLY!를 삭제하세요. main.py를 삭제한 후 SiPy를 다시 시작하면 프로그램 실행/업로드를 시작할 수 있습니다.
참고: 모든 것을 삭제할 경우에 대비하여 플래시 폴더를 OS(운영 체제)에 복사하는 것이 좋습니다.
5. Sigfox 백엔드에 등록
Visual Studio Code를 설치한 후 pycom 확장 보드를 컴퓨터에 연결하면 Visual Studio Code를 열 때 자동으로 연결을 감지합니다. 아래 코드를 복사하여 터미널이나 파일에 붙여넣고 실행하십시오. 두 가지 방법 모두 가능합니다.
네트워크에서 가져오기 Sigfox
binascii 가져오기
# RCZ*용 Sigfox 초기화(다른 RCZ 지역이 필요할 수 있음)
sigfox =Sigfox(mode=Sigfox .SIGFOX, rcz=Sigfox.RCZ*)
# 인쇄 Sigfox 장치 ID
print(binascii.hexlify(sigfox.id()))
# 인쇄 Sigfox PAC 번호
print(binascii.hexlify(sigfox.pac()))
참고 :*를 RCZ 지역 번호로 바꿉니다.
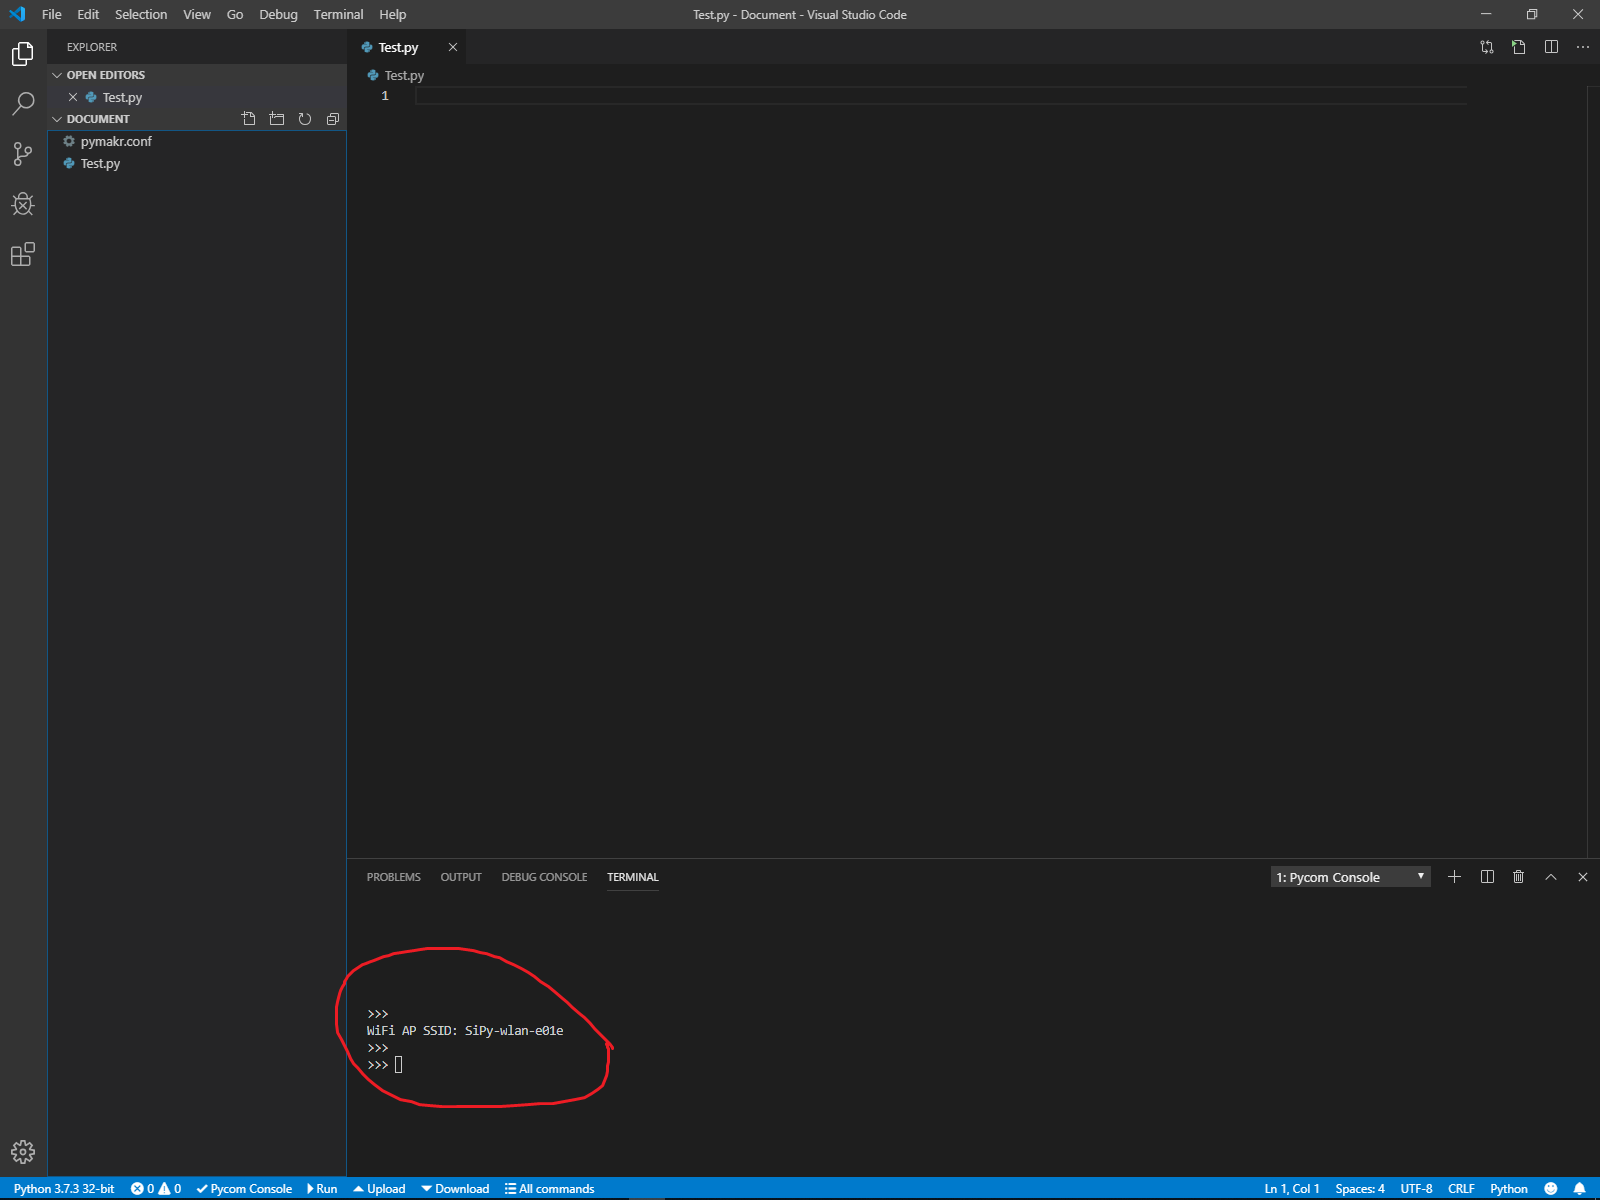
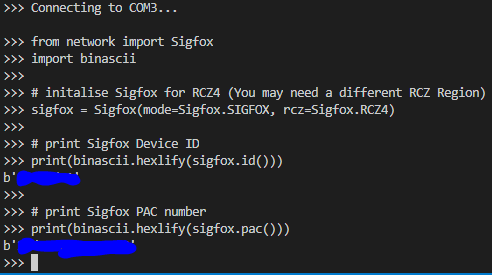
Sigfox 장치 ID 및 PAC 번호를 가져오는 터미널 방법
Visual Studio Code에서 터미널을 불러오려면 Ctrl+~를 누릅니다. 그런 다음 내부에 코드를 붙여넣으면 다음 그림과 같이 표시됩니다.
Sigfox 장치 ID 및 PAC 번호를 가져오는 파일 방법
Ctrl+S를 눌러 새 파일을 저장하거나 파일로 이동하여 저장하고 코드를 파일에 붙여넣고 파일을 저장한 다음 실행 버튼을 눌러 파일을 실행할 수 있습니다. 화면 하단에 표시되며 아래 그림과 같아야 합니다.

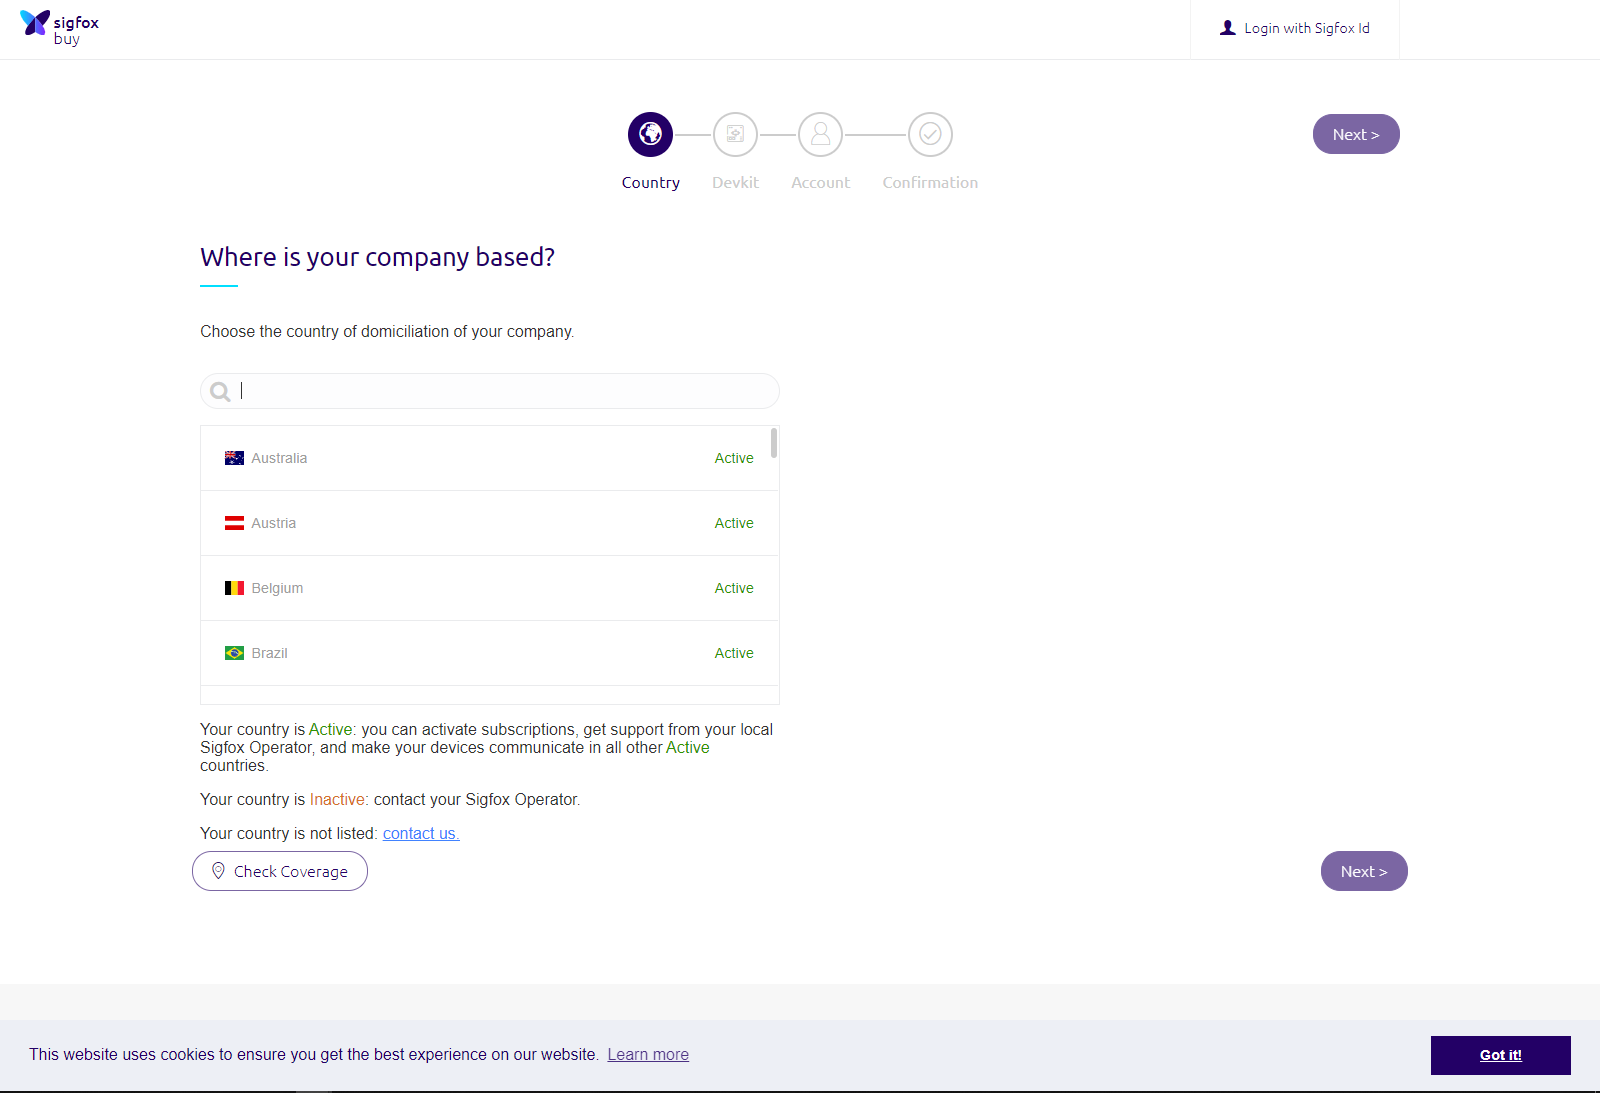
Sigfox 장치 ID와 PAC 번호를 받은 후 Sigfox 백엔드로 전송을 시작하기 전에 Sigfox를 Sigfox 백엔드에 등록해야 합니다. 첫 번째 페이지는 귀하의 sigfox 회사가 위치한 곳입니다. 각 Sigfox Zone이 다르게 구성되어 있으므로 이 Sigfox 장치가 사용될 국가를 선택해야 합니다.
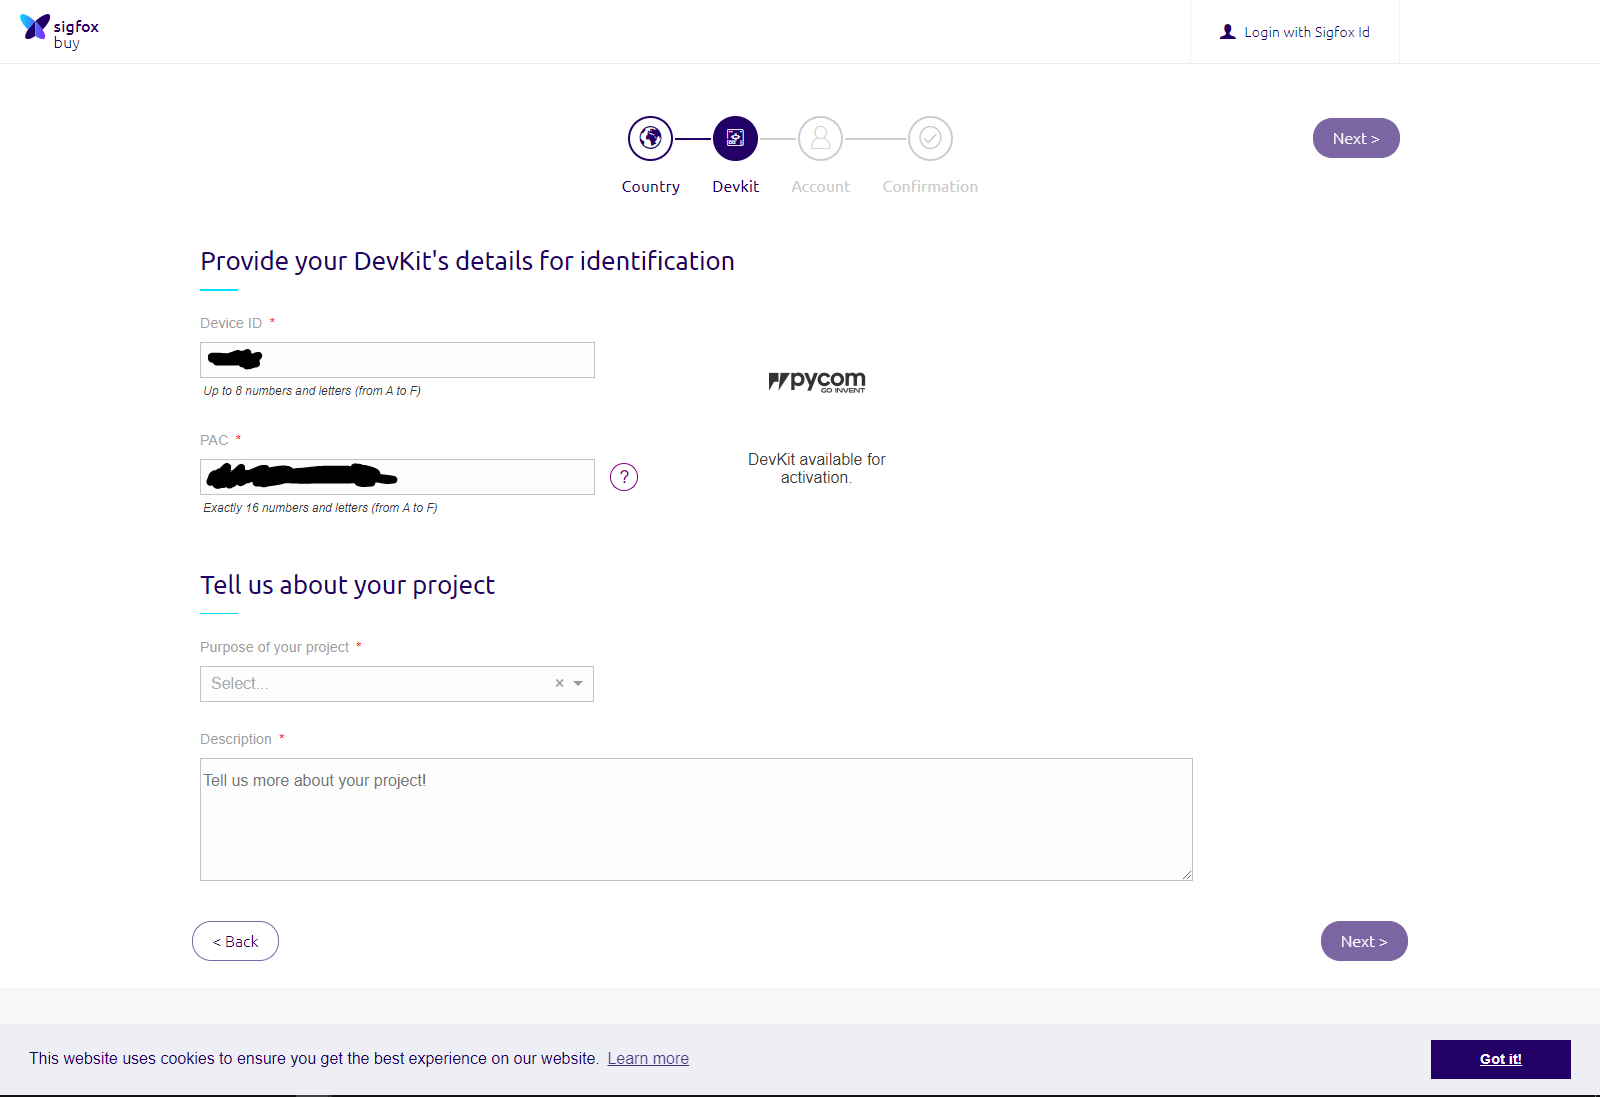
올바른 국가를 선택한 후 다음 페이지에는 이 장의 시작 부분에서 얻은 Sigfox 장치 ID와 PAC 번호가 필요합니다. 올바른 필드에 붙여넣으면 페이지가 그림처럼 보일 것입니다. 나머지는 그에 따라 채워주세요.
장치 페이지, Sigfox 계정 만들기 또는 기존 Sigfox 계정에 로그인한 후 계정에 Sigfox를 등록해야 합니다. 새 Sigfox 계정을 만드는 경우 Sigfox는 등록된 이메일로 이메일을 보내 비밀번호를 설정합니다.

sigfox 백엔드 계정을 설정한 후 이 코드를 실행하여 백엔드에서 데이터를 수신할 수 있는지 확인하기 위해 일부 데이터를 보낼 수 있습니다.
참고**: sigfox 프로그램을 실행하기 전에 먼저 sigfox 안테나를 연결하십시오.
네트워크에서 가져오기 Sigfox
소켓 가져오기
# RCZ*용 Sigfox 초기화(다른 RCZ 지역이 필요할 수 있음)
sigfox =Sigfox(mode=Sigfox .SIGFOX, rcz=Sigfox.RCZ*)
# Sigfox 소켓 생성
s =socket.socket(socket.AF_SIGFOX, socket.SOCK_RAW)
# 소켓을 차단하도록 합니다.
s.setblocking(True)
# 업링크 전용으로 구성합니다.
s.setsockopt(socket.SOL_SIGFOX, socket.SO_RX, False)
# 바이트 전송
s.send(bytes([1, 2, 3, 4, 5, 6, 7, 8, 9, 10, 11, 12]))
참고 :*를 RCZ 지역 번호로 바꿉니다.
6. 클라우드 설정
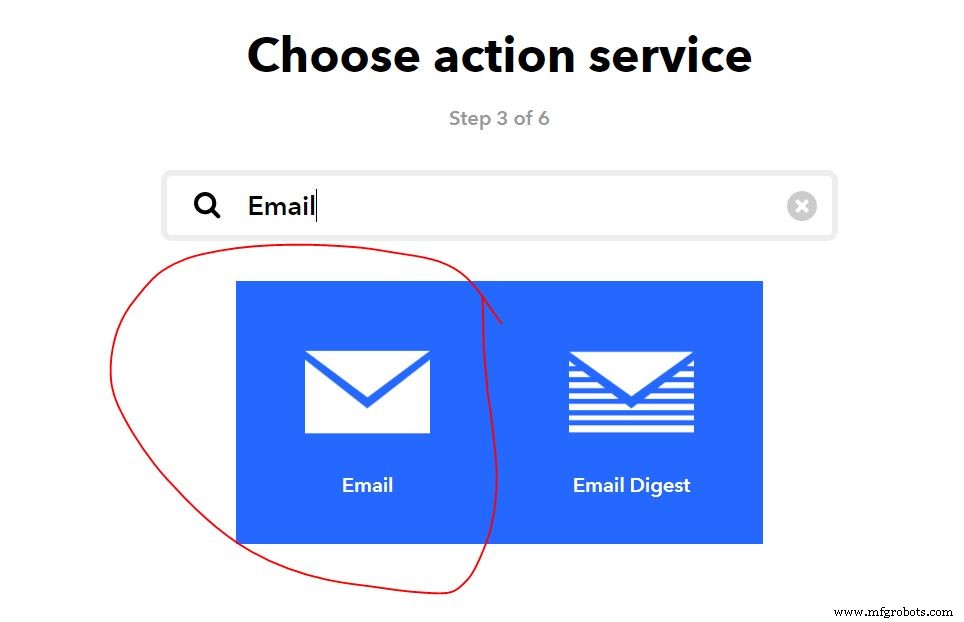
먼저 이메일을 보낼 수 있도록 IFTTT를 설정하고 IFTTT 웹사이트로 이동하여 계정을 만들어야 합니다. After setting up the account and logging in, go to your profile which is located near the top right corner of the screen on the left side of the “Explore” and press on the Create .
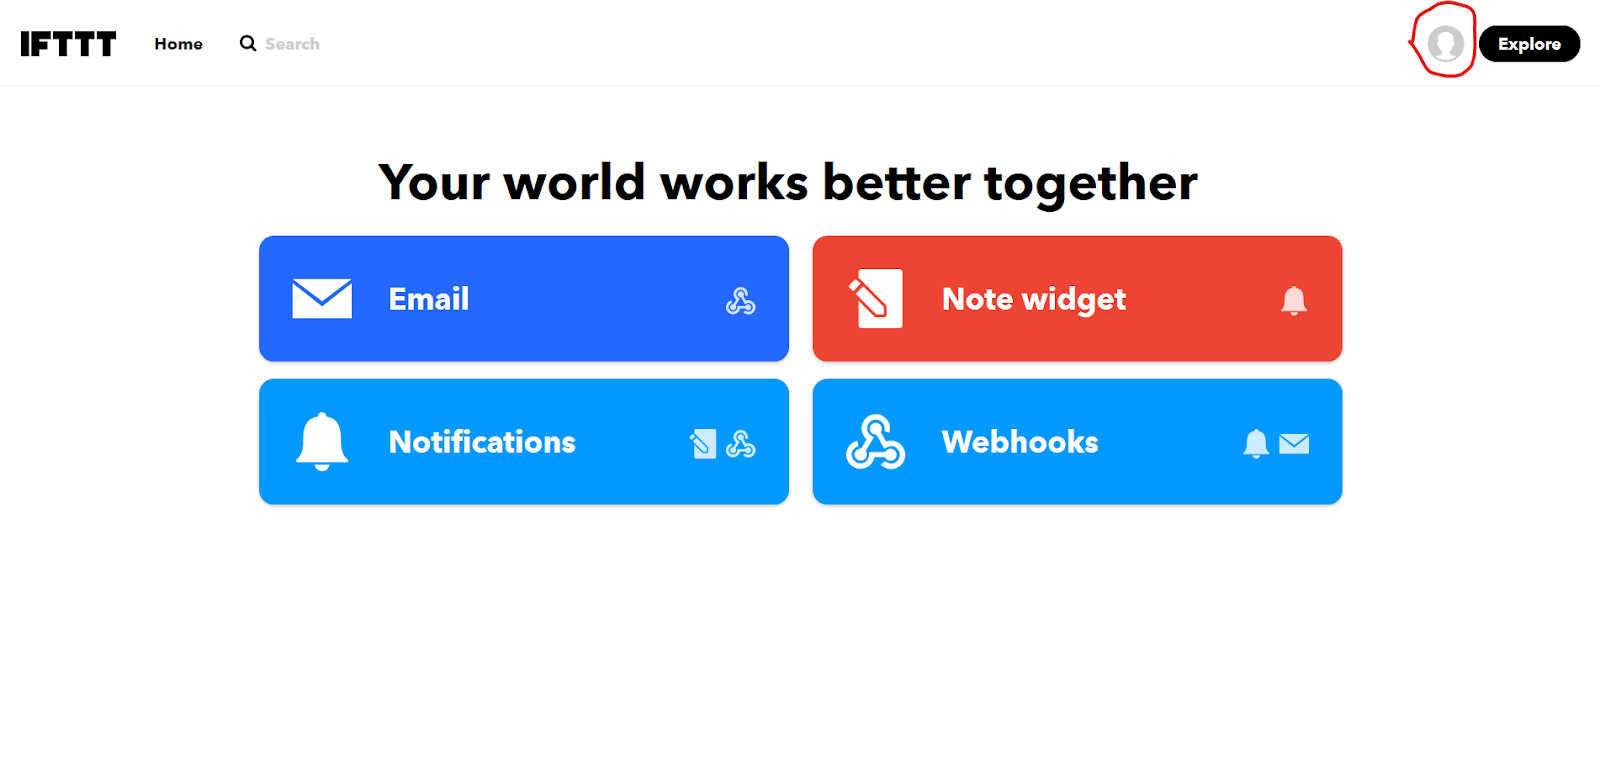
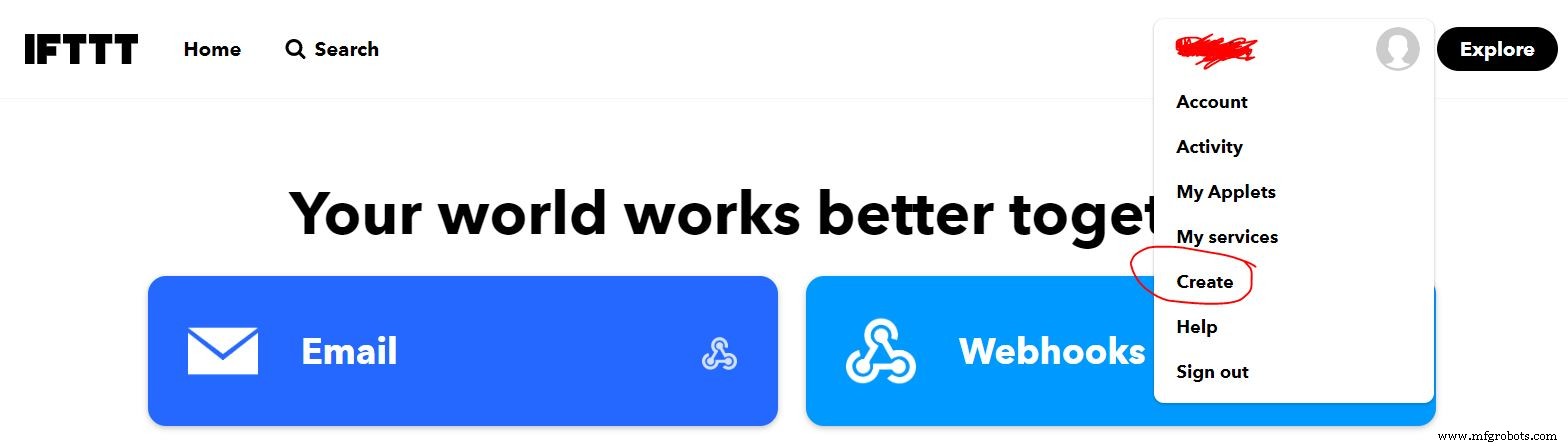
Click "This " and then search for Webhooks and press it. If you are unsure, the following pictures will help you with what to do.

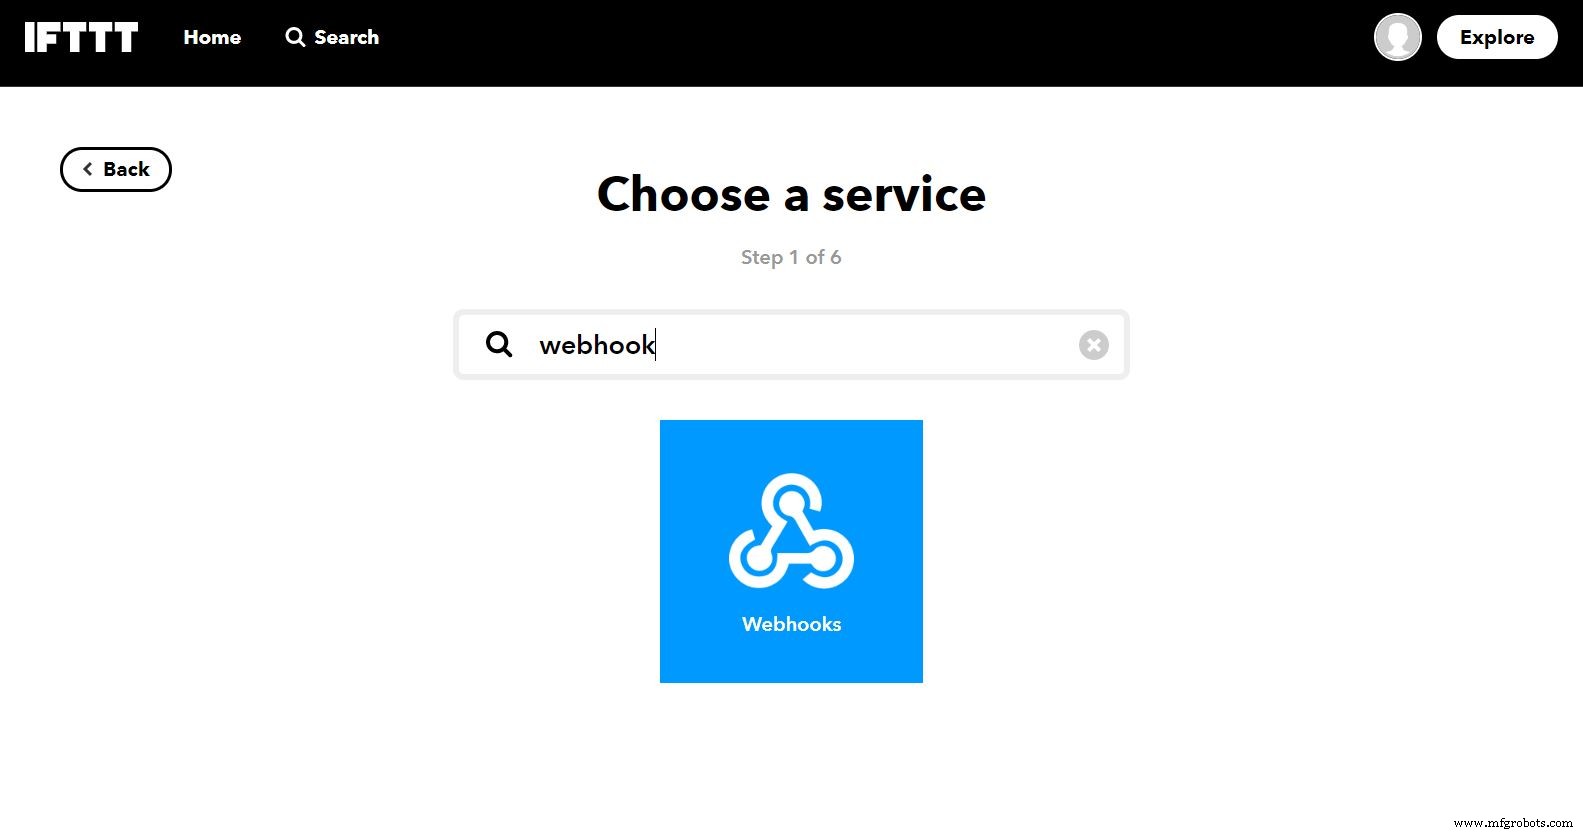
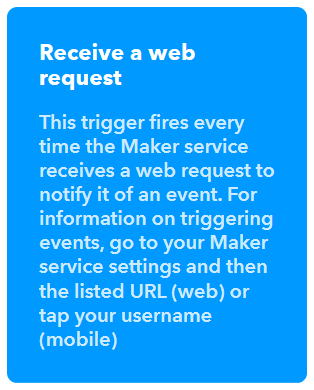
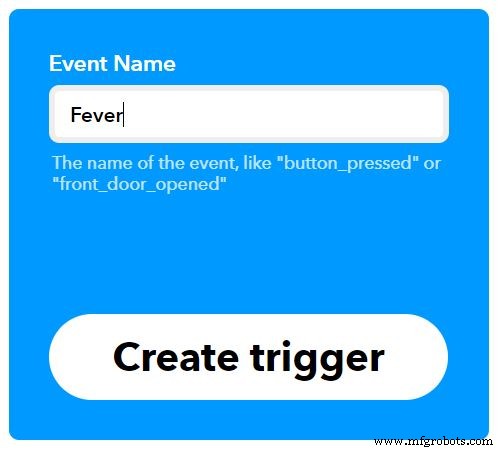
After selecting Webhooks, press the Receive a web request box and enter an event name to fit your requirements (in this example fever is used), afterwards press Create trigger .
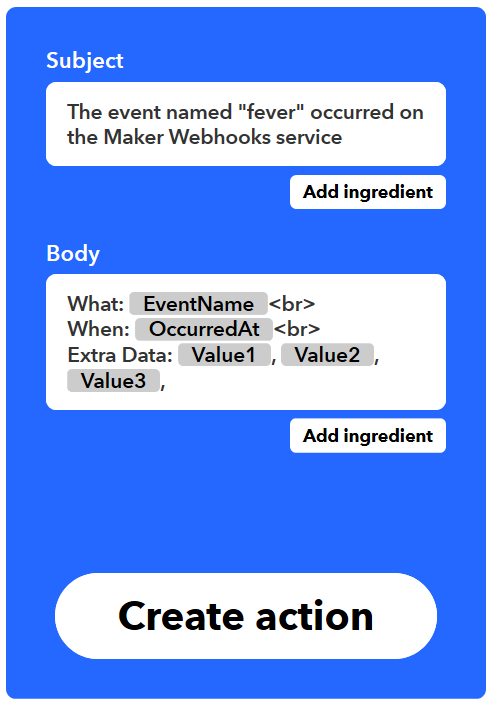
Press the word "That ", type email in the search box and press Email then press Send me an email box

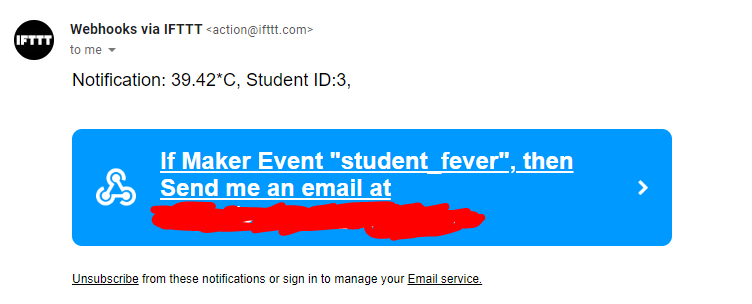
Enter message information. You can pass data about the event that triggered your message by using ingredients. For example, including {{Event Name}} adds the event name to your text message. The Body section must include at least {{Value1}} and {{Value2}}. Click Create action to finish the new applet. Note:Value 1, value 2 and value 3 in body message are derived from MATLAB Analysis and can be modified according to your requirement
ThingSpeak is an IOT (Internet of Things) platform which can be easily setup, learned and is open source.
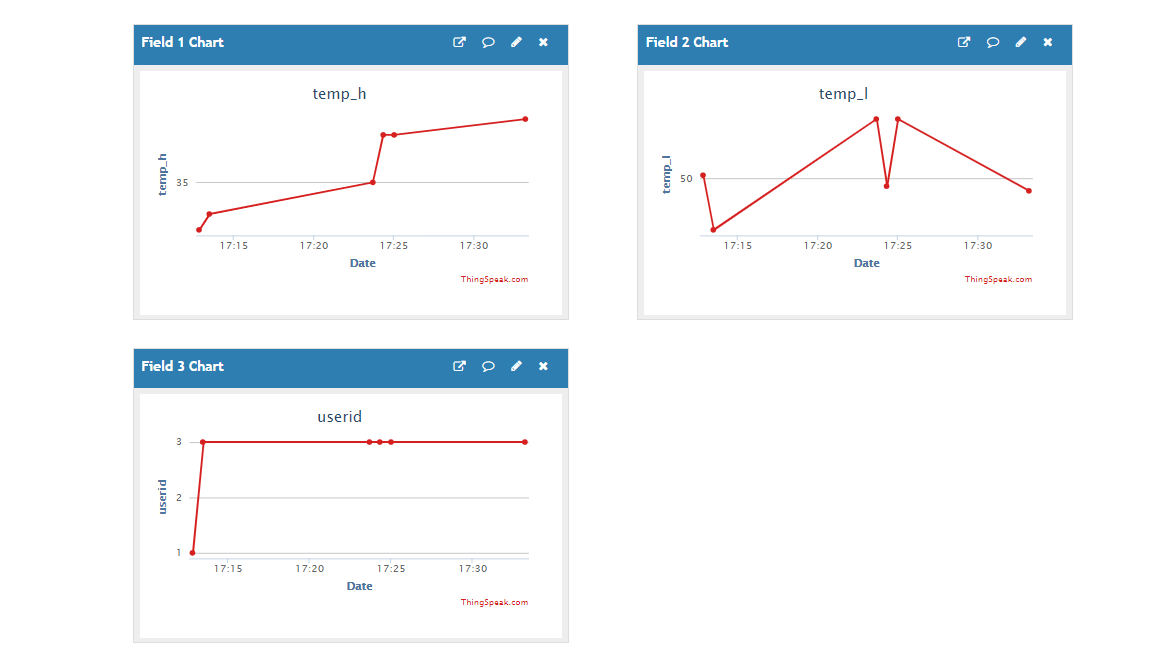
First, we create two channels; (SIGFOX) TEMPERATURE PRIVATE VIEWING &(SIGFOX) TEMPERATURE PUBLIC VIEWING.
For the (SIGFOX) TEMPERATURE PRIVATE VIEWING , its purpose is to obtain data from the Sigfox backend. Sigfox sends up using bytes, this is because, we have realised that Ubidots (a web service) do not really work well with decoding Strings, so to make it work and accessible with both ThingSpeak and Ubidots, we chose to use bytes as it contain numbers from 0-255.
Therefore, using bytes makes it so we have to send both the whole number and the decimal number of the temperature information separately. So, this channel is mainly for keeping these messy values, later transferring to another channel for viewing which is the (SIGFOX) TEMPERATURE PUBLIC VIEWING channel.
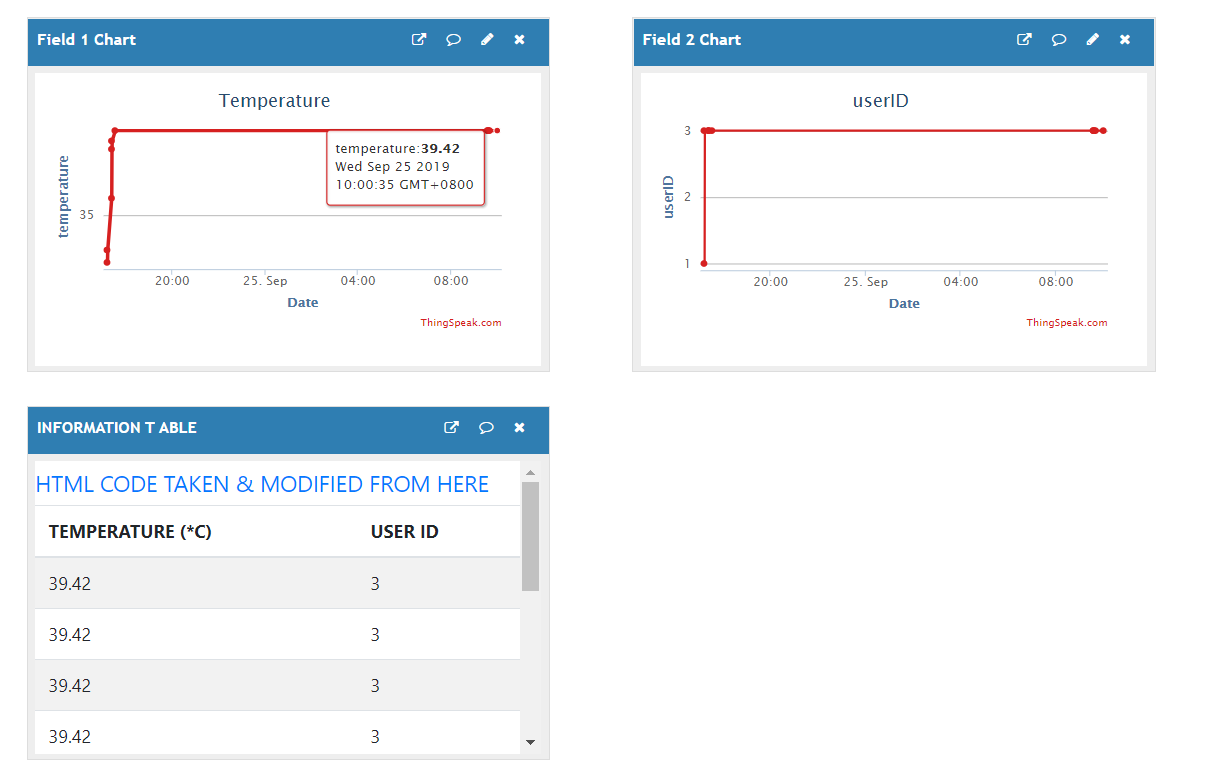
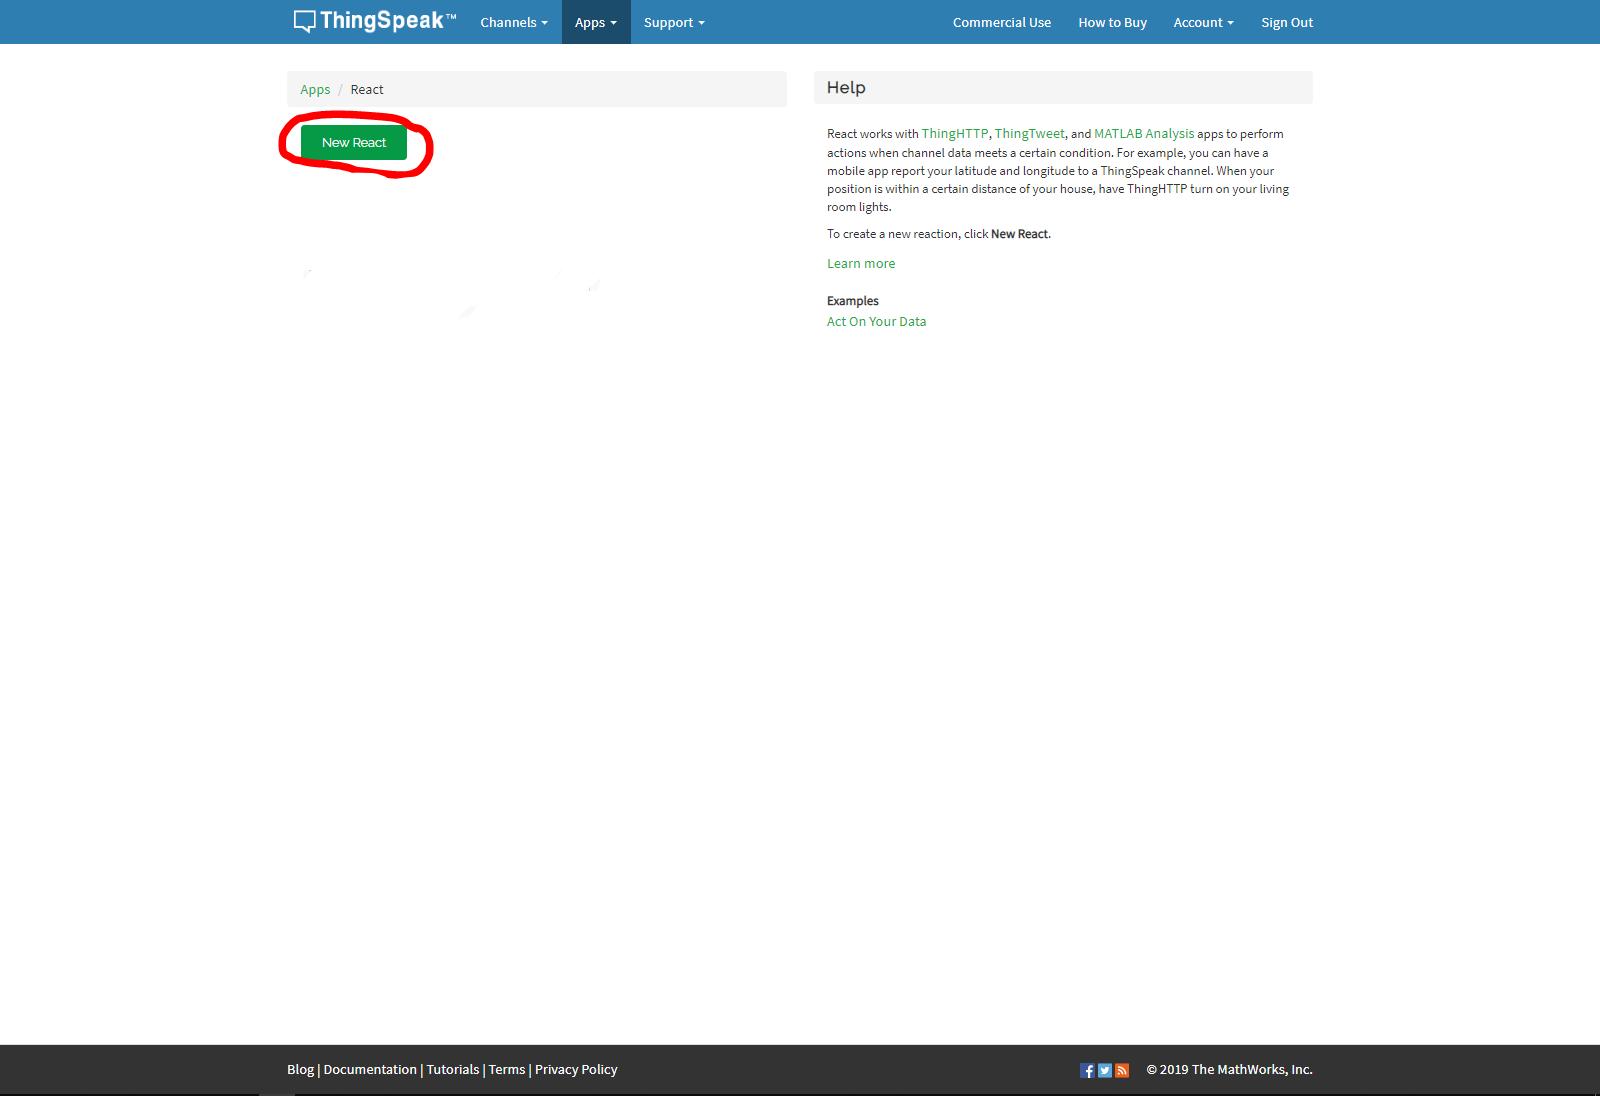
We use MATLAB Analysis to convert the two messy values (whole number &decimal number) into just one combined value and transfer it onto the other channel. At the same time, we also transfer the userID onto the (SIGFOX) TEMPERATURE PUBLIC VIEWING as it's used for viewing. The MATLAB script is triggered on data insertion using a ThingSpeak REACT which will be explained below.
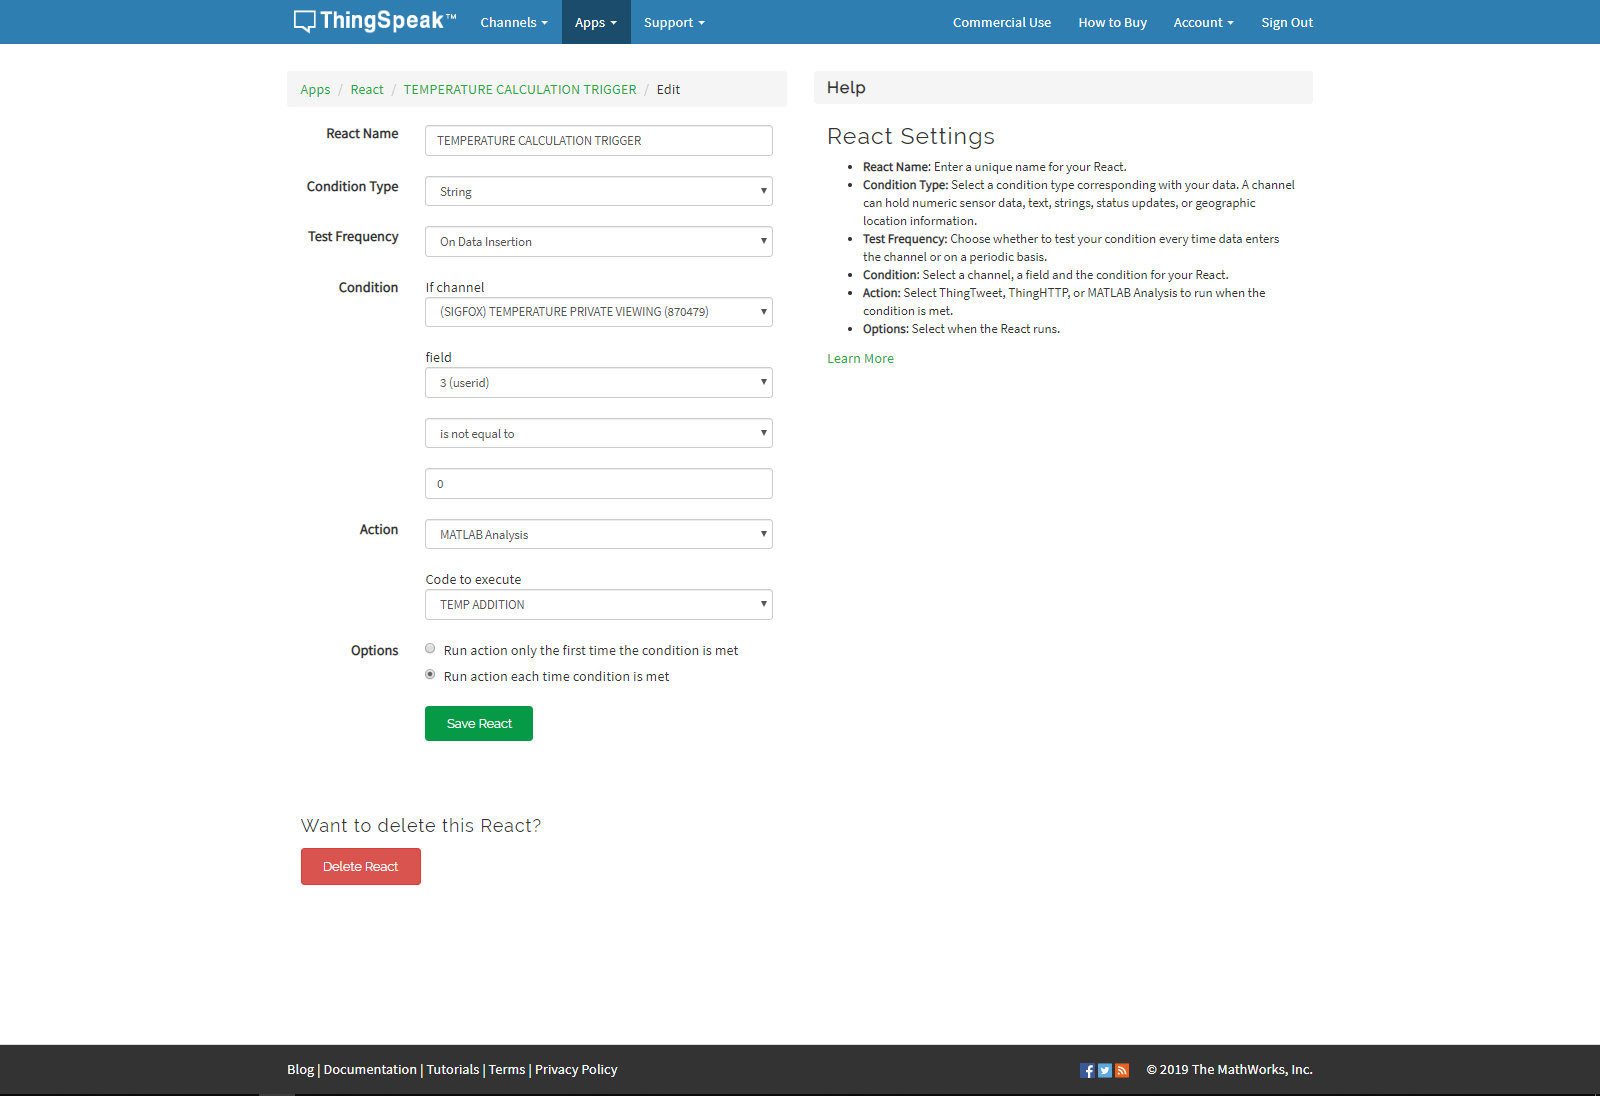
To setup the react, first go to Apps and then select React which will open the reacts tab. Press New React to create a new react for the MATLAB Analysis to be triggered when new data arrives from the Sigfox backend. Set the condition type to string, test frequency to on data insertion, condition to field 3 (which should be your userid) of the (SIGFOX) TEMPERATURE PRIVATE VIEWING when its not equal to 0, action to MATLAB Analysis with the code for calculating the temperature and Options to Run Action only the first time condition is met.

The table code was taken from an open sourced project and modified to suit our needs. It's very useful as the table auto updates every time a new data is sent in, perfect for our usage.
Unfortunately, the MATLAB plugin for the table is only view-able in private view and not in the public view. As it's intended for administrative purposes only, we do not subject this as an issue, it's intended to be only viewed in private view.
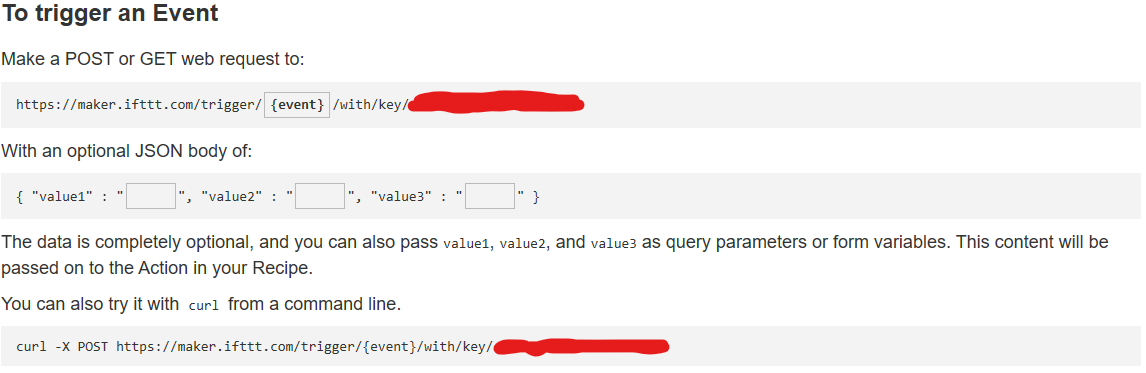
To retrieve Webhooks information, Click on your profile logo near the top right corner of the screen on the left of the “Explore” tab. Select My Services, select Webhooks then click documentation near the top right of the web page, from there you can see your key and format for sending a request. Enter that event name. The event name for this project is fever
https://maker.ifttt.com/trigger/{event}/with/key/(example)
https://maker.ifttt.com/trigger/fever/with/key/(example)
The service can be tested to see if it works or not by pasting the URL(example of the URL are shown above) into your browser or pressing the test button upon creation of the webhooks and email applet
After all that is done, you should be able to receive an email like the following picture, after you have finished setting up the ThingSpeak React.
Contributions
Aden - RaspberryPi + Arduino + its modules + ThingSpeak (MATLAB+ Setup)
Reginald - Sigfox + ThingSpeak Data Collection + Schematics
Bo Sheng - IFTTT Setup
<섹션 클래스="섹션 컨테이너 섹션 축소 가능" id="코드"> 코드
<울> [C] ARDUINO NANO
[PYTHON] RaspberryPi
[MicroPython] Sigfox (Pycom)
[ThingSpeak] MATLAB SCRIPT
[C] ARDUINO NANOArduino
This code is used for checking if there's a RFID card tap, if there is, there will be temperature taking and also handshaking between the Raspberry Pi to send data over like the card's ID, temperature and ready/standby signal and more.
It also uses LCD to show informative information.
If you're interested in knowing more, please read the section on "HOW IT WORKS:RaspberryPi &Arduino"/*90% is coded from scratch by Aden,http://www.astero.methe other 10% consists of open sourced libraries(Credits found below) used, like the RFID &temperature module.*//* * Initial Author:ryand1011 (https://github.com/ryand1011) * * Reads data written by a program such as "rfid_write_personal_data.ino" * * See:https://github.com/miguelbalboa/rfid/tree/master/examples/rfid_write_personal_data * * Uses MIFARE RFID card using RFID-RC522 reader * Uses MFRC522 - Library * ----------------------------------------------------------------------------------------- * MFRC522 Arduino Arduino Arduino Arduino Arduino * Reader/PCD Uno/101 Mega Nano v3 Leonardo/Micro Pro Micro * Signal Pin Pin Pin Pin Pin Pin * ----------------------------------------------------------------------------------------- * RST/Reset RST 9 5 D9 RESET/ICSP-5 RST * SPI SS SDA(SS) 10 53 D10 10 10 * SPI MOSI MOSI 11 / ICSP-4 51 D11 ICSP-4 16 * SPI MISO MISO 12 / ICSP-1 50 D12 ICSP-1 14 * SPI SCK SCK 13 / ICSP-3 52 D13 ICSP-3 15*//***************** This is a library example for the MLX90614 Temp Sensor Designed specifically to work with the MLX90614 sensors in the adafruit shop ----> https://www.adafruit.com/products/1748 ----> https://www.adafruit.com/products/1749 These sensors use I2C to communicate, 2 pins are required to interface Adafruit invests time and resources providing this open source code, please support Adafruit and open-source hardware by purchasing products from Adafruit! Written by Limor Fried/Ladyada for Adafruit Industries. BSD license, all text above must be included in any redistribution ******************/ // INCLUDE NECESSARY HEADER FILES #include #include #include #include #include #include // DEFINITION OF PINS#define RST_PIN 9 // Configurable, see typical pin layout above#define SS_PIN 10 // Configurable, see typical pin layout above#define BUZZER_PIN 7 //Pin define for Buzzer#define LED_PIN 6 //Pin define for LED #define dist_sensePin A0MFRC522 mfrc522(SS_PIN, RST_PIN); // Create MFRC522 instance.LiquidCrystal_I2C lcd(0x27,16,2); // Calls the LiquidCrystal class and creats an instance for the LCD.// set the LCD address to 0x27 with 16 chars and 2 line displayAdafruit_MLX90614 mlx =Adafruit_MLX90614(); // Calls the Adafruit MLX90614 instance.SoftwareSerial unoSerial(2, 3); // RX, TX // Calls the SoftwareSerial instance (for Pycom communication)// GLOBAL VARIABLESboolean tapped =true; boolean confirmation =false;String GetUID(){ String card_UID=""; String card_UID_no_space =""; for (byte i =0; i 200)) // Check if there is actually a valid user infront of the machine. If no, it'll keep looping what's under. { dist_senseValue =analogRead(dist_sensePin); // Keep checking until there's a person that comes in the distance sensor's range. lcd.setCursor(0,0); lcd.print("Please take"); lcd.setCursor(0,1); lcd.print("your temperature."); // Prompt the user to take their temperature by standing infront of the machine. } digitalWrite(BUZZER_PIN, 1); digitalWrite(LED_PIN, 1); lcd.clear(); // Turns on the Buzzer and LED, at the same time, clear the LCD too. meas_temp =(float)mlx.readObjectTempC(); temp_Hbyte =floor(meas_temp); temp_Lbyte =(meas_temp - temp_Hbyte) * 100; sMeasTemp +=userID; sMeasTemp +=","; sMeasTemp +=temp_Hbyte; sMeasTemp +=","; sMeasTemp +=temp_Lbyte; // Collect the temperature data that is taken. Serial.println("TEMP"); Serial.println(meas_temp); // Transfer the temperature data through Serial Communication to the RaspberryPi. if((meas_temp>
=28) &&(meas_temp <=42)) // Check if it's a valid temperature. unoSerial.print(sMeasTemp); // If it is, send to the sigfox module for cloud storage. lcd.setCursor(0,0); lcd.print("Temperature:"); lcd.setCursor(0,1); lcd.print(" " + String(meas_temp)); // Shows the temperature of the user through the LCD screen. } else // If it's an invalid user, { lcd.setCursor(0,0); lcd.print("Error!"); lcd.setCursor(0,1); lcd.print("Invalid User."); // Tells the user that he's not a valid user and he is unable to proceed to the temperature taking phase. } rawData =Serial.readString(); commaPos =rawData.indexOf(','); userInitial =rawData.substring(0, commaPos); // Above reads the incoming rawData again and converts into a userInitial variable. if(userInitial =="0") // If the user initial sent back is 0, it means that it's an invalid temperature because the RaspberryPi is unable to process it. { lcd.clear(); lcd.setCursor(0,0); lcd.print("Error!"); lcd.setCursor(0,1); lcd.print("Invalid Temperature."); // Prompts the user it's an invalid temperature range. } Serial.println("STANDBY"); // Sends Serial that the Arduino is still processing data. 지연(1000); // Delay for 1 second. mfrc522.PICC_HaltA(); mfrc522.PCD_StopCrypto1(); } }
[PYTHON] RaspberryPiPython
This code is mainly used for updating the MySQL database and also to handshake with the Arduino via Serial Communication. It plays a vital role with the Arduino in this project
If you're interested in knowing more, please read the section on "HOW IT WORKS:RaspberryPi &Arduino".'''Coded from scratch by Aden; for the Hackster.io Sigfox competition.http://www.astero.me'''# IMPORTSimport mysql.connectorimport serialimport osimport time# METHODSdef queryConnection():cursor =conn.cursor(buffered=True) cursor.execute("USE `" + databaseName + "`") # Use the userInfo database, return cursor # DATABASE INFORMATIONhost ="localhost"user ="root"password ="password"databaseName ="smartTemp"conn =mysql.connector.connect(host=host, user=user,passwd=password)# Serial CommunicationcomPort ='ttyUSB0'baudRate =9600ser =serial.Serial('/dev/' + comPort, baudRate, timeout=0) # Set the timeout as 0 so if it doesn't read a serial, it skips.print("Confirming USB Serial Port now, please wait") connected =False# Below, is to ensure that the RaPi receives the correct COM port of the Arduino board.for x in range(2):time.sleep(2) ser.write("RAPI") # Basically, here, we're writing to the Arduino to confirm communication. if connected ==False:serialConfirmation =ser.readline().strip() =="ARDUINO" # Check if the RaPi is reading the correct COM port, whether it can read the Arduino's serial communications. print(serialConfirmation) if(serialConfirmation ==False):comPort ='ttyUSB1' connected =True else:comPort ='ttyUSB0' connected =True print(comPort) ser =serial.Serial('/dev/' + comPort, baudRate) # Re-initiates this variable again, this time without a Serial Communication timeout. Meaning, it'll try to communicate with the Arduino w/o a timeout. print("COM PORT confirmed, using " + comPort) # Print to let you know which PORT the Arduino is on.# File CreationcountFile =open("count.txt", "a++") # Creates a count file if it doesn't exist.# GLOBAL VARIABLEStapRFID =Falsecursor =queryConnection()if(os.stat("count.txt").st_size ==0):# Checks if the count.txt is empty. print("Count has not been set, setting to 1 now.") count =1else:for countNumber in countFile:count =int(countNumber) # Set the count to the last counted count. print("Count has been restored from previous session:" + str(count)) try:# Tries to create the database if it doesn't already exists. print("Creating " + databaseName + " database now..") cursor.execute("CREATE DATABASE " + databaseName) # Create a database. print("Database has been sucessfully created.") except(mysql.connector.errors.DatabaseError):# If the database already exists, it excepts here. print(databaseName + " database is already created.") # If that database is found, run this block of code instead.cursor.execute("CREATE TABLE IF NOT EXISTS `userInfo` (id int, cardID VARCHAR(9), userID VARCHAR(4), userInitial VARCHAR(8))") # Create a userInfo table if it doesn't exist.cursor.execute("CREATE TABLE IF NOT EXISTS `tempData` (id int, userID VARCHAR(4), dateMeas date, timeMeas time, tempMeasure decimal(5,2))") # Create a tempData table if it doesn't exist.while True:# Endless loop. cursor =queryConnection() # Re-establishes the query connection using the queryConnection() method. cardID =str(ser.readline().strip()) # Reads the serial line and converts it to a String, stripping any empty spaces. cursor.execute("SELECT * FROM userInfo WHERE cardID ='" + cardID + "'") # Select the userInfo table with the inputted cardID from the Arduino. items =cursor.fetchone() # Fetch one line of the table. if(items !=None):# If it's able to fetch (valid user) print(cardID) # Print out the cardID that it's currently fetching. userID =str(items[2]) # Gets the userID from the fetched line. userDetails =str(items[3] + ", " + items[2]) # Get the userDetails from the fetched line. # Get the currentDate ¤tTime. currentDate =str(time.strftime("%Y-%m-%d %H:%M:%S", time.gmtime()))[0:10] currentTime =str(time.strftime("%Y-%m-%d %H:%M:%S", time.gmtime()))[11:] print(items) # Print the whole item array that was fetched. (for debugging) ser.write(b'' + userDetails) # Serial communication to the Arudino. countFile.close() # Closes the count file. countFile =open("count.txt", 'w') # Makes it so it overwrites the count file with the new saved count below. tempSignal =False while(tempSignal ==False):# Keeps looping until it gets the temperature reading from the Arduino. print("Getting Temperature") tempSignal =ser.readline().strip() =="TEMP" # Read the Arudino incoming serial. tempData =float(ser.readline().strip()) # Read the Arduino incoming serial of the temperature data. print(tempData) # Prints the retrieved temperature data from the Arduino. if(tempData>=28 and tempData <=42):# Check if the temperature is of a valid range. cursor.execute("INSERT INTO `tempData`(`id`, `userID`, `dateMeas`, `timeMeas`, `tempMeasure`) VALUES (" + str(count) + ",'" + userID + "','" + currentDate + "','" + currentTime + "','" + str(tempData) + "')") # Write into the database the necessary information. conn.commit() # Commit the INSERT changes into the database. count =count + 1 # Ups the count. countFile.write(str(count)) # Update the count file with the new count. else:# If it's not a valid temperature. ser.write(b'' + "0, 0") # Serial Communication to the Arduino informing that it's invalid temperature. else:# If it's not a valid user. ser.write(b'' + ", 0") # Serial Communication to the Arduino informing that no valid cardID is found. print("Nothing found") readySignal =ser.readline().strip() =="STANDBY" # Waits for the Arduino to tell that it's ready to do it again, to read/validate data. while(readySignal ==True):# If the Arduino is ready, loop until we're able to tell him back that we're also ready for another session. ser.write(b'' + "READY") # Serial communication basically to say we're ready too. print("sending") receivedSignal =ser.readline().strip() =="RECEIVED" if(receivedSignal ==True):readySignal =False print("received") cursor.close() # Close the query connection to prevent memory leaks. conn.close() # Closes the connection to the MySQL. [MicroPython] Sigfox (Pycom)Python
This code is mainly used to read the serial communication from the Arduino and upload the received values to the Sigfox backend
If you're interested in knowing more, please read the section on "HOW IT WORKS:Sigfox (Pycom)"'''100% is coded by Reginald,'''from machine import UART # Tx and Rx (``P3`` and ``P4``)from network import Sigfox # Import the sigfox library from the pycom controllerimport binascii # Import the Binary to ASCII library for converting from Binary (1,0) to ASCII (readable characters)import socket # Import socket module to enable socket connection for Sigfoximport time # Import time that can be used for delaysimport pycom # Import pycom module that contains fucntions that controls the pycom deviceimport sys # Import sys module to enable exit from the pycom running programpycom.heartbeat(False)#init Sigfox for RCZ4 (Asia)sigfox =Sigfox(mode=Sigfox.SIGFOX,rcz=Sigfox.RCZ4)uart1 =UART(1, baudrate=9600) # To set the serial communcation parametersuart1.init(9600,bits=8,parity=None, stop=1, pins =('P3', 'P4'), timeout_chars=20) # To set the serial communcation parameterswhile True:try:recv=uart1.readline() # It always reads the serial communcation for any messages if recv !=None:'''If there is a message recieved from the serial communcation, it will procced to establish the sigfox connection and process the message for sending''' #print Sigfox DeviceID print(binascii.hexlify(sigfox.id())) # print Sigfox PAC number print(binascii.hexlify(sigfox.pac())) #create Sigfox socket sk1 =socket.socket(socket.AF_SIGFOX, socket.SOCK_RAW) #make thesocket blocking sk1.setblocking(False) #configure as uplink only sk1.setsockopt(socket.SOL_SIGFOX, socket.SO_RX, False) dataList =recv.decode("utf-8") #decode the received message print("dataList :%s" %(dataList)) split_val =dataList.split(",") #split the listing based on commas # eg. if receive message is 8,35,60 -> userID =8, temperature =35.60 degree celsius userID =int(split_val[0]) # assign the 1st element in the listing to userID. temp_H =int(split_val[1]) # assign the 2nd element in the listing to the whole number of the temperature. temp_L =int(split_val[2]) # assign the 3rd element in the listing to the decimal numner of the temperature. print("userID :%d temp_H :%d temp_L :%d" % (userID, temp_H, temp_L)) bData =[userID,temp_H,temp_L] # create a list print(bData) meas_temp =temp_H + (temp_L*0.01) # merge temperature values print("measure temperature :%.2f" %(meas_temp)) sk1.send(bytes(bData)) #cast the data list to bytes and send to Sigfox backend. sk1.close() #close Sigfox socket connection. time.sleep(5) #delay for 5 seconds. except KeyboardInterrupt:sys.exit() [ThingSpeak] MATLAB SCRIPTMATLAB
This script focuses on combining the raw data that is sent up by the Sigfox to ThingSpeak and put them together into a presentable visual state, allowing users to properly visualize the information. It also works alongside with IFTTT by triggering a webhook URL when it reaches a fever temperature, alerting user(s) via Email.
If you're interested in learning more about this code, please read the section on "HOW IT WORKS:ThingSpeak".%% Made from scratch by Aden; for the Hackster.io Sigfox Competition.%% http://www.astero.mereadChannelID =870479; %% Channel to read.webhookTrigger ='https://maker.ifttt.com/trigger/student_fever/with/key/h10MdSGwjSPtZQ43wH-AgoiKI0pwaljBNnGUEu4Yecn';readAPIKey ='QGHINBPNJQKULBH2'; %% Channel read API Key.writeChannelID =870482; %% Channel to write.writeAPIKey ='R6NJIM8NT5A42R9N'; %% Channel write API Key.wholeNumber =thingSpeakRead(readChannelID, 'ReadKey', readAPIKey, 'Fields', 1); %% Read the value from field 1 and save it to a variable.decimalNumber =thingSpeakRead(readChannelID, 'ReadKey', readAPIKey, 'Fields', 2)/100;%% Read the value from field 2 and save it to a variable.userID =thingSpeakRead(readChannelID, 'ReadKey', readAPIKey, 'Fields', 3);%% Read the value from field 3 and save it to a variable.display(wholeNumber, 'BEFORE') %% Display value for debugging.analyzedData =wholeNumber + decimalNumber; %% Converting the two into one whole number instead of two separate values.display(analyzedData, 'AFTER')display(userID, 'USERID')%%thingSpeakWrite(writeChannelID, analyzedData, 'Fields', 1, 'WriteKey', writeAPIKey);thingSpeakWrite(writeChannelID,'Fields',[1,2],'Values',{analyzedData,userID},'WriteKey', writeAPIKey)if(analyzedData>=38) %% Check if fever temperature. webwrite(webhookTrigger,'value1',analyzedData,'value2',userID); %% If yes, trigger the webhook and send an email of the values.end 회로도
How everything is connected together 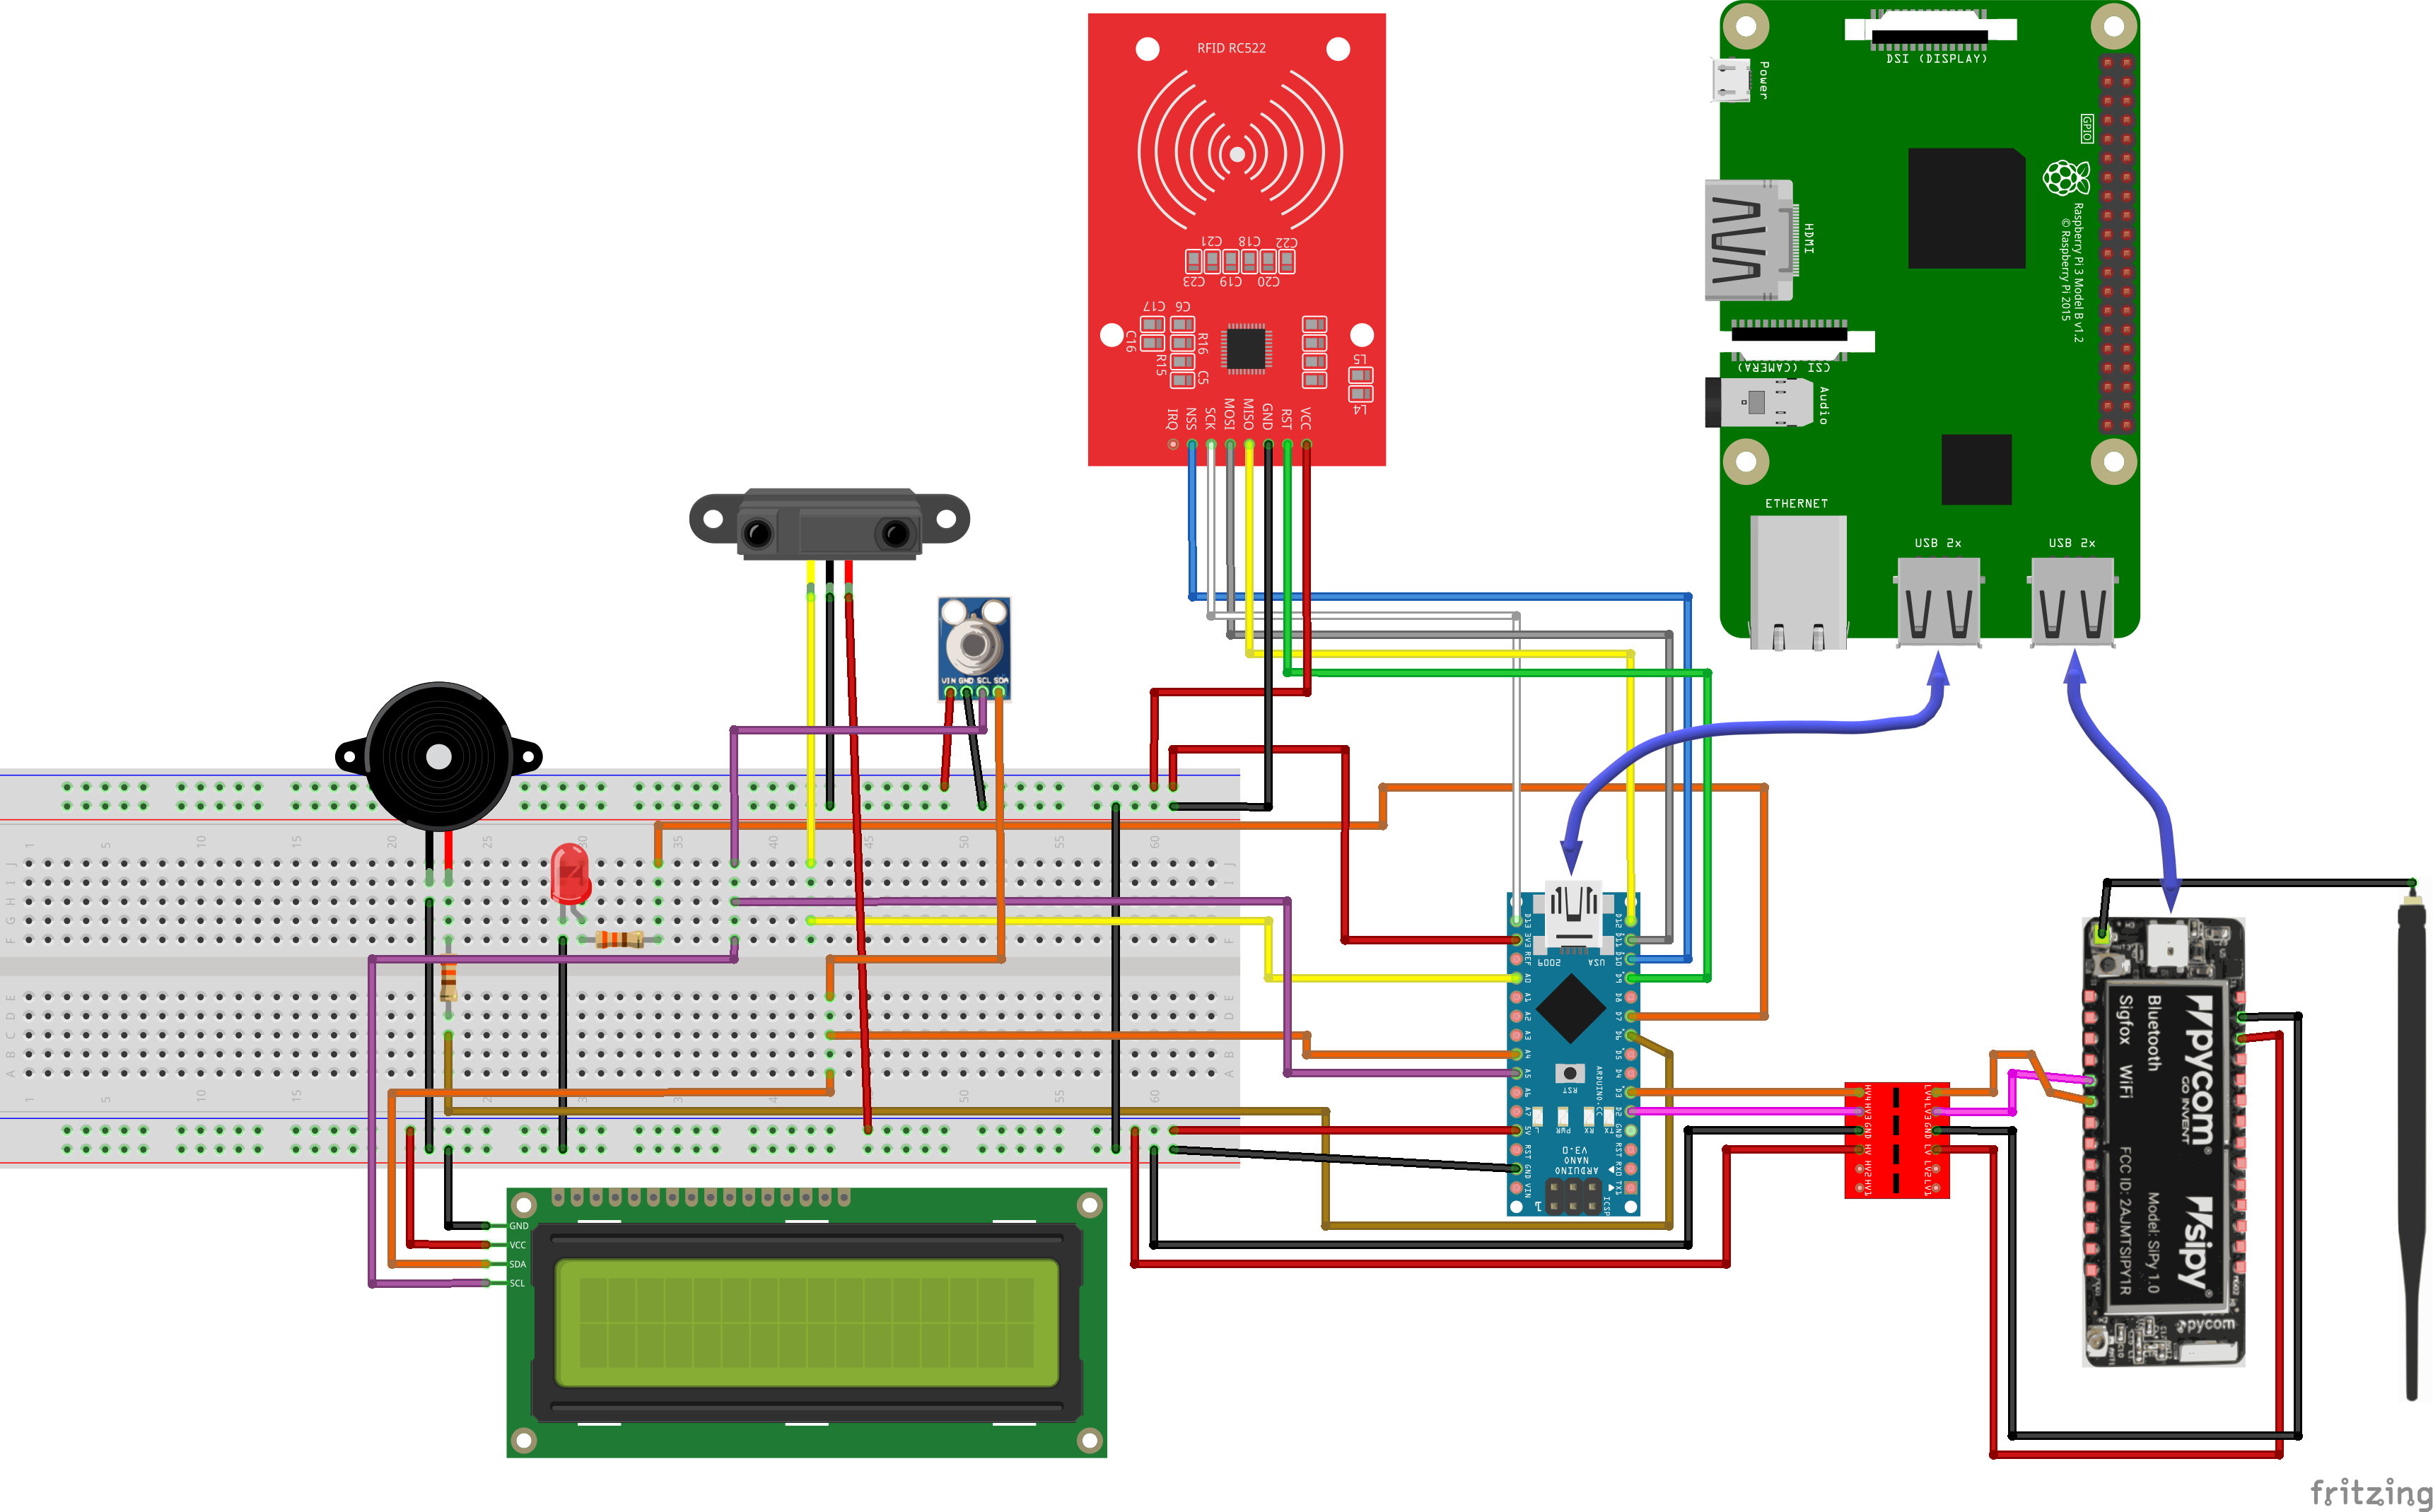 Connections for Distance Sensor for Arduino
 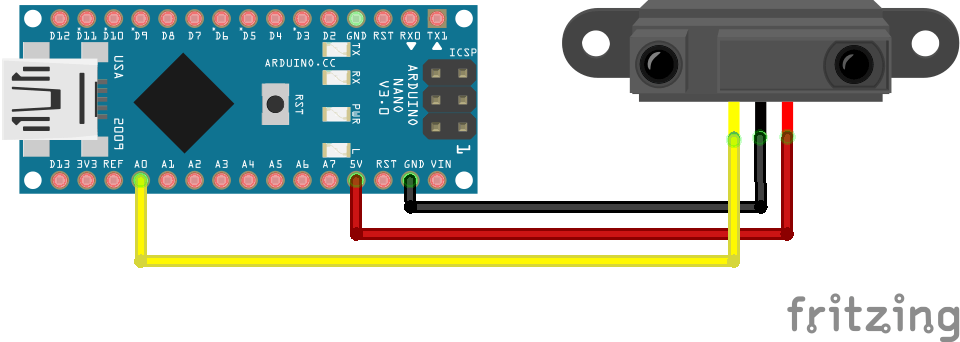 Connections for Temperature Sensor
 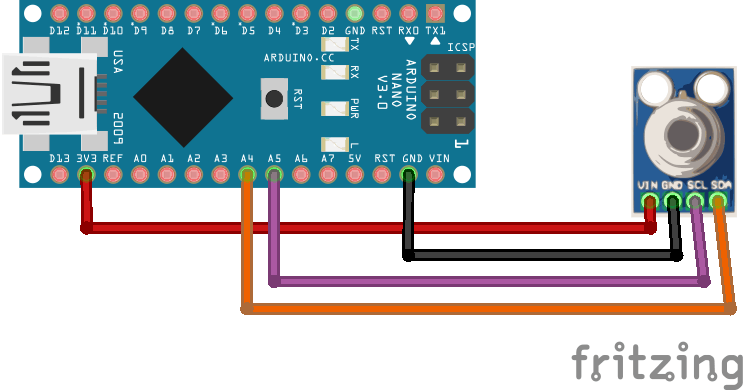 Connections for LED for Arduino
 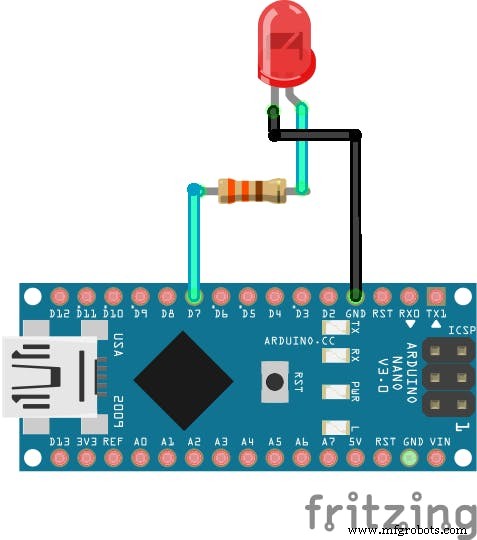 Connections for RFID for Arduino
 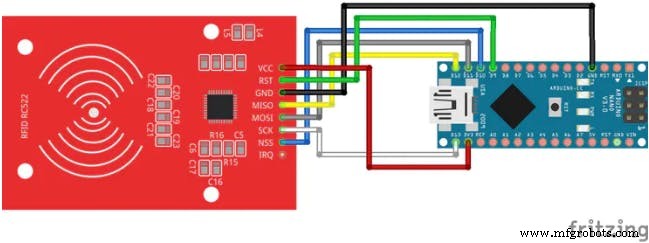 Connections for LCD for Arduino
 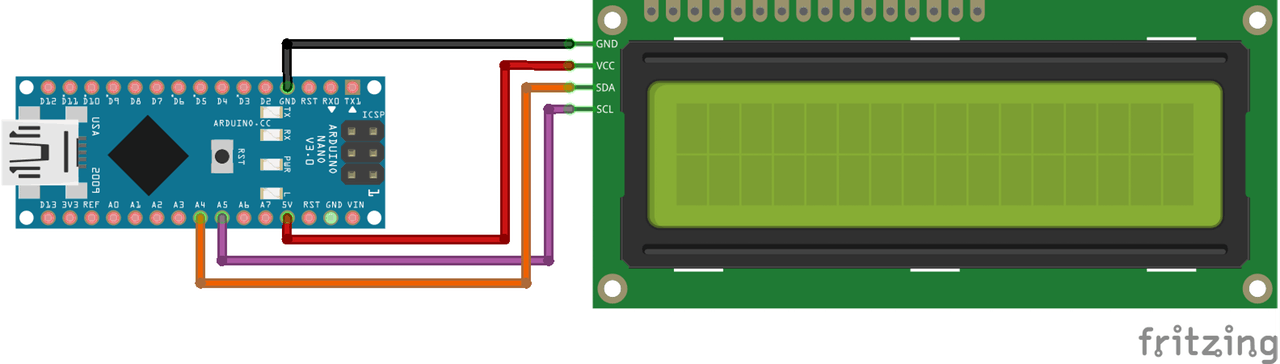 Connections for Buzzer for Arduino
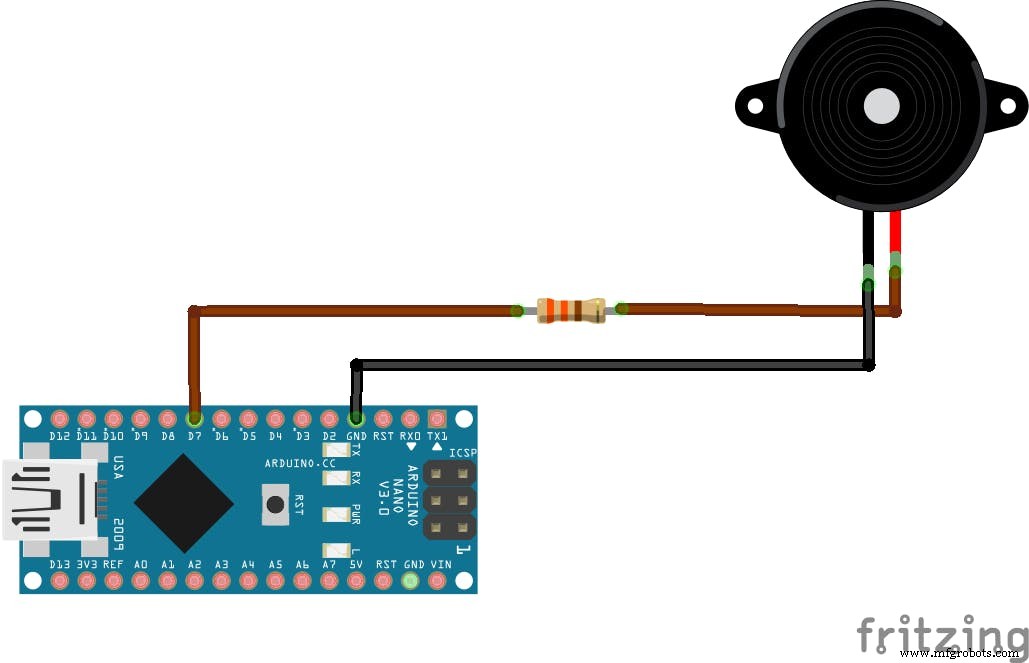
제조공정
-
Arduino IDE용 어두운 테마
구성품 및 소모품 Arduino UNO × 1 앱 및 온라인 서비스 Arduino IDE 이 프로젝트 정보 이 튜토리얼에서는 Arduino IDE에 어두운 테마를 설치하는 방법을 보여 드리겠습니다. 컴퓨터의 화면 빛에 과다 노출되기 때문에 어두운 테마는 눈 손상의 위험을 줄입니다. 배경이 어두워야 하는 이유는 무엇입니까? 흰색 화면을 오래 보는 것은 눈에 좋지 않습니다. 우리의 눈은 피로해지며, 이로 인해 주의가 산만해집니다. 이 변경으로 보다 효율적
-
수질 모니터링 시스템
구성품 및 소모품 Arduino UNO × 1 A7 GPRS/GPS 모듈 × 1 수질 센서 × 1 필요한 도구 및 기계 납땜 인두(일반) 앱 및 온라인 서비스 Microsoft Azure Arduino IDE 이 프로젝트 정보 소개 2016년 9월, 오염된 물이 공장으로 유입되어 정수장을 폐쇄해야 했습니다. 상수도 회사는 오염원을 정확히 찾아낼 수 없었고 이로 인해 심각한