

제조공정

산업 제조
 |
| × | 1 | |||
| × | 1 | ||||
 |
| × | 1 |
소개
이 프로젝트의 아이디어는 실제로 재미와 지식의 필요성에서 태어났습니다. 이 프로젝트는 만들기 쉽고 많은 응용 프로그램이 있습니다. 예를 들어 일부 하드웨어 변수를 제어, 저장 및 표시하는 데 사용할 수 있습니다.
시작하겠습니다
먼저 LCD를 연결해야 합니다. (저는 I2C 변환기를 사용했습니다) :
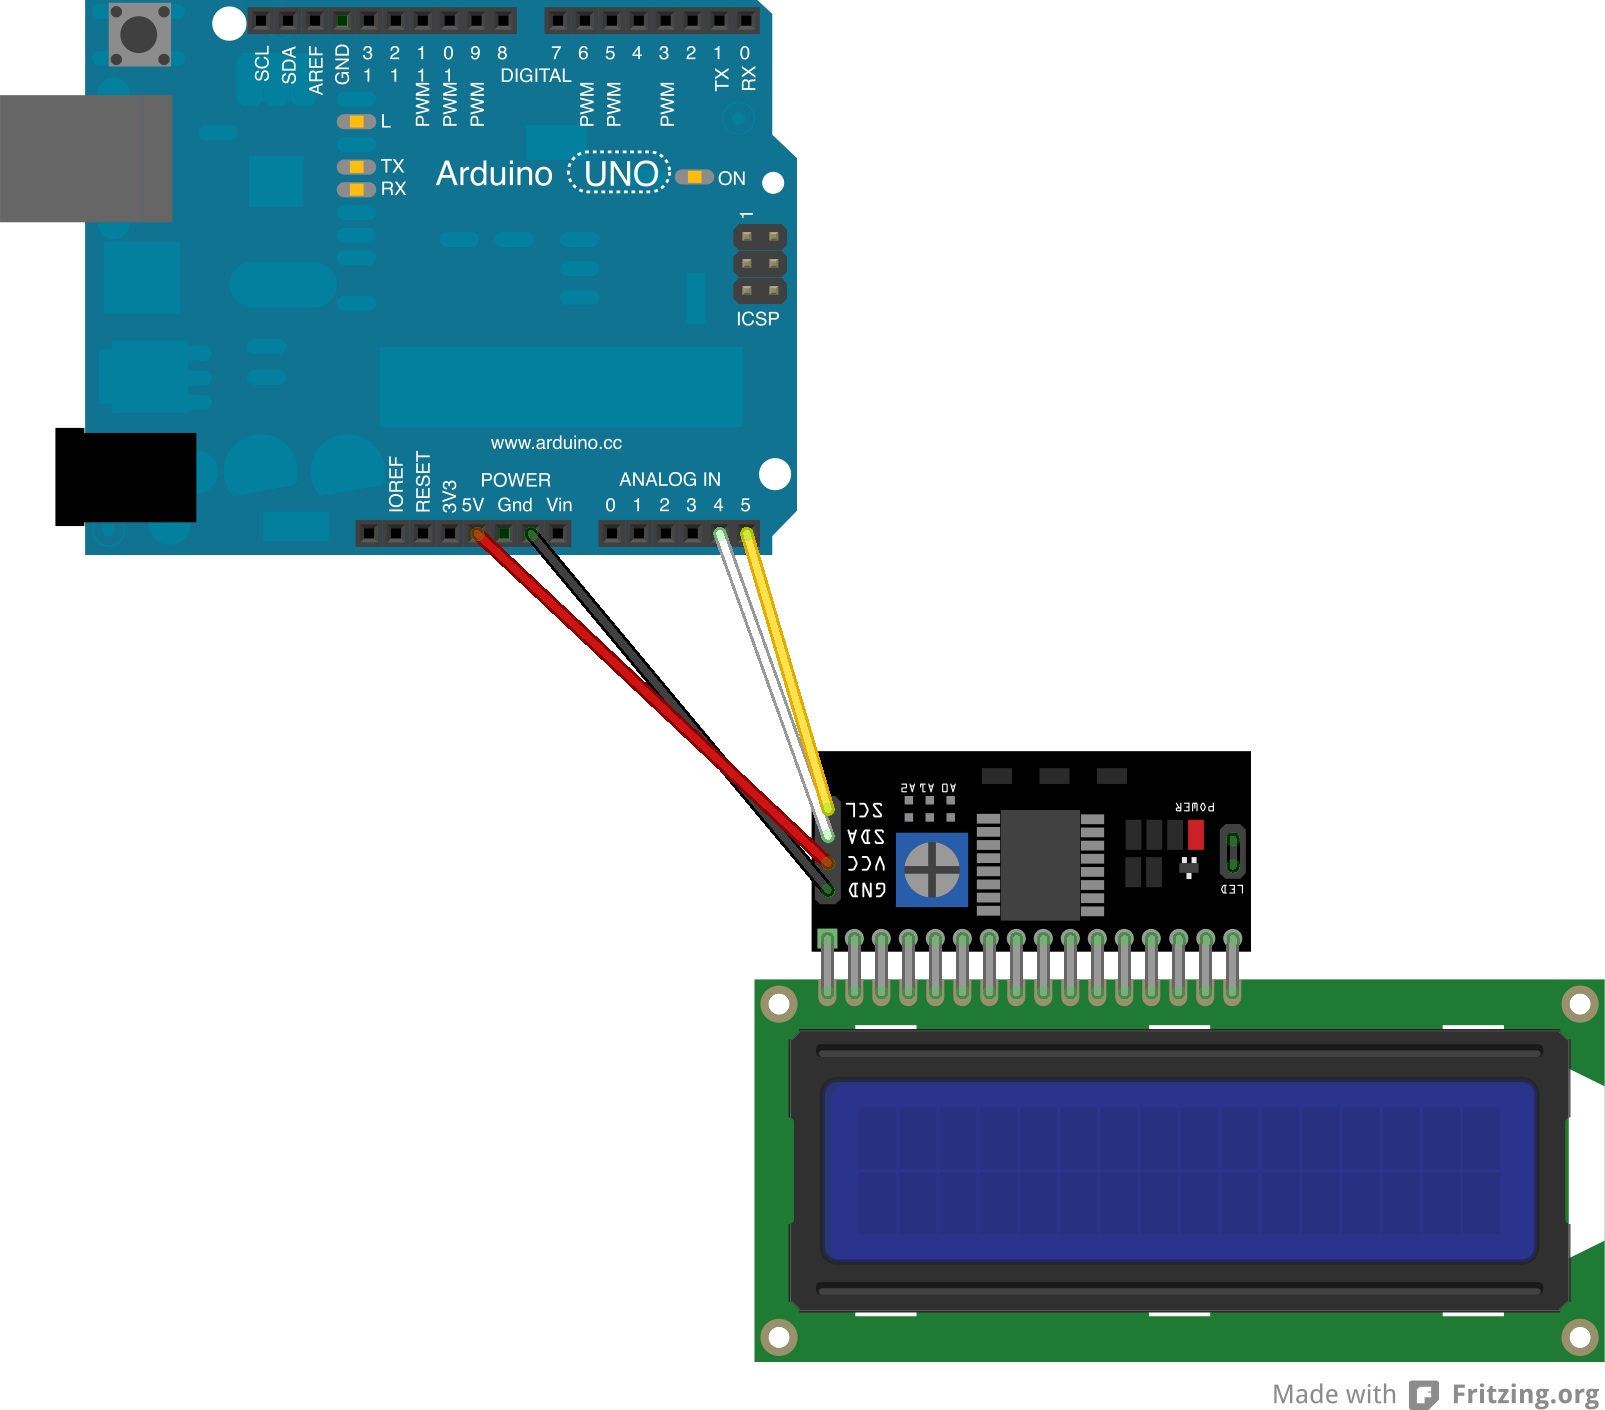
이 작업을 수행하면 다음 부분으로 이동할 수 있습니다...
코드를 작성해 봅시다...
주소 0x3F로 16x2 LCD 설정 - I2C 버스 장치의 주소는 Arduino Playground에서 사용할 수 있는 간단한 스케치를 통해 스캔하여 찾을 수 있습니다.
#include #include LiquidCrystal_I2C lcd(0x3F,16,2);
이제 String을 선언해야 합니다. 변수를 사용하여 직렬 입력을 저장하고 나머지 항목을 설정합니다.
문자열 inData; 무효 설정() { lcd.init(); Serial.begin(9600); lcd.backlight(); }
문자열 변수로 직접 데이터를 보내려는 경우 문자열 크기에 따라 약 1초의 대기 시간이 있기 때문에 문제가 될 수 있습니다. 이를 방지하려면 char를 사용하십시오. 변수를 만들고 inData에 추가합니다. .
좋아, 다 좋은데 데이터 수신이 중지되면? 해결책이 있습니다:
if (received =='*') { ... }
char의 마지막이 언제 * Arduino는 다음 부분을 진행할지 알 것입니다. 이제 우리는 메시지를 처리해야 합니다. 이 *를 제거해야 합니다. char so:
마지막으로:
<사전><코드>lcd.setCursor(0,0); lcd.print(inData); 데이터 =""; // 버퍼 지우기하지만... 사용하지 않은 두 번째 줄이 있습니다... 여기 해결책이 있습니다
if (received =='#') { inData.remove(inData.length() - 1, 1); lcd.setCursor(0,1); lcd.print(inData); 데이터 =""; } } char의 마지막이 #일 때 Arduino는 LCD의 두 번째 줄을 설정하고 다른 데이터를 인쇄합니다.
구성
C 또는 C++가 아닌 C#이 필요한 이유는 무엇입니까? C#은 쉽고 빠릅니다(빠른... 내 말은 서면으로)
우선 하드웨어 변수에 쉽게 액세스할 수 있도록 추가 라이브러리를 다운로드해야 합니다.
하드웨어 모니터 열기
압축을 풀면 라이브러리가 있습니다:OpenHardwareMonitorLib.dll
새 프로젝트 생성 -> Windows Forms 응용 프로그램 -> 솔루션 탐색기에서 참조를 마우스 오른쪽 버튼으로 클릭 -> 찾아보기 -> OpenHardwareMonitorLib.dll을 확인하고 잊지 말고 확인하십시오.
외관
양식 준비:


이제 코드를...
일부 지시문...
System.IO.Ports 사용; OpenHardwareMonitor.Hardware 사용; 그리고 선언...
SerialPort 포트 =new SerialPort();Computer c =new Computer() { GPUEnabled =true, CPUEnabled =true }; 부동 소수점 값1, 값2; <코드>C 오픈 하드웨어 모니터 개체입니다. CPU와 GPU를 활성화해야 합니다. Form Load 이벤트에 다음을 입력하십시오.
<사전><코드> c.Open();양식 생성자에서:
공개 Form1() 추가:
<사전><코드>초기화();그리고 어디에서나:
private void Init() { try { notifyIcon1.Visible =false; 포트.패리티 =패리티.없음; port.StopBits =StopBits.One; 포트.DataBits =8; port.Handshake =Handshake.None; 포트.RtsEnable =true; string[] 포트 =SerialPort.GetPortNames(); foreach(포트의 문자열 포트) { comboBox1.Items.Add(port); } 포트 전송 속도 =9600; } catch(예외 예외) { MessageBox.Show(ex.Message); } }
단순... 선언된 변수를 초기화하고 열린 포트를 검색하여 comboBox1에 추가
이제 변수를 저장하고 보내는 주요 기능:
private void Status() { foreach (c.Hardware의 var hardwadre) { if (hardwadre.HardwareType ==HardwareType.GpuNvidia) { hardwadre.Update(); foreach(hardwadre.Sensors의 var 센서) if (sensor.SensorType ==SensorType.Temperature) { value1 =sensor.Value.GetValueOrDefault(); } } if (hardwadre.HardwareType ==HardwareType.CPU) { hardwadre.Update(); foreach(hardwadre.Sensors의 var 센서) if (sensor.SensorType ==SensorType.Temperature) { value2 =sensor.Value.GetValueOrDefault(); } } } { port.Write(값1 + "*" + 값2 + "#"); } catch(예외 예외) { timer1.Stop(); MessageBox.Show(예:메시지); toolStripStatusLabel1.Text ="Arduino가 응답하지 않습니다..."; }
Status()를 추가하는 것을 잊지 마십시오. 타이머 틱 이벤트 기능.
이제 연결 버튼:
try { if (!port.IsOpen) { port.PortName =comboBox1.Text; 포트.Open(); timer1.Interval =Convert.ToInt32(comboBox2.Text); timer1.Enabled =true; toolStripStatusLabel1.Text ="데이터 전송 중..."; label2.Text ="연결됨"; } } catch(예외 예외) { MessageBox.Show(ex.Message); } 콤보박스2에서 타이머 간격을 설정하지 않고 모든 것을 실행하지 않으면 포트가 이미 열려 있는지 확인하고 있습니다!
연결 해제 버튼:
try { port.Write("DIS*"); 포트.닫기(); } catch(예외 예외) { MessageBox.Show(ex.Message); } label2.Text ="연결 끊김"; timer1.Enabled =거짓; toolStripStatusLabel1.Text ="아두이노에 연결..."; 데이터 =""; Arduino에 마지막 데이터를 작성하여 완료되었다고 말하십시오.
예를 들어 다음과 같은 몇 가지 기능을 추가할 수 있습니다. 트레이 등에 숨기기(아래 전체 코드)
프로그램은 관리자 권한으로 실행해야 합니다!
<섹션 클래스="섹션 컨테이너 섹션 축소 가능" id="코드">#include#include LiquidCrystal_I2C lcd(0x3F,16,2);String inData;void setup() { Serial.begin(9600); lcd.init(); lcd.backlight();} 무효 루프() { while (Serial.available()> 0) { 문자 수신 =Serial.read(); inData +=수신됨; if (received =='*') { inData.remove(inData.length() - 1, 1); lcd.setCursor(0,0); lcd.print("GPU 온도:" + inData + char(223)+"C "); 데이터 =""; if(inData =="DIS") { lcd.clear(); lcd.setCursor(0,0); lcd.print("연결이 끊어졌습니다!"); } } if (received =='#') { inData.remove(inData.length() - 1, 1); lcd.setCursor(0,1); lcd.print("CPU 온도:" + inData + char(223)+"C "); 데이터 =""; } }}

제조공정
구성품 및 소모품 Arduino UNO × 1 Adafruit RGB 백라이트 LCD - 16x2 × 1 브레드보드(일반) × 1 저항 220옴 × 1 SparkFun 푸시버튼 스위치 12mm × 1 점퍼 와이어(일반) × 1 USB-A-B 케이블 × 1 앱 및 온라인 서비스 Arduino IDE 이 프로젝트 정보 필요한 부품은 위의 그림과
이 Arduino 터치 스크린 튜토리얼에서는 Arduino와 함께 TFT LCD 터치 스크린을 사용하는 방법을 배웁니다. 다음 비디오를 보거나 아래에 작성된 튜토리얼을 읽을 수 있습니다. 개요 이 튜토리얼에서는 세 가지 예제를 작성했습니다. 첫 번째 예는 초음파 센서를 이용한 거리 측정입니다. 센서의 출력 또는 거리가 화면에 인쇄되고 터치 스크린을 사용하여 센티미터 또는 인치 단위를 선택할 수 있습니다. 다음 예는 이 3개의 RGB 슬라이더를 사용하여 RGB LED를 제어하는 것입니다. 예를 들어 파란색 슬라이더를 움직