

3D 프린팅

산업 제조
이 기사에서는 데카르트, 델타 및 코어 XY와 같은 다양한 모션 시스템을 사용하는 10가지 프린터 키트를 분석합니다. 각 키트에는 사양 요약, 다른 키트와 구별되는 기능에 대한 설명, 회사에서 제공하는 문서 및 판매 후 지원에 대한 정보가 있습니다.
3D 프린터를 구축하는 데 필요한 모든 요소가 포함된 DIY(Do It Yourself) 조립 키트입니다. 현재 시장에 나와 있는 키트는 대부분 사전 조립되어 있습니다. 이를 통해 사용자는 몇 단계만 거치면 프린터를 신속하게 구축할 수 있습니다. 완전히 조립되지 않은 키트도 있으므로 조립 시간이 조금 더 오래 걸립니다.
일반적으로 키트는 이미 조립된 프린터보다 저렴합니다. 프린터를 하나씩 조립하는 훌륭한 전문가는 작동 방식에 대해 훨씬 더 많이 배우고 시간이 지남에 따라 기계적 결함이 있는지 여부를 더 쉽게 알아차릴 수 있습니다.
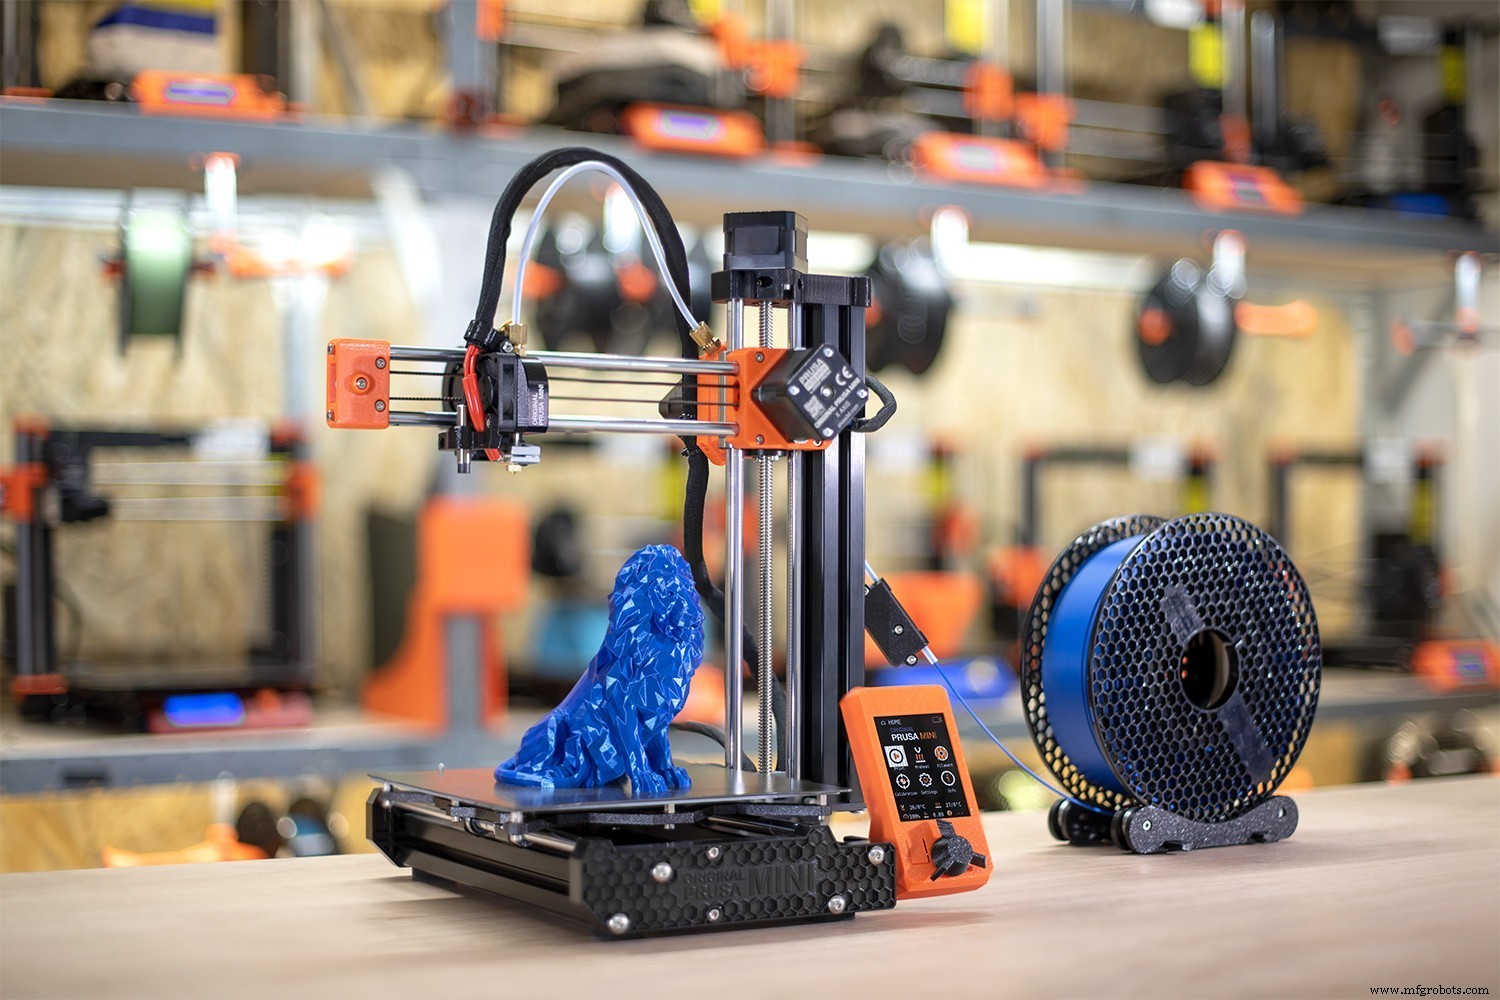
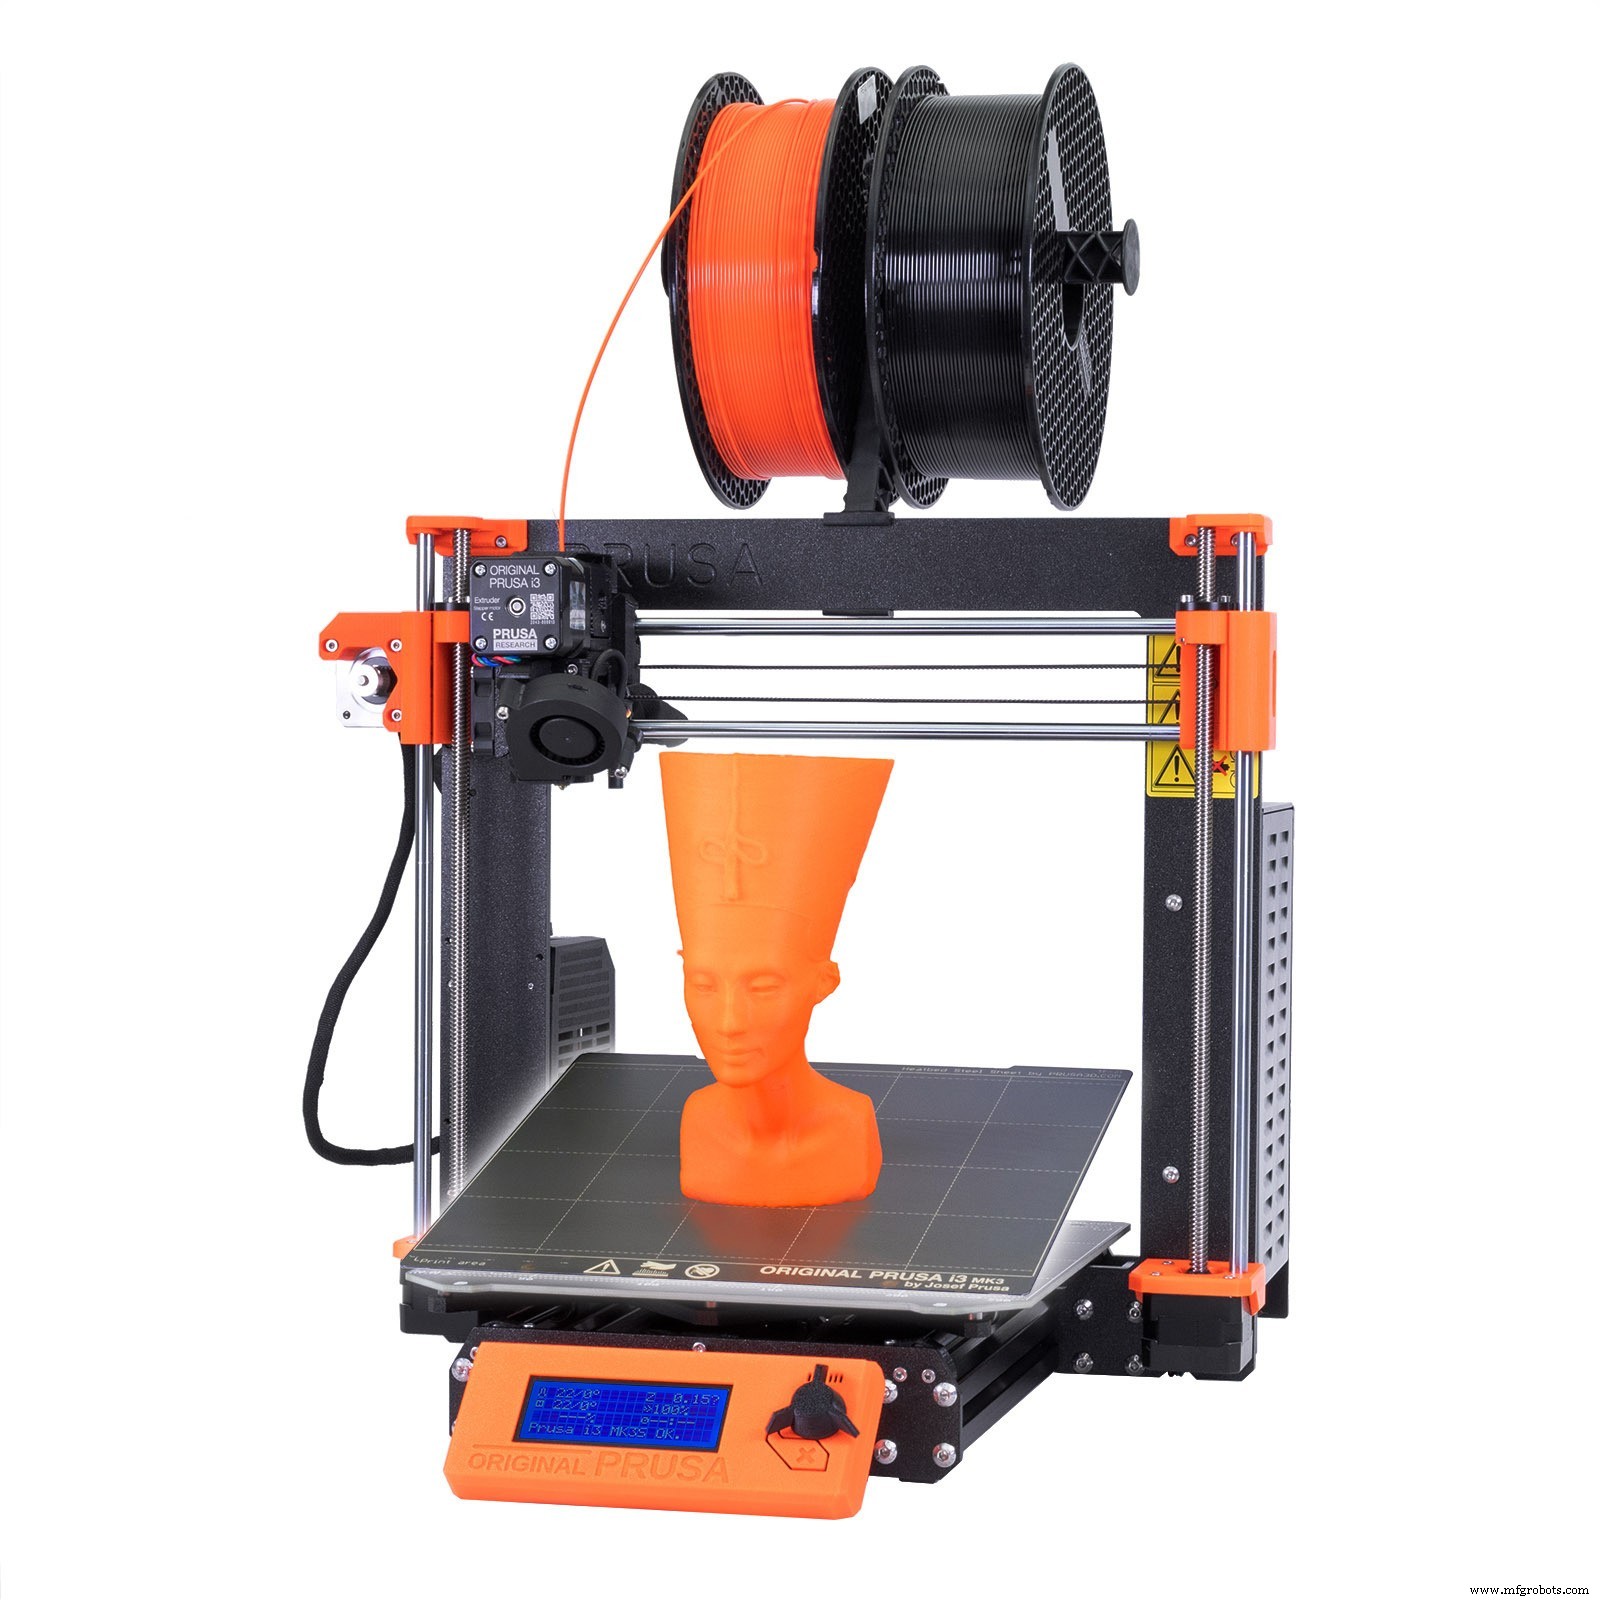
Prusa Mini+는 인쇄 품질이 우수한 소형 프린터로 사용자가 여러 재료를 사용할 수 있습니다. TCM 2209 드라이버 , 조용할 뿐만 아니라 사용자가 X 및 Y 축에서 0으로 제한 스위치 없이 항상 위치를 측정할 수 있습니다.
또 다른 기능은 SuperPINDA 셀프 레벨링 센서입니다. . 유도성일 뿐만 아니라 가열될 때 침대의 팽창을 추정하는 열 센서가 있습니다.
컬러 LCD 디스플레이를 통해 사용자는 외부 USB에서 gcode 파일을 선택하여 인쇄할 모델을 미리 볼 수 있습니다. 또한 이 프린터는 이더넷 포트를 통해 인터넷에 연결할 수 있으며 Wi-Fi 모듈을 추가할 수 있습니다. 따라서 Prusa는 원격으로 인쇄 파일을 보내고 펌웨어 업데이트를 수행하려고 합니다. 이러한 방식으로 많은 수의 Prusa Mini+ 프린터를 동일한 컴퓨터에서 제어할 수 있습니다. 이것은 프린터 팜을 구축하려는 모든 사용자에게 이상적입니다.
인쇄 중 전원 공급이 차단되면 Prusa Mini+는 안타깝게도 중단된 부분부터 인쇄를 재개할 수 없습니다.
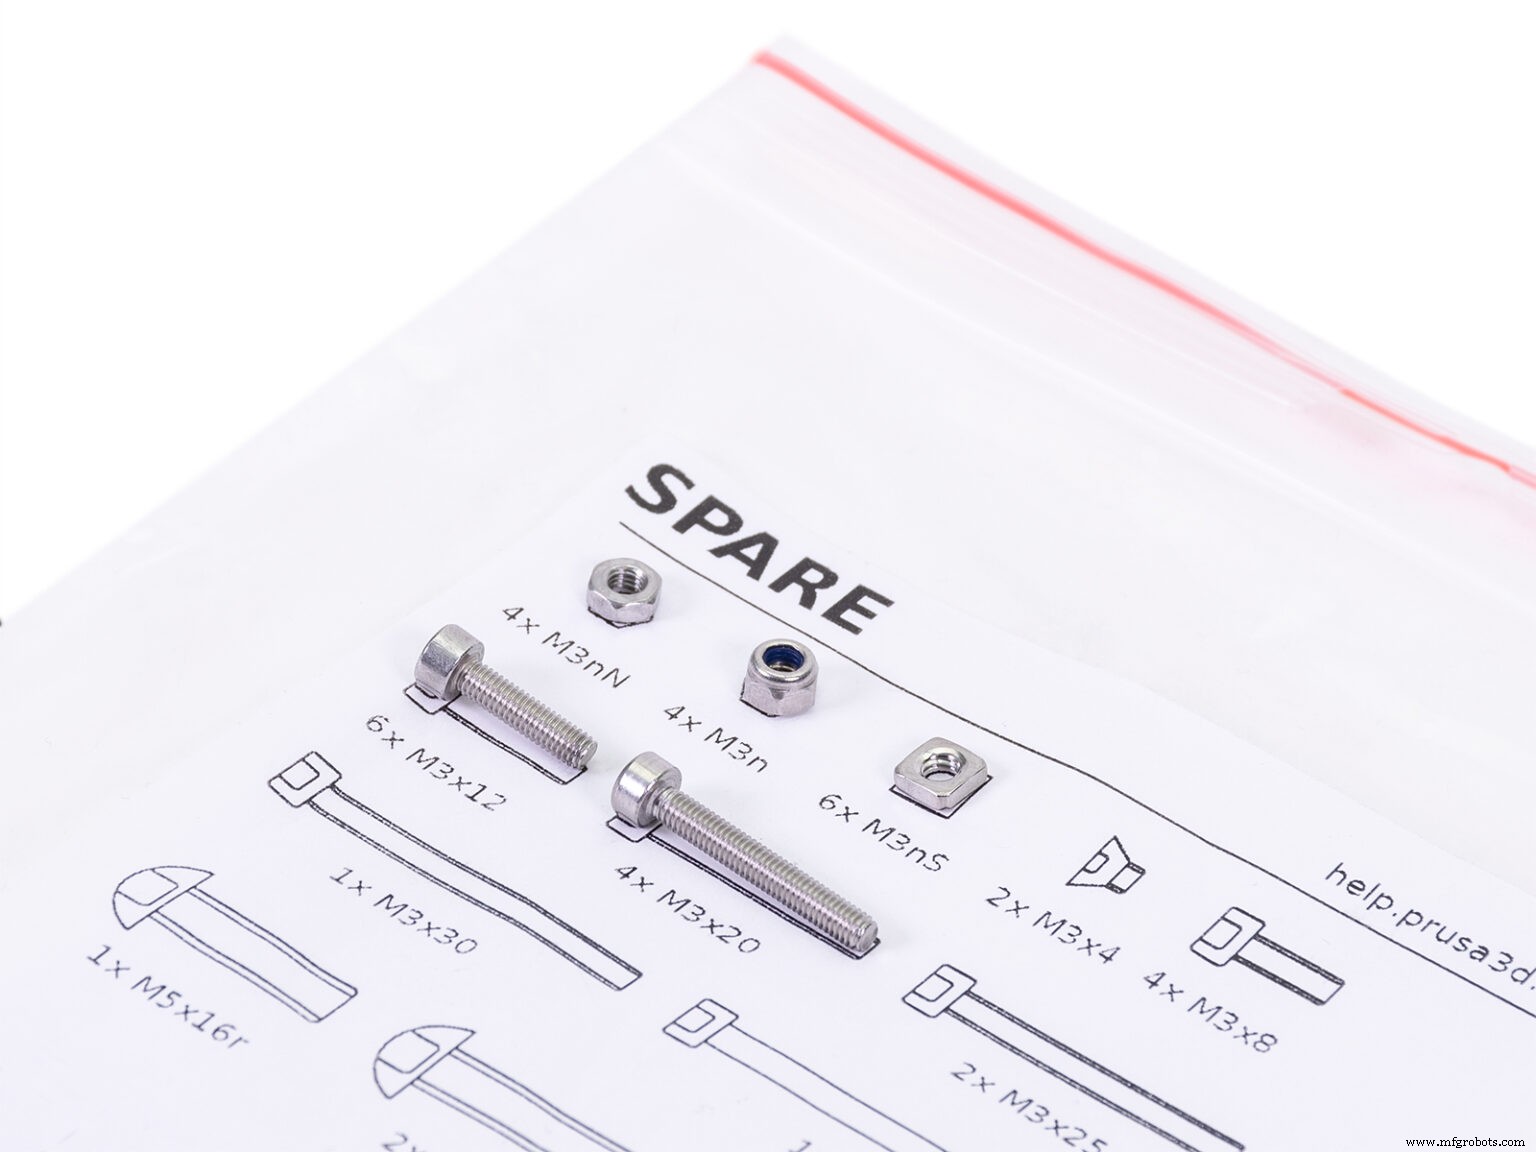
조립은 매우 쉽습니다. Prusa Mini+는 정밀한 양질의 이미지와 함께 훌륭하게 설명된 단계별 설명서를 제공합니다. 사용자의 작업을 용이하게 하기 위해 키트에는 전체 프로세스에 필요한 도구(앨런 키, 펜치, 렌치)가 포함되어 있습니다.
요소의 가방은 완벽하게 식별되며 사용 설명서의 어느 부분에 자세히 설명되어 있습니다. 이것으로 부족하다는 듯이 가방 하나하나에 안에 들어있는 구성품의 이미지가 있는데, 이 이미지들은 대부분이 실제 사이즈 이미지에요! 이러한 유형의 상세한 단계별 매뉴얼은 초보자에게 이상적입니다.
또한, 이것은 개방형 하드웨어 프린터이므로 사용자는 모든 부품의 3D 디자인을 쉽게 찾을 수 있습니다.
Prusa 회사는 7개 언어로 연중무휴 24시간 지원을 제공하기 때문에 탁월한 사용자 지원으로 잘 알려져 있습니다. 또한 사용자는 항상 귀하를 도울 준비가 된 대규모 커뮤니티의 일부가 될 것입니다. 이 프린터 모델의 처리 소프트웨어 및 구성 프로필은 공식 웹사이트에서도 무료로 다운로드할 수 있습니다.
이 프린터는 이중 압출기 시스템으로 사용자가 2가지 색상으로 인쇄할 수 있습니다. 두 개의 필라멘트 입력과 단일 노즐을 수신하는 핫엔드가 있습니다. 이를 통해 사용자는 인쇄할 때 두 색상 간에 전환할 수 있습니다.
이 시스템은 서로 다른 재료를 결합하는 데 유용합니다. 예를 들어, 사용자는 가용성 필라멘트를 사용하여 나중에 폐기될 다른 재료, 특히 고가의 특수 필라멘트를 방지할 수 있습니다. 따라서 부품을 손상시키지 않고 지지대를 쉽게 제거하고 관심 있는 재료를 절약할 수 있습니다. Bowden 시스템에는 우수한 견인력과 성능으로 잘 알려진 Titan 압출기가 있어 결과적으로 사용자에게 좋은 고품질 인쇄.
이 프린터에는 전체 표면에 걸쳐 16포인트 매트릭스로 침대까지의 거리를 측정하고 저장하는 "셀프 레벨링" 센서가 있습니다. 이러한 측정은 디스플레이에서 관찰할 수 있습니다. 수평 조정을 위해 수동으로 조정해야 하는 침대 나사를 사용자에게 보여줍니다. 그런 다음 최적의 레벨링이 달성될 때까지 프로세스를 반복해야 합니다. 이 센서는 자동이 아니지만 수동 레벨링 과정에서 사용자를 돕습니다.
Tronxy XY Pro 프린터는 빠르고 쉽게 조립할 수 있는 사전 조립된 키트입니다. 해당 키트에는 Allen 키, 드라이버 및 비디오가 포함된 조립 및 설치 설명서와 같은 필요한 도구가 있습니다. 케이블 연결은 이미 특수 커넥터가 장착되어 있어 사용자가 꽂기만 하면 됩니다. 몇 단계만 거치면 프린터를 조립하고 실행할 수 있습니다!
중국 회사는 사용자에게 각 브랜드 프린터에 대한 자체 슬라이싱 소프트웨어 및 구성 프로필을 제공합니다. 처음 24시간 이내에 답변을 제공하는 온라인 기술 지원 서비스가 있습니다. 공식 웹사이트에서 문제 해결 가이드가 있는 블로그를 찾을 수 있습니다.
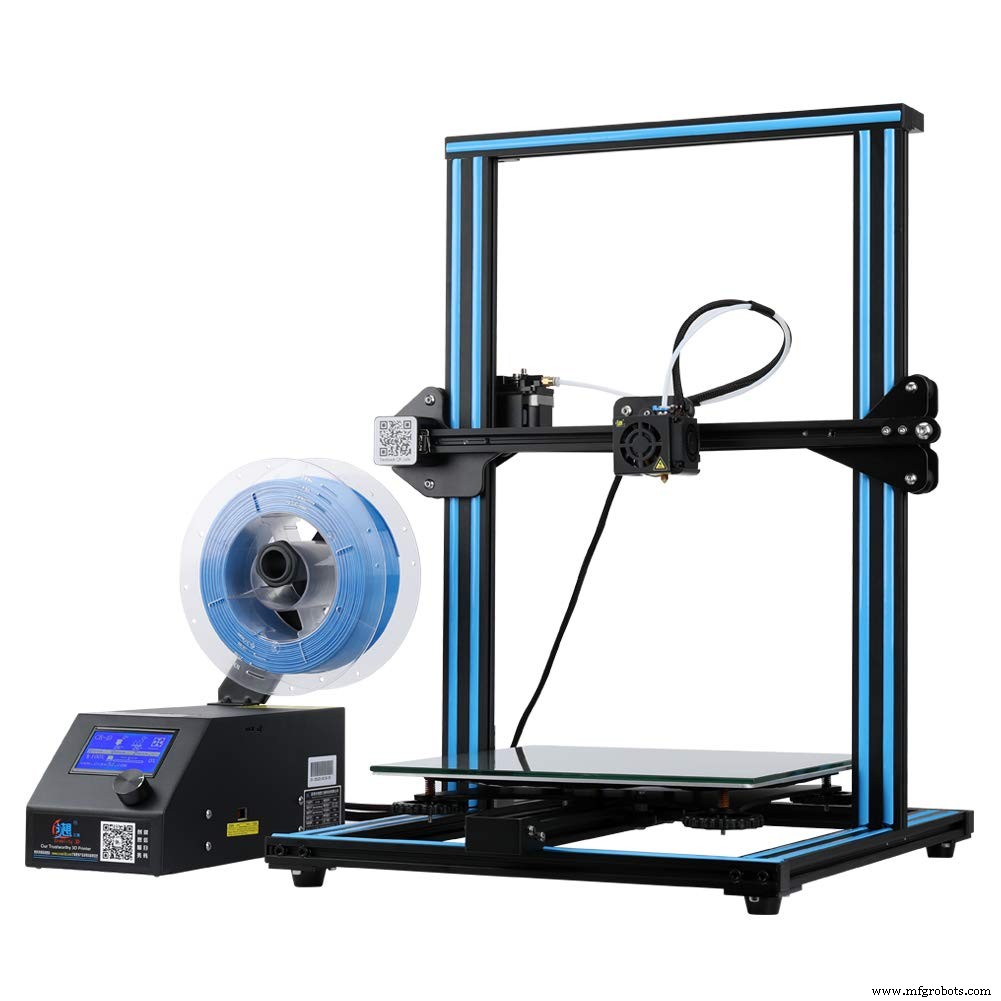
CR-10 프린터는 저렴한 비용으로 대용량 인쇄가 가능하며, 우수한 인쇄 품질로 사용자들에게 신뢰를 받고 있습니다. 다만, 외부 케이스 내부의 저렴한 드라이버와 팬으로 인해 매우 시끄러운 프린터입니다. 팬을 교체하고 모터에 댐퍼를 추가하여 진동을 줄이면 소음 수준을 쉽게 줄일 수 있습니다. 이 업그레이드는 약 $65입니다.
반면에 프린터에는 자동 레벨링 센서가 없지만 $50(Amazon)에 약간의 변경으로 BL Touch를 추가할 수 있습니다. 또한 필라멘트 끝 센서가 없지만 사용자는 $15(Amazon)에 추가할 수 있습니다. 이러한 모든 업그레이드를 통해 프린터 비용은 실제로 약 $440입니다.
인쇄면은 투명 유리이므로 인쇄할 때 조각을 붙이기 위해 약간의 풀이나 스프레이를 추가해야 합니다.
이러한 업그레이드 중 일부가 포함된 이 프린터의 새 버전이 있습니다. CR-10S($400)에는 필라멘트 끝단 센서가 있고 Z축에서 더 많은 안정성을 제공하며 정전 후에도 인쇄를 재개할 수 있습니다. 그러나 보드 드라이버는 개선되지 않았습니다.
이 비디오에는 CR-10을 음소거하는 방법에 대한 자세한 정보가 있습니다.
CR-10 프린터 키트는 사전 조립되어 사용자가 프레임을 조립하고 나사를 조이고 케이블을 연결하기만 하면 됩니다. 이런 식으로 조립이 쉽고 빠릅니다. 키트에는 렌치, 드라이버, 플라이어와 같은 조립에 필요한 도구와 이미지가 포함된 단계별 설명서가 포함되어 있습니다.
기술 지원과 관련하여 사용자는이 중국 회사에서 제공하는 서비스에 매우 만족하지 않습니다. 웹사이트에는 이메일, 전화번호, 온라인 고객 서비스가 있어 사용자가 회사 담당자에게 연락할 수 있습니다. 결론적으로 Creality는 A/S 평판이 좋은 회사가 아닙니다. 그러나 회사의 프린터 사용자(주로 Ender 프린터)의 대규모 커뮤니티가 서로 문제를 해결하고 솔루션 및 업그레이드를 찾도록 도울 준비가 되어 있습니다. 이 회사는 또한 프린터용 특수 슬라이서 소프트웨어를 제공하지 않습니다.
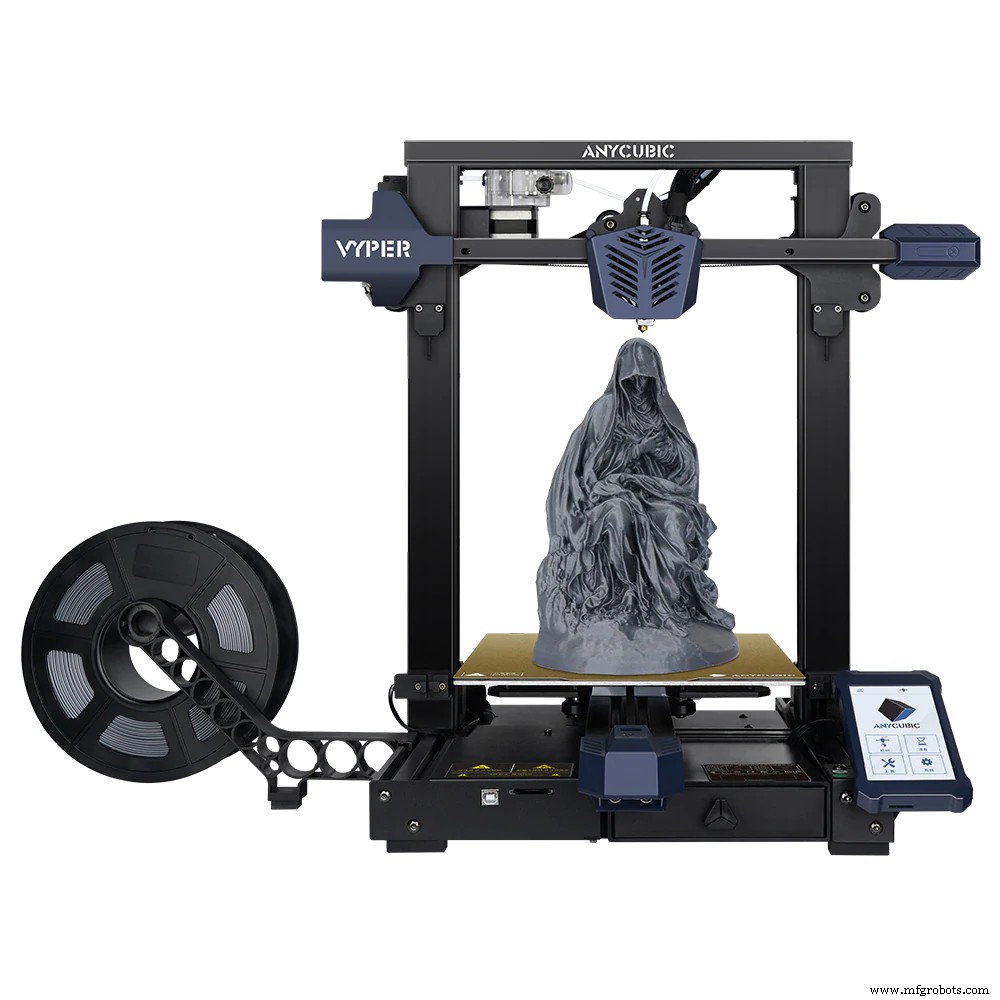
멋진 미학과 대형 화면을 갖춘 이 프린터는 사용자에게 양질의 인쇄물을 제공합니다. 프린트 헤드에는 마지막 인쇄 레이어를 빠르게 냉각시키는 2개의 레이어 팬이 있습니다. 따라서 아래에 지지대가 없는 긴 다리나 가파른 각도로 조각을 제조할 수 있으며 마감이 향상됩니다. Bowden 압출기는 우수한 추진력으로 필라멘트를 더 잘 당기는 이중 기어 시스템을 갖추고있어 여러 재료의 인쇄가 가능합니다. 또한 Extruder 하우징이 투명하여 사용자가 필라멘트가 기어를 통과하는 모습을 볼 수 있습니다.
다른 프린터와 달리 Anycubic Vyper에는 Z축용 광전 센서가 있어 축이 0일 때 베드 차이를 자동으로 보정합니다. 또한 16포인트 매트릭스 내에서 측정하는 자동 레벨링 센서가 있습니다.
Prusa Mini+와 달리 이 레벨링은 각 인쇄 전에 수행되지 않습니다. 대신 사용자는 자주 화면에서 수동으로 작업을 수행해야 합니다. 침대 모서리에는 수동으로 조정할 수 있는 스프링이나 나사가 없으므로 Z 오프셋을 올리고 내리는 방식으로 화면을 통해 조정됩니다.
프린터에는 조용한 드라이버가 있지만 팬이 주요 소음원입니다. 소음 수준은 견딜 수 있지만 장기적으로 성가시다. 이 소음은 팬을 더 좋은 품질의 팬으로 교체하면 줄일 수 있습니다.
Anycubic Vyper 사전 조립 키트에는 몇 가지 쉬운 단계가 있어 초보자에게 이상적입니다. 사용자는 프레임을 베이스에 끼우고 집타이를 자르고 케이블을 연결하기만 하면 됩니다. 키트에는 조립에 필요한 도구(Allen 키, 플라이어 등)가 포함되어 있습니다.
설명서에는 이미지가 포함된 일련의 단계와 Cura 슬라이서 소프트웨어의 설치 및 구성에 대한 가이드가 있습니다(사용자는 Prusa 슬라이서 사용을 권장하지만).
유저들의 후기에 따르면 중국 업체 애니큐빅은 공정한 애프터 서비스를 제공하고 있다. 웹 사이트에는 사용자가 문제를 설명하고 사진과 비디오를 첨부하는 티켓을 만드는 고객 서비스가 있습니다. 또한 Facebook, Reddit 및 Discord와 같은 다양한 플랫폼에서 커뮤니티의 일원이 될 수도 있습니다.

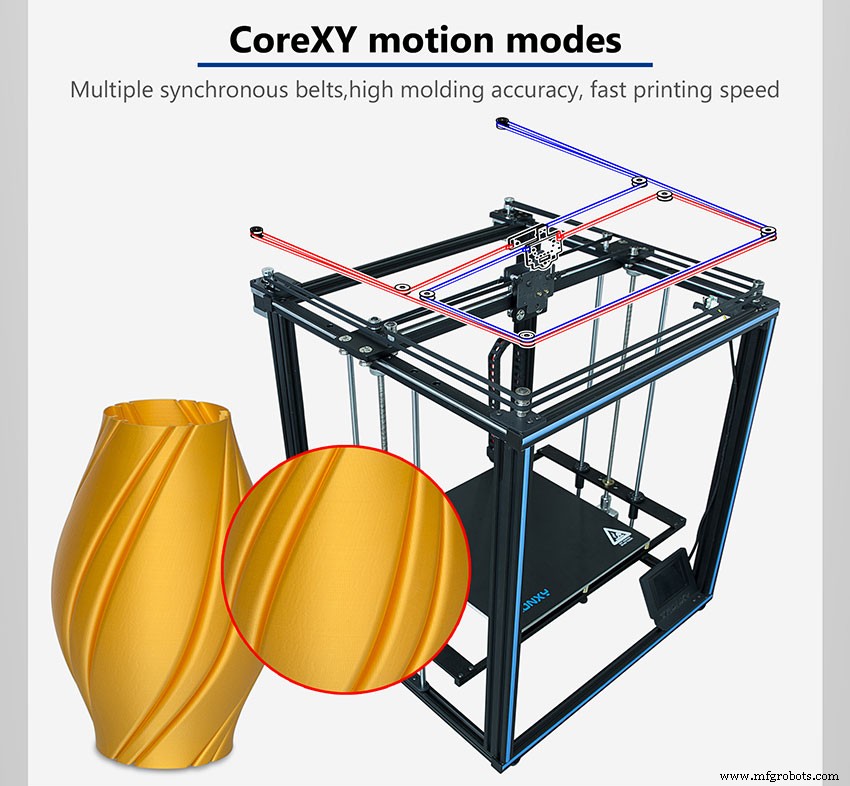
Tronxy X5SA Pro는 X 및 Y축 모터를 프레임에 고정하고 하나 또는 두 개의 긴 드라이브 벨트를 통해 프린트 헤드에 연결하는 Core XY 시스템이 있는 프린터입니다. X축과 Y축이 독립적으로 움직이는 직교 프린터와 달리 Core XY 시스템에서는 두 모터가 동시에 작동해야 합니다.
X축으로 이동하려면 두 모터가 같은 방향으로 회전해야 합니다. 그러나 반대 방향으로 회전하면 Y축으로 이동합니다. 모터 중 하나는 회전하고 다른 하나는 회전하지 않으면 헤드가 대각선으로 움직입니다. 이러한 유형의 시스템은 Y축에서 베드 이동의 관성을 줄여 안정성과 인쇄 속도를 향상시킵니다.
구조적으로 사용자는 TPU와 같은 어려운 재료를 인쇄할 수 있는 Titan 압출기 모델이 있는 솔리드 금속 프린터를 찾을 수 있습니다. 사양 내에서 기계가 매우 조용하다고 지적합니다. 하지만 사용자들은 그렇게 생각하지 않습니다.
높은 소음 수준은 주로 품질이 좋지 않은 팬 때문이지만 더 나은 팬으로 교체할 수 있습니다. 불행히도 프린터에는 모든 유형의 프린터에서 기본 요소인 핫엔드와 베드 모두에 대한 온도 안전 제어가 없습니다.
특히 이 프린터는 Extruder의 위치가 뒤쪽에 위치하여 사용자가 필라멘트 교체를 어렵게 하는 것과 같이 설계상의 결함과 피스 배치 불량이 있습니다.
인쇄 품질에 관해서는 많은 사용자의 리뷰에 따르면 평균 품질을 얻을 수 있습니다. 제대로 인쇄하려면 몇 가지 테스트와 구성을 수행해야 합니다.
Tronxy X5SA Pro는 완전히 분해된 키트입니다. 이미지가 있는 단계별 매뉴얼이 있지만, 그것을 하나로 모으기는 어렵습니다. 이것이 초보자에게 권장되는 이유입니다. 키트에 포함된 SD에는 조립 설명서, sliceo 소프트웨어의 실행 파일, 사용자가 인쇄할 수 있는 프린터 예비 부품이 포함된 STL 파일 및 인쇄할 준비가 된 일부 gcode 파일이 있습니다.
Tronxy XY-2 Pro-2E에 대해 회사에서 제공한 기술 지원에 대한 정보는 이전에 언급되었습니다.
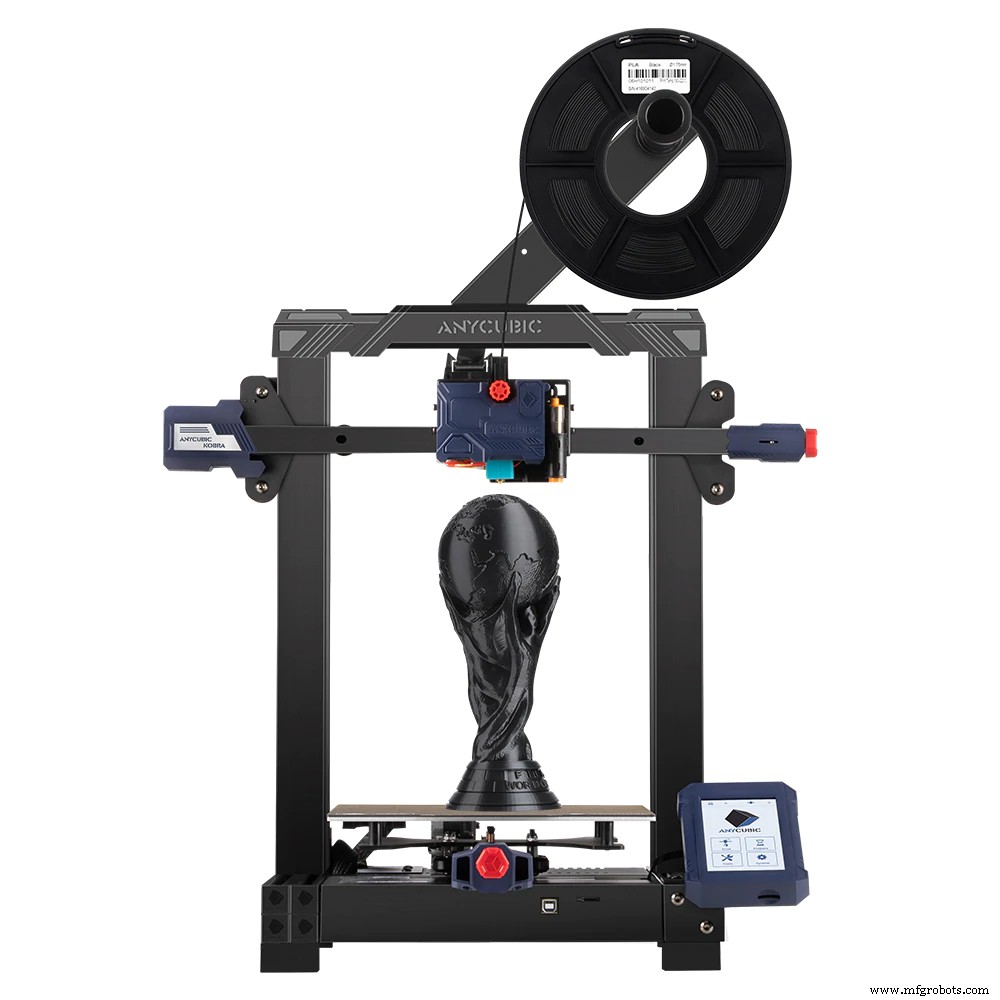
Anycubic Vyper와 마찬가지로 사용자는 수동 조정을 위한 나사나 스프링이 없는 침대를 사용하게 됩니다. Anycubic은 표면의 25개 지점을 측정하여 각 지점의 거리를 구하는 유도형 센서인 자동 레벨링 시스템인 LeviQ를 도입했습니다. 결과적으로 노력없이 우수한 레벨링이 달성됩니다. 유연한 마그네틱 플랫폼은 품질과 마감이 모두 우수하여 사용자에게 우수한 접착 표면을 제공합니다.
이 프린터는 StallGuard 기술이 포함된 Trinamic 브랜드 드라이버로 인해 축에 제한 스위치가 없기 때문에 눈에 띕니다. 축이 원점에 도달하여 구조에 닿으면 드라이버가 위치를 원점으로 유지하는 것으로 감지하는 모터에 약간의 저항이 형성되기 시작합니다.
Unlike the Anycubic Vyper, this printer uses a direct extrusion system placed above the print head and allows users to use flexible materials without any inconvenience.
Although it has quiet drivers, fans are the cause of the noise since they are slightly noisy. Said noise can be reduced simply by changing the fans for quieter models.
Their printing quality is very good right from the start because of the printing profiles that the company offers for the Cura software. However, users may need to make minor adjustments to improve its quality, especially to reduce stringing.
The kit for this printer comes pre-assembled and allows users to assemble it in a few easy steps; it is ideal for beginners. It includes an instruction manual and the necessary tools for assembly, and also a microSD card that contains the files ready to make the first printing tests. Together with its auto-leveling system, this printer is an excellent option to quickly enter the world of 3D printing without any inconveniences.
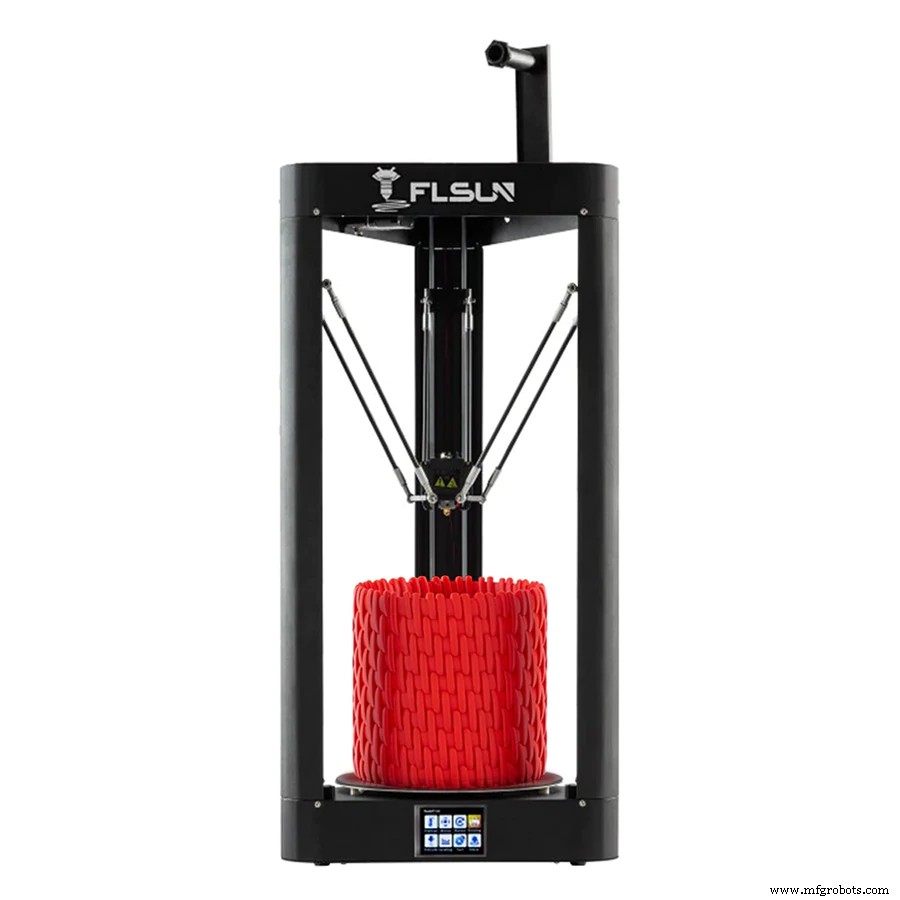
Unlike the printers that we are used to seeing, the Flsun QQS Pro is a Delta-type printer with a fixed circular bed and three motors placed in a triangle shape that move the print head in 3 axes. Because of this, users obtain a high printing speed. High-rise pieces can be made with this type of printer.
The company sought to reduce printer noise by using dampers on the motors, graphite linear bearings, and a quiet fan in the hotend. However, the electronics fan is a bit noisy.
Its Bowden system made up of a Titan extruder is an excellent option that provides good traction and allows users to employ multiple materials, including flexible ones.
For automatic leveling, the kit includes a module that attaches magnetically to the print head. Users must place it only once, carry out the leveling process from the display and then remove the module. Finally, they must perform a manual check with a sheet of paper to adjust the distance from the nozzle to the bed at a single point in the center of the surface. As the bed is fixed, there is no need to carry out self-leveling before each print.
Its Wi-Fi system allows users to control the printer wirelessly. In order to print, the SD card must be placed in the printer since it will store the printing file. In this way, it is not necessary for the computer to be on to continue the printing process.
The printing quality turns out to be high and printing speeds are very interesting. It has a special printing style that doubles the speed at which it is set within the gcode. However, if speed is too high, the printing quality may decrease.
The Flsun QQS Pro kit is pre-assembled and allows users to quickly assemble it in a few easy steps. They simply put the smooth rods and straps together, attach the extruder, and connect the cables (with great connectors). The kit also includes spare parts such as the block, nozzle, and barrel already assembled, a limit switch, a thermistor, a heater cartridge, extra screws, and filament along with the necessary tools (This is a wise choice on the part of the company). Inside the SD card, there is a very detailed assembly manual and videos, the firmware and manuals for Wi-Fi updating and setting, and the software and gcode files ready for the first printing tests. This kit is without a doubt an excellent experience for beginners.
According to users’ reviews, the Flsun company provides a good after-sales service and offers a reply within the first 24 hours.
It is one of the most multi-award-winning printers on the market. It has a direct extrusion system that allows users to employ multiple materials, including flexible ones. It has an inductive auto-leveling sensor that takes measurements in a dot matrix, quickly performing this process before each print.
The kit has three types of magnetic sheets:smooth, textured, and satin to avoid adhesion problems for different materials.
It is a quiet printer because of its Trinamic brand drivers and the usage of high-quality Noctua brand fans.
The Prusa MK3S+ achieves a very good printing quality, starting from an excellent first layer due to its automatic leveling. From time to time the company publishes new firmware updates on its website to improve its performance. It is a reliable, durable, and quiet printer with excellent performance, ideal for those users who work within the same room as well as for classrooms at schools.
The printer kit is completely disassembled but it includes an excellent manual that will guide users step by step without any inconvenience. All the necessary tools for assembly and bags with their well-identified elements are included. Although assembly will take a few hours, it will undoubtedly be a satisfactory experience. It also has its own PrusaSlicer slicing software optimized for each of the printers of this brand.
Post-sales support was previously described for the Prusa Mini+.
Read the following article where there is more detailed information about this printer and a comparison with the Ender 3 Pro.

After years of experience and together with the many contributions from the maker community, the Rat Rig company launched this premium printer:a fully configurable, modular, and open-source kit! Its most striking feature is without a doubt the bed. Unique among all printers, the Ratrig V-Core 3 print bed is suspended on three motors arranged in a triangle on the sides of the printer. Each support point consists of a small metal ball that is magnetically coupled to the plastic structure of the motor, isolating it electrically and allowing fluid movement. In this way, the printer seeks to perform a fully automatic and efficient leveling, leaving room for the natural expansion that occurs when the bed heats up and preventing it from curving.
See the fluid movement of the bed in the following video:
The following video shows an example of how automatic leveling works:
From its website, users can find a pre-configured kit with most of the printer pieces. They can also make their own element selection and choose different settings and technologies and even buy the pieces that they want elsewhere, use the ones that they already have or print their own pieces. Users can choose different bed sizes:11.81×11.81×11.81 in, 15.74×15.74×15.74 in, or 19.68×19.68×19.68 in. Users can also choose the extrusion system that they want the most (whether it is direct or Bowden) due to the EVA 2 modular system that gives users the chance to adapt the motor elements for extrusion and different hotend models. Its pieces can be printed by means of changing the extrusion system whenever users want to.
Its metal structure is really strong and its design is well thought out. Electronics are assembled on a panel at the rear of the printer; this provides users with easy access and excellent space for convenient cabling. It is important to bear in mind that this panel cannot be purchased from its website. However, the company provides the necessary file to send it to your local supplier for manufacturing.
Its printing quality is excellent because of its strong structure, automatic leveling and great design. It can be controlled and configured from any device through Fluidd, a user interface for Klipper firmware. Users can also add any type of screen to it, even a tablet.
The kit is completely unassembled and, although the manual is excellent, it can be a bit hard to put it together. Personally, I would not recommend this kit for beginners. However, for all those with experience and passion for 3D printing, it will be a great and fun adventure.
As for its post-sale support, users are satisfied with the attention and professionalism provided by the company. Furthermore, there is a large and very active community willing to help. The only thing that users criticize is the long shipping delay, but the wait is worth it for this great printer.
Voron is a project that was born from a community of very passionate 3D printers. Their goal was to create a good quality, quiet, nice, low maintenance, customizable and open-source printer capable of working 24 hours a day with no interruptions. After years of several tests and versions, they managed to design the Voron 2.4, among other printer models.
Curiously, it is not possible to buy the printer on their website. This website will guide users so they can choose the most desired printer settings:extrusion system, bed size, etc. At the end, it will show you the complete list of materials that you will need to be able to assemble it. Now it will be the users’ turn to buy them where it suits them best, even printing some pieces or buying them from another 3D printer. It is also possible to buy the kit on some unofficial pages.
Unlike the Ratrig V-Core 3, this Voron model has a fixed bed. For this reason, the print head moves along the Z-axis as well. It uses 4 motors at the corners of the Z-axis that independently move the head height to correct measurements taken by the leveling sensor.
In this way, the printer has a total of 7 engines and therefore 7 drivers. To control them it is necessary that their electronics be exceptional and for this it has two BigTreeTech SKR V1.4 controller boards. Like the Ratrig, it has a Raspberry Pi to stand the usage of the Kippler firmware. It seeks to leave the gcode processing to an external computer and achieve a higher printing speed.
Due to its good design and good quality elements, this printer achieves an excellent printing quality. Its metallic structure is firm and the design includes an acrylic enclosure in order to maintain the printing temperature inside and facilitate the printing of sensitive materials such as ABS.
Although its manual is explained in detail, users will have to assemble the printer piece by piece and even manufacture some parts. Buying each of the elements can be long and hard.
This printer is not recommended to beginners, but rather to passionate and experienced 3D printers with a lot of patience. Both the Ratrig V-Core 3 and the Voron 2.4 are advanced premium printers, they have outstanding electronics and their designs are truly perfect. As support users will find a large community willing to help you.
A great question difficult to answer. Everything will depend on the objectives and the purpose that the users want to give to the printer, as well as the available budget. In the following table there is a brief summary of some important aspects according to my evaluation criteria for each kit.
| Price[usd] | Printing volume [in] | Technology level* | Type of kit | Ideal for | |
| Prusa Mini+ | ~350 | 7.08×7.08×7.08 | 높음 | Unassembled | Beginners |
| Tronxy XY-2 Pro_2E | ~320 | 10.03×10.03×9.64 | Normal | Pre-assembled | Beginners |
| Creality CR-10 | ~310 | 11.81×11.81×15.74 | Basic | Pre-assembled | Beginners |
| Anycubic Vyper | ~360 | 9.64×9.64×10.23 | Medium | Pre-assembled | Beginners |
| Tronxy X5SA Pro | ~540 | 12.99×12.99×15.74 | Basic | Unassembled | Users with previous experience |
| Anycubic Kobra | ~300 | 8.66×8.66×9.84 | Medium | Pre-assembled | Beginners |
| Flsun QQS-Pro | ~340 | Ø 10.03×14.17 | 높음 | Pre-assembled | Beginners |
| Prusa i3 MK3S+ | ~750 | 9.84×8.26×8.26 | 높음 | Unassembled | Beginners |
| Ratrig V-Core 3 | ~1200 | 11.81×11.81×11.81 15.74×15.74×15.74 19.68×19.68×19.68 | Advanced | Unassembled | Advanced users |
| Voron 2.4 | ~1000 | 9.84×9.84×9.84 11.81×11.81×11.81 13.77×13.77×13.77 | Advanced | Unassembled | Advanced users |
*Rating in the following order:Basic – Normal – Medium – High – Advanced
Based on all of the above, the kits I would most recommend for the general public are:
For the most experienced users, I recommend assembling the Ratrig V-Core 3 or the Voron 2.4. Both kits will provide users with a rich experience and a lot of learning. Moreover, they will find very high quality, reliable and durable printers.
With a good budget, the Prusa i3 MK3S+ will always be a great option for both beginners and advanced users because it is an extremely reliable and durable printer. If the budget is a bit tighter, there are options around $300 with excellent features such as the Anycubic Kobra or the Flsun QQS-Pro. For the most advanced and experienced users, if the budget is available, do not hesitate to assemble the Ratrig V-Core 3 or the Voron 2.4. It will be a long process but definitely worth it.
3D 프린팅
작업 중 3D 프린터에서 발생하는 매연과 냄새가 걱정되십니까? 건강에 해로울 수 있다고 걱정하십니까? 예, 3D 프린팅에서 냄새가 납니다. 3D 프린터가 가열 기술을 사용하여 필라멘트 재료를 녹이기 때문에 악취가 발생합니다. 대부분의 3D 프린팅 재료는 다양한 유형의 플라스틱으로 만들어집니다. 필연적으로 플라스틱을 태우면 건강에 해로운 냄새가 납니다. 3D 프린팅 냄새를 줄이려면 실내 환기가 잘 되도록 해야 합니다. 또한 권장되는 3D 프린팅 예방 조치를 엄격히 준수해야 합니다. 필요한 모든 정보가 포함된 가이드를 제공했
파이프가 자동으로 스스로 고칠 수 있다면 어떨까요? 금이 가거나 부러지거나 옷이 날씨나 사용자가 하는 활동에 따라 변경될 수 있는 경우 ? 스스로 조립하는 가구, 성장에 적응하는 보철물... 이것들은 4D 프린팅 기술이 실현할 것으로 예상되는 응용 분야 중 일부에 불과합니다. 이미지 1:모양을 수정하는 4D 프린팅 발톱. 출처:Sculpteo. 3D 프린팅 거의 30년 동안 존재해 왔으며 여전히 연구 과정에 있는 동안 새로운 재료 및 응용 프로그램, 4D와 같은 새로운 기술이 등장했습니다. MIT 자가 조립 연구소에서 ,