

제조공정

산업 제조
 |
| × | 1 | |||
 |
| × | 1 | |||
| × | 1 | ||||
| × | 1 | ||||
| × | 1 |
SmartThings 클라우드에 연결하면 간단한 TV 리모컨으로 훨씬 더 많은 채널을 변경할 수 있습니다. 적은 수의 부품과 즉각적인 수익을 얻을 수 있는 프로젝트는 플랫폼을 탐색할 수 있는 좋은 방법입니다.
SmartThings ThingShield를 사용하면 Arduino를 사용하여 SmartThings 프로토타입을 쉽게 구축할 수 있습니다. 실드는 Zigbee 프로토콜을 통해 SmartThings 허브에 연결되는 UNO에 직접 연결됩니다. 실드의 스위치를 사용하면 핀 0,1 또는 2,3을 사용하여 Arduino와 통신할 수 있습니다. ThingShield는 이미 핀 6의 사용을 예약하고 있습니다.
아루디노 시작에 대한 자세한 정보:http://arduino.cc/en/Guide/Introduction
이 프로젝트는 Ken Shirriff가 개발한 놀라운 Arduino 라이브러리에 의존합니다. https://github.com/shirriff/Arduino-IRremote
일반적인 방법으로 라이브러리 Arduino 라이브러리를 설치합니다.
http://arduino.cc/en/Guide/Libraries
일단 설치되면 핀 9의 타이머를 사용하도록 IRRemoteInt.h를 수정해야 합니다. 이 예에서는 ThingShield와 통신하기 위해 핀 3을 사용합니다.
다음으로 스케치를 Arduino 보드에 업로드합니다(코드 섹션 참조).
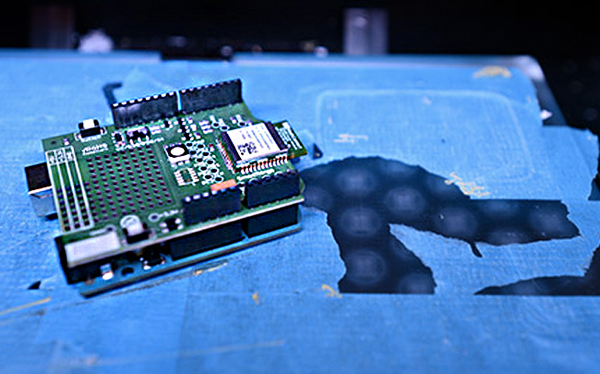
빌드는 간단하고 간단합니다. 먼저 아두이노 위에 ThingShield를 연결합니다. 아래 그림에는 아두이노만 표시되어 있지만 실드를 부착한 핀 위치는 동일합니다.
IR 수신기의 경우 해당 핀을 접지 및 5V에 연결합니다. 그런 다음 데이터 핀을 Arduino 핀 11에 연결합니다. IR 방출 LED를 핀 9에 연결하고 접지합니다. 100옴 저항은 LED가 신호를 보내기 위해 빠르게 깜박일 때 Arduino의 최대 전류를 처리할 수 있으므로 이 설계에서 선택 사항입니다. 계속 켜져 있으면 동일한 전류가 LED를 태울 가능성이 높습니다.
SmartThings IDE에서 다음으로 ThingShield용 새 장치 유형을 만듭니다.
"내 장치 유형" 섹션으로 이동하여 오른쪽에 있는 "새 SmartDevice"를 클릭하십시오.
새 SmartDevice를 생성하려면 두 단계가 필요합니다. 먼저 "Ir Bridge" 상단에 새 장치 유형에 이름을 지정합니다. 나중에 SmartApp 코드에서 SmartDevice 이름을 참조할 예정입니다.
장치의 속성(변수)과 명령(기능)을 정의해야 합니다. 이 튜토리얼에서는 두 개의 프로그래밍 가능한 버튼과 녹음 버튼에 대한 속성과 명령을 생성할 것입니다. 표시된 각 속성과 명령을 추가하십시오. 장치 코딩을 계속하려면 "만들기"를 선택하십시오.
그런 다음 장치 정의를 IDE의 코드 창에 복사합니다(코드 섹션 참조). 상단의 "저장" 버튼을 클릭한 다음 "게시"를 클릭하여 기기를 사용할 수 있도록 합니다.
아직 설정하지 않은 경우 ThingShield를 SmartThings 허브에 추가해야 합니다. 장치를 페어링하려면 ThingShield를 Arudino에 연결하고 전원을 켭니다. 실드의 "전환" 버튼을 6초 동안 누릅니다. SmartThings 스마트폰 앱으로 추가 버튼을 선택하세요. 물리적 "스위치" 버튼을 한 번 더 누르면 허브가 ThingShield를 식별하는 것을 볼 수 있습니다.
다시 IDE에서 홈 화면의 "장치"를 클릭하여 Arduino ThingShield로 이동합니다. 목록에서 장치를 선택하고 페이지 하단의 "편집" 버튼을 클릭합니다. "유형" 드롭다운 메뉴에서 생성한 새 SmartDevice 유형을 선택합니다. 나중에 선택해야 할 때 장치에 의미 있는 레이블 이름을 지정하는 것이 좋습니다. 업데이트를 눌러 기기를 새 기기 유형으로 설정하세요.
참고로 나중에 사용자 지정 장치 유형에 대한 업데이트를 게시할 때 게시된 업데이트 후에 실제 장치가 올바른 장치 유형과 연결된 상태로 남아 있는지 다시 확인하는 것이 좋습니다.
프로젝트에 SmartApp 자체라는 코드가 하나 더 있습니다. "My SmartApps"로 이동하고 오른쪽에 있는 버튼을 클릭하여 "New SmartApp"을 시작합니다. 이름, 설명 및 범주("내 앱")를 지정합니다. 앱 코딩을 계속하려면 "만들기"를 클릭하세요.
smartApp 코드를 복사합니다(코드 섹션 참조). "저장"을 선택한 다음 "게시"를 클릭하여 Smartthings iOS 또는 Android(출시 예정) 앱에서 SmartApp을 사용할 수 있도록 합니다.
원래 "Ir Bridge"라는 이름에서 사용한 원래 공간 없이 "IrBridge"로 이름으로 SmartDevice 유형을 참조합니다.
"irDevice", "device.IrBridge" 입력
이 라인을 통해 SmartApp에서 선택할 수 있는 옵션으로 "Ir Bridge" 유형의 장치만 표시할 수 있습니다. 사용된 camelCasing은 매우 구체적입니다. 스마트 앱에서 장치 유형을 참조할 때 이름에서 공백이 제거됩니다. 공백 다음에 오는 첫 번째 문자와 문자는 대문자로 표시됩니다. 나머지는 모두 원래 대문자와 상관없이 소문자입니다.
SmartThings 스마트폰 앱 내에서 새로운 SmartApp을 새로운 IR 장치와 연결하고 제어하려는 스위치를 선택하십시오. 그런 다음 "설치"를 클릭하십시오.
앱의 각 버튼을 프로그래밍하려면 타일 모서리에 있는 톱니바퀴를 클릭하여 타일 세부정보로 이동합니다. 큰 녹음 버튼을 선택하십시오. 녹음 모드에 있음을 나타내기 위해 빨간색으로 바뀝니다. 그런 다음 제어하려는 타일(재생/일시 중지 또는 B)을 클릭합니다. 그러면 노란색으로 바뀝니다. 리모컨을 ThingShield에 조준하고 학습하려는 버튼을 누릅니다. ThingShield는 이제 해당 코드를 SmartThings 클라우드로 보내고 SmartApp에서 선택한 버튼과 연결합니다. 새로 프로그래밍된 버튼이 녹색으로 바뀌고 녹음 버튼이 흰색으로 돌아갑니다.
다음에 리모컨의 해당 버튼을 누르면 SmartApp의 버튼과 연결된 스위치를 토글합니다.
<섹션 클래스="섹션 컨테이너 섹션 축소 가능" id="코드">/** * Smart Ir * * 작성자:[email protected] * 날짜:2013-03-06 */metadata { // 시뮬레이터 메타데이터 시뮬레이터 {} // UI 타일 정의 Tiles { standardTile("recStatus", "device.recStatus", 너비:2, 높이:2, canChangeIcon:true, canChangeBackground:true) { state "off", label:'record', action:"record", backgroundColor:"#ffffff" state "on" , label:'record', action:"record", backgroundColor:"#ff0000" } //이것은 보조 타일입니다 //set, unset, prog - 녹색, 흰색, 노란색 standardTile("buttonA", "device.buttonAStatus ", 너비:1, 높이:1, canChangeIcon:true, canChangeBackground:true) { state "unset", label:'', action:"buttonA", icon:"st.custom.buttons.play-pause", backgroundColor :"#cccccc" //회색 상태 "prog", 레이블:'', 작업:"buttonA", 아이콘:"st.custom.buttons.play-pause", backgroundColor:"#FDE910" //노란색 상태 "설정 ", label:'', action:"buttonA", icon:"st.custom.buttons.play-pause", backgroundColor:"#79b821" //green } //set, unset, prog - 녹색, 흰색, y ellow standardTile("buttonB", "device.buttonBStatus", 너비:1, 높이:1, canChangeIcon:true, canChangeBackground:true) { state "unset", label:'', action:"buttonB", 아이콘:"st .custom.buttons.b", backgroundColor:"#cccccc" //회색 상태 "prog", 레이블:'', 작업:"buttonB", 아이콘:"st.custom.buttons.b", backgroundColor:"#FDE910 " //노란색 상태 "set", 레이블:'', 작업:"buttonB", 아이콘:"st.custom.buttons.b", backgroundColor:"#79b821" //green } //가능한 메인 타일 메인([ "buttonA","buttonB"]) // 이것은 여러 타일 세부 정보에 대한 배열입니다(["recStatus","buttonA","buttonB"]) }}// 이벤트를 생성하기 위해 수신 장치 메시지를 구문 분석합니다. parse(String description) { log.trace "parse:" def 값 =zigbee.parse(description)?.text def codeParts =value.split(/,/) log.trace "코드:${codeParts[0]}" //[0] 는 16진수이고, [1]은 //[1]의 재전송이고, 처음 세 문자는 유형이고, 그 뒤에 코드 if(device.currentValue("recStatus") =="on") //in record mode { log .trace "기록 활성화" if(device.cur rentValue("lastButton") !="") { log.trace "마지막 버튼이 활성화되었습니다" def buttonStatus ="${device.currentValue("lastButton")}상태"; def buttonHex ="${device.currentValue("lastButton")}16진수"; def buttonCode ="${device.currentValue("lastButton")}코드"; def result =[ createEvent(name:buttonStatus, value:"set", isStateChange:true) // 버튼을 녹색으로 설정 ,createEvent(name:buttonHex, value:codeParts[0], isStateChange:true) //코드 저장 , createEvent(name:buttonCode, value:codeParts[1], isStateChange:true) //코드 저장 ,createEvent(name:"recStatus", value:"off", isStateChange:true) ,createEvent(name:"lastButton", value:"", isStateChange:true) //마지막 버튼 재설정 ] return result } else{ log.trace "선택된 버튼 없음" } } else { //그렇지 않은 경우 //모든 버튼과 일치하는지 확인 if(codeParts[ 0] ==device.currentValue("buttonAHex")) { //buttonA 관련 이벤트 보내기 def result =createEvent(name:"button", value:"A",isStateChange:true) log.debug "Parse는 $ {result?.descriptionText}" return result } else if(codeParts[0] ==device.currentValue("buttonBHex")) { //버튼B 관련 이벤트 보내기 def result =createEvent(name:"button", value:"B", isStateChange:true ) log.debug "분석 결과 ${result?.descriptionText} 반환됨" ret urn result } } def result =createEvent(name:null, value:"") return result}def record(){ //기록 모드 진입 log.debug "${device.currentValue("recStatus")}에서 레코드 모드 변경" clearLast() //마지막 버튼 지우기 //속성을 켜기/끄기로 전환 if(device.currentValue("recStatus") =="on") { sendEvent(name:"recStatus", value:"off", isStateChange:true ) //타일 색상이 흰색으로 변경 } else { sendEvent(name:"recStatus", value:"on", isStateChange:true) // 타일 색상이 빨간색으로 변경 }}def buttonA(){ log.debug "ButtonA Pressed" if(device.currentValue("recStatus") =="on") //기록 모드인 경우 프로그래밍할 버튼 설정 { clearLast() log.debug "Put buttonA in programming mode" // lastTile 속성을 tileA로 설정 //노란색으로 변경 sendEvent(name:"buttonAStatus", value:"prog", isStateChange:true) sendEvent(name:"lastButton", value:"buttonA", isStateChange:true) } else if(device.currentValue(" buttonAStatus") =="set") //설정되어 있으면 저장된 코드를 보냅니다. { log.debug "버튼A 코드 보내기" // 블래스터에 대한 원격 코드 zigbee.smartShield(text:"${device.currentValue("buttonACode")}").format() } else { log.debug "버튼은 현재 ${device.currentValue("buttonAStatus")} " }}def buttonB(){ clearLast() log.debug "ButtonB Pressed" if(device.currentValue("recStatus") =="on") //기록 모드인 경우 프로그래밍할 버튼 설정 { log.debug "Put button in programming mode" // lastTile 속성을 tileA로 설정 // 노란색으로 바꿉니다. sendEvent(name:"buttonBStatus", value:"prog", isStateChange:true) sendEvent(name:"lastButton", value:"buttonB ", isStateChange:true) } else if(device.currentValue("buttonBStatus") =="set") //설정되어 있으면 저장된 코드를 보냅니다. { log.debug "Send buttonB Code" //원격 코드를 다음으로 보냅니다. 블래스터 zigbee.smartShield(text:"${device.currentValue("buttonBCode")}").format() } else if(device.currentValue("buttonBStatus") =="unset") { log.debug "버튼 현재 설정 해제되어 있습니다." }}def clearLast(){ if(device.currentValue("lastButton") !="") { sendEvent(name:"${device.current 값("lastButton")}", 값:"unset", isStateChange:true) sendEvent(이름:"lastButton", 값:"", isStateChange:true) }}
/** * IR 수신기 * * 작성자:[email protected] * 날짜:2013-03-31 */preferences { section("IR 장치 선택...") { 입력 "irDevice", "장치 .IrBridge" } section("버튼 A가 켜지거나 꺼지는 중..."){ input "switch1", "capability.switch", 제목:"이 조명", 필수:false } section("버튼 B가 켜지거나 꺼짐 ..."){ 입력 "switch2", "capability.switch", 제목:"이 조명", 필수:false } }def installed() { log.debug "설정으로 설치됨:${settings}" subscribe(irDevice , "button.B", handleB) subscribe(irDevice, "button.A",handleA)}def updated() { log.debug "설정으로 업데이트됨:${settings}" unsubscribe() subscribe(irDevice, "button. B", handleB) subscribe(irDevice, "button.A",handleA)}def handleA(evt) { log.debug "버튼 A를 받았습니다" if (switch1.currentValue("switch") =="on") { switch1 .off() } else { switch1.on() }}def handleB(evt) { log.debug "버튼 B 수신" if (switch2.currentValue("switch") =="on") { switch2.off() } else { switch2.on() }}
제조공정
자동차 전자 제품, 고정밀 기기 또는 기타 고정밀 컬렉션으로 작업하고 있습니까? 아니면 데이터 분석, 증폭 및 정확도 향상을 위해 아날로그를 디지털로 변경할 수 있는 안정적인 장치가 필요하십니까? 그런 다음 필요한 것은 ADS1115입니다. 이 저전력 기기를 처음 접하는 경우 이 기사를 통해 좋은 출발점을 얻을 수 있습니다. 핀 구성, 작동 원리, 인터페이스 방법 등에 대해 자세히 알아볼 것입니다. 의 시작하자! ADS115 ADC 모듈이란 무엇입니까? ADS115 ADC 모듈은 저전력 및 16비트 정밀 AD 컨버터를
초, 분, 일, 월, 심지어 년을 포함하여 Arduino에서 시간을 추적하는 방법을 찾고 계십니까? 이 경우 RTC 모듈인 DS1307 Arduino가 필요합니다. 실시간 시계(RTC)는 시간을 추적하고 특정 시간에 작업을 수행하는 데 도움이 되는 장치입니다. 그러나 이것이 모든 회로에서 작동하려면 Arduino와 인터페이스해야 합니다. 다행히도 저희가 도와드리겠습니다. 이 기사에서는 DS1307을 RTC 모듈로 사용하고 이에 대한 모든 것을 배우고 Arduino 보드와 함께 사용하는 방법을 배우게 됩니다. DS1307 모