1Sheeld로 스마트 홈 자동화 및 보안 시스템 구축하기
부품 및 소모품
| 아두이노 우노 (Arduino UNO) |
× |
1 |
| 1Sheeld 보드 |
× |
1 |
| 릴레이 모듈 (4채널, YW Robot) |
× |
1 |
| 부저 |
× |
2 |
| 온도 센서 (LM35DZ) |
× |
1 |
| 점퍼 와이어 (일반) |
× |
1 |
| PIR 모션 센서 |
× |
1 |
| 자기 도어 스위치 (SparkFun) |
× |
2 |
| LCD 디스플레이 16x2 (아다프루트, 흰색/파란색) |
× |
1 |
필수 도구 및 장비
프로젝트 개요
이 프로젝트는 스마트폰을 40가지 이상의 아두이노 실드로 활용할 수 있는 1Sheeld를 사용하여, 음성 명령과 SMS로 가정의 조명을 제어하고 보안 및 온도 모니터링 기능을 제공하는 통합 시스템입니다.
주요 기능
- 음성 제어: "자비스(Jarvis)" 호출 후 "거실 켜", "침실 끄기" 등 명령으로 조명 제어
- SMS 제어: "lights on/off" 문자로 전체 조명 일괄 제어
- 보안 시스템: "security on/off"로 활성화/비활성화, 문 열림 시 부저 경보 및 이메일 알림
- 온도 감시: 주방 온도 35℃ 초과 시 부저 울림 및 이메일 발송 (코드에서 주석 처리됨)
- 시간 안내: "몇 시야" 명령 시 현재 시간 음성 안내
- LCD 상태 표시: 각 동작별 상태 메시지 출력
1Sheeld란?
1Sheeld는 스마트폰의 센서(마이크, GPS, 자이로스코프 등)와 통신 기능(블루투스, SMS, 이메일, 인터넷)을 아두이노에서 실드처럼 사용할 수 있게 해주는 보드입니다. 별도 센서 구매 없이 스마트폰 하나로 다양한 기능을 구현할 수 있습니다.
하드웨어 구성
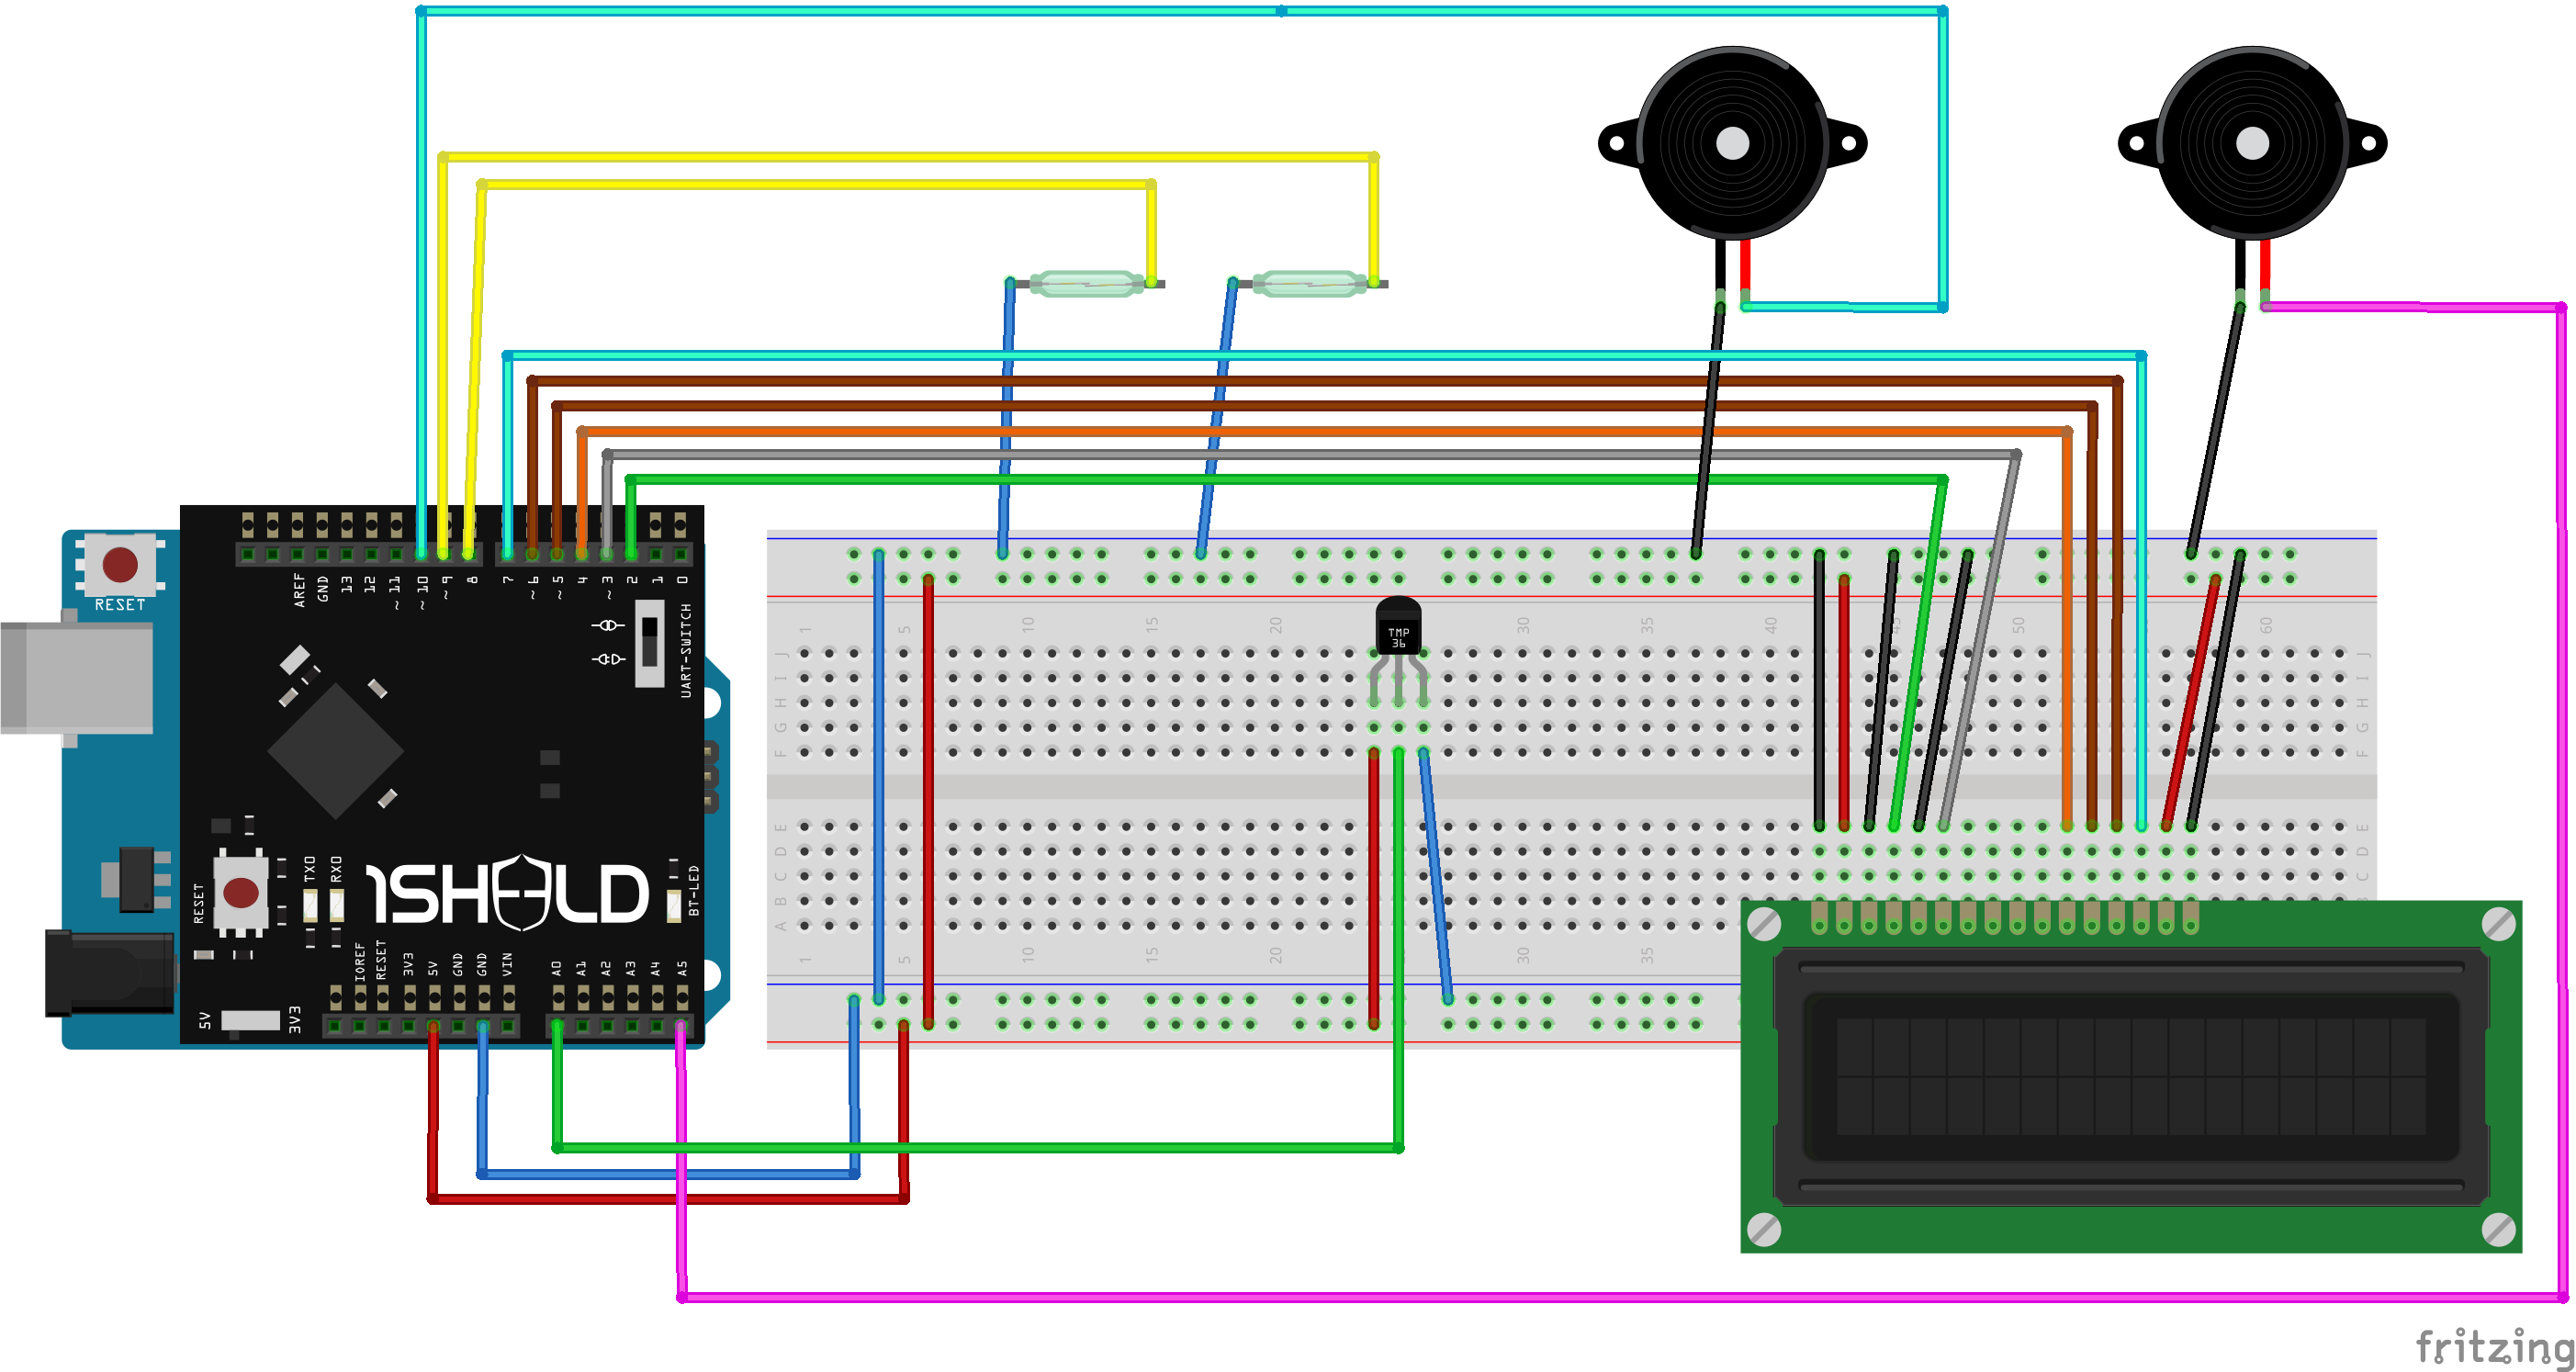
- 도어 센서 설치: 자기 스위치를 문에 부착, 열림/닫힘 상태를 디지털 값(0/1)으로 읽음
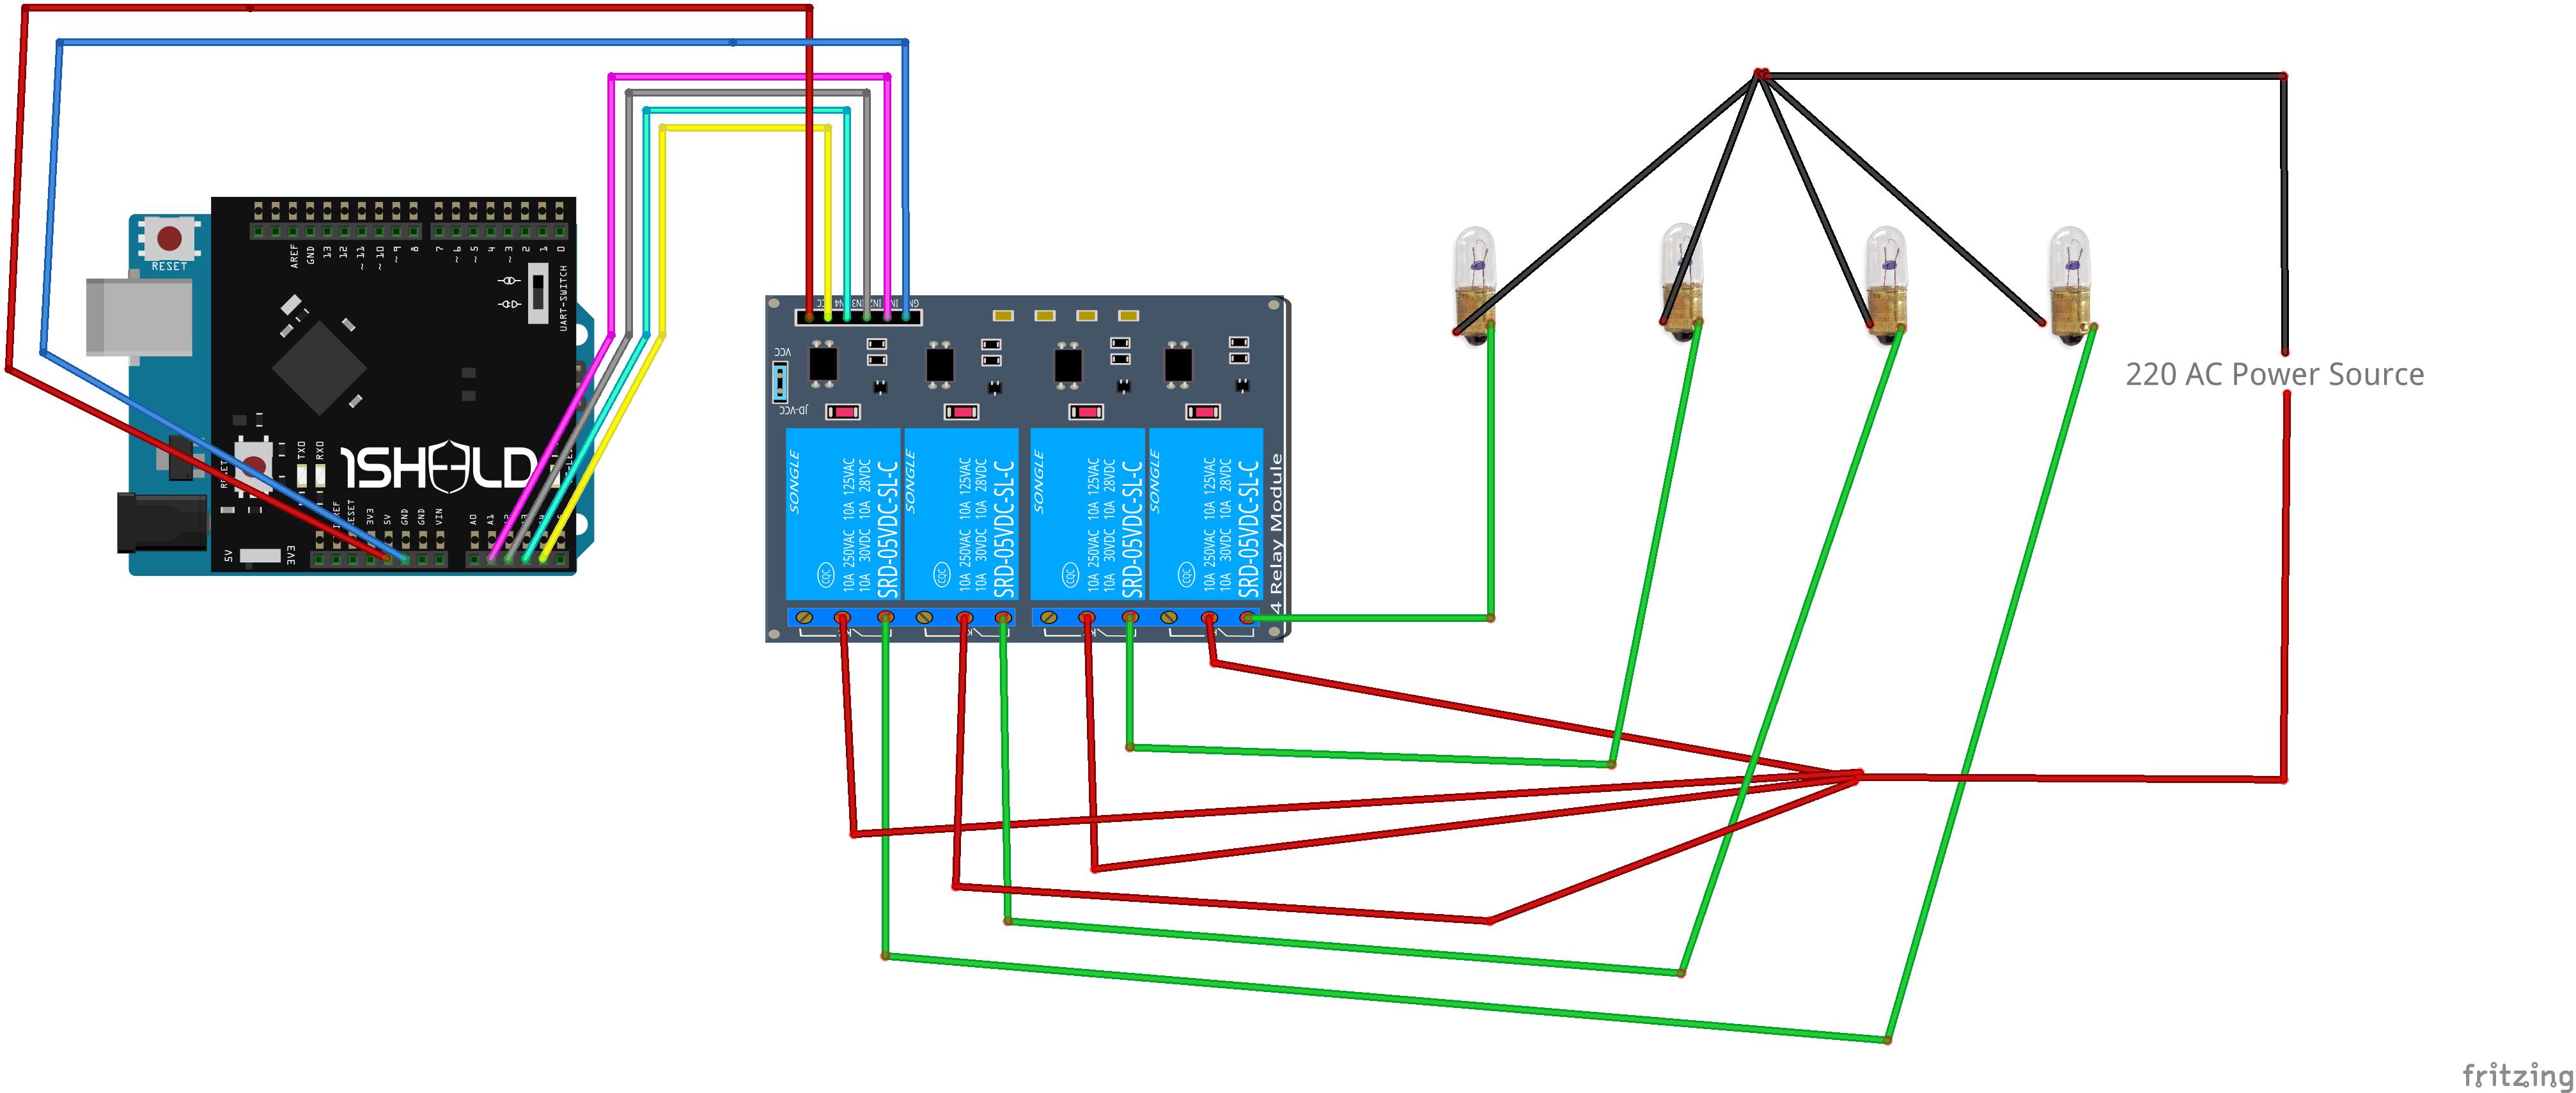
- 조명 배선: AC 램프를 병렬로 연결하고 릴레이로 제어
- 온도 센서(LM35DZ): VCC→5V, GND→GND, OUT→A0 핀 연결
- 1Sheeld 장착: 아두이노 위에 스택, UART 스위치를 '업로드 모드'로 두고 코드 업로드 후 '동작 모드'로 전환 필수
1Sheeld 앱 설정
- 앱 설치 후 블루투스로 보드와 페어링 (기본 코드: 1234)
- 사용할 실드 선택: SMS, 음성 인식, 텍스트 투 스피치, 시계, 이메일
- 음성 명령 전 반드시 "자비스"라고 호출
코드
/* Smart Home Automation & Security System
 * Team SADEE - ahmedebrahemua@yahoo.com
 */

#define CUSTOM_SETTINGS
#define INCLUDE_VOICE_RECOGNIZER_SHIELD
#define INCLUDE_TEXT_TO_SPEECH_SHIELD
#define INCLUDE_CLOCK_SHIELD
#define INCLUDE_SMS_SHIELD
#define INCLUDE_EMAIL_SHIELD

#include
#include

int minutes, hours;
String strh, strm;
char h[4], m[4];
LiquidCrystal lcd(2, 3, 4, 5, 6, 7);

#define receptionLamp A1
#define bedRoomLamp A2
#define pathRoomLamp A3
#define balaconyLamp A4

// 음성 명령 문자열
const char mainCommand[] = "jarvis";
const char receptionCommandOn[] = "reception on";
const char receptionCommandOff[] = "reception off";
const char bedRoomCommandOn[] = "bedroom on";
const char bedRoomCommandOff[] = "bedroom off";
const char pathRoomCommandOn[] = "bathroom on";
const char pathRoomCommandOff[] = "bathroom off";
const char balaconyCommandOn[] = "kitchen on";
const char balaconyCommandOff[] = "kitchen off";
const char whatsUp[] = "good morning";
const char timeCommand[] = "what time is it";
const char securityModeOn[] = "security on";
const char securityModeOff[] = "security off";
const char lightsOn[] = "on";
const char lightsOff[] = "off";

byte smile[] = { B00000, B01001, B01001, B00000, B00000, B10001, B01110, B00000 };

#define magneticReception 8
#define magneticBalacony 9
int buzzer1 = A5;  // 도어 센서용 부저
int buzzer2 = 10;  // 온도 센서용 부저

int magneticReceptionState, magneticBalaconyState;
int state = 0;     // 자비스 호출 대기 상태
bool security = false;

void setup() {
  noTone(buzzer1); noTone(buzzer2);

  // 릴레이 초기 상태: HIGH = OFF (액티브 로우 가정)
  digitalWrite(receptionLamp, HIGH);
  digitalWrite(bedRoomLamp, HIGH);
  digitalWrite(pathRoomLamp, HIGH);
  digitalWrite(balaconyLamp, HIGH);

  lcd.begin(16, 2);
  OneSheeld.begin();

  pinMode(receptionLamp, OUTPUT);
  pinMode(bedRoomLamp, OUTPUT);
  pinMode(pathRoomLamp, OUTPUT);
  pinMode(balaconyLamp, OUTPUT);
  pinMode(buzzer1, OUTPUT);
  pinMode(magneticReception, INPUT_PULLUP);
  pinMode(magneticBalacony, INPUT_PULLUP);
  pinMode(buzzer2, OUTPUT);

  lcd.createChar(0, smile);

  // 시작 메시지 시퀀스
  lcdPrint("Welcome To The", 0, 0, 4000);
  lcdPrint("Smart Home", 0, 0, 4000);
  lcdPrint("Automation And", 0, 1, 0);
  lcdPrint("Security System", 0, 0, 4000);
  lcdPrint("CALIBRATING....", 0, 0, 10000);

  if (!VoiceRecognition.isNewCommandReceived()) {
    lcdPrint("We Are Here To", 1, 0, 0);
    lcdPrint("HELP You", 4, 1, 0);
  }
  security = false;
}

void loop() {
  Clock.queryDateAndTime();
  SMS.setOnSmsReceive(&MyFunction);

  minutes = Clock.getMinutes();
  hours = Clock.getHours();

  // 24시간 → 12시간 변환
  if (hours > 12) { hours -= 12; noon = "PM"; }
  else { noon = "AM"; }

  strh = String(hours); strh.toCharArray(h, 4);
  strm = String(minutes); strm.toCharArray(m, 4);

  VoiceRecognition.start();
  OneSheeld.delay(8000);  // 음성 인식 대기

  if (VoiceRecognition.isNewCommandReceived()) {
    // "자비스" 호출 감지
    if (!strcmp(mainCommand, VoiceRecognition.getLastCommand())) {
      TextToSpeech.say("yes sir");
      lcd.clear(); lcd.setCursor(8, 0); lcd.write(byte(0));
      state = 1;
    }

    // 조음 제어 명령들 (state == 1일 때만 동작)
    handleVoiceCommand(receptionCommandOn, "ok sir lamp in the reception is on", receptionLamp, LOW, "The Hall Lamp Is", "ON");
    handleVoiceCommand(receptionCommandOff, "ok sir lamp in the reception is off", receptionLamp, HIGH, "The Hall Lamp Is", "OFF");
    handleVoiceCommand(bedRoomCommandOn, "ok sir lamp in the bedroom is on", bedRoomLamp, LOW, "The Bedroom", "lamp Is: ON");
    handleVoiceCommand(bedRoomCommandOff, "ok sir lamp in the bedroom is off", bedRoomLamp, HIGH, "The Bedroom", "lamp Is: OFF");
    handleVoiceCommand(pathRoomCommandOn, "ok sir lamp in the bathroom is on", pathRoomLamp, LOW, "The Bathroom", "lamp Is: ON");
    handleVoiceCommand(pathRoomCommandOff, "ok sir lamp in the bathroom is off", pathRoomLamp, HIGH, "The Bathroom", "lamp Is: OFF");
    handleVoiceCommand(balaconyCommandOn, "ok sir lamp in the kitchen is on", balaconyLamp, LOW, "The Kitchen", "Lamp Is: ON");
    handleVoiceCommand(balaconyCommandOff, "ok sir lamp in the kitchen is off", balaconyLamp, HIGH, "The Kitchen", "Lamp Is: OFF");

    // 인사 및 시간 안내
    if (!strcmp(whatsUp, VoiceRecognition.getLastCommand()) && state == 1) {
      lcdPrint("Good Morning :)", 0, 0, 0);
      lcdPrint("Its A Good Day", 0, 1, 0);
      sayTime();
      state = 0;
    }
    if (!strcmp(timeCommand, VoiceRecognition.getLastCommand()) && state == 1) {
      lcdPrint("Time In Cairo Is", 0, 0, 0);
      lcd.setCursor(0, 1); lcd.print(h); lcd.print(":"); lcd.print(m); lcd.print(" "); lcd.print(noon);
      sayTime();
      state = 0;
    }

    // 보안 시스템 제어
    if (!strcmp(securityModeOn, VoiceRecognition.getLastCommand()) && state == 1) {
      lcdPrint("Ok,Sir Feel Safe", 0, 0, 0);
      lcdPrint("Security Mode", 0, 1, 200);
      TextToSpeech.say("security system was triggered");
      security = true; state = 0;
    }
    if (!strcmp(securityModeOff, VoiceRecognition.getLastCommand()) && state == 1) {
      lcdPrint("Ok,Sir Security", 0, 0, 0);
      lcdPrint("is OFF", 0, 1, 200);
      TextToSpeech.say("security system was turned off");
      security = false; state = 0;
    }
  }

  // 보안 시스템: 문 열림 감지 시 경보
  magneticReceptionState = digitalRead(magneticReception);
  magneticBalaconyState = digitalRead(magneticBalacony);

  if (security) {
    if (magneticReceptionState == HIGH || magneticBalaconyState == HIGH) {
      tone(buzzer1, 1500);
      Email.send("ahmedebrahemua@yahoo.com", "Home Security System", "Someone Entered Your Home, Be Careful");
      OneSheeld.delay(3500);
    } else {
      noTone(buzzer1);
    }
  } else {
    noTone(buzzer1);
  }

  /* 온도 감시 코드 (주석 처리됨)
  voltage = analogRead(A0) * 1100 / 1024;
  degree = voltage / 10;
  if (degree >= 35) { ... }
  */
}

// SMS 수신 처리 함수
void MyFunction(char* phoneNumber, char* messageBody) {
  if (!strcmp(lightsOn, messageBody)) {
    allLamps(LOW);
    TextToSpeech.say("all lights was turned on");
    lcdPrint("All Lights is ON", 0, 0, 300);
    Email.send("...", "Home Security System", "all Lights Were Turned ON");
  } else if (!strcmp(lightsOff, messageBody)) {
    allLamps(HIGH);
    TextToSpeech.say("all lights was turned off");
    lcdPrint("All Lights Is OFF", 0, 0, 300);
    Email.send("...", "Home Security System", "all Were Turned OFF");
  }
}

// 헬퍼 함수들 (코드 간소화를 위해 별도 정의)
void handleVoiceCommand(const char* cmd, const char* speech, int pin, int val, const char* lcd1, const char* lcd2) {
  if (!strcmp(cmd, VoiceRecognition.getLastCommand()) && state == 1) {
    TextToSpeech.say(speech);
    OneSheeld.delay(2500);
    digitalWrite(pin, val);
    lcd.clear(); lcd.setCursor(0, 0); lcd.print(lcd1);
    lcd.setCursor(0, 1); lcd.print(lcd2);
    state = 0;
  }
}

void sayTime() {
  TextToSpeech.say("time in cairo is");
  OneSheeld.delay(1500);
  TextToSpeech.say(h); OneSheeld.delay(1000);
  TextToSpeech.say(m); OneSheeld.delay(1000);
  TextToSpeech.say(noon);
}

void allLamps(int val) {
  digitalWrite(receptionLamp, val); delay(500);
  digitalWrite(pathRoomLamp, val); delay(500);
  digitalWrite(bedRoomLamp, val); delay(500);
  digitalWrite(balaconyLamp, val); delay(500);
}

void lcdPrint(const char* line1, int col1, int row1, int delayMs) {
  lcd.clear(); lcd.setCursor(col1, row1); lcd.print(line1);
  if (delayMs) delay(delayMs);
}
CAD 파일
drawing_lasser_cutting_lvvsN9X9Xg.dwg (레이저 커팅용 도면)
회로도
구현 시 주의사항
- 1Sheeld의 UART 스위치: 코드 업로드 시 '업로드 모드', 실행 시 '동작 모드'로 반드시 전환
- 릴레이 모듈은 액티브 로우(LOW 시 켜짐) 타입 기준 작성됨
- 이메일 발송 시 발신자 계정 설정 필요 (1Sheeld 앱에서 구성)
- 음성 인식은 영어 명령 기준, 한글 지원 시 별도 설정 필요
- 온도 감시 기능은 코드에서 주석 처리되어 있음, 필요 시 주석 해제 후 캘리브레이션 필요



