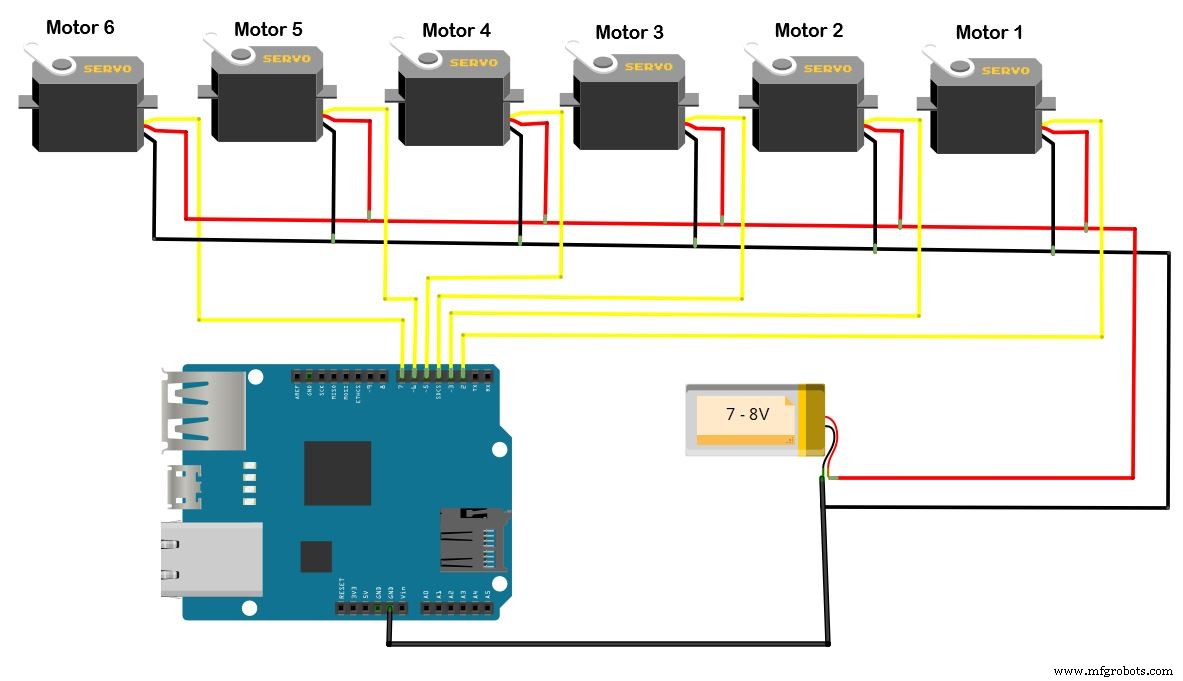
Remote_arm.php: 웹 앱 코드 (PHPoC WiFi 쉴드에 업로드). flywheel.png 이미지도 함께 업로드 필요.
RobotArmWeb.ino (아두이노)
#include <Phpoc.h>
#include <Servo.h>

int angle_init[] = {90, 101, 165, 153, 90, 120};   // 모터 직립 시 실제 각도
int angle_offset[] = {0, 11, -15, -27, 0, 137};    // 웹 각도와 실각도 오프셋
int cur_angles[] = {90, 101, 165, 153, 90, 120};   // 현재 각도
int dest_angles[] = {0, 0, 0, 0, 0, 0};             // 목표 각도
int angle_max[] = {180, 180, 160, 120, 180, 137};
int angle_min[] = {0, 0, 0, 20, 0, 75};
int direction[] = {1, 1, 1, 1, 1, -1};
int angleSteps[] = {3, 2, 2, 2, 4, 4};              // 모터별 이동 스텝(도)

Servo servo[6];
PhpocServer server(80);
PhpocClient client;
int stepNum = 0;

void setup() {
  Serial.begin(9600);
  Phpoc.begin(PF_LOG_SPI | PF_LOG_NET);
  server.beginWebSocket("remote_arm");
  for(int i=0; i<6; i++) {
    servo[i].attach(i+2); // 핀 2~7
    servo[i].write(angle_init[i]);
  }
}

void loop() {
  PhpocClient client = server.available();
  if (client) {
    String angleStr = client.readLine();
    if (angleStr) {
      Serial.println(angleStr);
      int commaPos1 = -1, commaPos2;
      for(int i=0; i<5; i++) {
        commaPos2 = angleStr.indexOf(',', commaPos1+1);
        int angle = angleStr.substring(commaPos1+1, commaPos2).toInt();
        dest_angles[i] = angle * direction[i] + angle_offset[i];
        commaPos1 = commaPos2;
      }
      int angle5 = angleStr.substring(commaPos1+1).toInt();
      dest_angles[5] = angle5 * direction[5] + angle_offset[5];
      stepNum = 0;
      // 최대 스텝 수 계산
      for(int i=0; i<6; i++) {
        int dif = abs(cur_angles[i] - dest_angles[i]);
        int step = dif / angleSteps[i];
        if (stepNum < step) stepNum = step;
      }
    }
  }
  // 스텝별 이동
  if (stepNum > 0) {
    for(int i=0; i<6; i++) {
      int angleStepMove = (dest_angles[i] - cur_angles[i]) / stepNum;
      cur_angles[i] += angleStepMove;
      cur_angles[i] = constrain(cur_angles[i], angle_min[i], angle_max[i]);
      servo[i].write(cur_angles[i]);
    }
    stepNum--;
    delay(20);
  }
}
Remote_arm.php (웹 앱, PHP/JavaScript)
<!DOCTYPE html>
<html>
<head>
<title>Arduino - Arm Robot - Web</title>
<meta name="viewport" content="width=device-width, initial-scale=0.9">
<style>
body { text-align: center; }
canvas { background-color: #FFFFFF; }
</style>
<script>
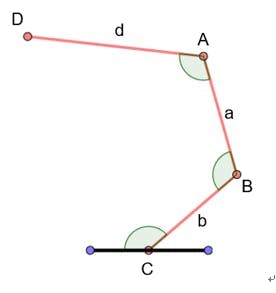
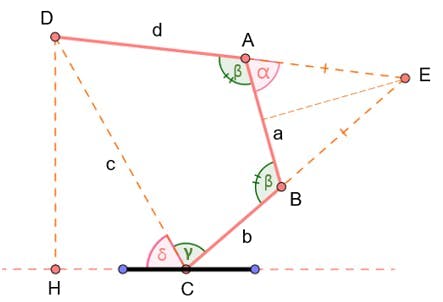
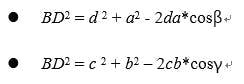
// ... (캔버스 렌더링, 터치/마우스 이벤트 처리, 기하 계산 geometric_calculation(),
// 웹소켓 통신, 존별 제어 로직 등 전체 코드는 원문 참조)
// 주요 변수: ARM_LENGTH_1=95, ARM_LENGTH_2=88, ARM_LENGTH_3=155 등 링크 길이
// Zone A: 역기구학으로 모터 2,3,4 각도 계산
// Zone B/C: 원형 터치 영역으로 모터 1,5 각도 제어
// Zone D: 수직 바로 모터 6(그리퍼) 제어
// 웹소켓으로 "angle1,angle2,angle3,angle4,angle5,angle6\r\n" 전송
</script>
</head>
<body>
<h2>Arduino - Control Arm Robot via Web</h2>
<canvas id="servo"></canvas>
<p>WebSocket : <span id="ws_state">null</span><br></p>
<button id="wc_conn" type="button" onclick="wc_onclick();">Connect</button>
</body>
</html>