아두이노 튜토리얼 06: Processing과 시리얼 통신으로 연결하기
아두이노 튜토리얼 시리즈의 여섯 번째 튜토리얼입니다. 이 튜토리얼에서는 아두이노를 Processing에 연결하고 시리얼 포트를 사용하여 어떻게 통신하는지 배웁니다. Processing IDE를 사용하여 아두이노 보드에 명령을 보내고 그 반대의 경우도 예제로 만듭니다.
따라하기 쉬운 단계별 비디오 튜토리얼입니다. 또한 비디오 아래에서 이 튜토리얼에 필요한 부품과 예제의 소스 코드를 찾을 수 있습니다.
이 아두이노 튜토리얼에 필요한 구성 요소
- 아두이노 보드
- 브레드보드와 점퍼 와이어
- LED
- 220옴 저항
- 푸시 버튼
회로도
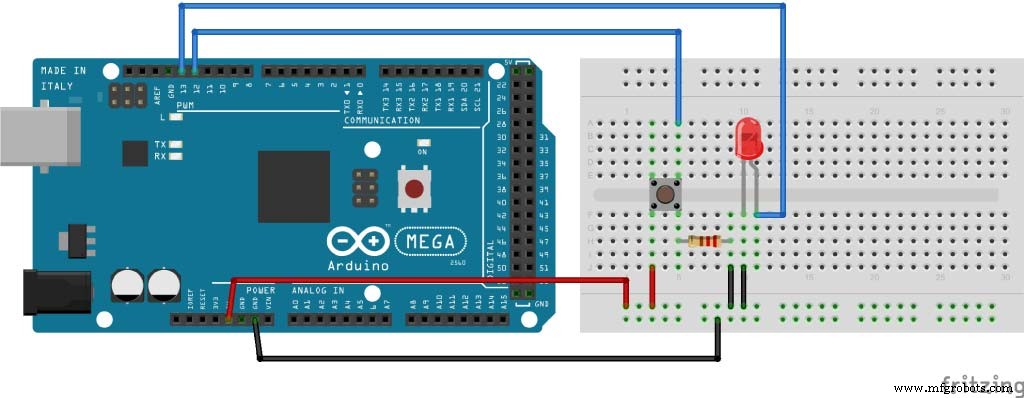
아두이노 소스 코드
int led = 13;
int button = 12;

void setup() {
  pinMode(led, OUTPUT);
  pinMode(button, INPUT);
  Serial.begin(9600);
}

void loop() {
  if (Serial.available() > 0) {
    char ledState = Serial.read();
    if (ledState == '1') {
      digitalWrite(led, HIGH);
    }
    if (ledState == '0') {
      digitalWrite(led, LOW);
    }
  }

  int buttonState = digitalRead(button);
  if (buttonState == HIGH) {
    Serial.println("Button is pressed");
    delay(500);
  }
}
Processing 소스 코드
import processing.serial.*;

Serial myPort;
String myText = "";

void setup() {
  size(300, 300);
  myPort = new Serial(this, "COM4", 9600);
  myPort.bufferUntil('\n');
}

void serialEvent(Serial myPort) {
  myText = myPort.readStringUntil('\n');
}

void draw() {
  background(0, 0, 0);
  text(myText, 120, 120);
  myText = "";

  if (mousePressed && (mouseButton == LEFT)) {
    myPort.write('1');
  }
  if (mousePressed && (mouseButton == RIGHT)) {
    myPort.write('0');
  }
}



