

산업 제조
 |
| × | 1 | |||
 |
| × | 1 | |||
 |
| × | 1 | |||
| × | 4 | ||||
| × | 1 | ||||
| × | 1 | ||||
| × | 1 | ||||
| × | 1 | ||||
| × | 3 | ||||
| × | 1 | ||||
| × | 7 | ||||
| × | 7 | ||||
| × | 1 | ||||
| × | 1 |
 |
|
| ||||
| ||||
 |
|
업데이트
TheAmplituhedron.com을 사용하여 IoT 프로젝트를 개선하는 방법은 무엇입니까? 당신을 위해 서버 측 프로그래밍을 처리하는 내 새 프로젝트입니다. TheAmplituhedron.com을 호스트로 사용하면 인터넷을 통해 손쉽게 데이터 패킷을 보내고 받을 수 있습니다.
내 프로젝트와 기사를 지원하려면 여기에서 내 웹사이트를 방문하세요. :)
설명
집에 있는 수족관과 관개 시스템을 제어할 수 있는 전문 웹사이트를 만들고
내가 집에 없을 때 집에 대한 정보를 받는 것이 이 프로젝트의 주요 측면입니다.
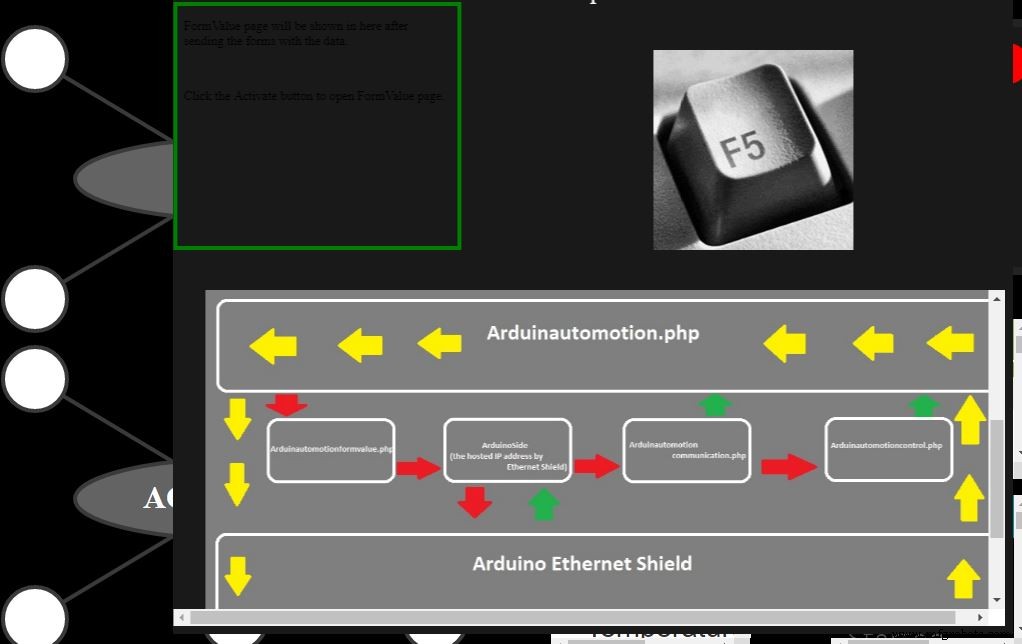
그 목표를 달성하기 위해 4개의 다른 HTML 페이지(Arduinautomotion.php, Arduinautomotioncontrol.php, Arduinautomotionformvalue.php, Arduinautomotioncommunication.php)를 포함하는 Arduinautomotion 프로젝트를 만들었습니다. 내 Apache 로컬 호스트에서.
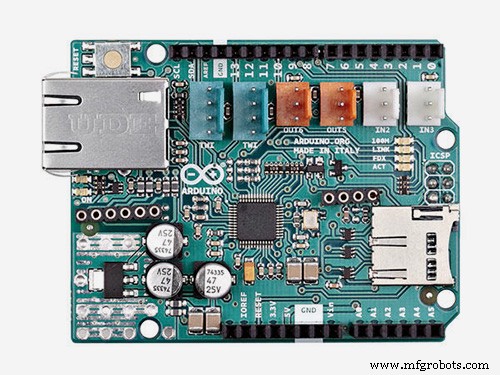
또한 Arduino Ethernet Shield는 Arduinautomotion 웹사이트와 통신하기 위해 선택한 IPAddress로 연결할 수 있는 또 다른 HTML 웹 페이지(ArduinoSide.php)를 호스팅합니다.
2주 동안 휴가를 가야 해서 이 프로젝트에 대해 생각했고 그 때문에 수족관을 조정할 수 없었습니다. 때로는 수족관의 산소 수준이 증가하는 것을 방지하기 위해 내부 필터를 닫아야 하거나 원격으로 물고기를 먹이기 위해 피더를 열어야 합니다. 수족관의 내용물을 제어하는 6가지 옵션과 관개 시스템을 활성화하는 1가지 옵션을 추가했습니다.
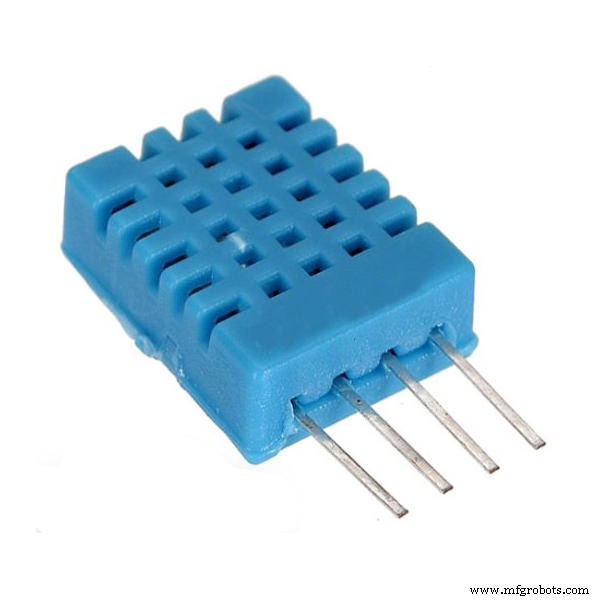
또한 Arduino 이더넷 쉴드를 통해 Arduinautomotion을 사용하여 가정에 대한 데이터(예:온도 및 습도 값은 DHT11 센서에서 가져오고 가정의 메탄 가스 값은 MQ4 센서에서 가져옴)를 쉽게 얻을 수 있습니다.
따라서 Arduinautomotion 웹 사이트에는 Arduino에서 가정에 대한 데이터를 가져오고 보낼 수 있는 쉬운 인터페이스가 있습니다.
HTML, CSS, JavaScript, PHP 및 jQuery 언어 지식은 전체 프로젝트의 내용을 이해하는 데 필요하므로 이것은 프로젝트의 쇼케이스일 뿐이지만 언어를 알고 있다면 프로젝트에 포함된 모든 웹 페이지를 찾을 수 있습니다. 아래 PHP 코드 파일.
참고:저는 메모장++을 사용하여 웹 페이지를 프로그래밍했습니다.
두 PHP 웹 페이지 간에 데이터를 보내고 받는 방법
HTML 양식, PHP 메소드 및 PHP $_SESSION [""]을 사용하여 웹 페이지 간에 데이터를 가져오고 전송했습니다. 통신은 Get Method가 Post Method보다 간편하지만 Post Method가 Get Method보다 안전하므로 Post Method를 사용하여 ArduinoSide 웹페이지를 제외한 웹페이지 간 통신을 했습니다. 그러나 Get Method는 Post Request보다 HTTP GET Request가 훨씬 쉽기 때문에 Arduino Ethernet Shield와 통신하는 가장 쉬운 방법이므로 ArduinoSide 웹 페이지에 Get Method를 사용했습니다. 또한 PHP $_SESSION[""]은 두 개 이상의 웹 페이지 간에 영구적으로 데이터를 저장하는 방법입니다.
https://www.w3schools.com/php/php_forms.asp
https://www.w3schools.com/php/php_sessions.asp
Apache HTTP Server(Localhost)에서 웹사이트를 설정하는 방법
Apache HTTP Server는 이러한 종류의 호스팅에 효율적이지만 대신 XAMPP 또는 다른 호스팅 서버를 선택할 수 있습니다. 제 경우에는 AppServ>> www>> Arduinautomotion.php 및 그 내용입니다. 내 자신의 IPAddress("192.168.1.20"은 Localhost를 나타냄)를 사용하여 웹 페이지에 액세스했지만 IPAddress(예:http://yourIPAddress/Arduinautomotion.php)를 사용해야 합니다.
http://editrocket.com/articles/php_apache_windows.html
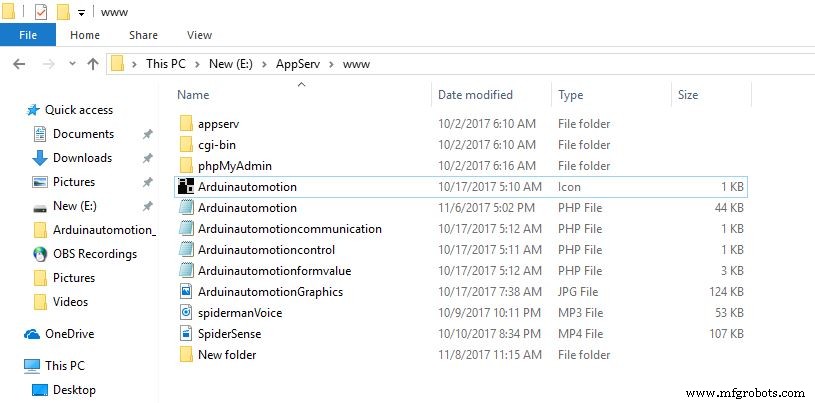
아래의 커스텀 부분에 Arduinautomotion.php의 모든 내용이 추가되었습니다.
Android 기기에서 Localhost에 연결하는 방법
Windows는 이 작업의 MAC과 다르지만 아래 링크는 Windows에 도움이 될 수 있습니다.
https://stackoverflow.com/questions/4779963/how-can-i-access-my-localhost-from-my-android-device
그런 다음 동일한 Wİ-Fİ 네트워크에서 자신의 IPAddress로 Arduinautomotion.php에 쉽게 액세스할 수 있습니다.
Wi-Fi를 통해 로컬 호스트에 액세스하는 방법
Windows는 이 작업의 MAC과 다르지만 아래 링크는 Windows에 도움이 될 수 있습니다.
그것은 당신의 외부 IPAddress와 함께 작동하지만 당신만이 외부 IPAddress를 알고 있다고 확신합니다. 왜냐하면 그것은 호스팅하는 위험한 방법일 수 있기 때문입니다.
https://stackoverflow.com/questions/5524116/accessing-localhost-xampp-from-another-computer-over-lan-network-how-to
또한 ArduinoSide.php에 액세스하려면 포트 포워딩을 사용해야 하며 아래 ArduinoSide 코드에서 선택한 IPAddress와 함께 작동합니다.
https://en.wikipedia.org/index.php?q=aHR0cHM6Ly9lbi53aWtpcGVkaWEub3JnL3dpa2kvUG9ydF9mb3J3YXJkaW5n
아두인오토모션.php
아두이노 이더넷 실드와 통신하기 위한 메인 페이지로, 이 페이지에서 아두이노에 명령을 내리고 아두이노에서 집에 대한 데이터를 쉽게 얻을 수 있습니다.
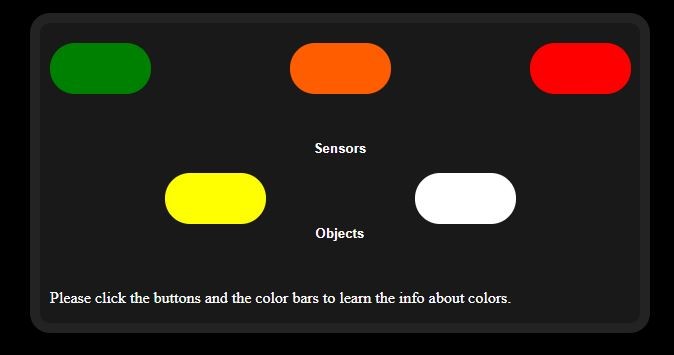
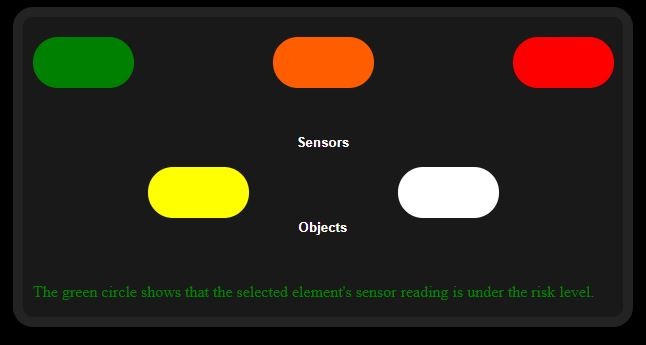
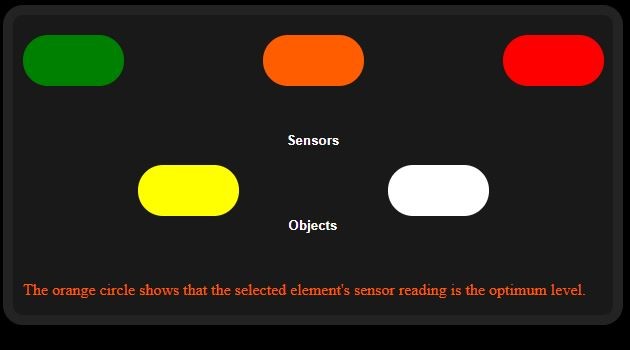
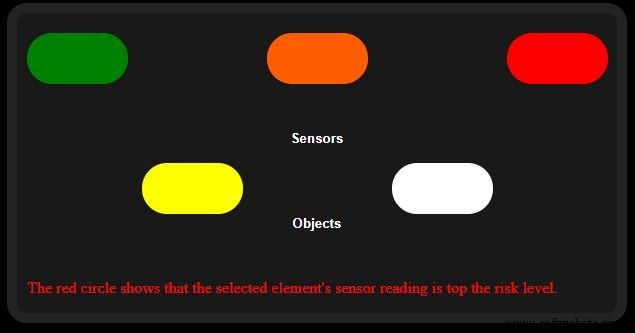
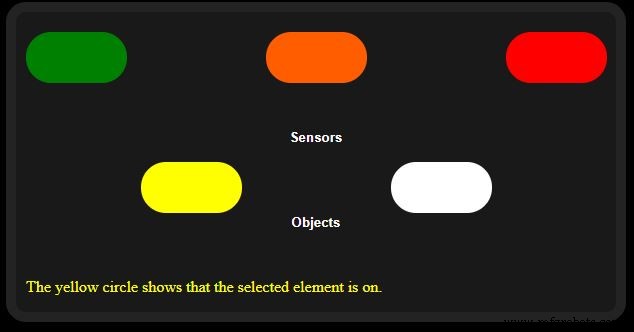
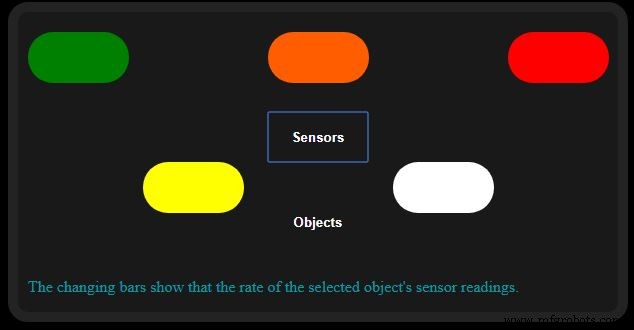
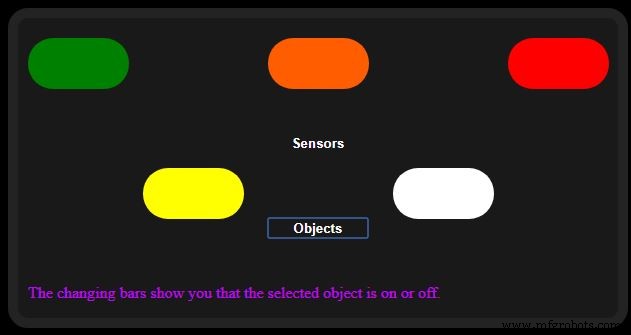
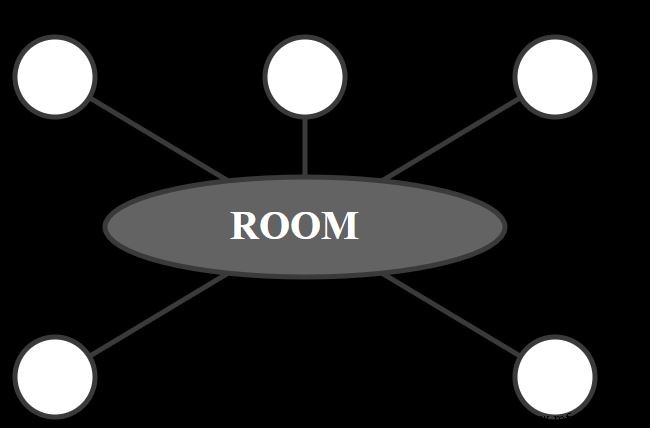
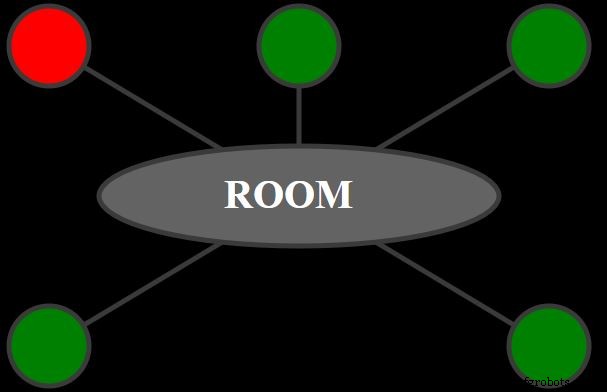
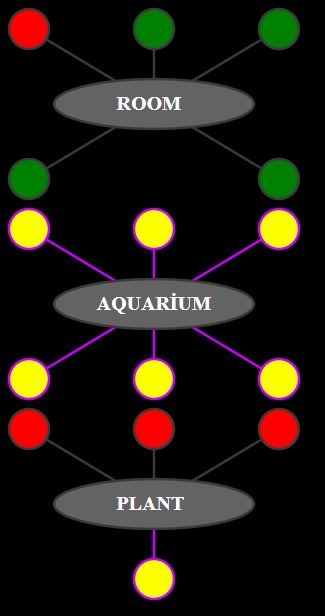
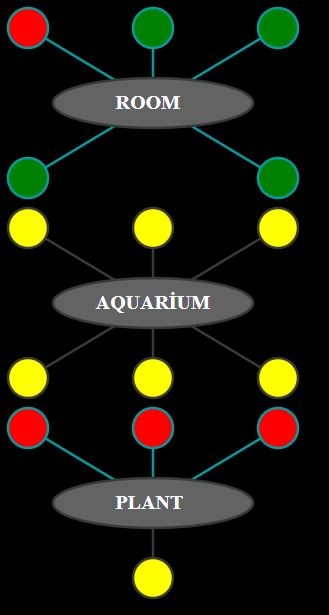
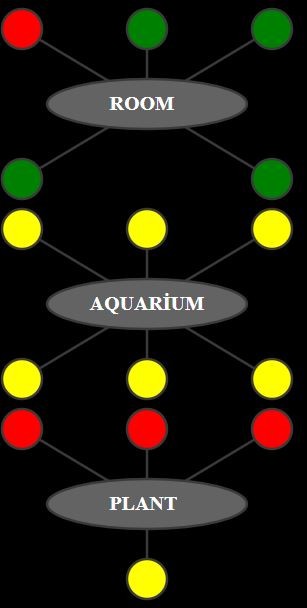
Change Menu는 변화하는 상황을 설명하고 부품의 색상을 변경하여 어느 부분이 물체이고 어떤 부분이 센서인지 보여줍니다.
변화하는 원으로 센서의 값과 물체의 상황을 보여줍니다.

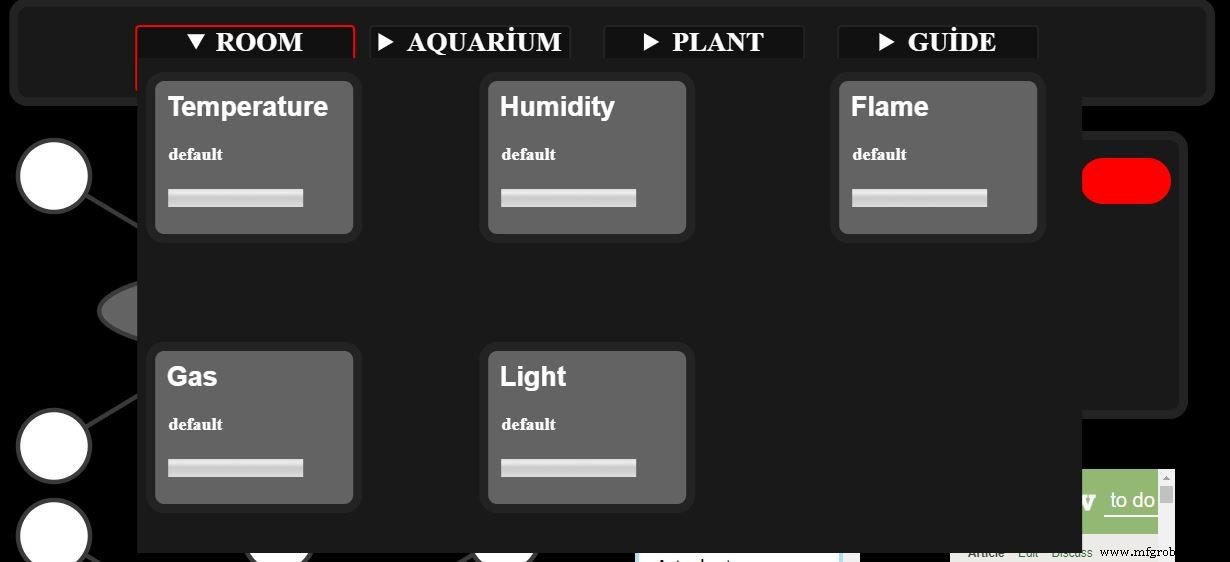
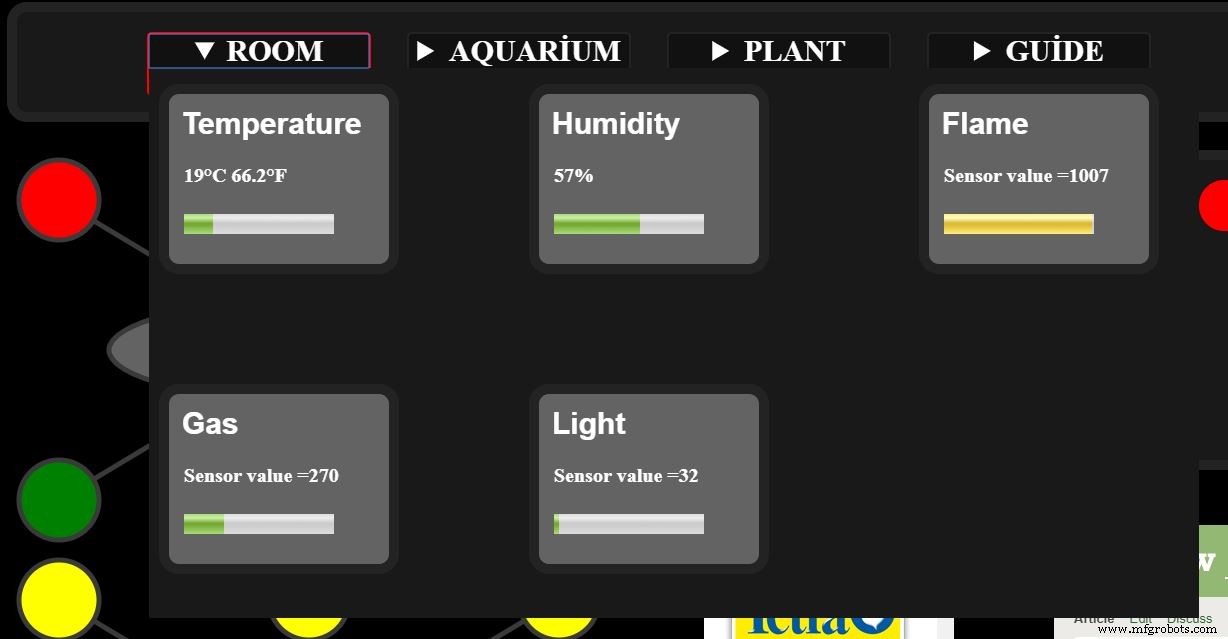
1) 회의실 섹션
Arduinautomotioncommunication.php에서 가져온 방에 대한 모든 데이터는 방 섹션에 표시됩니다.
이전:
이후:
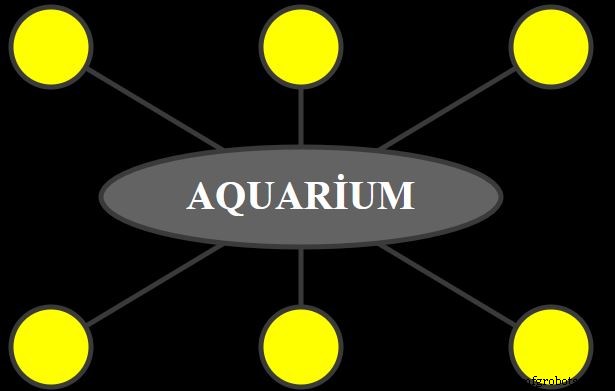
2 )수족관 섹션
HTML 양식을 사용하여 수족관 부분에 대해 선택하는 모든 조합은 Arduinautomotioncontrol.php에서 Arduinautomotion.php로 출력으로 반환된 후 Arduinautomotionformvalue.php로 전송됩니다.
이전:

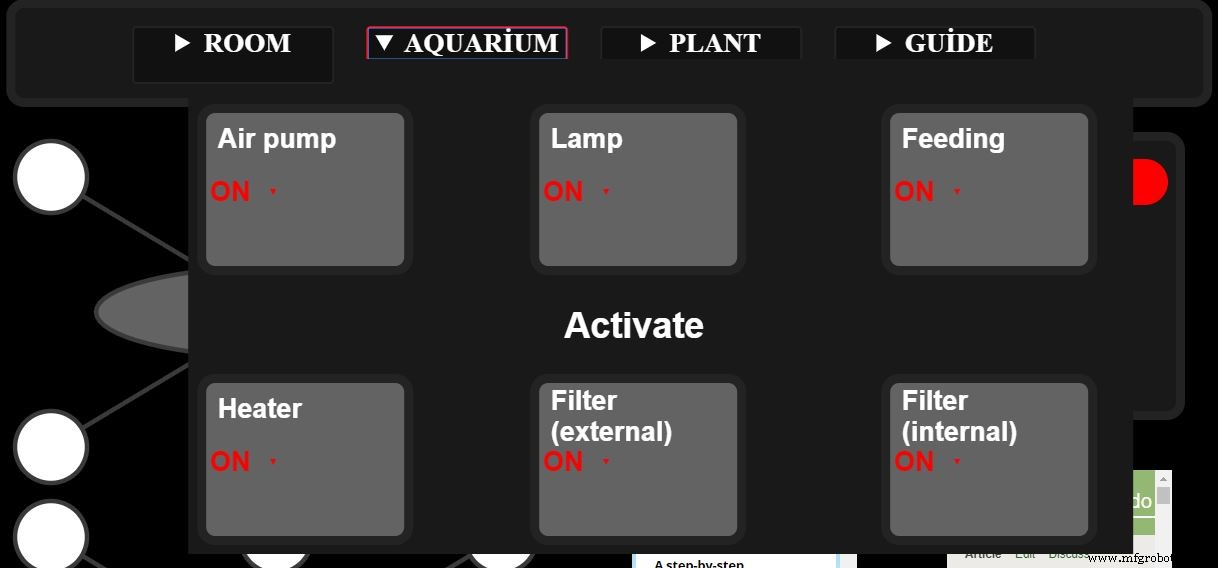
이후:
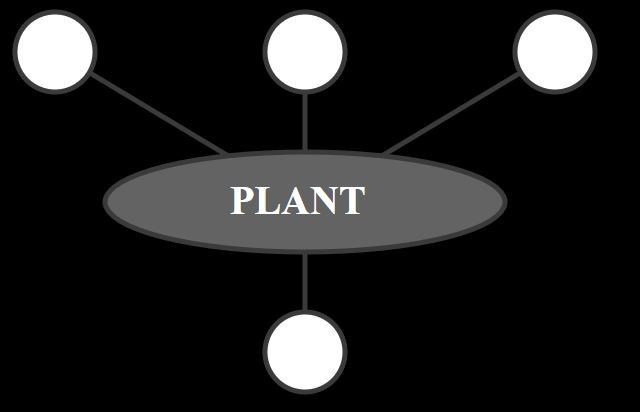
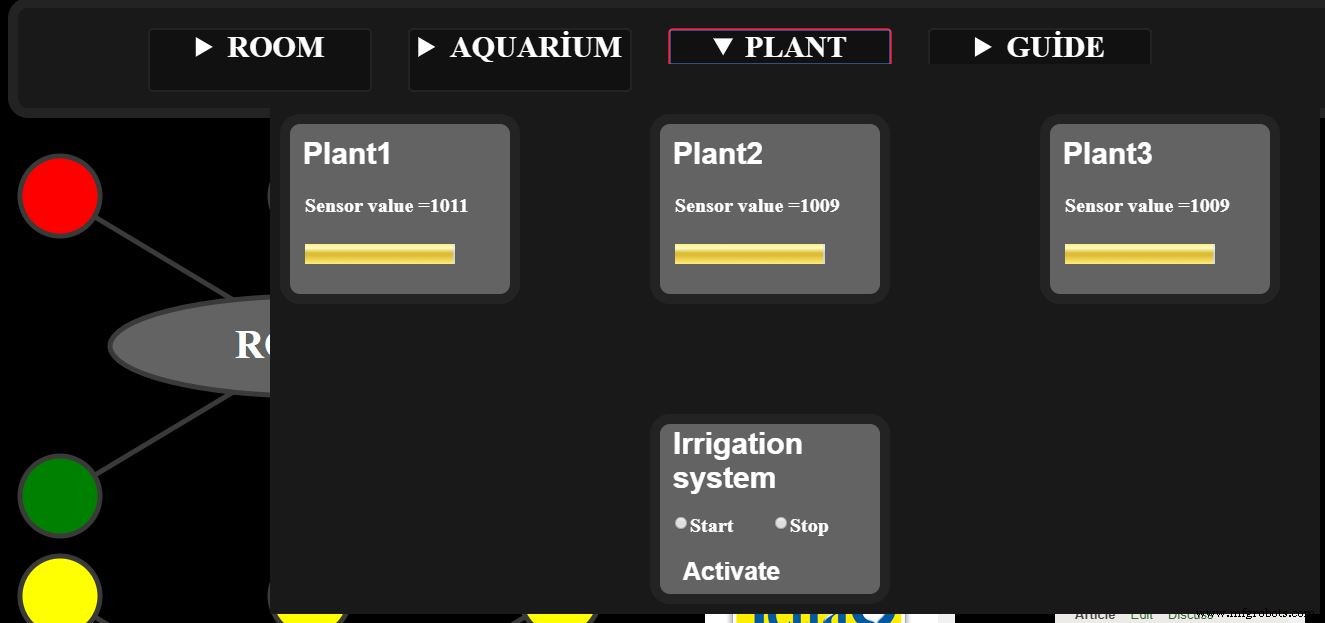
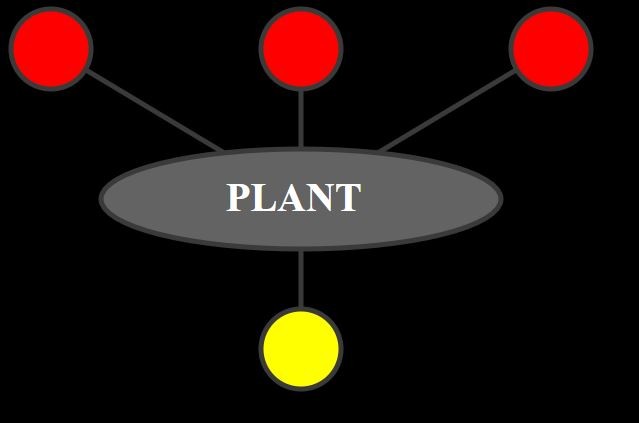
3) 식물 섹션
습도계 센서의 값을 관찰할 수 있으며 관개 시스템의 시작은 값을 통해 고려할 수 있습니다. 수족관 섹션으로 데이터는 Arduinautomotioncontrol.php에서 Arduinautomotion.php로 출력으로 반환됩니다.
이전:
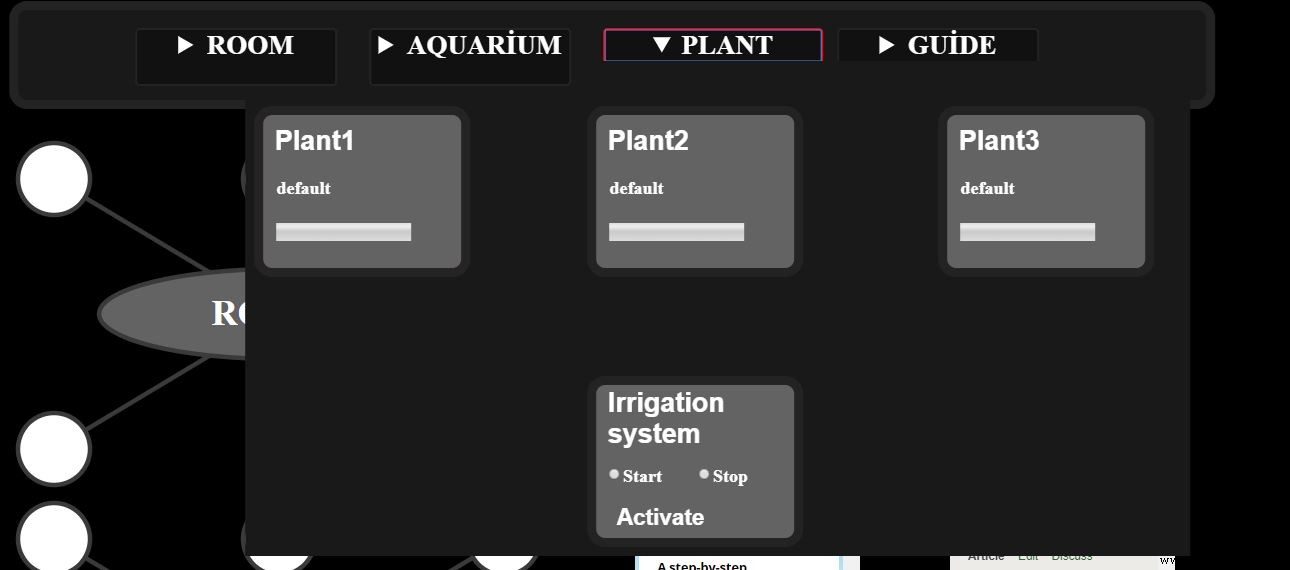
이후:
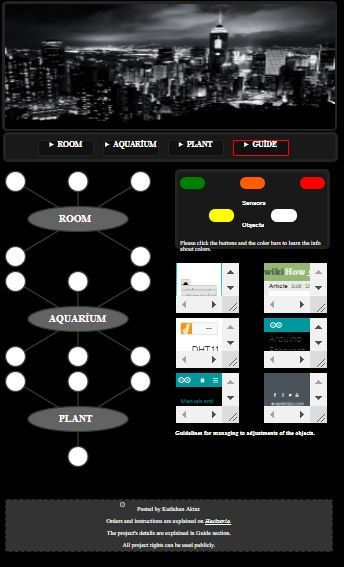
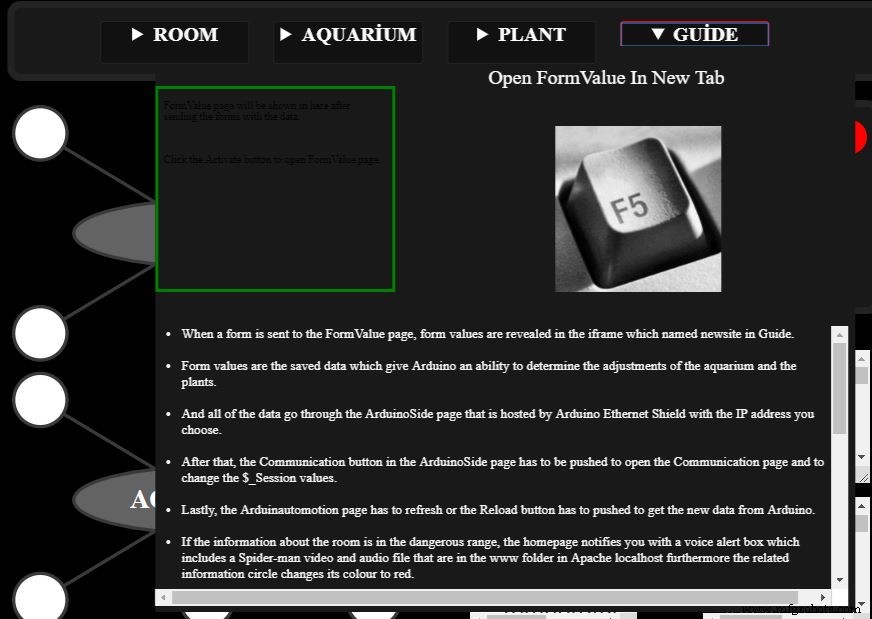
4) 가이드 섹션
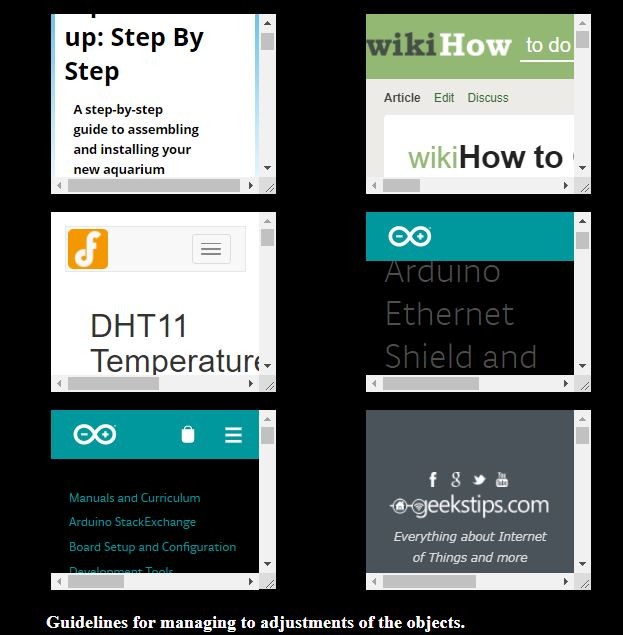
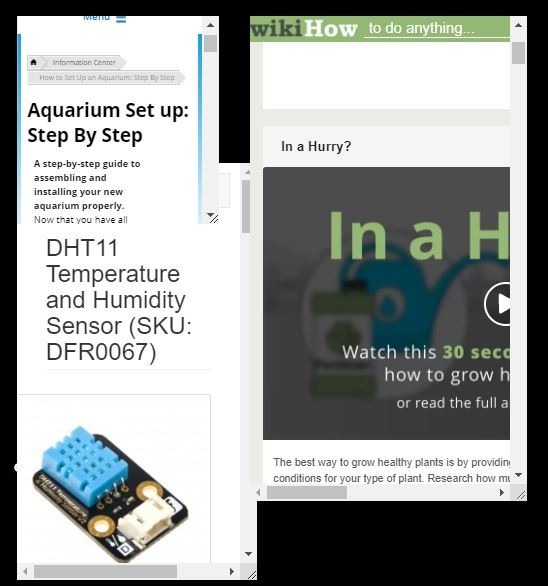
그것은 Arduinautomotionformvalue.php 웹 페이지를 포함하여 양식의 선택을 다시 관찰합니다. 또한 프로젝트에 대한 몇 가지 지침과 의사 소통 과정을 설명하는 그림이 포함되어 있습니다.
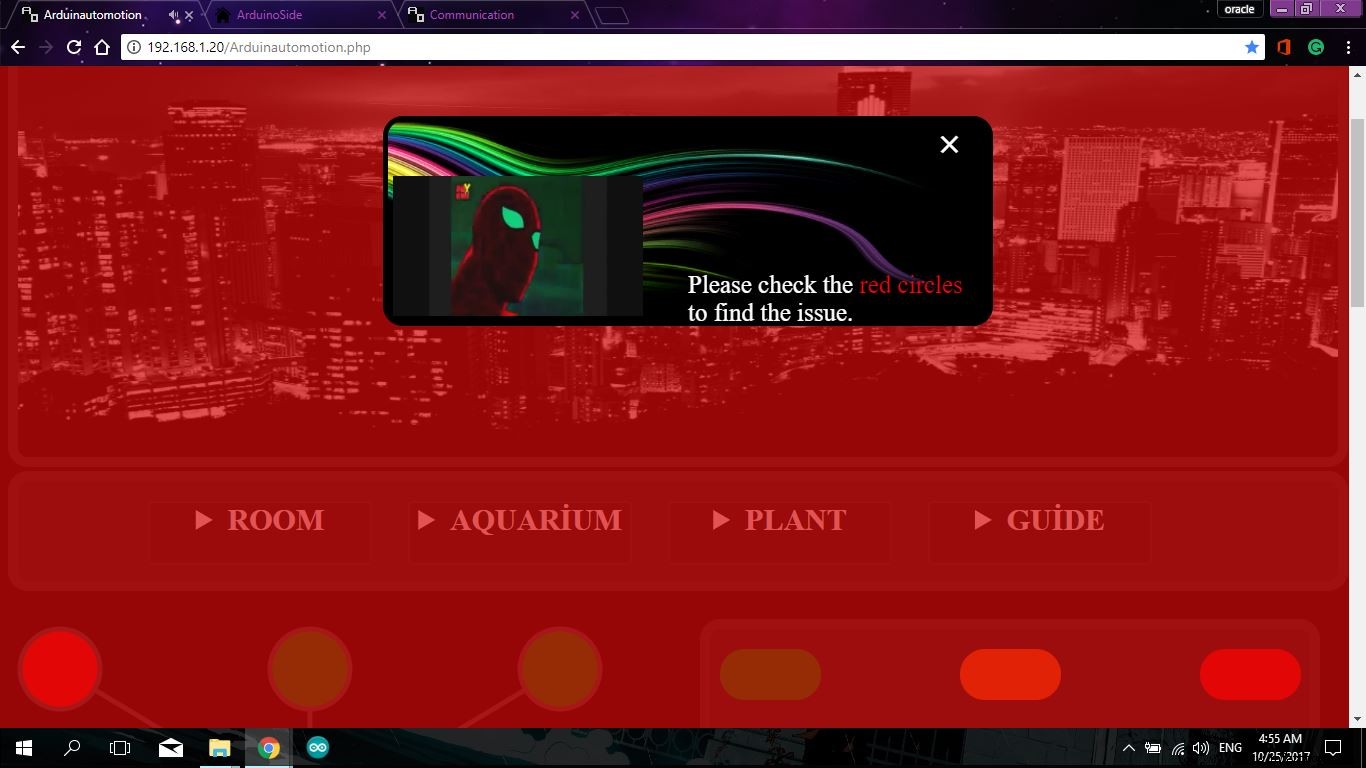
5 )경고 상자
어떤 값이 위험 범위에 있든, 스파이더맨 비디오 파일과 오디오 파일("Spider-sense is tingling")이 포함된 경고 상자는 Arduinautomotion.php 웹 페이지를 다시 로드할 때 나타납니다.
6) Arduinautomotion.php의 일부
크기 조정이 가능한 웹사이트 지침:
변화하는 전체 서클:

바닥글:

Arduinautomotioncontrol.php
Arduinautomotion.php 웹 페이지에 포함되어 Arduinautomotionformvalue.php 및 Arduinautomotioncommunication.php에서 모든 데이터를 $_SESSION [" "]으로 가져옵니다.
그것은 PHP 페이지를 통해 영구적으로 데이터를 저장합니다.
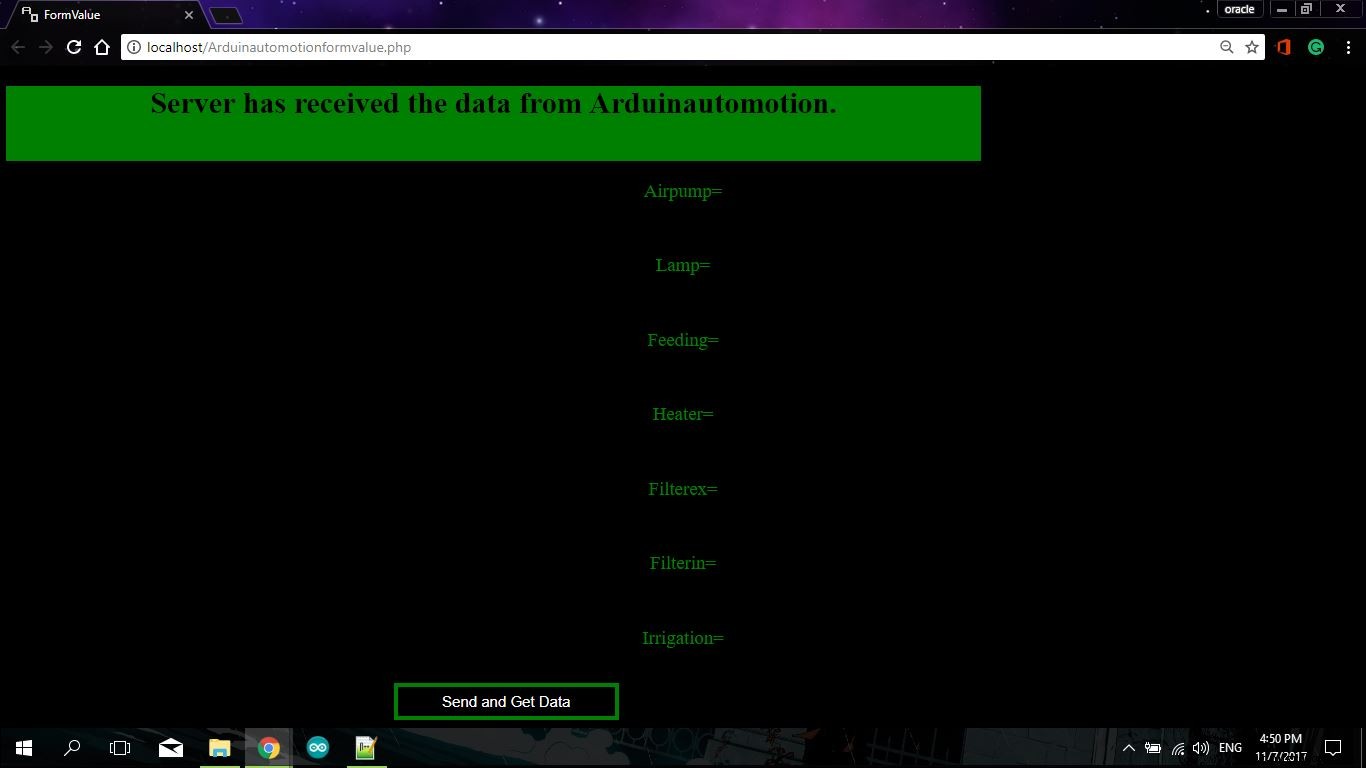
Arduinautomotionformvalue.php
Arduinautomotion.php에서 양식 선택을 가져와 ArduinoSide 및 Arduinautomotioncontrol.php로 보냅니다. 이것은 Arduinautomotion.php 웹 페이지의 가이드 섹션에 포함되어 있지만 새 탭으로 액세스할 수도 있습니다.
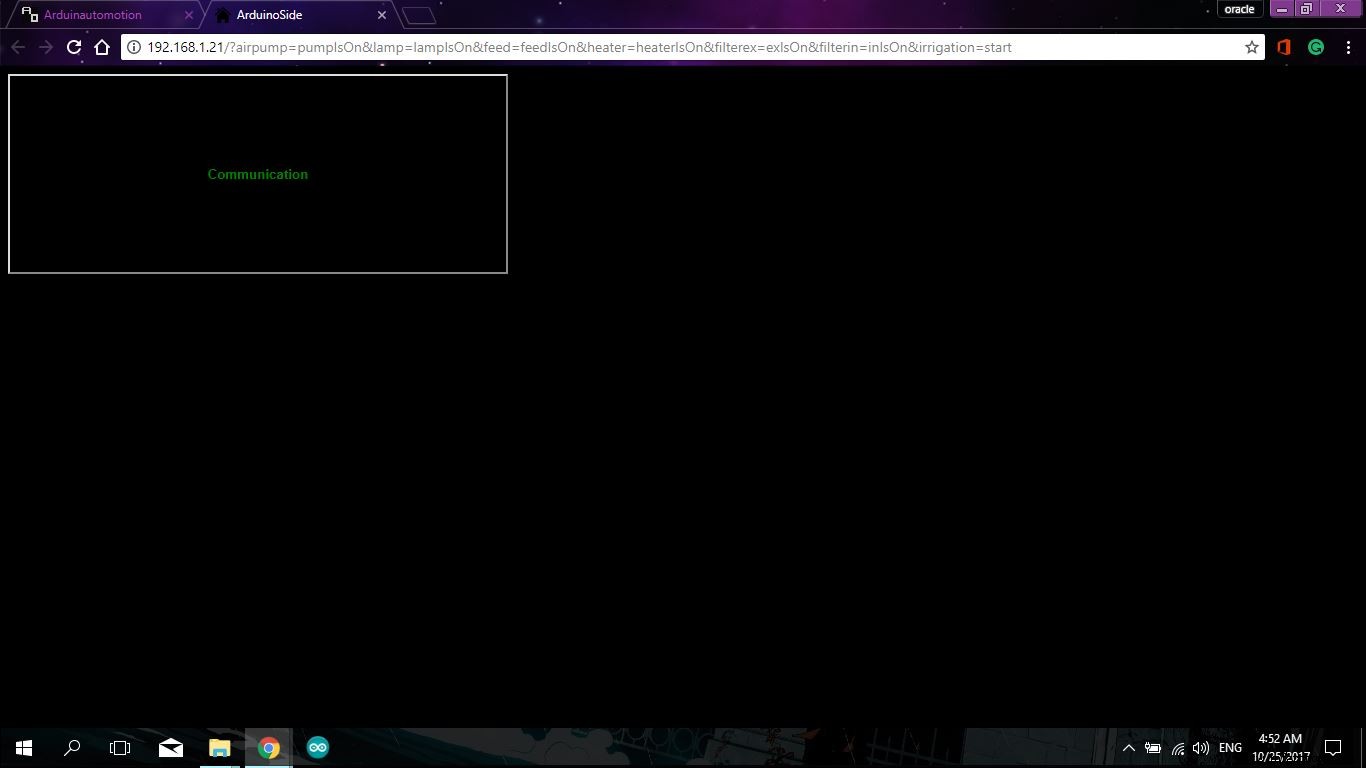
아두인오토모션커뮤니케이션.php
ArduinoSide에서 가져온 데이터는 Arduinautomotioncommunication.php에서 저장한 후 자동으로 데이터를 Arduinautomotioncontrol.php로 보냅니다.

아두이노사이드
DNS를 통해 Arduino Ethernet Shield에 의해 호스팅되며 아래 ArduinoSide 코드에서 선택한 IPAddress( https://yourChosenIPAddress )로 액세스할 수 있습니다.
연결
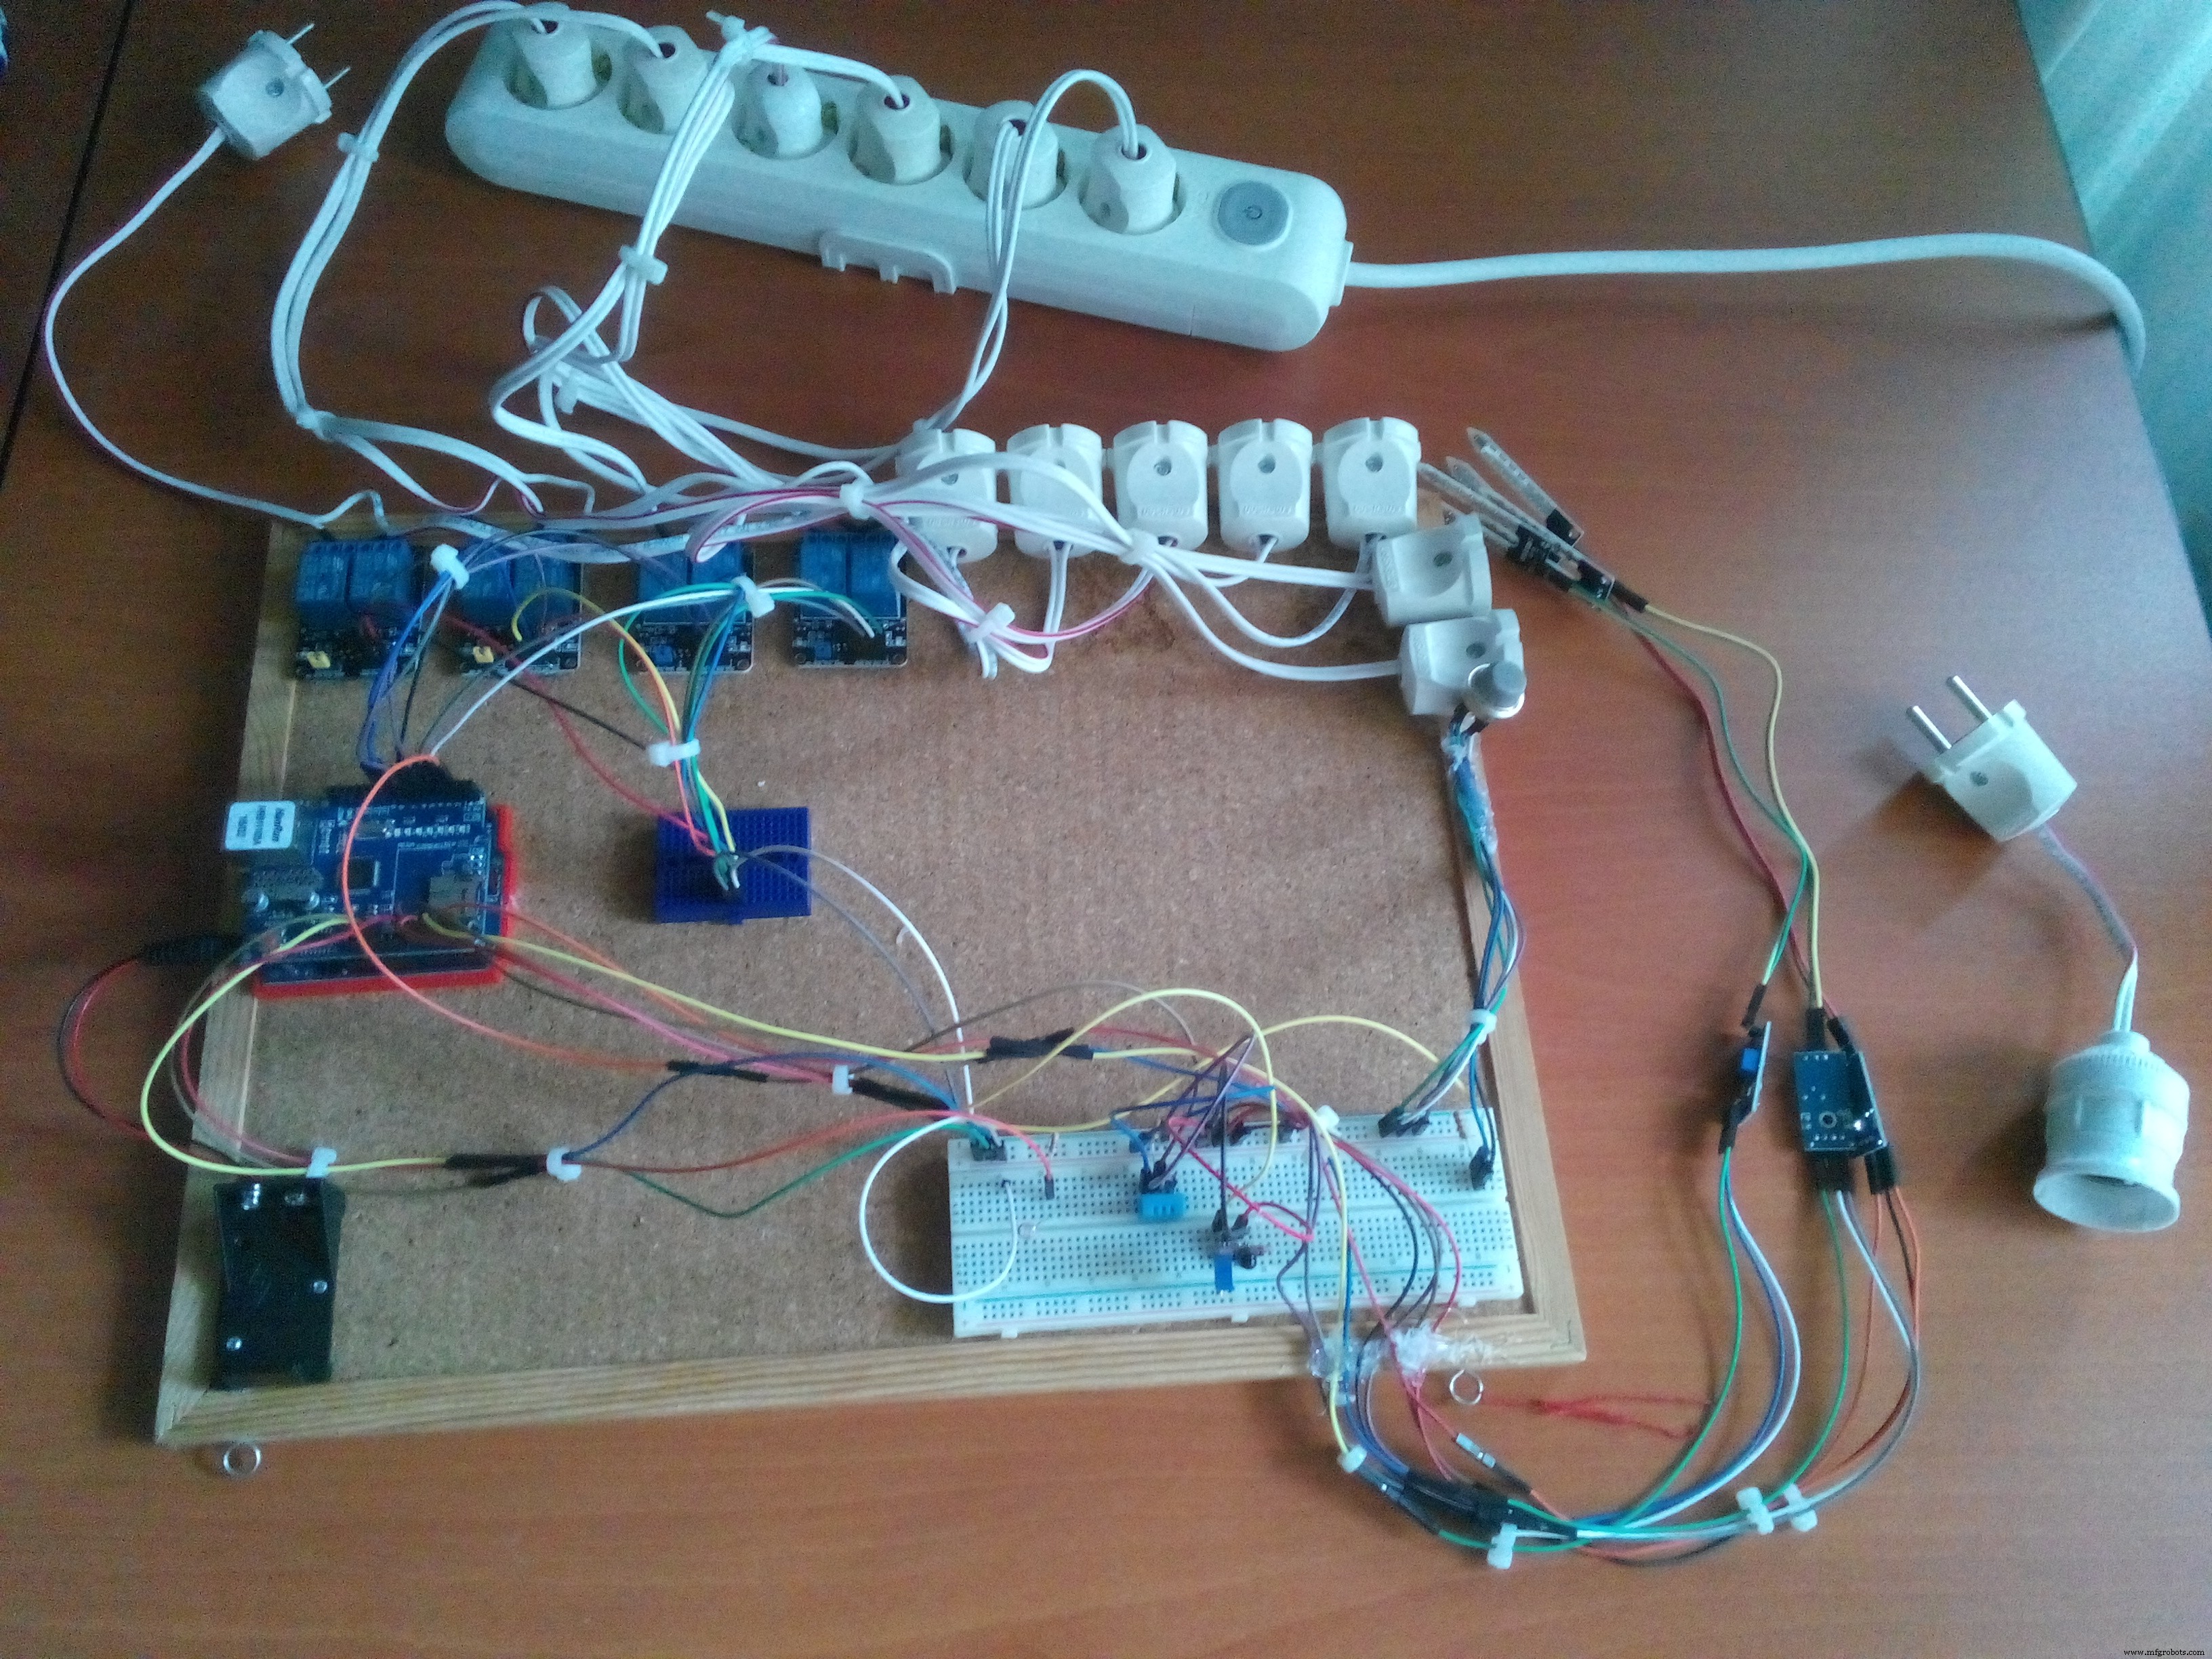
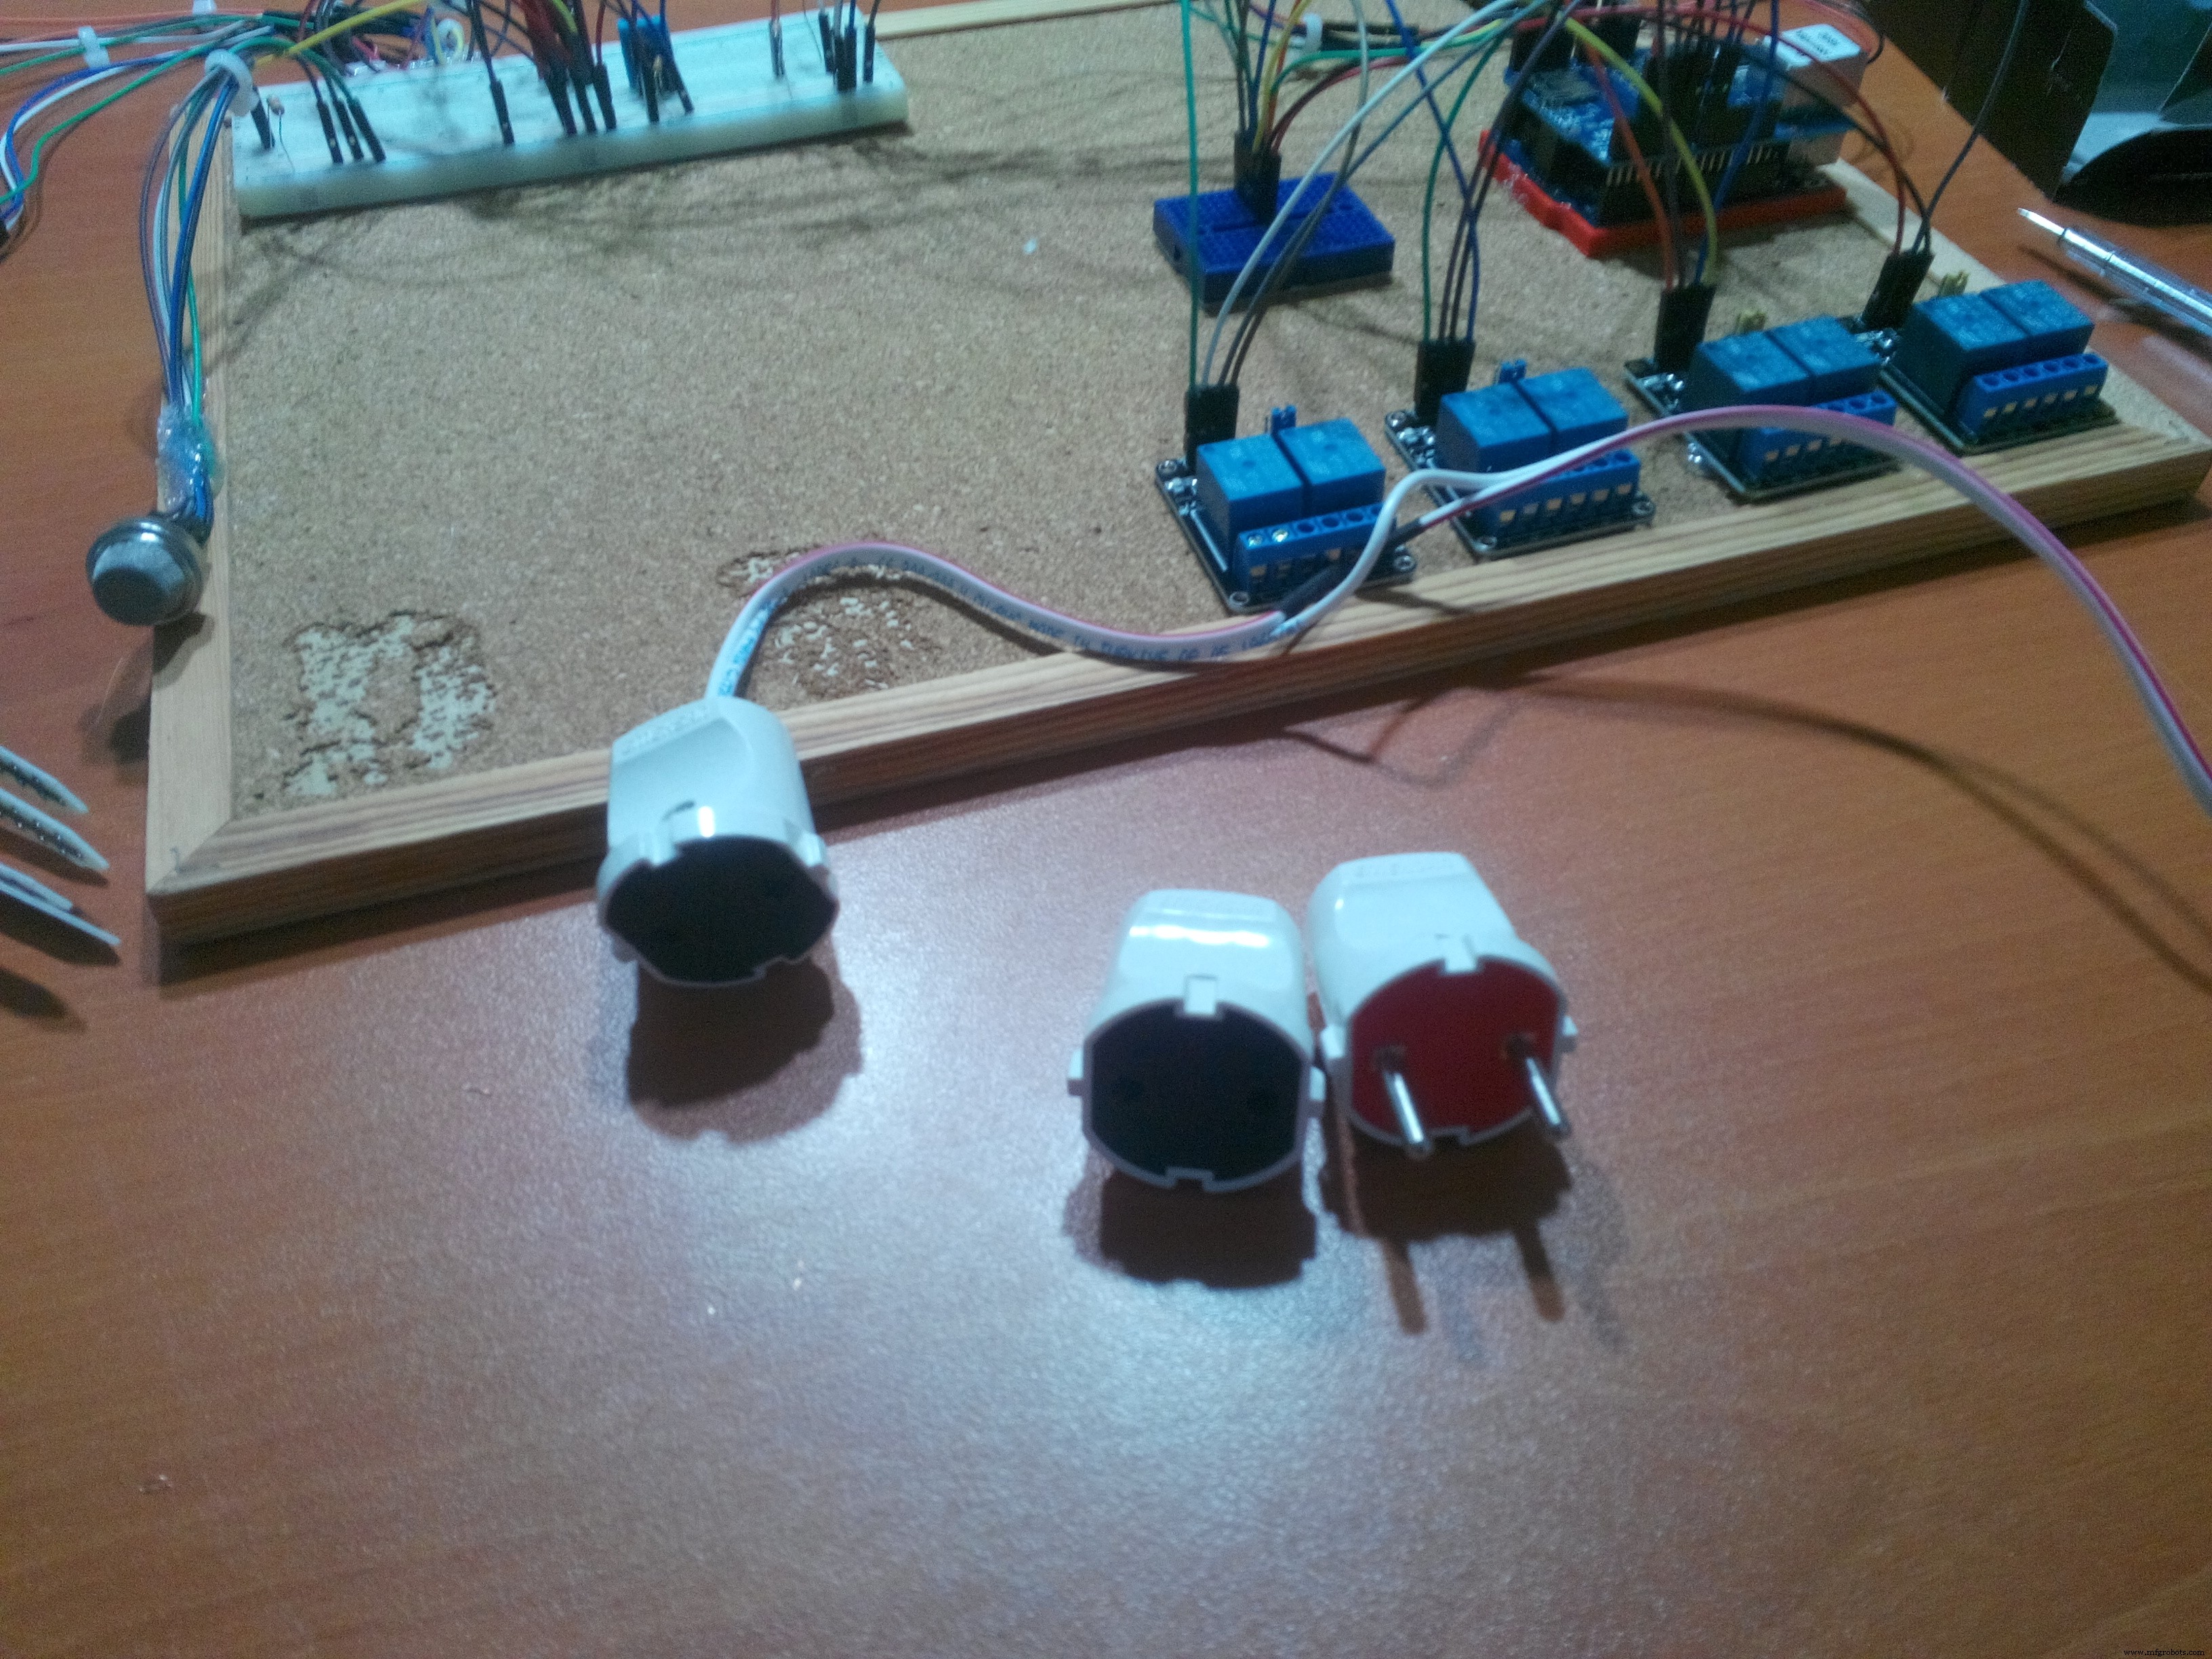
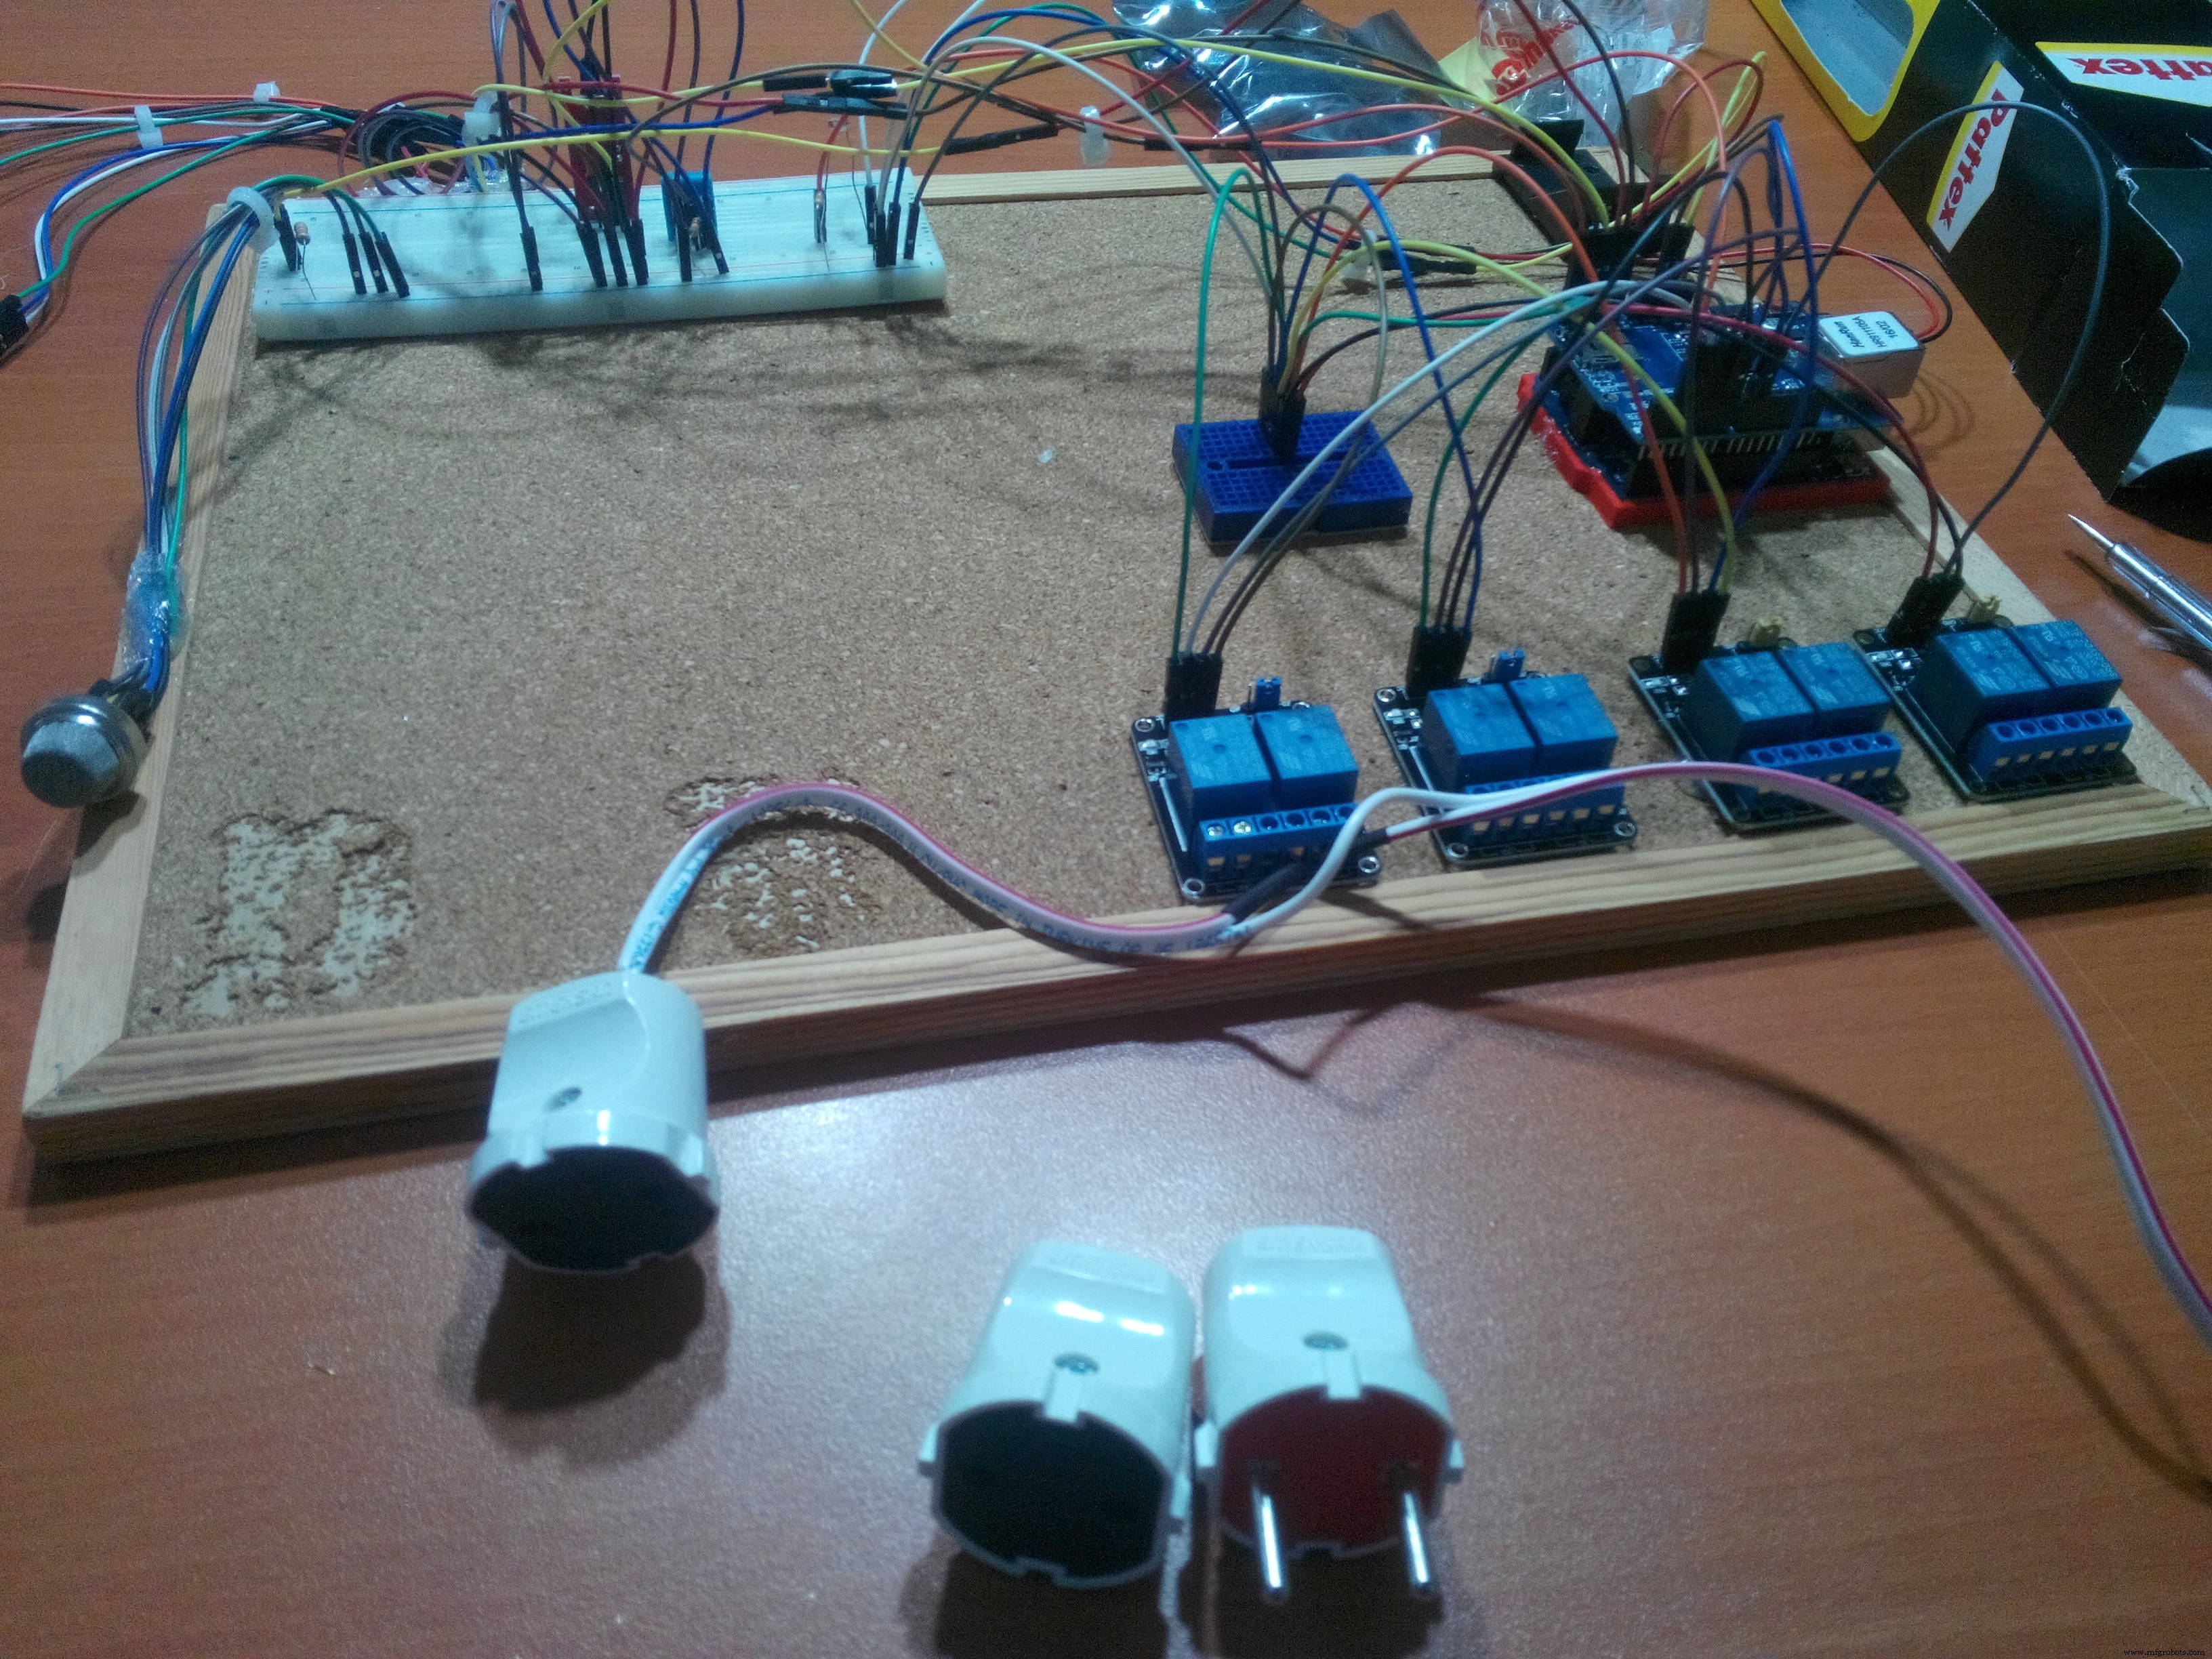
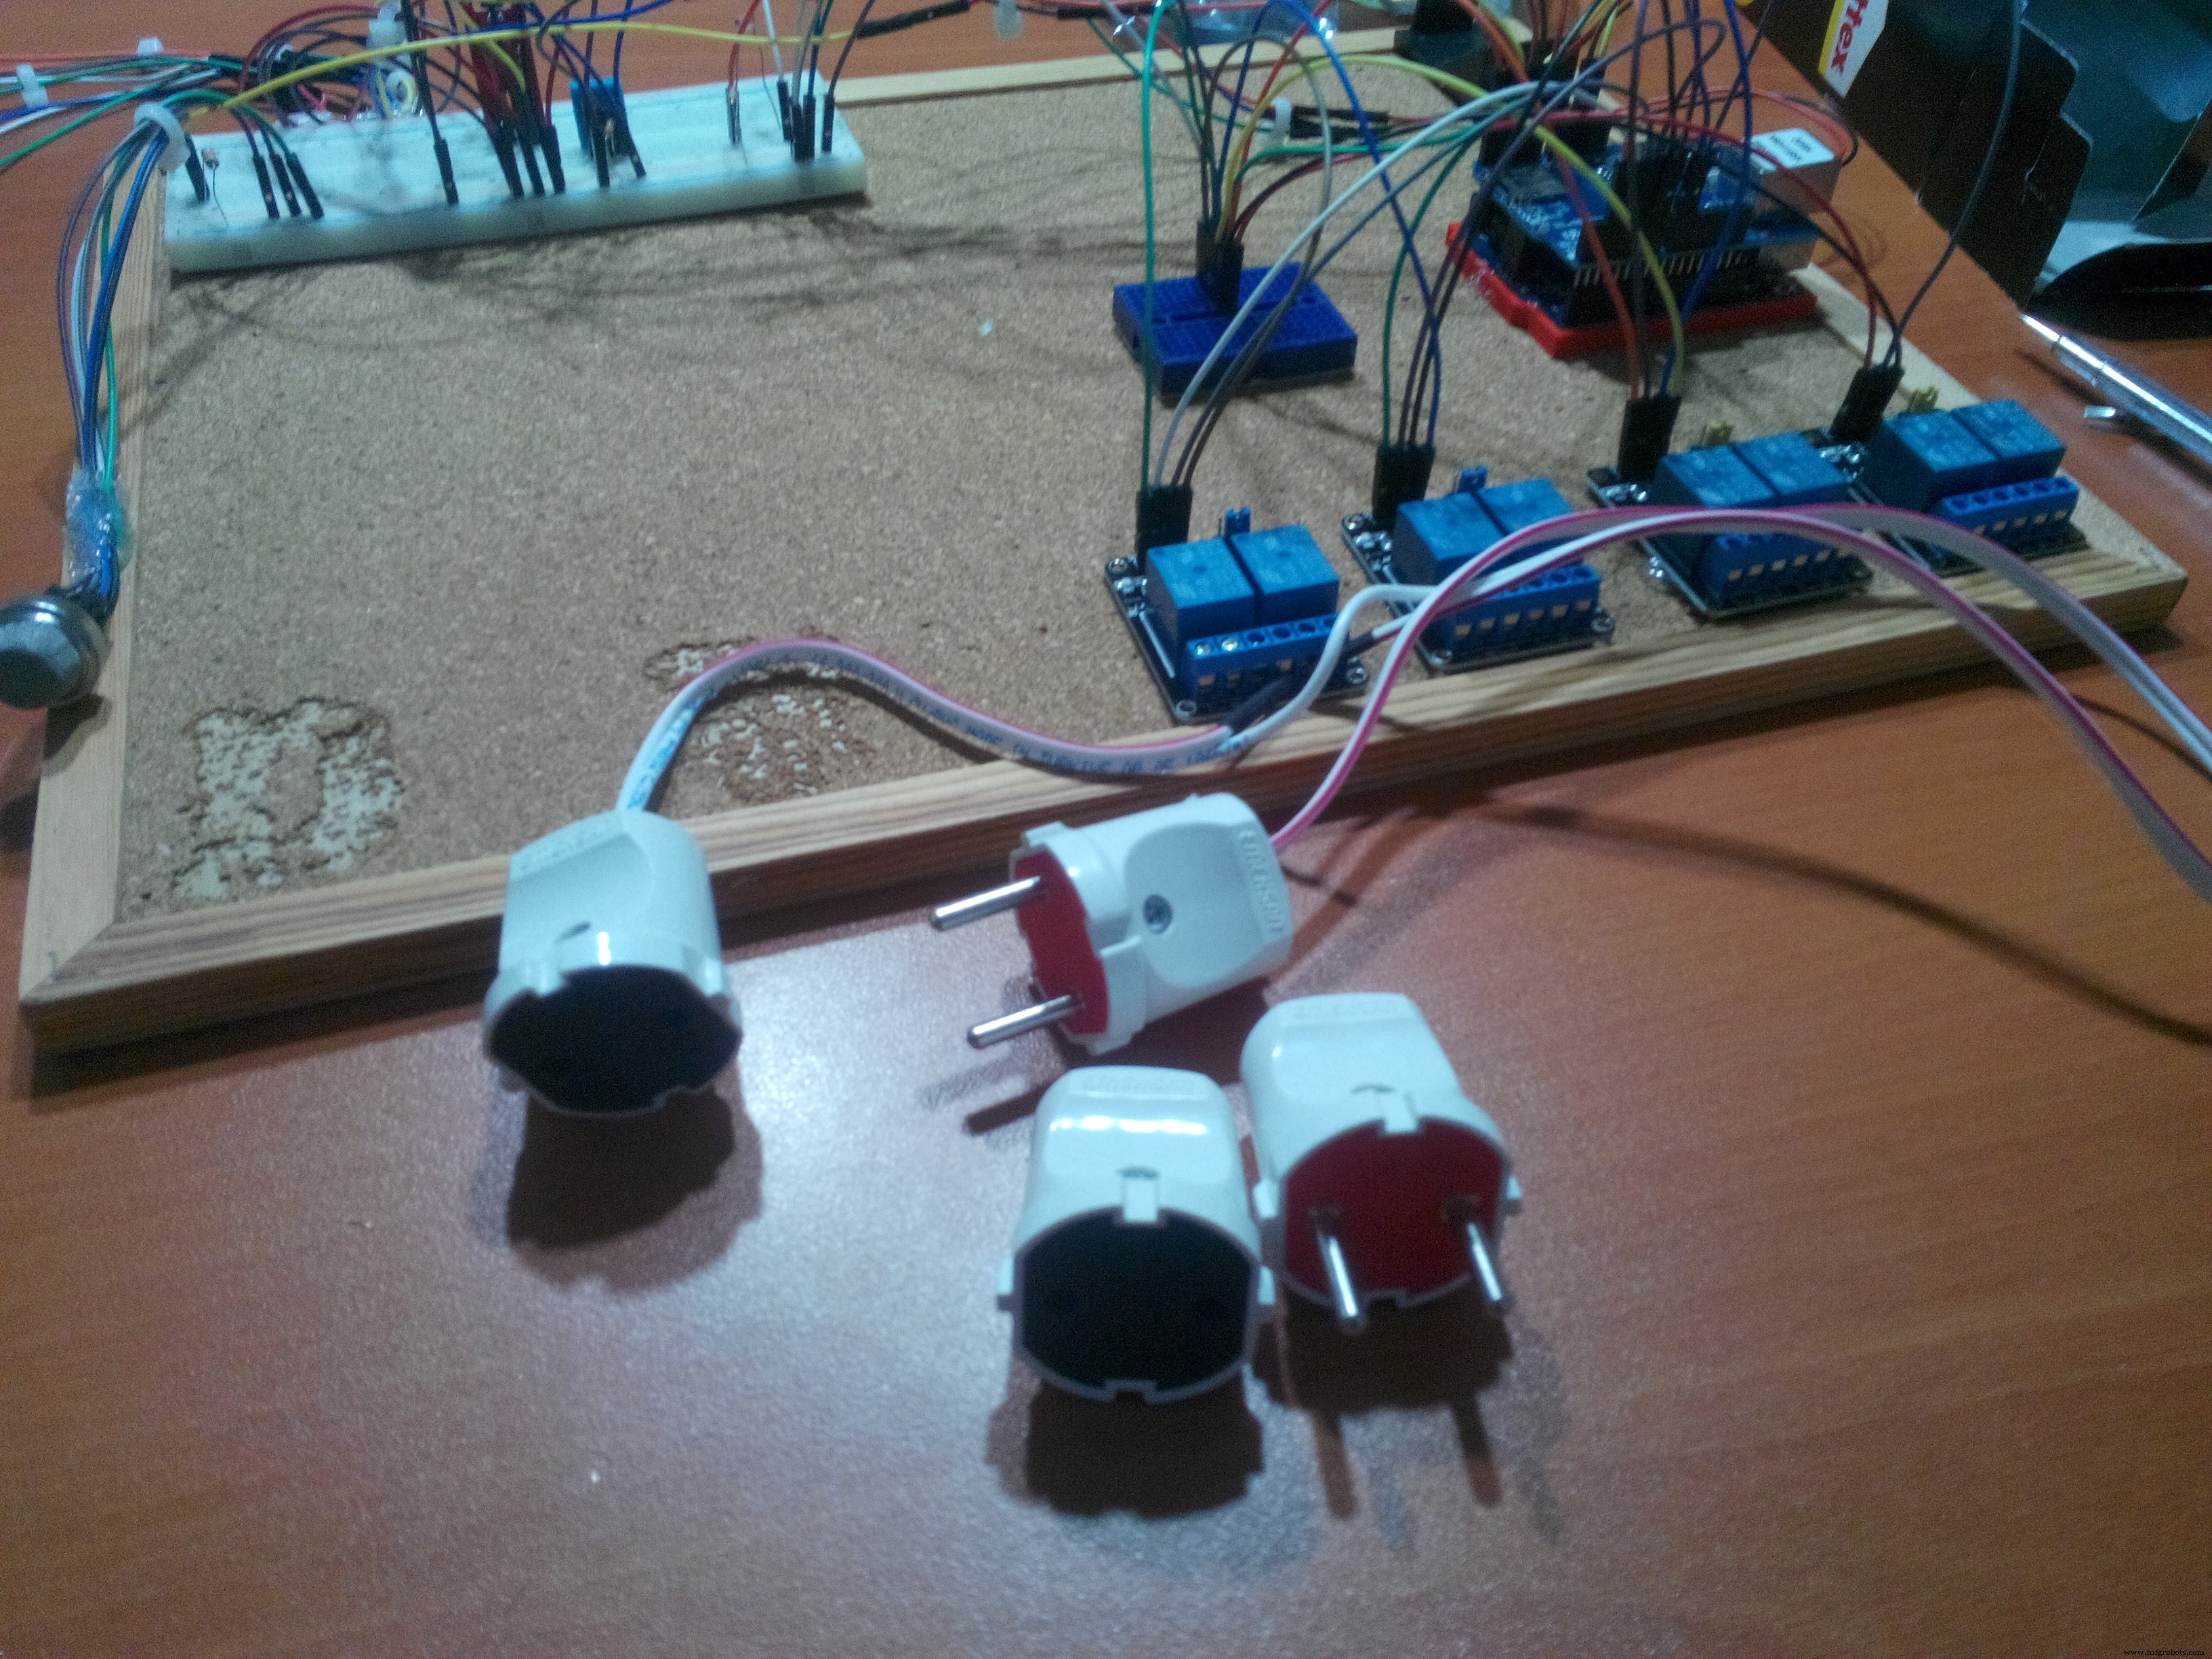
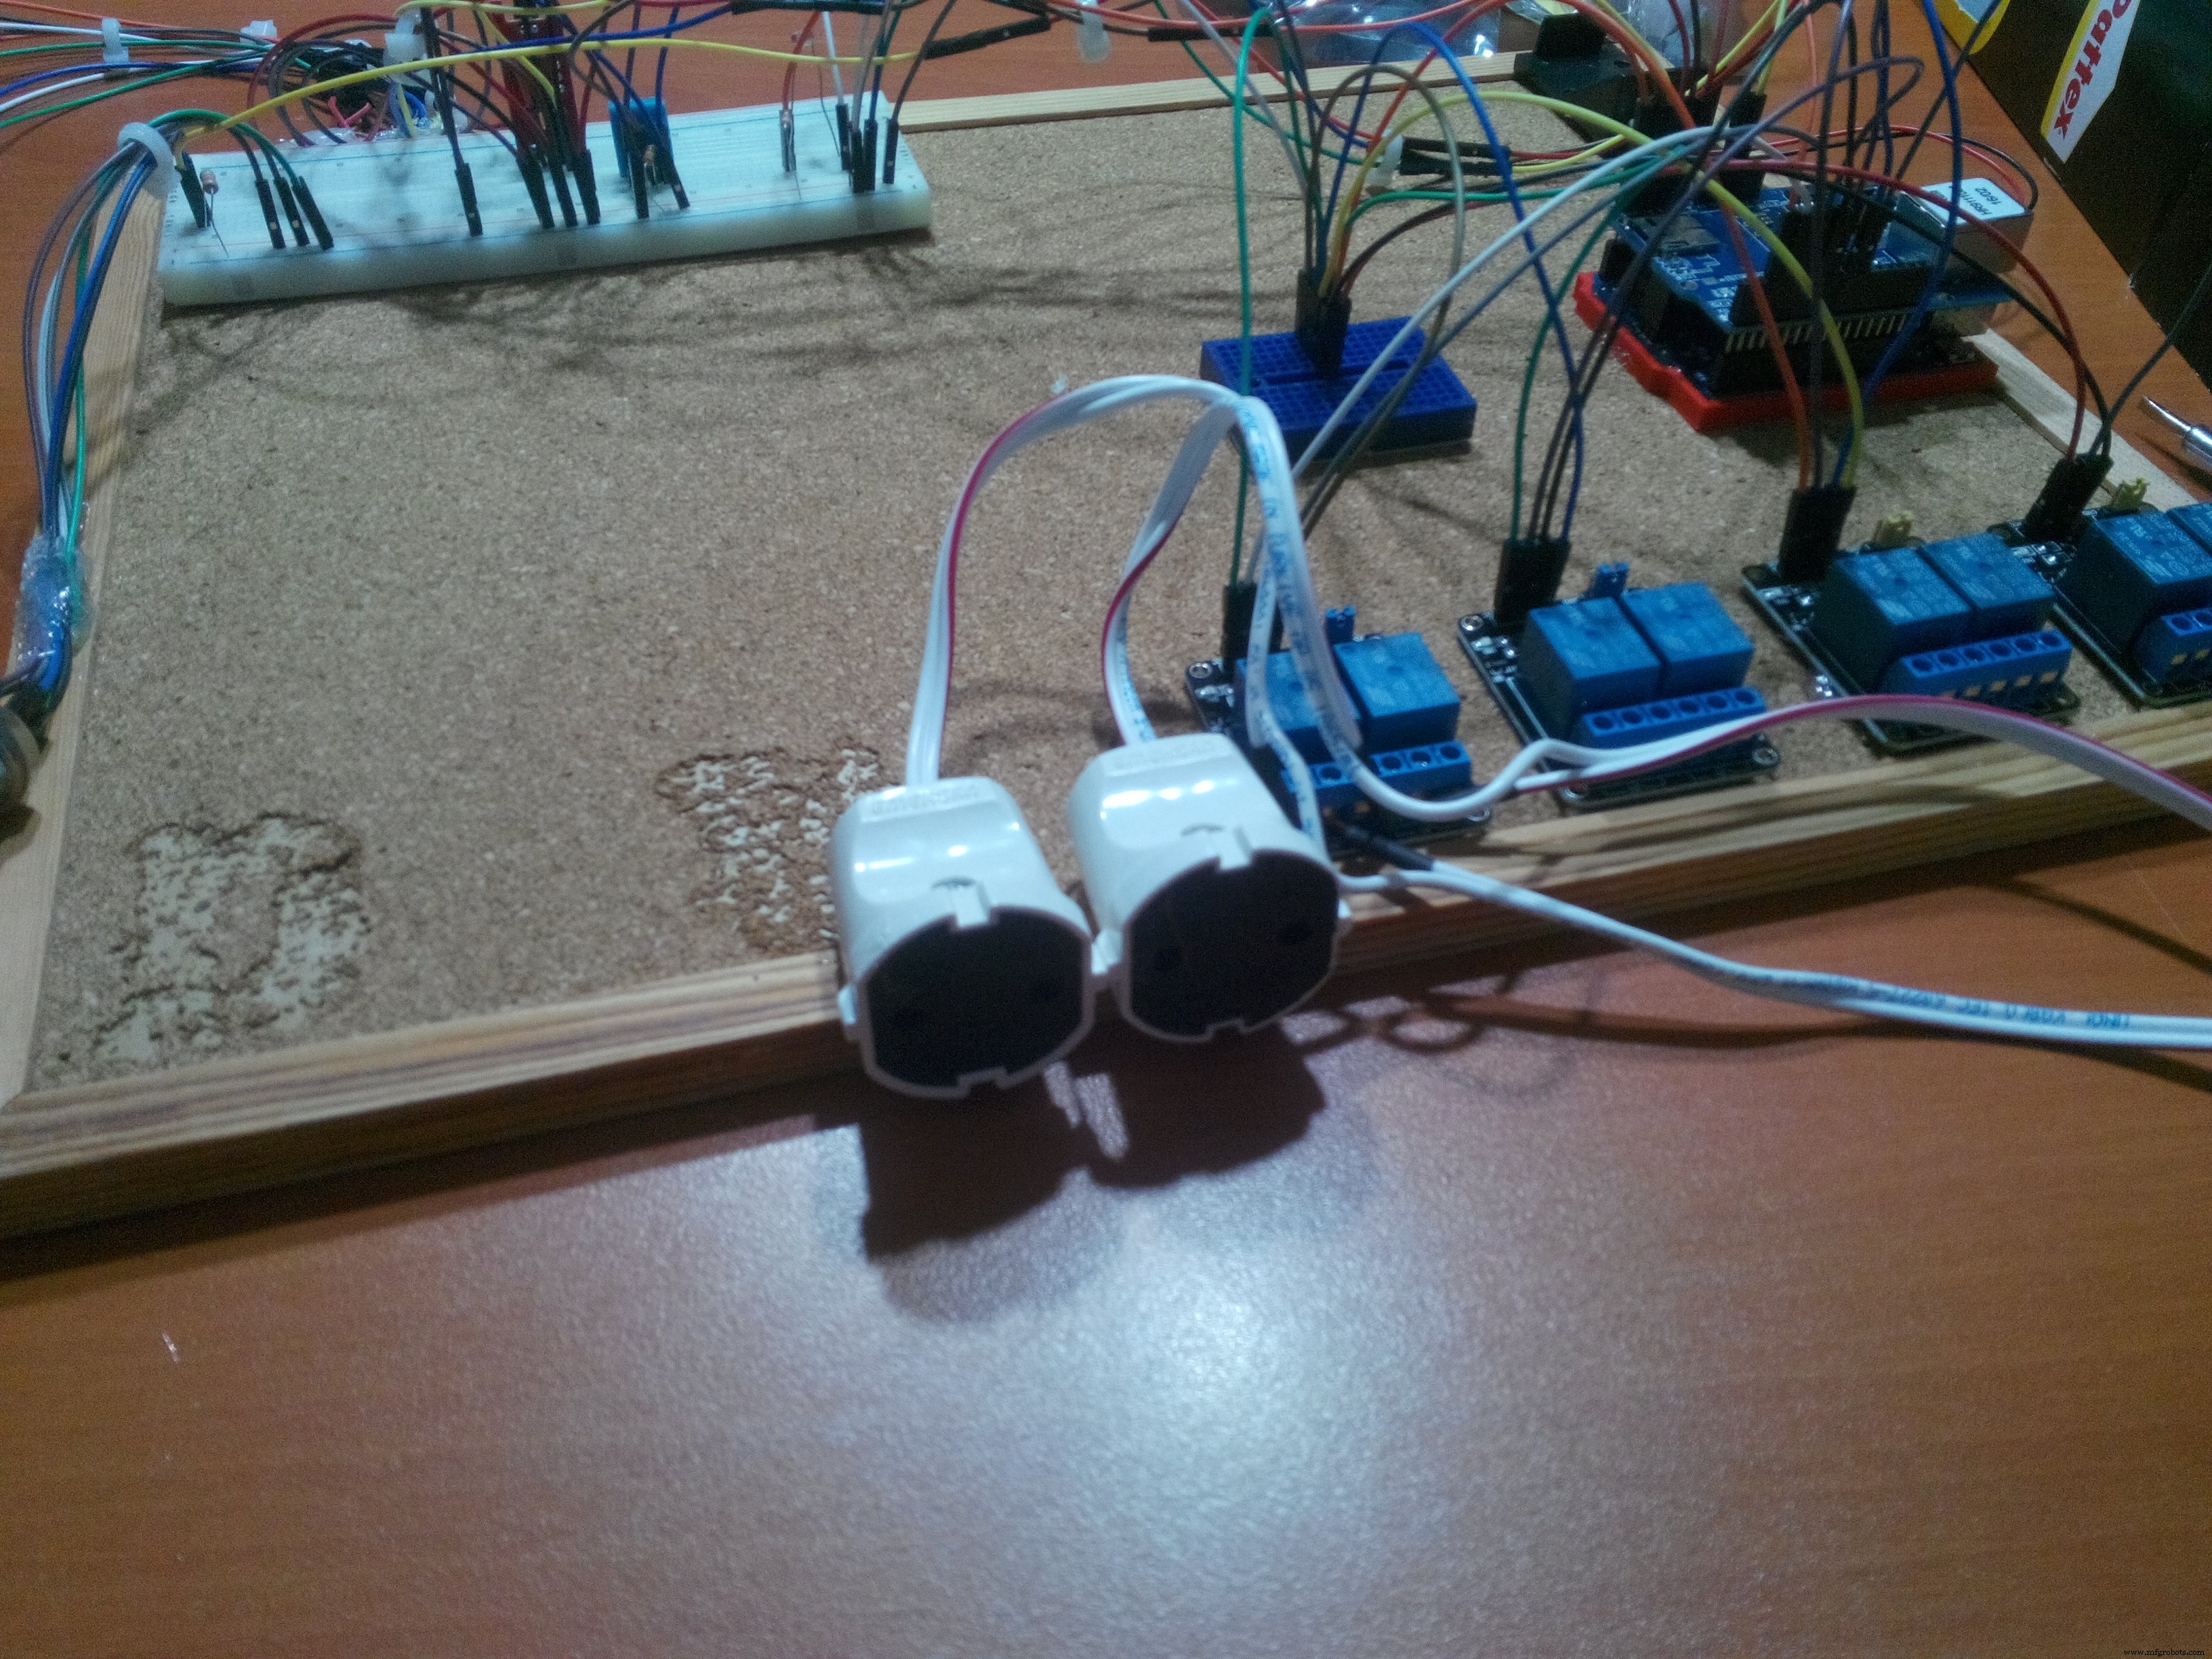
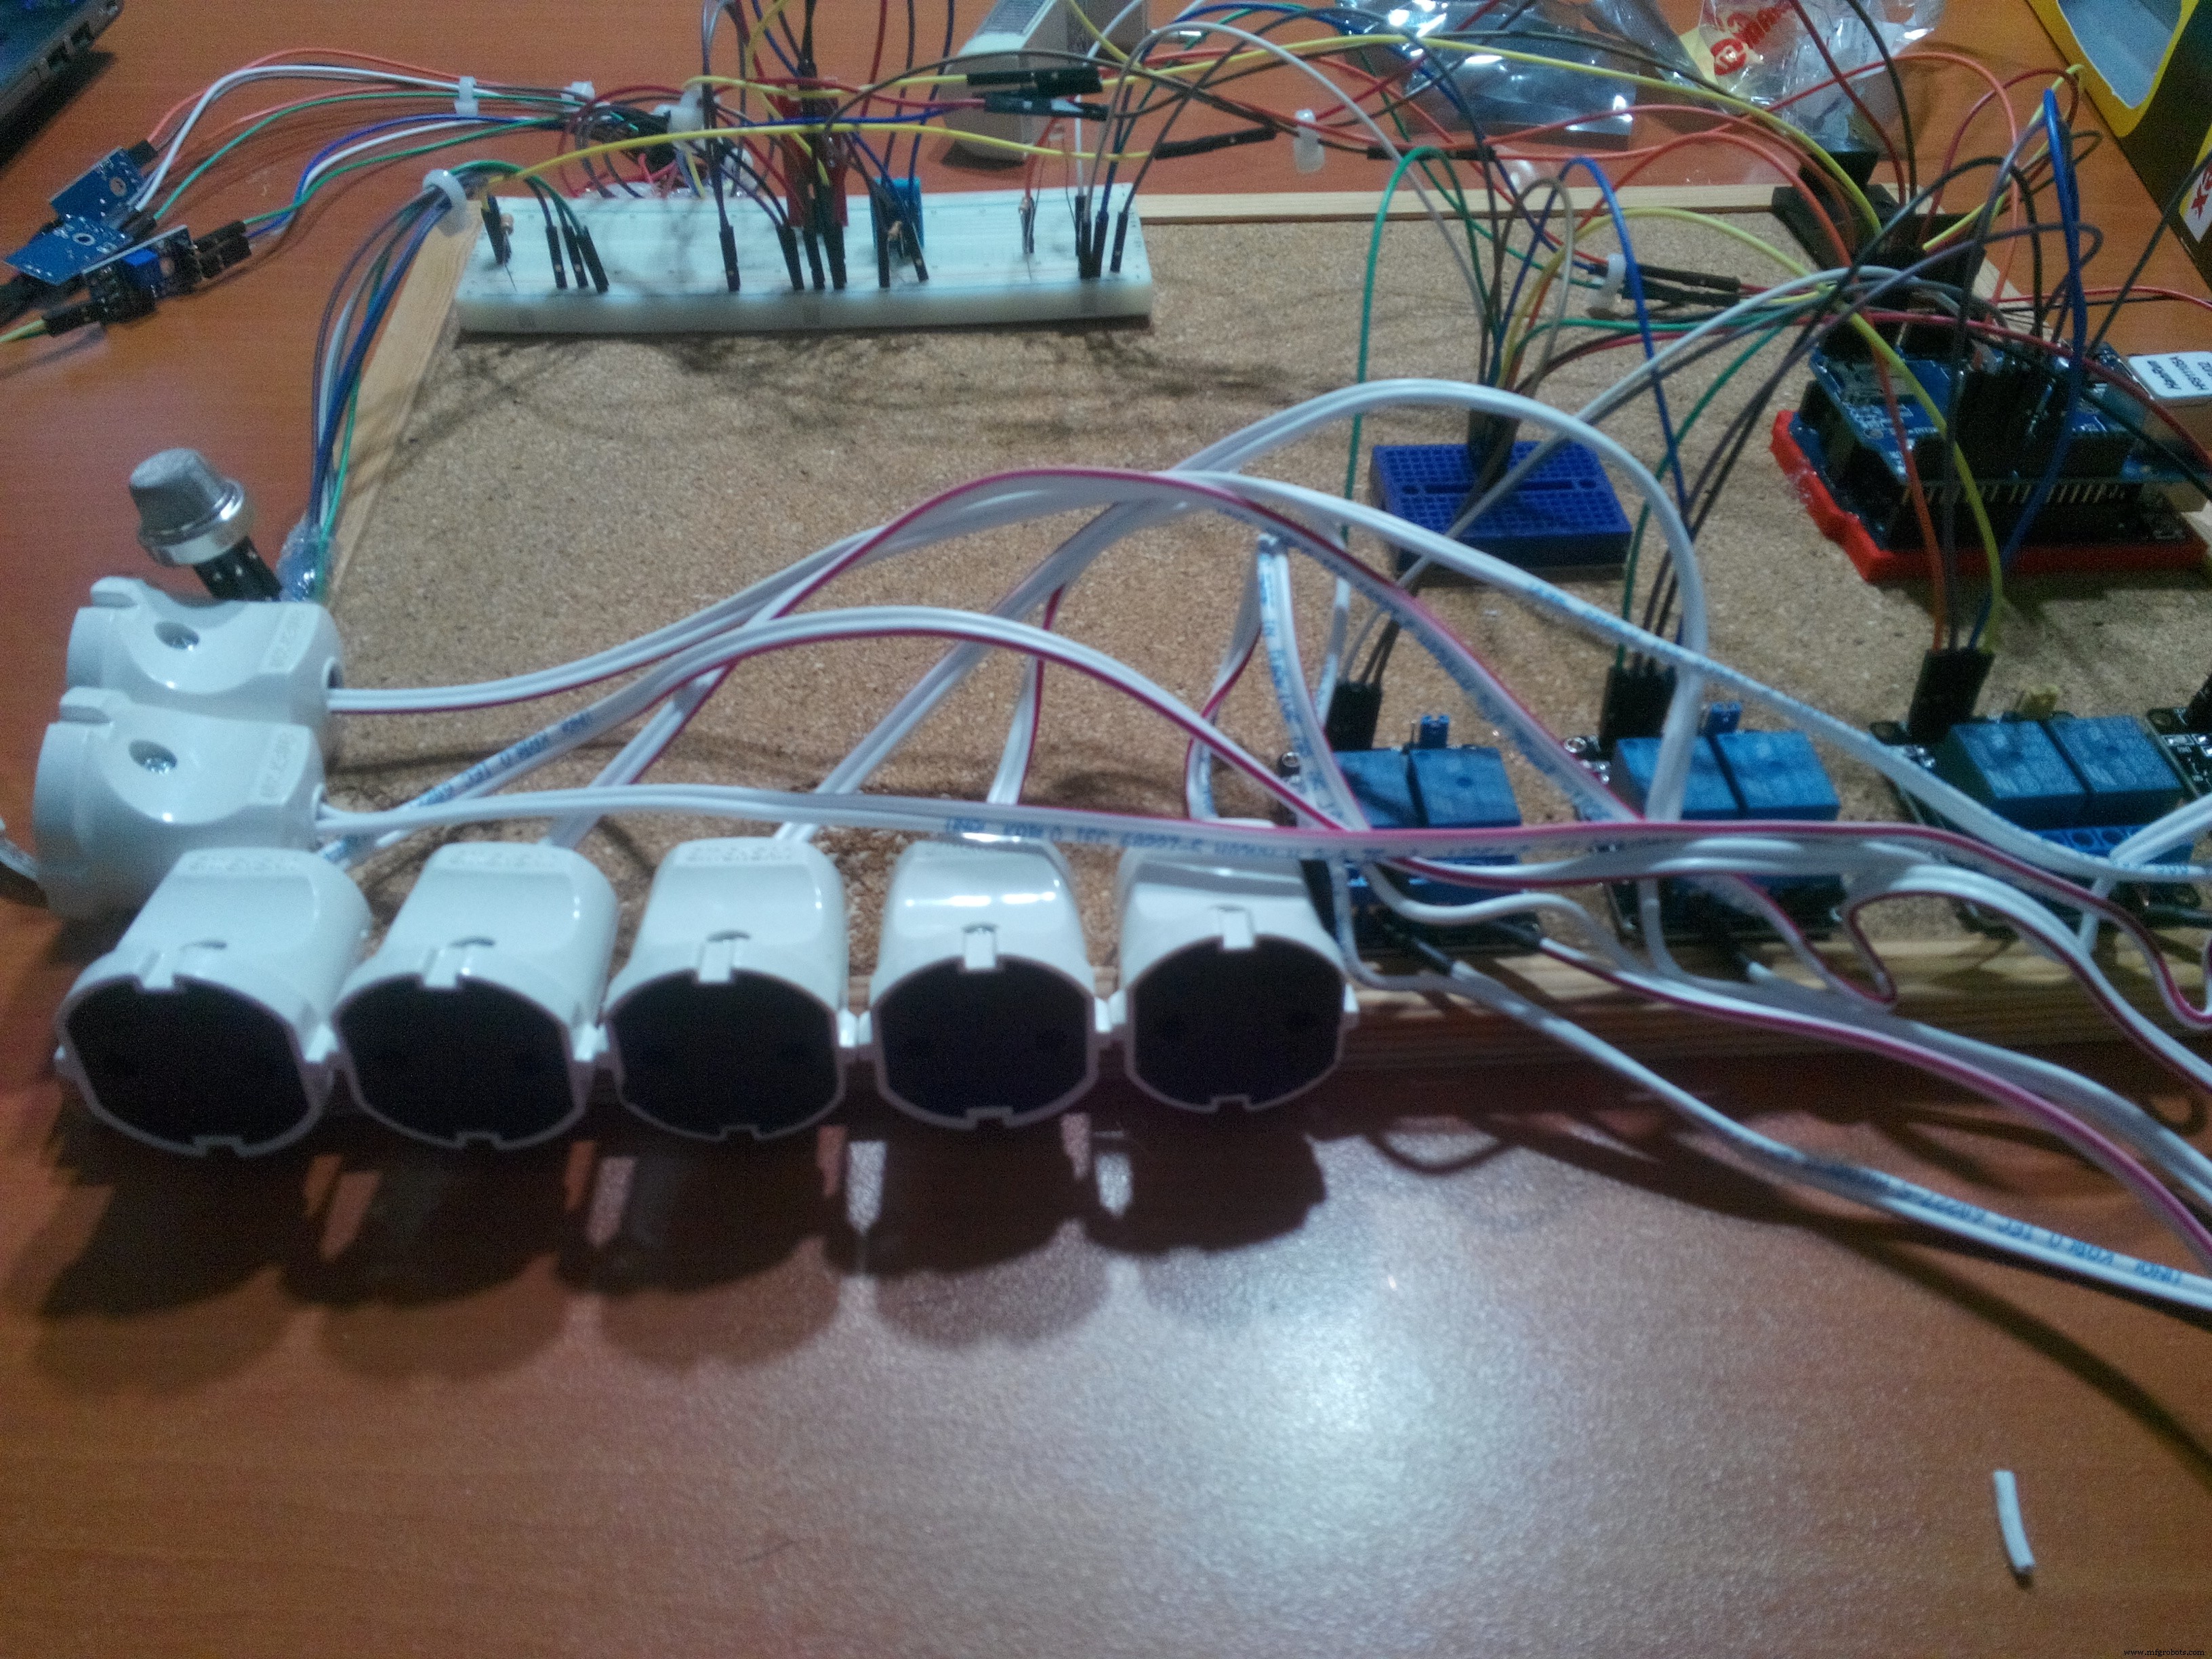
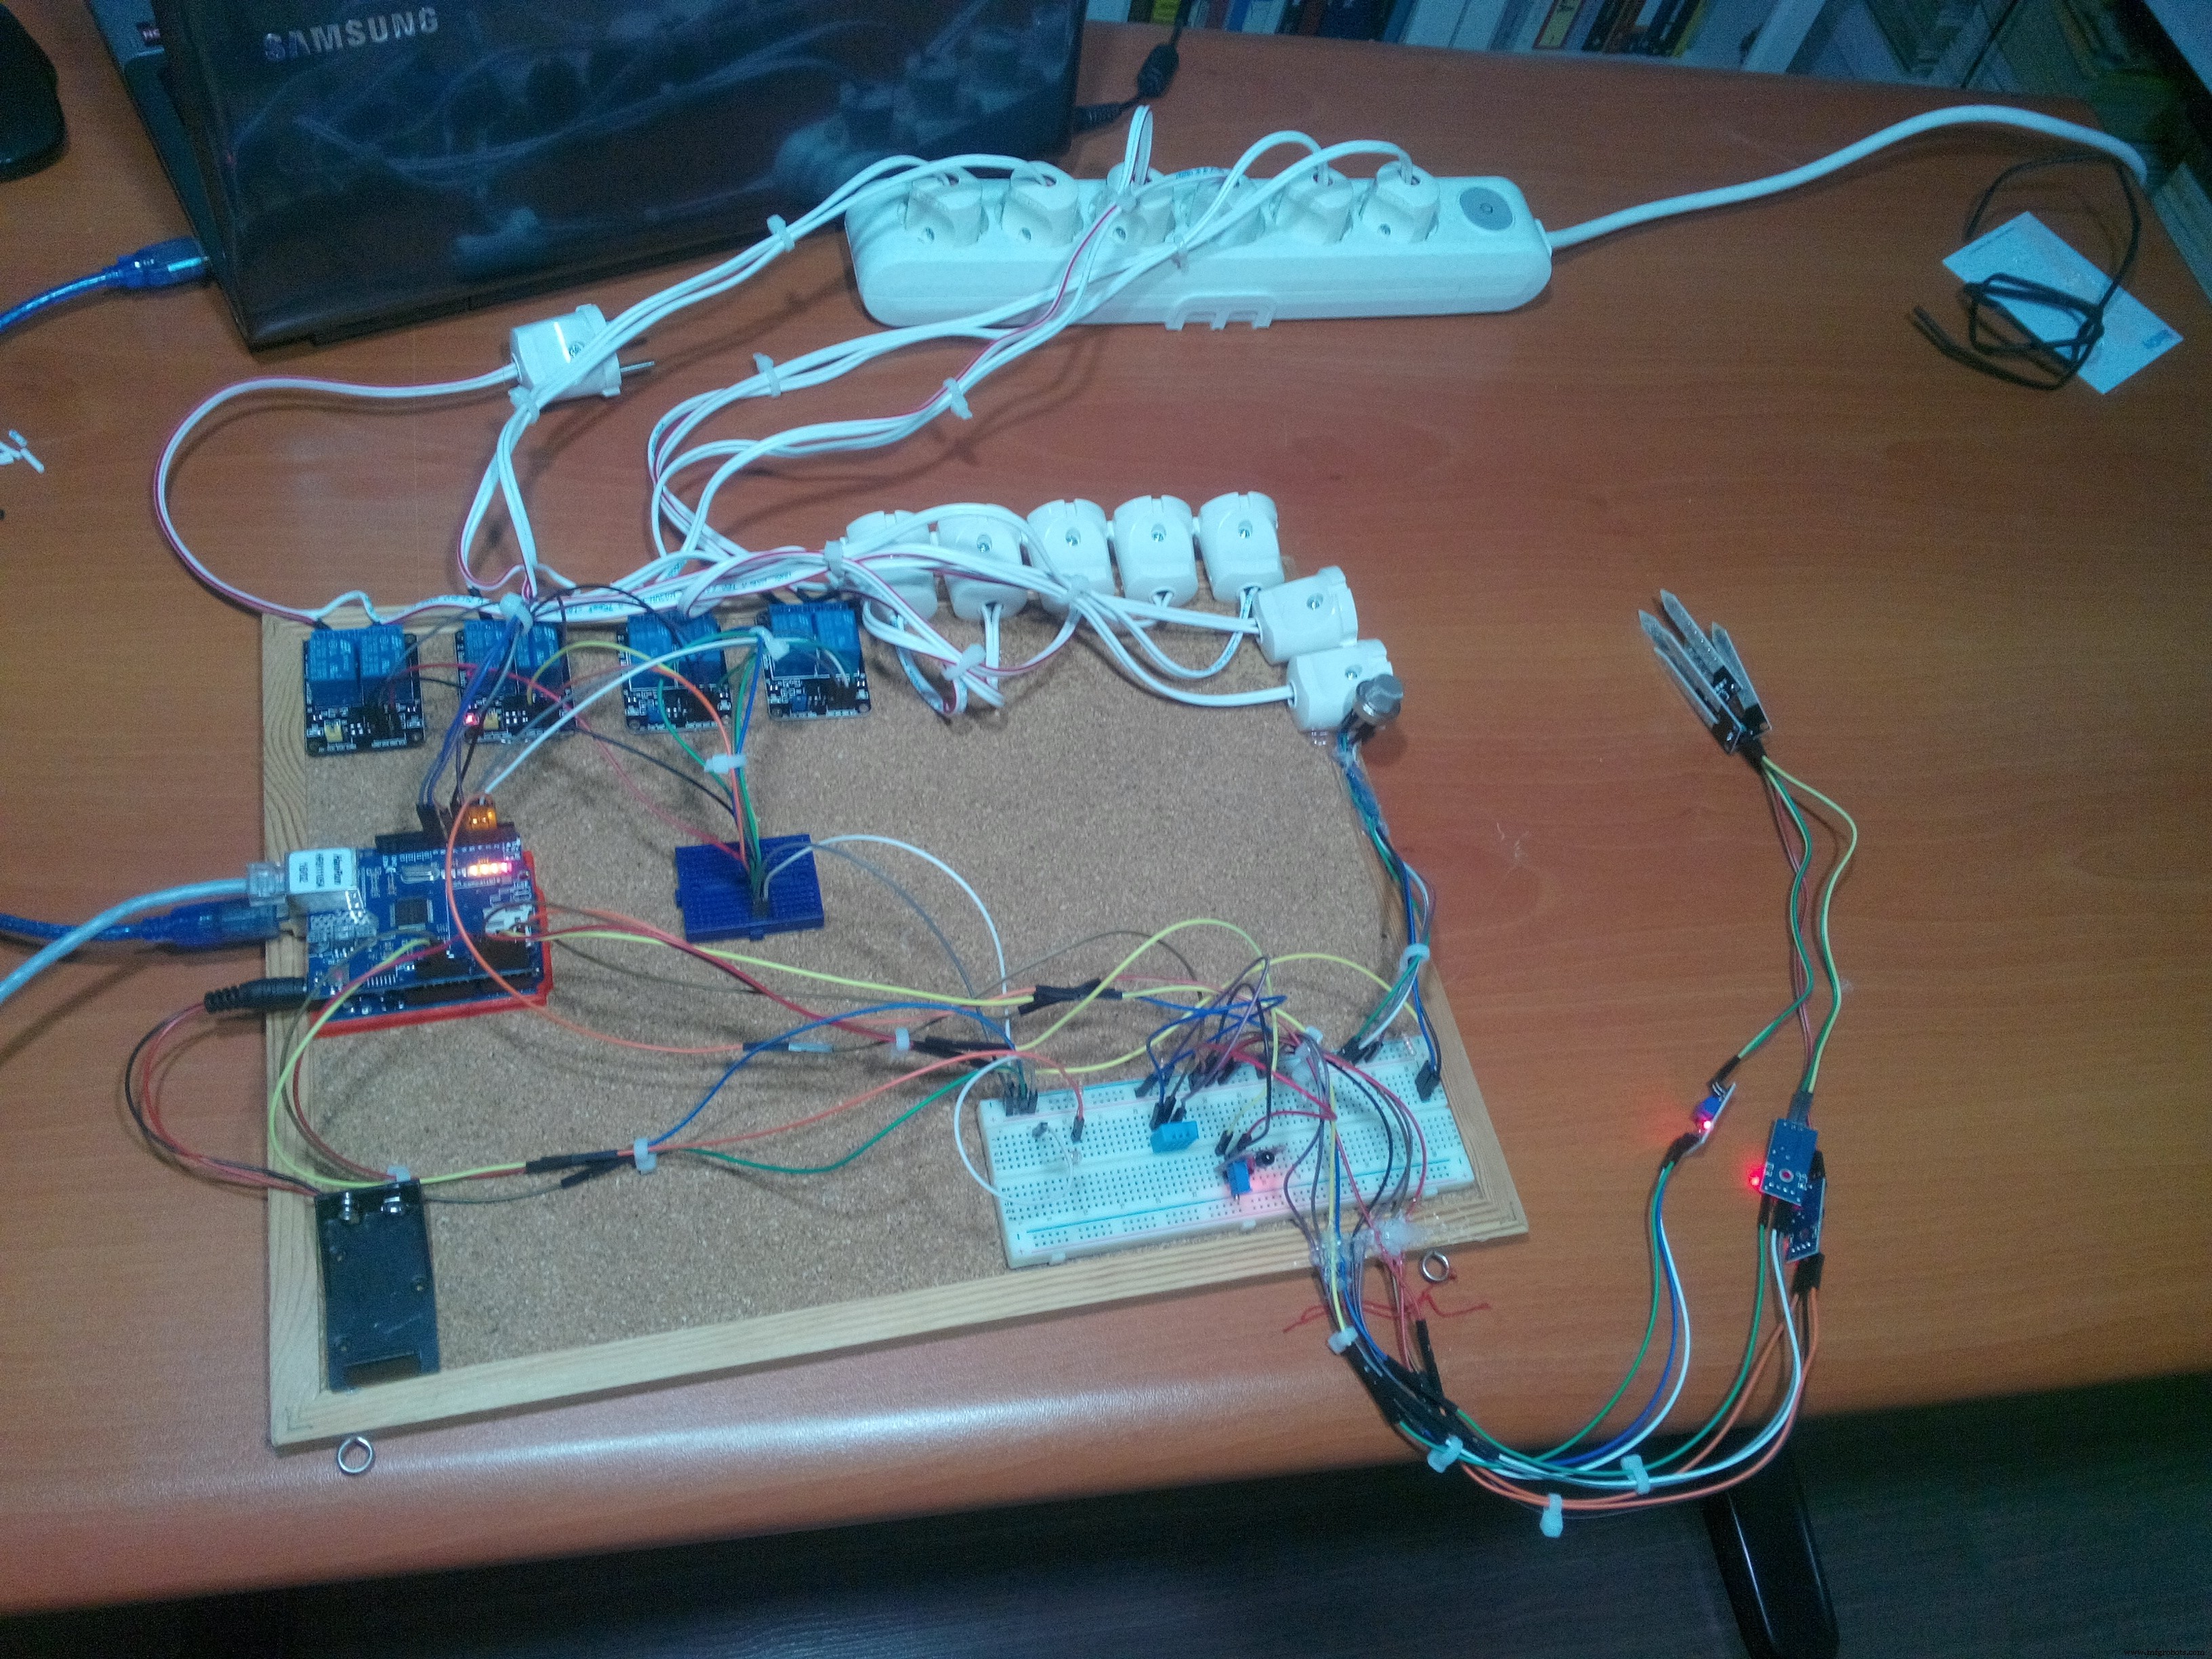
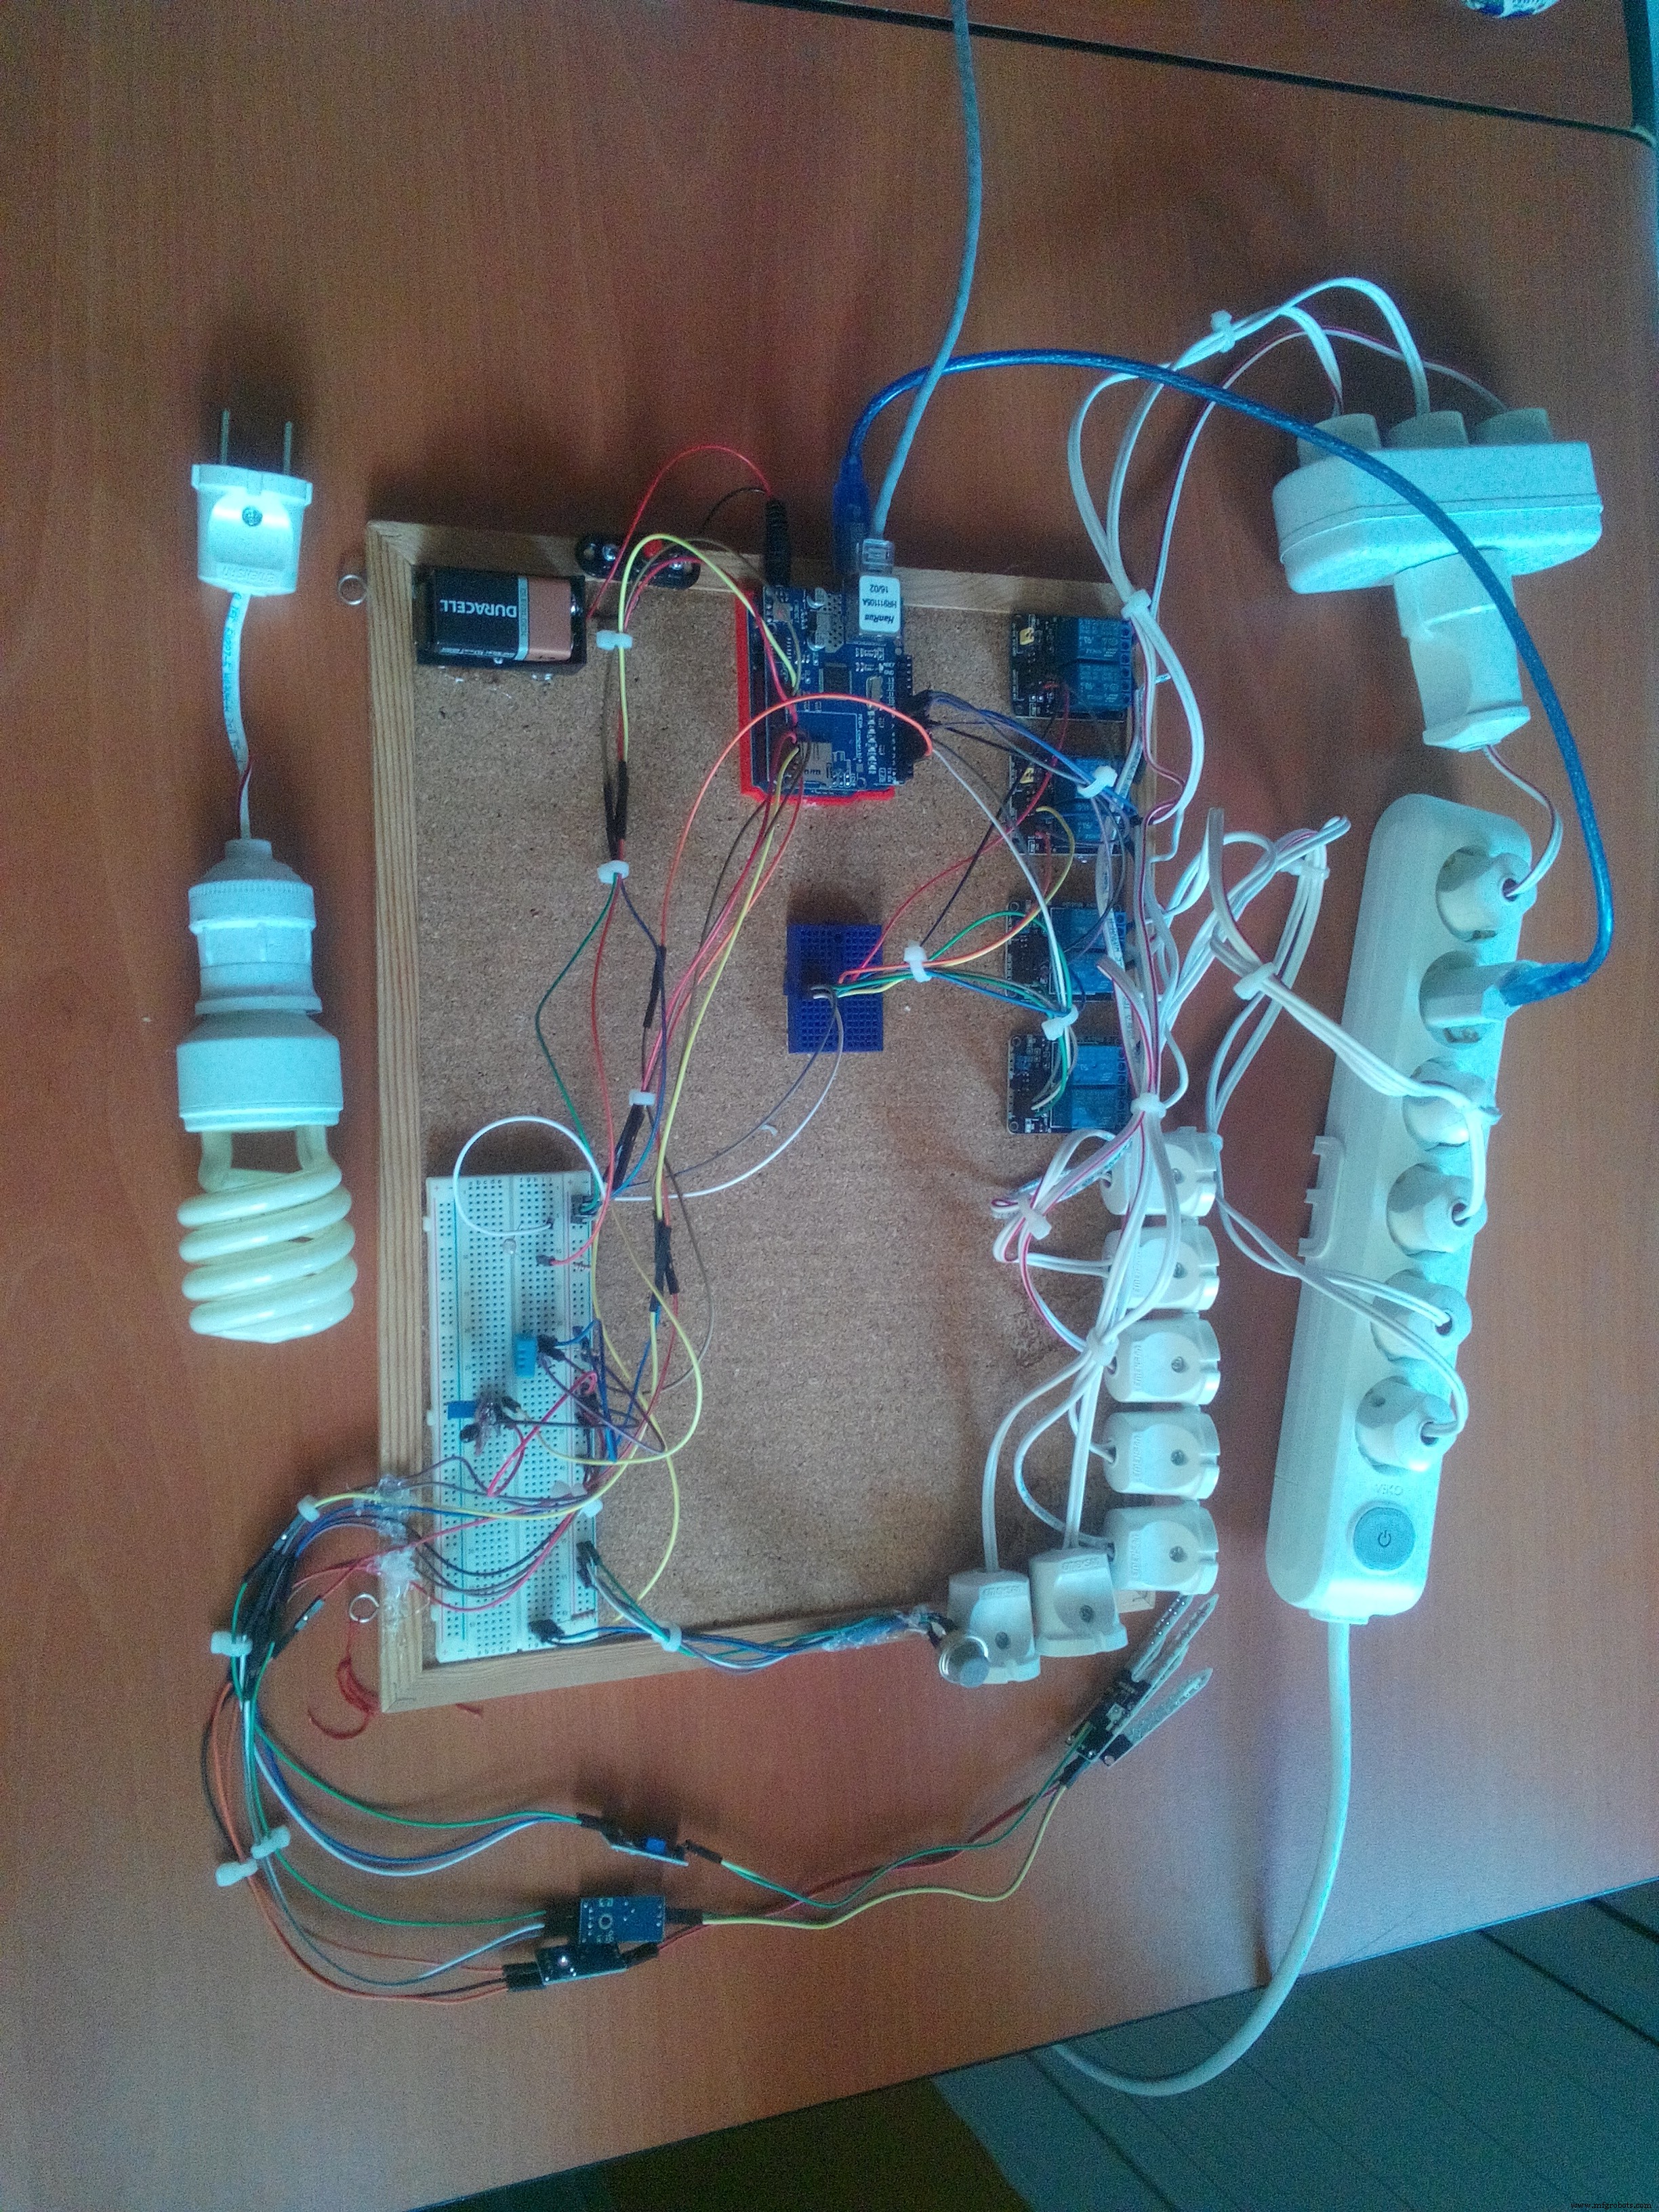
아래 ArduinoSide 코드와 Fritzing 그림에 설명된 대로 연결하기만 하면 됩니다. 단방향 플러그와 소켓을 2방향 릴레이에 연결하고 모든 구성요소를 코르크 보드와 같은 평면에 붙여넣습니다.
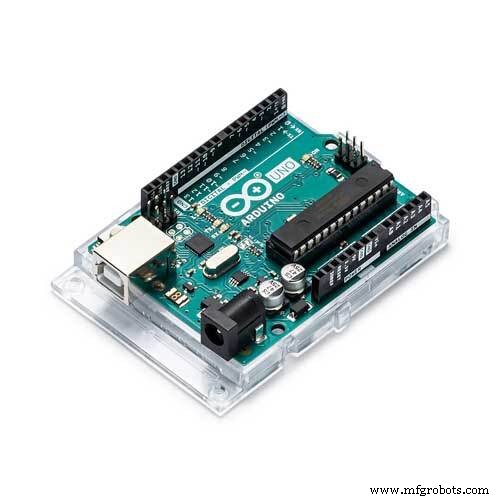
아두이노
DHT11 모듈
핀 2 --------------------------
양방향 릴레이 (1)
핀 3 --------------------------
핀 4 --------------------------
양방향 릴레이(2)
핀 5 -------------------------
핀 6 --------------------------
양방향 릴레이 (3)
핀 7 --------------------------
핀 8 --------------------------
양방향 릴레이(4)
핀 9 --------------------------
아두노 이더넷 쉴드
핀 10 --------------------------
핀 11 --------------------------
핀 12 --------------------------
핀 13 --------------------------
LDR
AO --------------------------
화염 감지기
A1 --------------------------
MQ4 센서
A2 --------------------------
습도계 모듈(1)
A3 --------------------------
습도계 모듈(2)
A4 --------------------------
습도계 모듈(3)
A5 --------------------------

Arduino 코드는 기본적으로 이더넷 라이브러리 예제 폴더에 있는 WebServer 코드와 유사합니다.
센서를 제어하고 Arduinautomotion 웹사이트에서 가져온 명령을 실행하기 위한 몇 가지 코드만 추가했습니다.
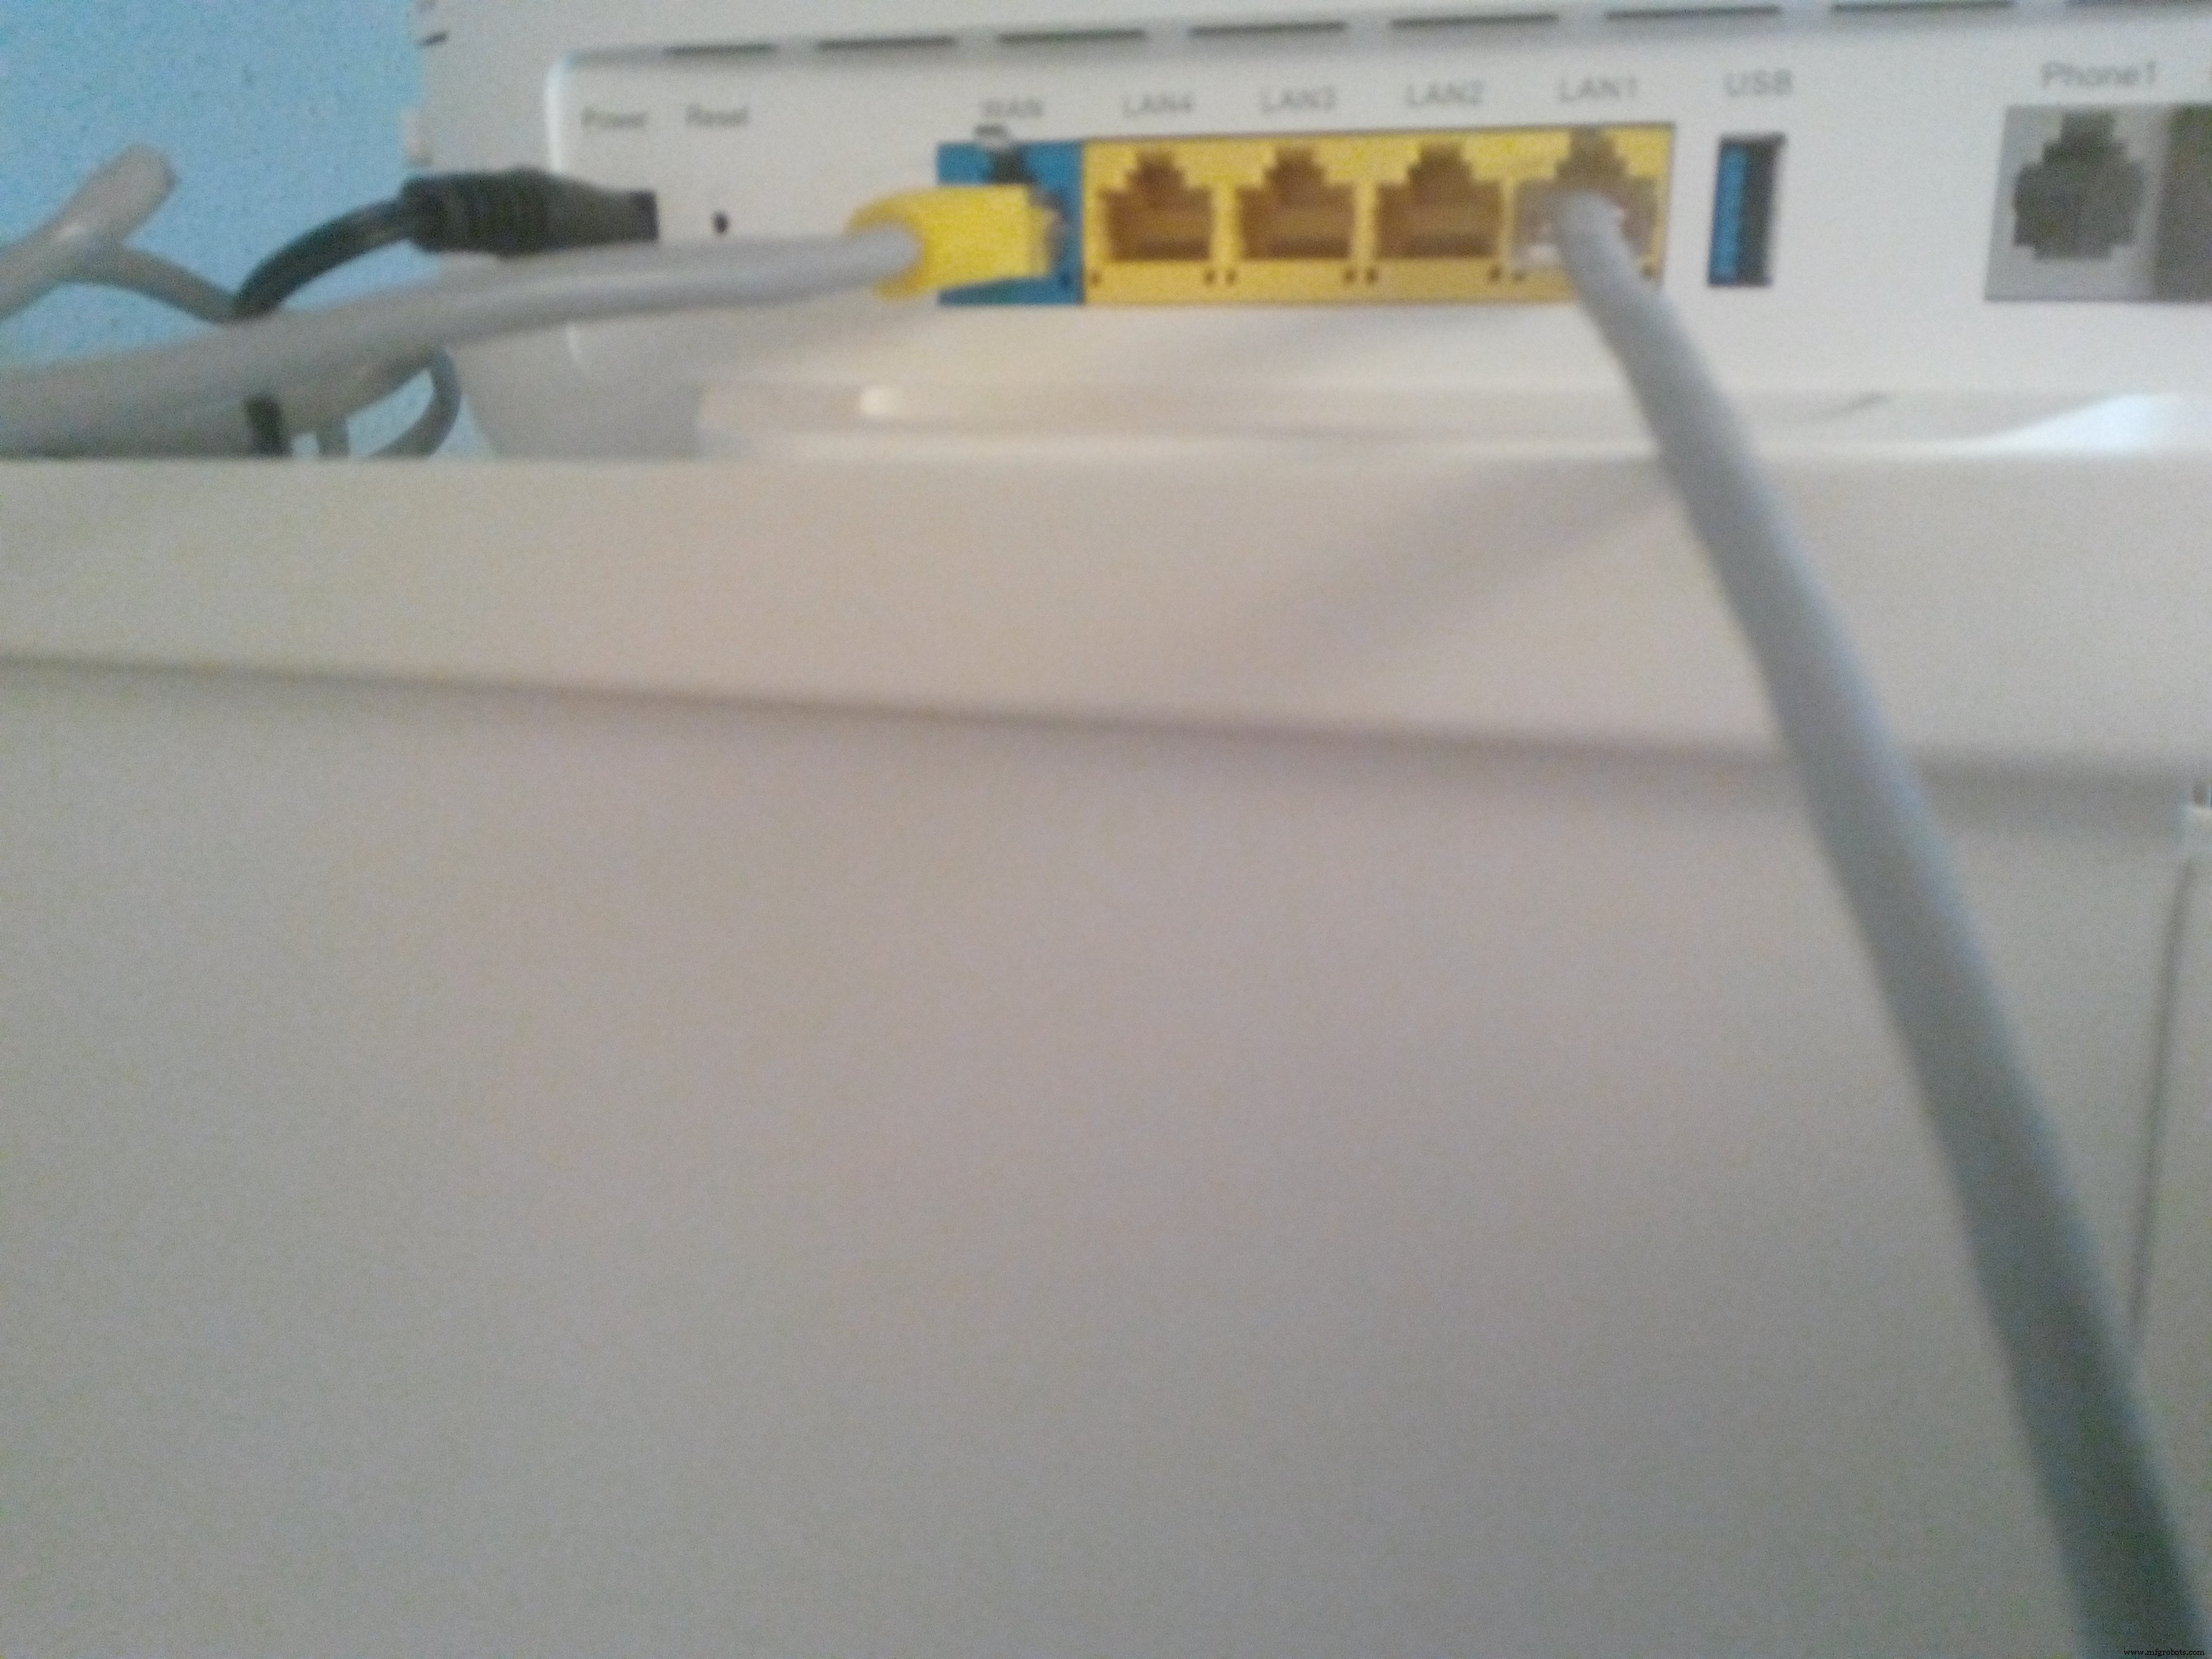
그리고 아두이노 이더넷 쉴드의 ADSL 케이블을 라우터에 연결합니다.
Arduino 코드가 실행된 후 Arduinautomotion 웹 사이트는 Wİ-Fİ를 통해 LAN을 통해 Arduino에서 데이터를 보내고 받습니다.
테스트 동영상
수족관과 관개 시스템(기본적으로 물 모터)에 연결한 후 프로젝트를 테스트했는데 프로젝트가 훌륭하게 작동합니다. :) Arduinautoumotion 프로젝트의 테스트 영상입니다. Filmora 체험판으로 편집했는데 작품 존중을 위해 워터마크를 지우지 않았습니다.
컴퓨터:
안드로이드:
<섹션 클래스="섹션 컨테이너 섹션 축소 가능" id="코드">
<스크립트> $(document).ready(function(){ $("#roomshome").click(function(){ $(this).css("border-color", "red"); $(aquariumshome).css( "테두리 색상", "rgb(35, 35, 35)"); $(plantshome).css("테두리 색상", "rgb(35, 35, 35)"); $(guideshome).css( "테두리 색상", "rgb(35, 35, 35)"); }); $("#aquariumshome").click(function(){ $(roomshome).css("테두리 색상", "rgb (35, 35, 35)"); $(this).css("테두리 색상", "빨간색"); $(plantshome).css("테두리 색상", "rgb(35, 35, 35) "); $(guideshome).css("border-color", "rgb(35, 35, 35)"); }); $("#plantshome").click(function(){ $(roomshome). css("테두리 색상", "rgb(35, 35, 35)"); $(aquariumshome).css("테두리 색상", "rgb(35, 35, 35)"); $(this). css("테두리 색상", "빨간색"); $(guideshome).css("테두리 색상", "rgb(35, 35, 35)"); }); $("#guideshome").click (function(){ $(roomshome).css("테두리 색상", "rgb(35, 35, 35)"); $(aquariumshome).css("테두리 색상", "rgb(35) , 35, 35)"); $(plantshome).css("테두리 색상", "rgb(35, 35, 35)"); $(this).css("테두리 색상", "빨간색"); }); $("#iframeform").mouseenter(function(){ $(this).css("position","absolute"); $(this).css("top","60px"); $(this) .css("왼쪽","0px"); $(this).css("height", "600px"); $(this).css("width","1050px"); $(this).css ("테두리 색상","녹색"); }); $("#iframeform").mouseleave(function(){ $(this).css("position","absolute"); $(this).css("top","60px"); $(this) .css("왼쪽","0px"); $(this).css("height", "300px"); $(this).css("width","350px"); $(this).css ("테두리 색상","녹색"); }); });
Guidelines for managing to adjustments of the objects.
Please click the buttons and th e color bars to learn the info about colors.
ROOM
AQUARUM
PLANT
GUDE
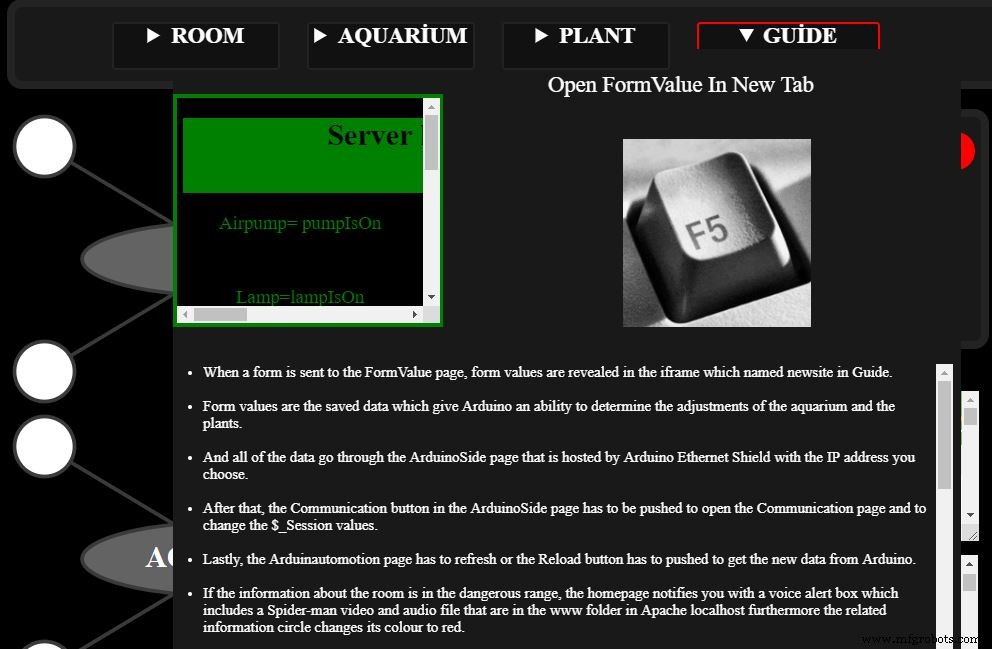
Open FormValue In New Tab
- When a form is sent to the FormValue page, form values are revealed in the iframe which named newsite in Guide.
- Form values are the saved data which give Arduino an ability to determine the adjustments of the aquarium and the plants.
- And all of the data go through the ArduinoSide page that is hosted by Arduino Ethernet Shield with the IP address you choose.
- After that, the Communication button in the ArduinoSide page has to be pushed to open the Communication page and to change the $_Session values.
- Lastly, the Arduinautomotion page has to refresh or the Reload button has to pushed to get the new data from Arduino.
- If the information about the room is in the dangerous range, the homepage notifies you with a voice alert box which includes a Spider-man video and audio file that are in the www folder in Apache localhost furthermore the related information circle changes its colour to red.


PLANT
AQUARUM
...This file has been truncated, please download it to see its full contents. Arduinautomotioncontrol.phpPHP
Arduinautomotion
Arduinautomotionformvalue.phpPHP
FormValue Server has received the data from Arduinautomotion.
Airpump=
Lamp=
Feeding=
Heater=
Filterex=
Filterin=
Irrigation=
Arduinautomotioncommunication.phpPHP
Communication
