

제조공정

산업 제조
<메인 클래스="사이트 메인" id="메인">
이 튜토리얼에서는 맞춤형 Android 애플리케이션을 사용하여 무선으로 제어하고 프로그래밍할 수 있는 Arduino 로봇 팔을 만드는 방법을 배웁니다. 로봇 부품 설계 및 3D 프린팅, 전자 부품 연결 및 Arduino 프로그래밍부터 로봇 팔 제어를 위한 자체 Android 애플리케이션 개발에 이르기까지 전체 제작 과정을 보여 드리겠습니다.
다음 비디오를 보거나 아래에 작성된 튜토리얼을 읽을 수 있습니다.
앱의 슬라이더를 사용하여 로봇 팔의 각 서보 또는 축의 움직임을 수동으로 제어할 수 있습니다. 또한 "저장" 버튼을 사용하여 각 위치 또는 단계를 기록하면 로봇 팔이 자동으로 실행하고 이러한 단계를 반복할 수 있습니다. 같은 버튼으로 자동 작업을 일시 중지하고 모든 단계를 재설정하거나 삭제하여 새 단계를 기록할 수 있습니다.
먼저 Solidworks 3D 모델링 소프트웨어를 사용하여 Robot Arm을 설계했습니다. 팔의 자유도는 5입니다.
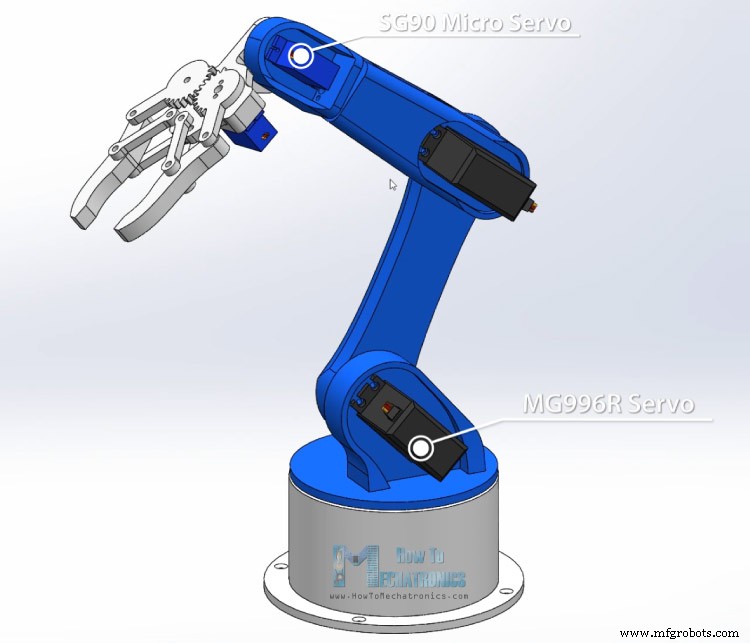
처음 3축인 허리, 어깨, 팔꿈치에는 MG996R 서보를 사용했고, 나머지 2축에는 손목 롤링과 손목 피치, 그리퍼는 더 작은 SG90 마이크로 서보를 사용했습니다.
이 3D 모델을 찾아 다운로드할 수 있을 뿐만 아니라 Thangs의 브라우저에서 탐색할 수 있습니다.
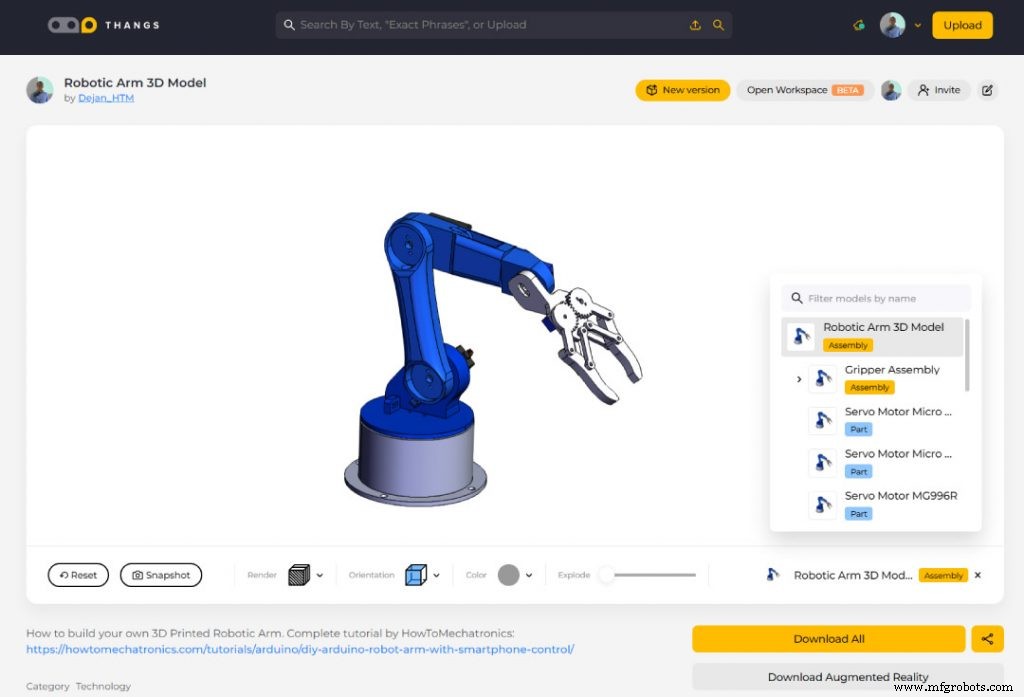
Thangs에서 어셈블리 3D 모델을 다운로드합니다.
이 튜토리얼을 지원해 주셔서 감사합니다.
3D 인쇄용 STL 파일:

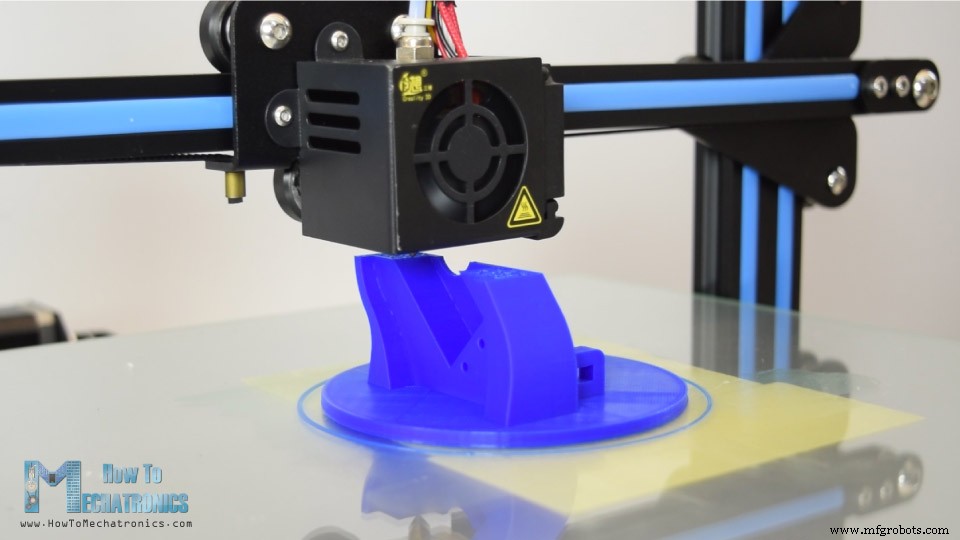
새로운 3D 프린터인 Creality CR-10을 사용하여 Arduino 로봇 팔의 모든 부품을 3D 인쇄했습니다.
여기서 저는 이 멋진 3D 프린터를 제공한 것에 대해 Banggood.com에 감사의 인사를 전하고 싶습니다. Creality CR-10 인쇄 품질은 가격대비 놀랍고 거의 90%가 사전 조립되어 제공된다는 것도 큰 장점입니다.
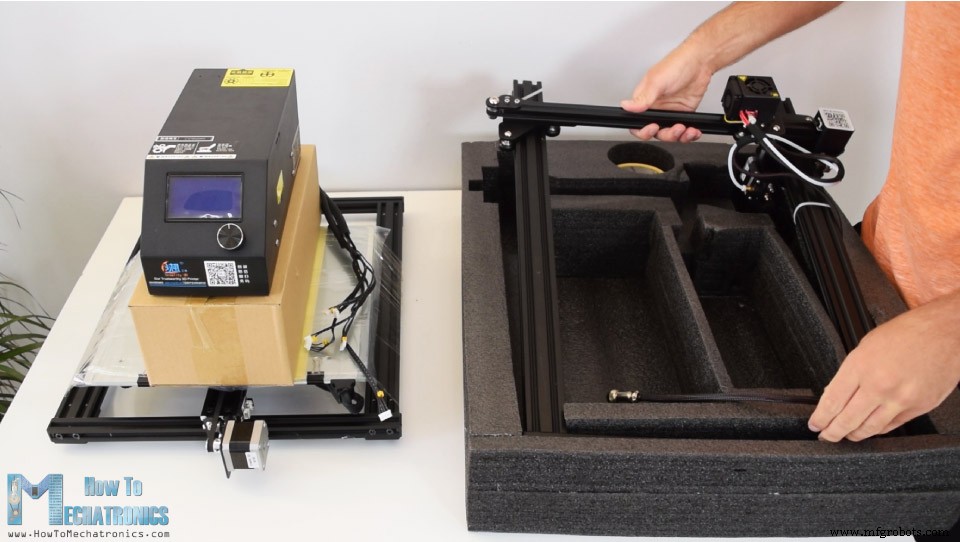
조립을 완료하려면 볼트와 브래킷을 사용하여 상하부 프레임을 연결하고 제공된 케이블을 사용하여 전자 부품과 컨트롤 박스를 연결하기만 하면 됩니다.

시도하기 전에 롤러 휠이 충분히 조여졌는지 확인하는 것이 좋습니다. 그렇지 않은 경우 편심 너트를 사용하여 조이면 됩니다. 3D 프린팅 베드의 수평을 맞추면 3D 창작물을 현실로 만들 준비가 된 것입니다.
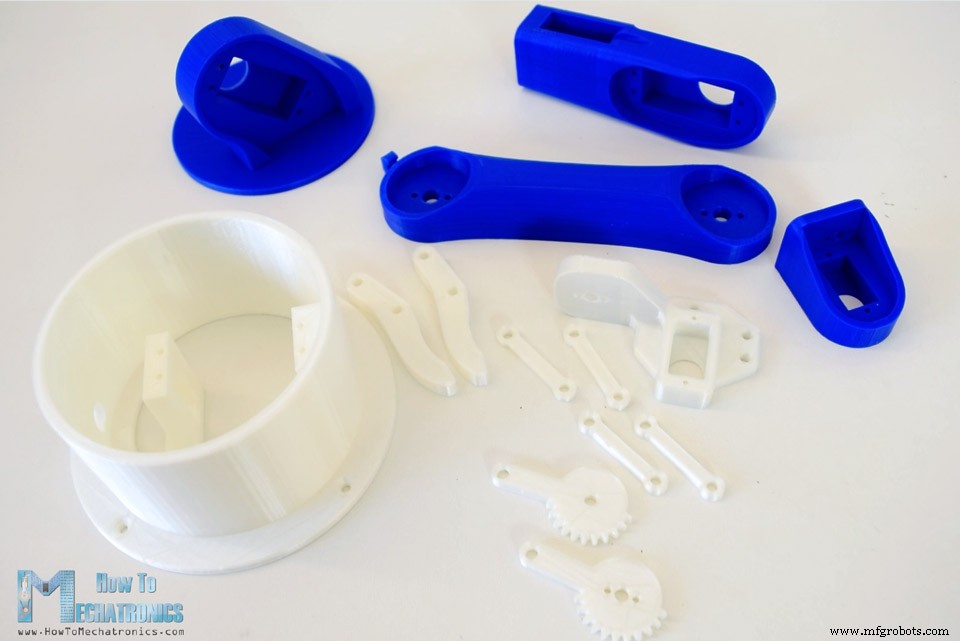
몇 시간 만에 Arduino 로봇 암의 모든 부품을 준비했습니다.
더 읽어보기:꼭 필요한 3D 프린터 액세서리 및 도구 15가지
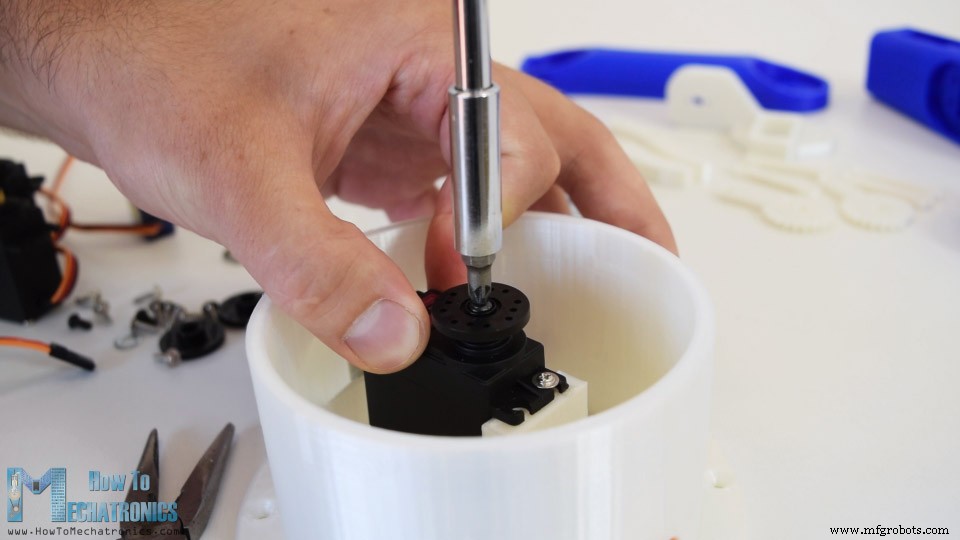
자, 이제 로봇 팔을 조립할 준비가 되었습니다. 패키지에 포함된 나사를 사용하여 첫 번째 서보 모터를 부착한 베이스부터 시작했습니다. 그런 다음 서보의 출력 샤프트에 둥근 혼을 볼트로 고정했습니다.
그리고 그 위에 윗부분을 놓고 나사 2개로 고정했습니다.
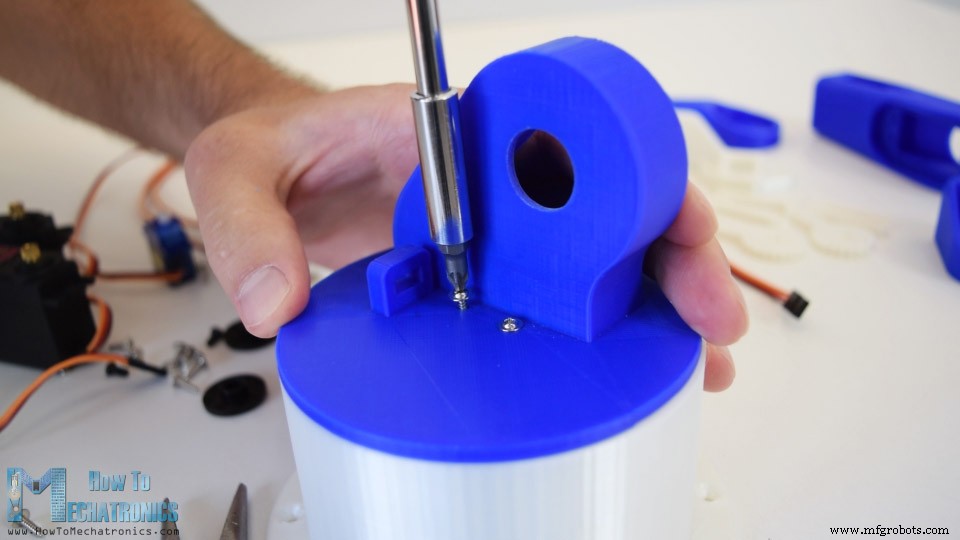
여기서 다시 먼저 서보를 이동한 다음 다음 부품에 둥근 혼을 연결한 다음 출력 샤프트의 볼트를 사용하여 서로 고정합니다.

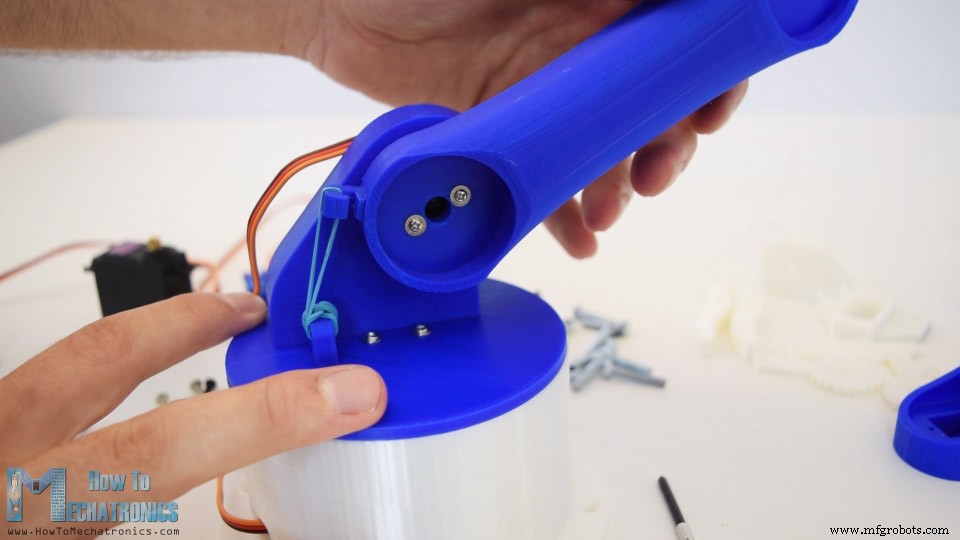
여기서 우리는 어깨 축에 일종의 스프링을 포함하는 것이 좋은 생각임을 알 수 있습니다. 또는 제 경우에는 이 서보가 팔의 나머지 부분의 전체 무게도 운반하기 때문에 서보에 약간의 도움을 주기 위해 고무 밴드를 사용했습니다. 페이로드로.
비슷한 방식으로 나머지 로봇 팔을 계속 조립했습니다. 그리퍼 메커니즘의 경우 4mm 볼트와 너트를 사용하여 조립했습니다.
<그림 클래스="aligncenter">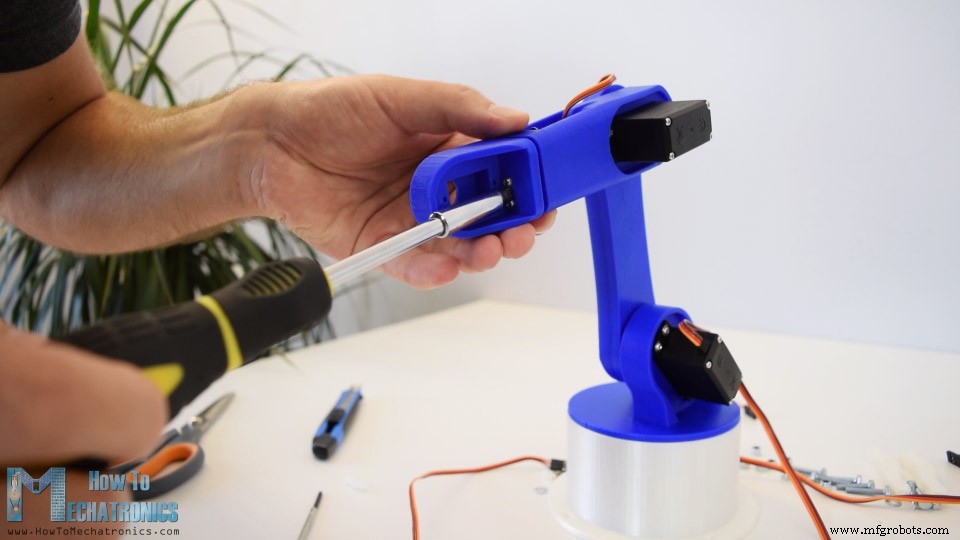
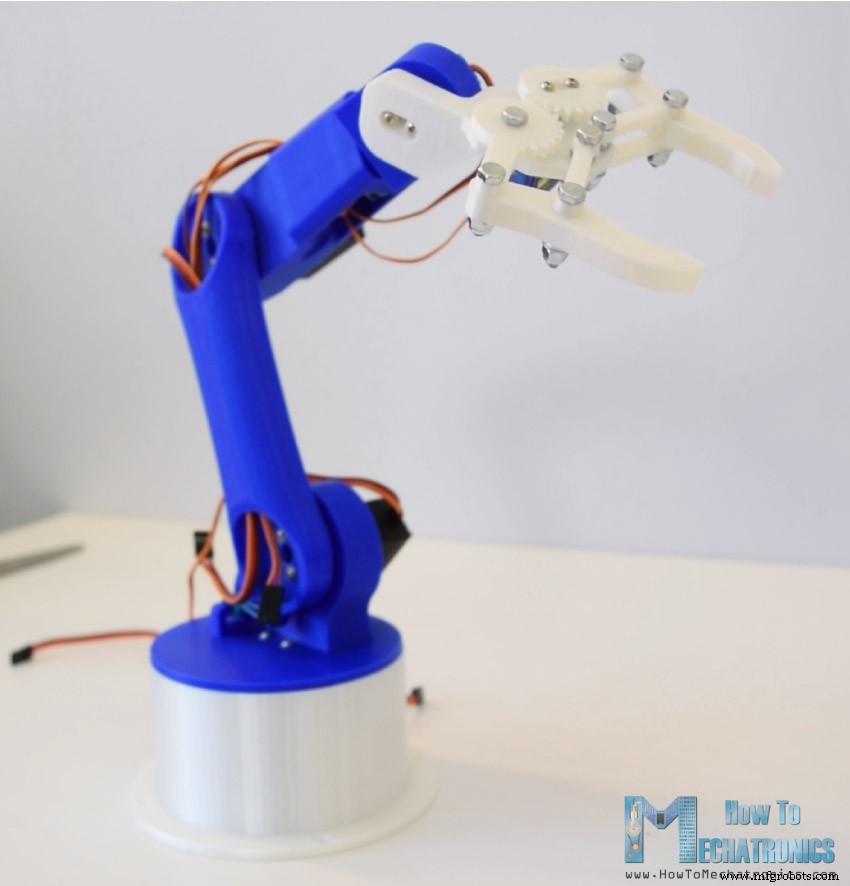
마지막으로 마지막 서보에 그리퍼 기구를 붙이고 아두이노 로봇팔을 완성했습니다.
다음 단계는 전자 장치를 연결하는 것입니다. 이 프로젝트의 회로도는 실제로 매우 간단합니다. 스마트폰과의 통신을 위해서는 아두이노 보드와 HC-05 블루투스 모듈만 있으면 됩니다. 6개의 서보 모터의 제어 핀은 Arduino 보드의 6개의 디지털 핀에 연결됩니다.
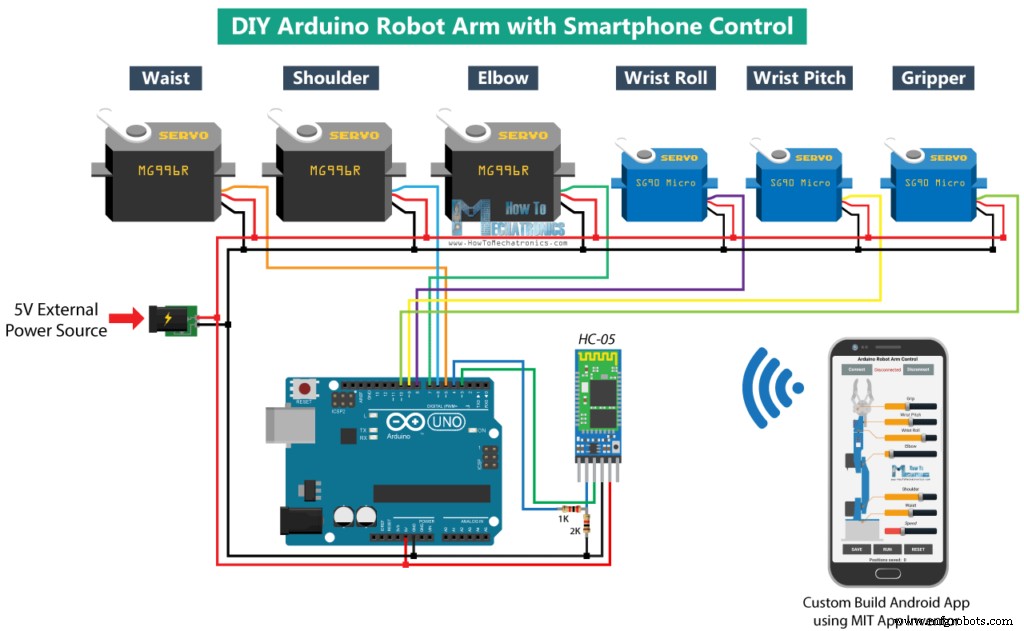
서보에 전원을 공급하려면 5V가 필요하지만 Arduino는 모든 서보가 끌어낼 수 있는 전류의 양을 처리할 수 없기 때문에 외부 전원에서 공급되어야 합니다. 전원은 최소 2A의 전류를 처리할 수 있어야 합니다. 모든 것이 연결되면 Arduino 프로그래밍으로 넘어갈 수 있고 Android 앱을 만들 수 있습니다.
아래 링크에서 이 예시에 필요한 구성요소를 얻을 수 있습니다.
코드가 조금 더 길기 때문에 이해를 돕기 위해 프로그램의 소스 코드를 섹션별로 설명과 함께 게시하겠습니다. 그리고 이 기사의 끝에 완전한 소스 코드를 게시할 것입니다.
따라서 먼저 Bluetooth 모듈의 직렬 통신을 위한 SoftwareSerial 라이브러리와 서보 라이브러리를 포함해야 합니다. 이 두 라이브러리는 모두 Arduino IDE에 포함되어 있으므로 외부에 설치할 필요가 없습니다. 그런 다음 6개의 서보, HC-05 Bluetooth 모듈 및 서보의 현재 및 이전 위치를 저장하기 위한 일부 변수와 자동 모드를 위한 위치 또는 단계를 저장하기 위한 어레이를 정의해야 합니다.
#include <SoftwareSerial.h>
#include <Servo.h>

Servo servo01;
Servo servo02;
Servo servo03;
Servo servo04;
Servo servo05;
Servo servo06;

SoftwareSerial Bluetooth(3, 4); // Arduino(RX, TX) - HC-05 Bluetooth (TX, RX)

int servo1Pos, servo2Pos, servo3Pos, servo4Pos, servo5Pos, servo6Pos; // current position
int servo1PPos, servo2PPos, servo3PPos, servo4PPos, servo5PPos, servo6PPos; // previous position
int servo01SP[50], servo02SP[50], servo03SP[50], servo04SP[50], servo05SP[50], servo06SP[50]; // for storing positions/steps
int speedDelay = 20;
int index = 0;
String dataIn = "";Code language: Arduino (arduino)
설정 섹션에서 서보와 블루투스 모듈을 초기화하고 로봇 팔을 초기 위치로 이동해야 합니다. 서보를 0도에서 180도까지 임의의 위치로 단순히 이동시키는 write() 함수를 사용하여 이를 수행합니다.
void setup() {
  servo01.attach(5);
  servo02.attach(6);
  servo03.attach(7);
  servo04.attach(8);
  servo05.attach(9);
  servo06.attach(10);
  Bluetooth.begin(38400); // Default baud rate of the Bluetooth module
  Bluetooth.setTimeout(1);
  delay(20);
  // Robot arm initial position
  servo1PPos = 90;
  servo01.write(servo1PPos);
  servo2PPos = 150;
  servo02.write(servo2PPos);
  servo3PPos = 35;
  servo03.write(servo3PPos);
  servo4PPos = 140;
  servo04.write(servo4PPos);
  servo5PPos = 85;
  servo05.write(servo5PPos);
  servo6PPos = 80;
  servo06.write(servo6PPos);
}Code language: Arduino (arduino)
다음으로 루프 섹션에서 Bluetooth.available() 함수를 사용하여 스마트폰에서 들어오는 데이터가 있는지 지속적으로 확인합니다. true이면 readString() 함수를 사용하여 데이터를 문자열로 읽고 dataIn 변수에 저장합니다. 도착한 데이터에 따라 로봇 팔에 무엇을 해야 하는지 알려줍니다.
// Check for incoming data
  if (Bluetooth.available() > 0) {
dataIn = Bluetooth.readString(); // Read the data as stringCode language: Arduino (arduino)이제 안드로이드 앱을 살펴보고 실제로 아두이노에 어떤 데이터를 보내고 있는지 알아봅시다.
<그림 클래스="aligncenter">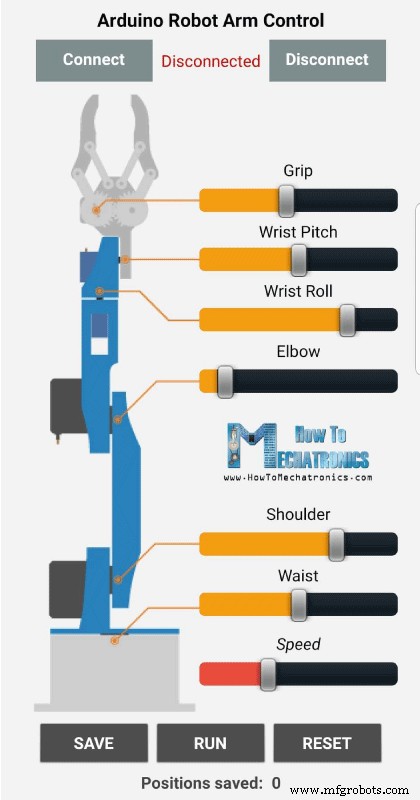
MIT App Inventor 온라인 응용 프로그램을 사용하여 앱을 만들었으며 작동 방식은 다음과 같습니다. 상단에는 스마트폰을 HC-05 Bluetooth 모듈에 연결하기 위한 두 개의 버튼이 있습니다. 그런 다음 왼쪽에는 로봇 팔의 이미지가 있고 오른쪽에는 서보를 제어하기 위한 6개의 슬라이더와 속도 제어를 위한 1개의 슬라이더가 있습니다.
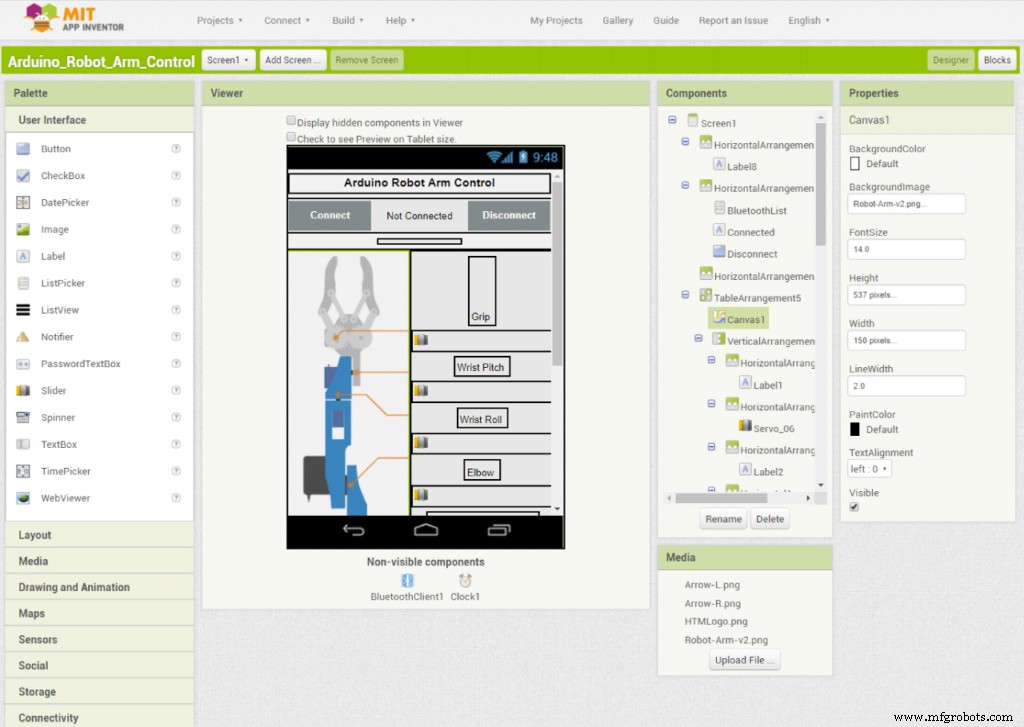
각 슬라이더는 로봇 팔 관절에 맞는 초기값, 최소값, 최대값이 다릅니다. 앱 하단에는 로봇 팔이 자동으로 실행되도록 프로그래밍할 수 있는 세 개의 버튼(SAVE, RUN 및 RESET)이 있습니다. 저장한 단계 수를 나타내는 레이블도 아래에 있습니다. 그럼에도 불구하고 MIT 앱 인벤터를 사용하여 이와 같은 앱을 빌드하는 방법에 대한 자세한 내용은 제 다른 자세한 자습서를 참조하세요.
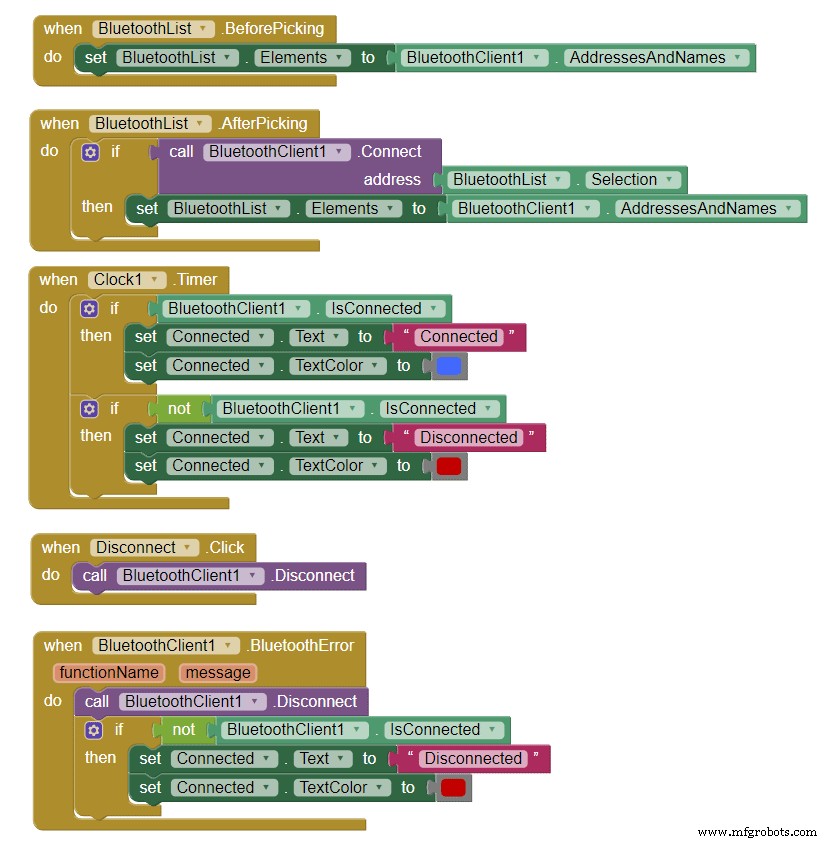
자, 이제 프로그램이나 응용 프로그램 뒤에 있는 블록을 살펴보겠습니다. 먼저, 왼쪽에는 스마트폰을 블루투스 모듈에 연결하기 위한 블록이 있습니다.
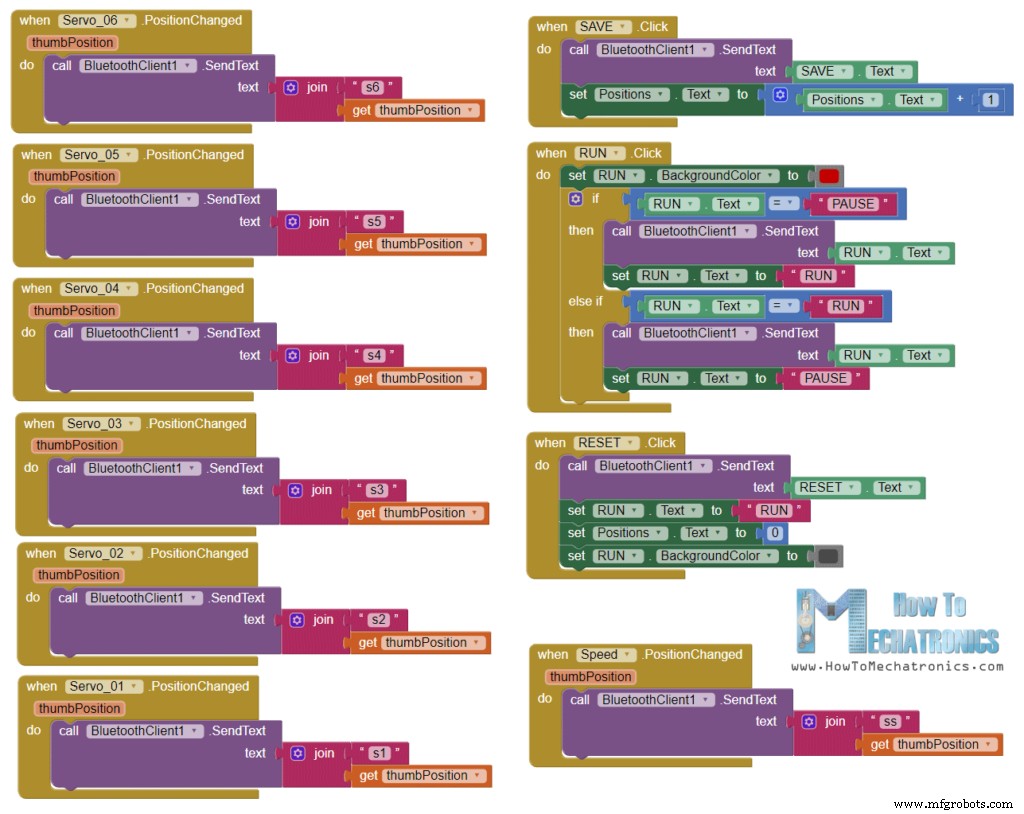
그런 다음 서보 위치 제어를 위한 슬라이더 블록과 로봇 팔 프로그래밍을 위한 버튼 블록이 있습니다. 따라서 Bluetooth 기능 .SendText를 사용하여 슬라이더의 위치를 변경하면 Arduino에 텍스트를 보냅니다. 이 텍스트는 슬라이더의 현재 값뿐만 아니라 변경된 슬라이더를 나타내는 접두사로 구성됩니다.
다음은 위의 MIT App Inventor 프로젝트와 스마트폰에 설치할 준비가 된 Android 앱의 다운로드 파일입니다.
따라서 Arduino에서 startsWith() 함수를 사용하여 들어오는 각 데이터의 접두사를 확인하고 다음에 무엇을 해야 하는지 알 수 있습니다. 예를 들어 접두사가 "s1"이면 서보 번호 1을 이동해야 한다는 것을 알고 있습니다. substring() 함수를 사용하여 나머지 텍스트를 얻거나 그것이 위치 값입니다. 정수로 변환하고 값을 사용하여 서보를 해당 위치로 이동합니다.
// If "Waist" slider has changed value - Move Servo 1 to position
    if (dataIn.startsWith("s1")) {
      String dataInS = dataIn.substring(2, dataIn.length()); // Extract only the number. E.g. from "s1120" to "120"
      servo1Pos = dataInS.toInt();  // Convert the string into integerCode language: Arduino (arduino)
여기서 우리는 단순히 write() 함수를 호출할 수 있고 서보는 그 위치로 갈 것입니다. 그러나 그렇게 하면 서보는 로봇 팔에 너무 많은 최대 속도로 실행될 것입니다. 대신 우리는 서보의 속도를 제어해야 하므로 각 반복 사이에 지연 시간을 구현하여 서보를 이전 위치에서 현재 위치로 점진적으로 이동시키기 위해 몇 개의 FOR 루프를 사용했습니다. 지연 시간을 변경하여 서보의 속도를 변경할 수 있습니다.
// We use for loops so we can control the speed of the servo
      // If previous position is bigger then current position
      if (servo1PPos > servo1Pos) {
        for ( int j = servo1PPos; j >= servo1Pos; j--) {   // Run servo down
          servo01.write(j);
          delay(20);    // defines the speed at which the servo rotates
        }
      }
      // If previous position is smaller then current position
      if (servo1PPos < servo1Pos) {
        for ( int j = servo1PPos; j <= servo1Pos; j++) {   // Run servo up
          servo01.write(j);
          delay(20);
        }
      }
      servo1PPos = servo1Pos;   // set current position as previous position
    }Code language: Arduino (arduino)
로봇팔의 각 축을 구동하는 방법은 동일합니다.
그 아래에는 SAVE 버튼이 있습니다. SAVE 버튼을 누르면 각 서보 모터의 위치가 어레이에 저장됩니다. 누를 때마다 인덱스가 증가하여 배열이 단계별로 채워집니다.
// If button "SAVE" is pressed
    if (dataIn.startsWith("SAVE")) {
      servo01SP[index] = servo1PPos;  // save position into the array
      servo02SP[index] = servo2PPos;
      servo03SP[index] = servo3PPos;
      servo04SP[index] = servo4PPos;
      servo05SP[index] = servo5PPos;
      servo06SP[index] = servo6PPos;
      index++;                        // Increase the array index
    }Code language: Arduino (arduino)
그런 다음 RUN 버튼을 누르면 저장된 단계를 실행하는 runservo() 사용자 정의 함수를 호출합니다. 이 기능을 살펴보겠습니다. 여기에서 RESET 버튼을 누를 때까지 저장된 단계를 계속해서 실행합니다. FOR 루프를 사용하여 어레이에 저장된 모든 위치를 실행하고 동시에 스마트폰에서 들어오는 데이터가 있는지 확인합니다. 이 데이터는 로봇을 일시 정지하는 RUN/PAUSE 버튼일 수 있으며, 다시 클릭하면 자동 이동을 계속합니다. 또한 속도 슬라이더 위치를 변경하면 해당 값을 사용하여 서보 모터의 속도를 제어하는 아래 FOR 루프의 각 반복 사이의 지연 시간을 변경합니다.
// Automatic mode custom function - run the saved steps
void runservo() {
  while (dataIn != "RESET") {   // Run the steps over and over again until "RESET" button is pressed
    for (int i = 0; i <= index - 2; i++) {  // Run through all steps(index)
      if (Bluetooth.available() > 0) {      // Check for incomding data
        dataIn = Bluetooth.readString();
        if ( dataIn == "PAUSE") {           // If button "PAUSE" is pressed
          while (dataIn != "RUN") {         // Wait until "RUN" is pressed again
            if (Bluetooth.available() > 0) {
              dataIn = Bluetooth.readString();
              if ( dataIn == "RESET") {
                break;
              }
            }
          }
        }
        // If SPEED slider is changed
        if (dataIn.startsWith("ss")) {
          String dataInS = dataIn.substring(2, dataIn.length());
          speedDelay = dataInS.toInt(); // Change servo speed (delay time)
        }
      }
      // Servo 1
      if (servo01SP[i] == servo01SP[i + 1]) {
      }
      if (servo01SP[i] > servo01SP[i + 1]) {
        for ( int j = servo01SP[i]; j >= servo01SP[i + 1]; j--) {
          servo01.write(j);
          delay(speedDelay);
        }
      }
      if (servo01SP[i] < servo01SP[i + 1]) {
        for ( int j = servo01SP[i]; j <= servo01SP[i + 1]; j++) {
          servo01.write(j);
          delay(speedDelay);
        }
      }Code language: Arduino (arduino)
이 IF 문과 FOR 루프로 앞에서 설명한 것과 유사한 방식으로 서보를 다음 위치로 이동합니다. 마지막으로 RESET 버튼을 누르면 어레이의 모든 데이터가 0으로 지워지고 인덱스도 0으로 재설정되어 새로운 움직임으로 로봇 팔을 다시 프로그래밍할 수 있습니다.
// If button "RESET" is pressed
    if ( dataIn == "RESET") {
      memset(servo01SP, 0, sizeof(servo01SP)); // Clear the array data to 0
      memset(servo02SP, 0, sizeof(servo02SP));
      memset(servo03SP, 0, sizeof(servo03SP));
      memset(servo04SP, 0, sizeof(servo04SP));
      memset(servo05SP, 0, sizeof(servo05SP));
      memset(servo06SP, 0, sizeof(servo06SP));
      index = 0;  // Index to 0
    }Code language: Arduino (arduino)
이제 그만입니다. 이제 로봇 팔을 가지고 즐겁게 놀 수 있습니다.
다음은 Arduino 로봇 암의 전체 코드입니다.
/*
       DIY Arduino Robot Arm Smartphone Control
        by Dejan, www.HowToMechatronics.com
*/

#include <SoftwareSerial.h>
#include <Servo.h>

Servo servo01;
Servo servo02;
Servo servo03;
Servo servo04;
Servo servo05;
Servo servo06;

SoftwareSerial Bluetooth(3, 4); // Arduino(RX, TX) - HC-05 Bluetooth (TX, RX)

int servo1Pos, servo2Pos, servo3Pos, servo4Pos, servo5Pos, servo6Pos; // current position
int servo1PPos, servo2PPos, servo3PPos, servo4PPos, servo5PPos, servo6PPos; // previous position
int servo01SP[50], servo02SP[50], servo03SP[50], servo04SP[50], servo05SP[50], servo06SP[50]; // for storing positions/steps
int speedDelay = 20;
int index = 0;
String dataIn = "";

void setup() {
  servo01.attach(5);
  servo02.attach(6);
  servo03.attach(7);
  servo04.attach(8);
  servo05.attach(9);
  servo06.attach(10);
  Bluetooth.begin(38400); // Default baud rate of the Bluetooth module
  Bluetooth.setTimeout(1);
  delay(20);
  // Robot arm initial position
  servo1PPos = 90;
  servo01.write(servo1PPos);
  servo2PPos = 150;
  servo02.write(servo2PPos);
  servo3PPos = 35;
  servo03.write(servo3PPos);
  servo4PPos = 140;
  servo04.write(servo4PPos);
  servo5PPos = 85;
  servo05.write(servo5PPos);
  servo6PPos = 80;
  servo06.write(servo6PPos);
}

void loop() {
  // Check for incoming data
  if (Bluetooth.available() > 0) {
    dataIn = Bluetooth.readString();  // Read the data as string

    // If "Waist" slider has changed value - Move Servo 1 to position
    if (dataIn.startsWith("s1")) {
      String dataInS = dataIn.substring(2, dataIn.length()); // Extract only the number. E.g. from "s1120" to "120"
      servo1Pos = dataInS.toInt();  // Convert the string into integer
      // We use for loops so we can control the speed of the servo
      // If previous position is bigger then current position
      if (servo1PPos > servo1Pos) {
        for ( int j = servo1PPos; j >= servo1Pos; j--) {   // Run servo down
          servo01.write(j);
          delay(20);    // defines the speed at which the servo rotates
        }
      }
      // If previous position is smaller then current position
      if (servo1PPos < servo1Pos) {
        for ( int j = servo1PPos; j <= servo1Pos; j++) {   // Run servo up
          servo01.write(j);
          delay(20);
        }
      }
      servo1PPos = servo1Pos;   // set current position as previous position
    }

    // Move Servo 2
    if (dataIn.startsWith("s2")) {
      String dataInS = dataIn.substring(2, dataIn.length());
      servo2Pos = dataInS.toInt();

      if (servo2PPos > servo2Pos) {
        for ( int j = servo2PPos; j >= servo2Pos; j--) {
          servo02.write(j);
          delay(50);
        }
      }
      if (servo2PPos < servo2Pos) {
        for ( int j = servo2PPos; j <= servo2Pos; j++) {
          servo02.write(j);
          delay(50);
        }
      }
      servo2PPos = servo2Pos;
    }
    // Move Servo 3
    if (dataIn.startsWith("s3")) {
      String dataInS = dataIn.substring(2, dataIn.length());
      servo3Pos = dataInS.toInt();
      if (servo3PPos > servo3Pos) {
        for ( int j = servo3PPos; j >= servo3Pos; j--) {
          servo03.write(j);
          delay(30);
        }
      }
      if (servo3PPos < servo3Pos) {
        for ( int j = servo3PPos; j <= servo3Pos; j++) {
          servo03.write(j);
          delay(30);
        }
      }
      servo3PPos = servo3Pos;
    }
    // Move Servo 4
    if (dataIn.startsWith("s4")) {
      String dataInS = dataIn.substring(2, dataIn.length());
      servo4Pos = dataInS.toInt();
      if (servo4PPos > servo4Pos) {
        for ( int j = servo4PPos; j >= servo4Pos; j--) {
          servo04.write(j);
          delay(30);
        }
      }
      if (servo4PPos < servo4Pos) {
        for ( int j = servo4PPos; j <= servo4Pos; j++) {
          servo04.write(j);
          delay(30);
        }
      }
      servo4PPos = servo4Pos;
    }
    // Move Servo 5
    if (dataIn.startsWith("s5")) {
      String dataInS = dataIn.substring(2, dataIn.length());
      servo5Pos = dataInS.toInt();
      if (servo5PPos > servo5Pos) {
        for ( int j = servo5PPos; j >= servo5Pos; j--) {
          servo05.write(j);
          delay(30);
        }
      }
      if (servo5PPos < servo5Pos) {
        for ( int j = servo5PPos; j <= servo5Pos; j++) {
          servo05.write(j);
          delay(30);
        }
      }
      servo5PPos = servo5Pos;
    }
    // Move Servo 6
    if (dataIn.startsWith("s6")) {
      String dataInS = dataIn.substring(2, dataIn.length());
      servo6Pos = dataInS.toInt();
      if (servo6PPos > servo6Pos) {
        for ( int j = servo6PPos; j >= servo6Pos; j--) {
          servo06.write(j);
          delay(30);
        }
      }
      if (servo6PPos < servo6Pos) {
        for ( int j = servo6PPos; j <= servo6Pos; j++) {
          servo06.write(j);
          delay(30);
        }
      }
      servo6PPos = servo6Pos;
    }
    // If button "SAVE" is pressed
    if (dataIn.startsWith("SAVE")) {
      servo01SP[index] = servo1PPos;  // save position into the array
      servo02SP[index] = servo2PPos;
      servo03SP[index] = servo3PPos;
      servo04SP[index] = servo4PPos;
      servo05SP[index] = servo5PPos;
      servo06SP[index] = servo6PPos;
      index++;                        // Increase the array index
    }
    // If button "RUN" is pressed
    if (dataIn.startsWith("RUN")) {
      runservo();  // Automatic mode - run the saved steps
    }
    // If button "RESET" is pressed
    if ( dataIn == "RESET") {
      memset(servo01SP, 0, sizeof(servo01SP)); // Clear the array data to 0
      memset(servo02SP, 0, sizeof(servo02SP));
      memset(servo03SP, 0, sizeof(servo03SP));
      memset(servo04SP, 0, sizeof(servo04SP));
      memset(servo05SP, 0, sizeof(servo05SP));
      memset(servo06SP, 0, sizeof(servo06SP));
      index = 0;  // Index to 0
    }
  }
}

// Automatic mode custom function - run the saved steps
void runservo() {
  while (dataIn != "RESET") {   // Run the steps over and over again until "RESET" button is pressed
    for (int i = 0; i <= index - 2; i++) {  // Run through all steps(index)
      if (Bluetooth.available() > 0) {      // Check for incomding data
        dataIn = Bluetooth.readString();
        if ( dataIn == "PAUSE") {           // If button "PAUSE" is pressed
          while (dataIn != "RUN") {         // Wait until "RUN" is pressed again
            if (Bluetooth.available() > 0) {
              dataIn = Bluetooth.readString();
              if ( dataIn == "RESET") {
                break;
              }
            }
          }
        }
        // If speed slider is changed
        if (dataIn.startsWith("ss")) {
          String dataInS = dataIn.substring(2, dataIn.length());
          speedDelay = dataInS.toInt(); // Change servo speed (delay time)
        }
      }
      // Servo 1
      if (servo01SP[i] == servo01SP[i + 1]) {
      }
      if (servo01SP[i] > servo01SP[i + 1]) {
        for ( int j = servo01SP[i]; j >= servo01SP[i + 1]; j--) {
          servo01.write(j);
          delay(speedDelay);
        }
      }
      if (servo01SP[i] < servo01SP[i + 1]) {
        for ( int j = servo01SP[i]; j <= servo01SP[i + 1]; j++) {
          servo01.write(j);
          delay(speedDelay);
        }
      }

      // Servo 2
      if (servo02SP[i] == servo02SP[i + 1]) {
      }
      if (servo02SP[i] > servo02SP[i + 1]) {
        for ( int j = servo02SP[i]; j >= servo02SP[i + 1]; j--) {
          servo02.write(j);
          delay(speedDelay);
        }
      }
      if (servo02SP[i] < servo02SP[i + 1]) {
        for ( int j = servo02SP[i]; j <= servo02SP[i + 1]; j++) {
          servo02.write(j);
          delay(speedDelay);
        }
      }

      // Servo 3
      if (servo03SP[i] == servo03SP[i + 1]) {
      }
      if (servo03SP[i] > servo03SP[i + 1]) {
        for ( int j = servo03SP[i]; j >= servo03SP[i + 1]; j--) {
          servo03.write(j);
          delay(speedDelay);
        }
      }
      if (servo03SP[i] < servo03SP[i + 1]) {
        for ( int j = servo03SP[i]; j <= servo03SP[i + 1]; j++) {
          servo03.write(j);
          delay(speedDelay);
        }
      }

      // Servo 4
      if (servo04SP[i] == servo04SP[i + 1]) {
      }
      if (servo04SP[i] > servo04SP[i + 1]) {
        for ( int j = servo04SP[i]; j >= servo04SP[i + 1]; j--) {
          servo04.write(j);
          delay(speedDelay);
        }
      }
      if (servo04SP[i] < servo04SP[i + 1]) {
        for ( int j = servo04SP[i]; j <= servo04SP[i + 1]; j++) {
          servo04.write(j);
          delay(speedDelay);
        }
      }

      // Servo 5
      if (servo05SP[i] == servo05SP[i + 1]) {
      }
      if (servo05SP[i] > servo05SP[i + 1]) {
        for ( int j = servo05SP[i]; j >= servo05SP[i + 1]; j--) {
          servo05.write(j);
          delay(speedDelay);
        }
      }
      if (servo05SP[i] < servo05SP[i + 1]) {
        for ( int j = servo05SP[i]; j <= servo05SP[i + 1]; j++) {
          servo05.write(j);
          delay(speedDelay);
        }
      }

      // Servo 6
      if (servo06SP[i] == servo06SP[i + 1]) {
      }
      if (servo06SP[i] > servo06SP[i + 1]) {
        for ( int j = servo06SP[i]; j >= servo06SP[i + 1]; j--) {
          servo06.write(j);
          delay(speedDelay);
        }
      }
      if (servo06SP[i] < servo06SP[i + 1]) {
        for ( int j = servo06SP[i]; j <= servo06SP[i + 1]; j++) {
          servo06.write(j);
          delay(speedDelay);
        }
      }
    }
  }
}Code language: Arduino (arduino)
이 비디오를 좋아하고 새로운 것을 배웠기를 바랍니다. 아래 댓글 섹션에서 언제든지 질문하고 내 Arduino 프로젝트 컬렉션을 확인하세요.
제조공정
이 Arduino IR Tutorial에서는 TV 리모컨과 Arduino를 사용하여 전자 장치를 제어하는 방법을 배웁니다. 간단한 LED 제어부터 DC Fan 속도 제어, 고전압 가전 제어까지 몇 가지 예를 들어 보겠습니다. 다음 동영상을 보거나 아래에 작성된 튜토리얼을 읽을 수 있습니다. 작동 방식 버튼을 눌렀을 때 TV 리모컨 앞의 LED가 깜박이는 것을 볼 수 있습니다. 실제로 이것은 적외선이며 사람의 눈에는 보이지 않기 때문에 카메라를 통해서만 볼 수 있습니다. 따라서 깜박임은 버튼을 누를 때 적외선 LED가 적
이 튜토리얼에서는 이전 비디오 중 하나에서 제작한 DIY 3D Printed SCARA 로봇 팔을 레이저 조각기로 변환하는 방법을 보여 드리겠습니다. 동영상 다음 동영상을 보거나 아래 기사를 읽을 수 있습니다. 프로젝트 개요 SCARA 로봇은 4개의 NEMA 17 스테퍼 모터로 구동되고 Arduino 보드를 사용하여 제어되는 4개의 자유도를 가지고 있습니다. 원본 비디오에서는 Arduino UNO 보드를 CNC Shield와 조합하여 사용했지만 이제는 Arduino MEGA 보드와 RAMP 보드를 함께 사용합니다. 로봇을 제어하