산업 제조
산업용 사물 인터넷 | 산업자재 | 장비 유지 보수 및 수리 | 산업 프로그래밍 |
home  MfgRobots >> 산업 제조 >  >> Manufacturing Technology >> 제조공정

RFID 작동 방식 및 Arduino 기반 RFID 도어록을 만드는 방법

<메인 클래스="사이트 메인" id="메인">

이 튜토리얼에서는 RFID가 무엇인지, 어떻게 작동하는지, Arduino 기반 RFID 도어록을 만드는 방법을 배웁니다. 자세한 내용은 다음 동영상을 보거나 아래에 작성된 튜토리얼을 참조하세요.

개요

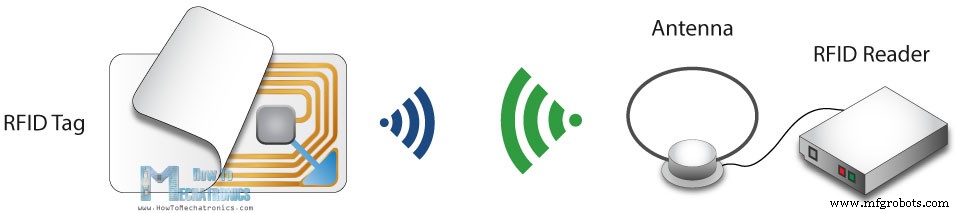
RFID는 무선 주파수 식별을 나타냅니다. 그리고 인사 추적, 액세스 제어, 공급망 관리, 도서관의 책 추적, 톨게이트 시스템 등과 같은 작업을 위해 많은 산업 분야에서 널리 사용되는 비접촉 기술입니다.[/column]

RFID 작동 방식


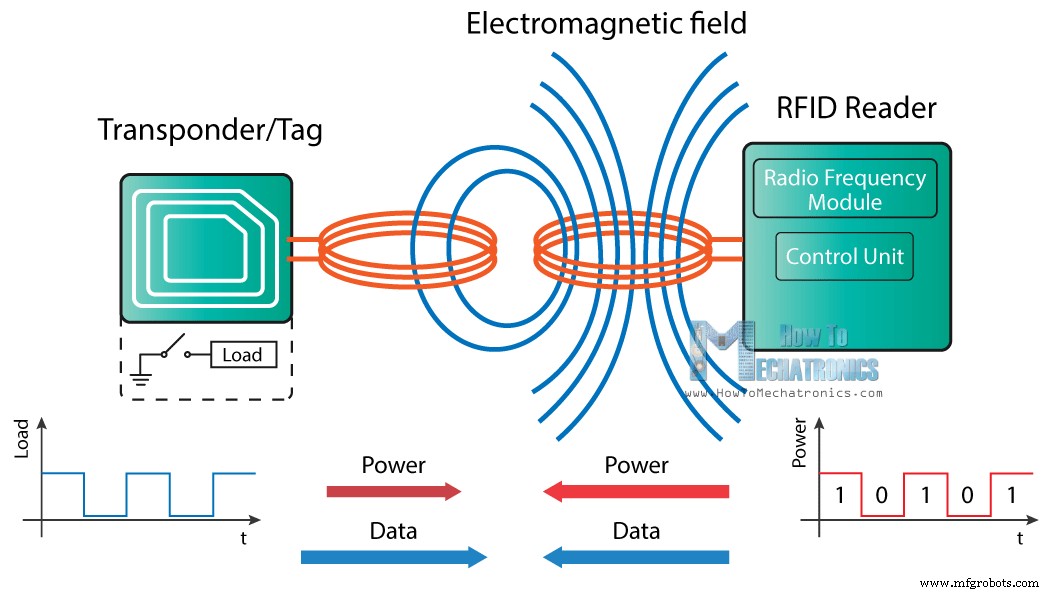
RFID 시스템은 두 가지 주요 구성 요소인 트랜스폰더 또는 식별하려는 물체에 위치한 태그와 트랜시버 또는 리더로 구성됩니다.

RFID 리더는 무선 주파수 모듈, 제어 장치 및 고주파 전자기장을 생성하는 안테나 코일로 구성됩니다. 한편, 태그는 일반적으로 안테나와 전자 마이크로칩만으로 구성된 수동소자이므로 송수신기의 전자기장에 가까워지면 유도에 의해 안테나 코일에 전압이 발생하고 이 전압은 마이크로칩의 전원 역할을 합니다.

이제 태그에 전원이 공급되면 리더에서 전송된 메시지를 추출할 수 있으며 메시지를 리더로 다시 보내기 위해 로드 조작이라는 기술을 사용합니다. 태그의 안테나에서 부하를 켜고 끄면 전압 강하로 측정할 수 있는 판독기 안테나의 전력 소비에 영향을 미칩니다. 이 전압 변화는 1과 0으로 캡처되며 데이터가 태그에서 판독기로 전송되는 방식입니다.

리더와 태그 사이에 데이터를 전송하는 또 다른 방법인 후방 산란 결합(backscattered coupling)이 있습니다. 이 경우 태그는 수신 전력의 일부를 사용하여 리더의 안테나에 의해 포착될 또 다른 전자기장을 생성합니다.

RFID 및 Arduino

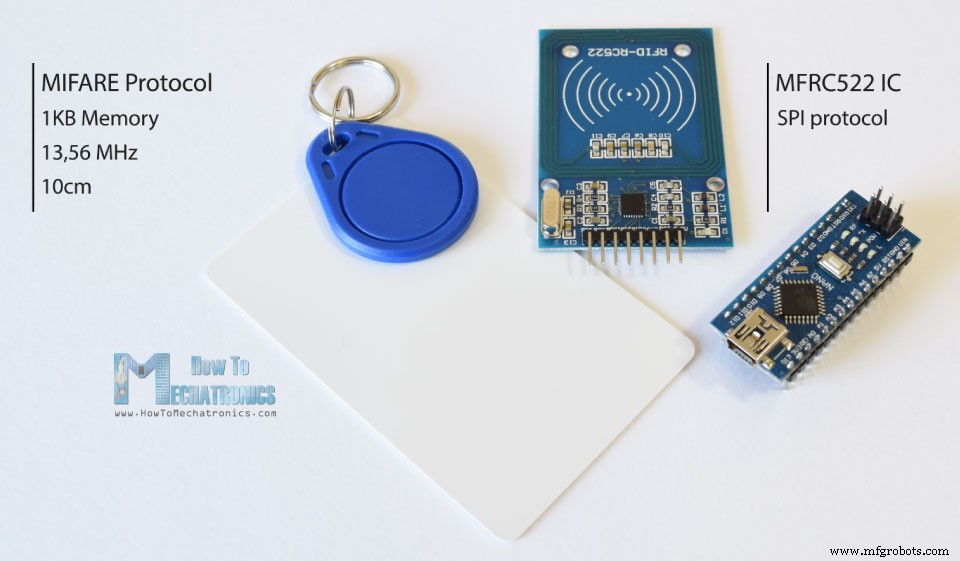
이것이 기본 작동 원리이며 이제 Arduino와 RFID를 사용하고 자체 RFID 도어록을 구축하는 방법을 살펴보겠습니다. 우리는 MIFARE 프로토콜과 MFRC522 RFID 리더를 기반으로 하는 태그를 사용할 것이며 비용은 몇 달러에 불과합니다.

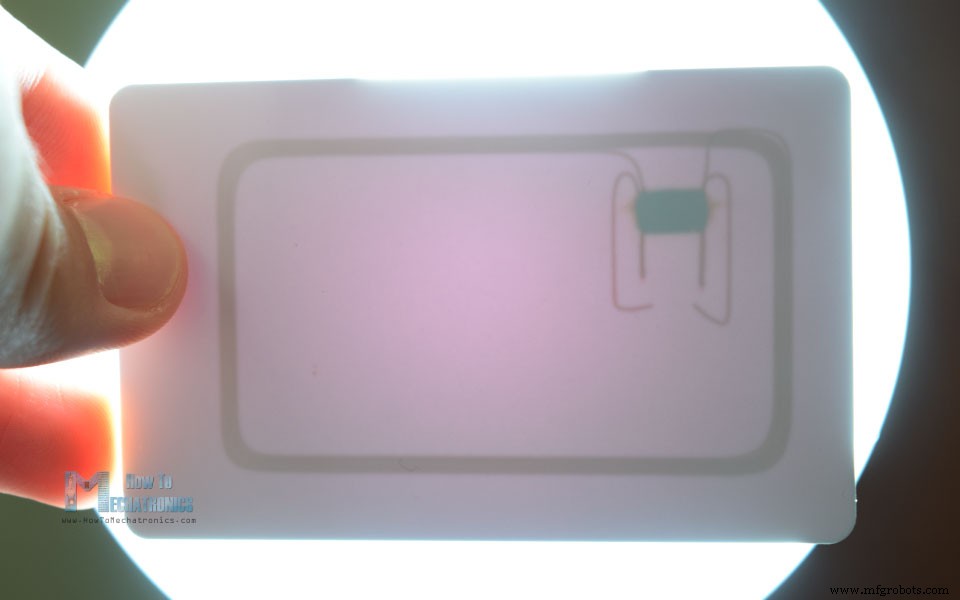
이 태그에는 1kb의 메모리가 있으며 산술 연산을 수행할 수 있는 마이크로칩이 있습니다. 작동 주파수는 13.56MHz이고 작동 거리는 안테나의 기하학적 구조에 따라 최대 10cm입니다. 이 태그 중 하나를 광원 앞에 가져오면 앞서 이야기한 안테나와 마이크로칩을 볼 수 있습니다.

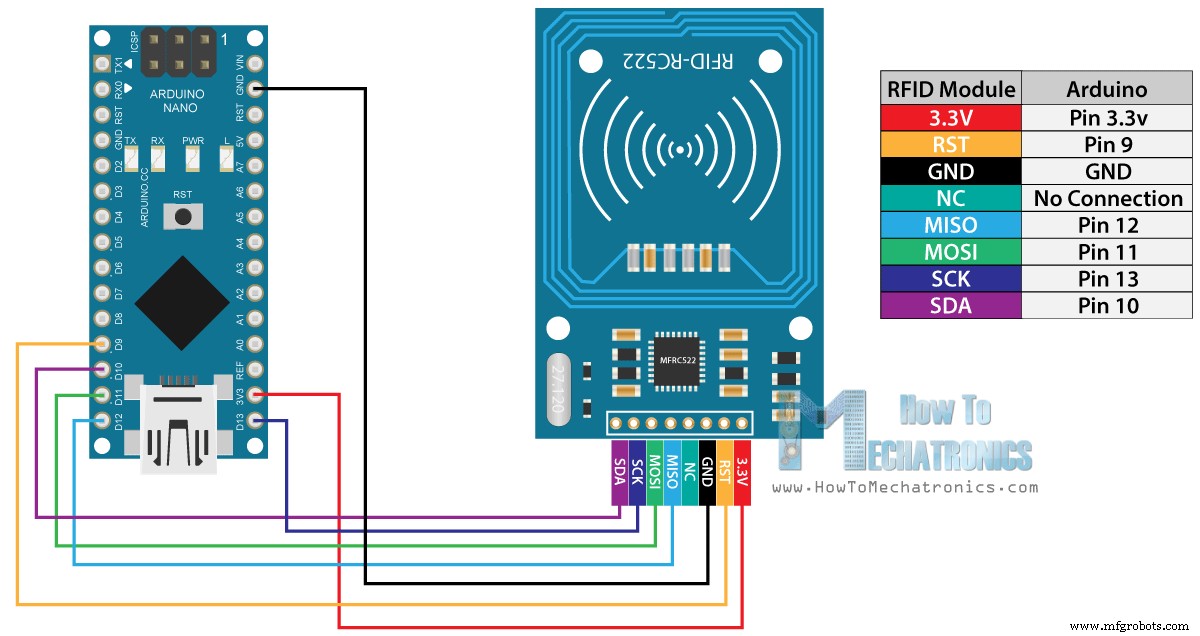
RFID 리더 모듈은 아두이노 보드와의 통신을 위해 SPI 프로토콜을 사용하며, 이를 연결하는 방법은 다음과 같습니다. 모듈의 VCC를 3.3V에 연결해야 하며 다른 핀은 5V를 허용하므로 걱정할 필요가 없습니다.

모듈을 연결하면 GitHub에서 MFRC522 라이브러리를 다운로드해야 합니다. 라이브러리에는 모듈 사용법을 배울 수 있는 몇 가지 좋은 예가 있습니다.

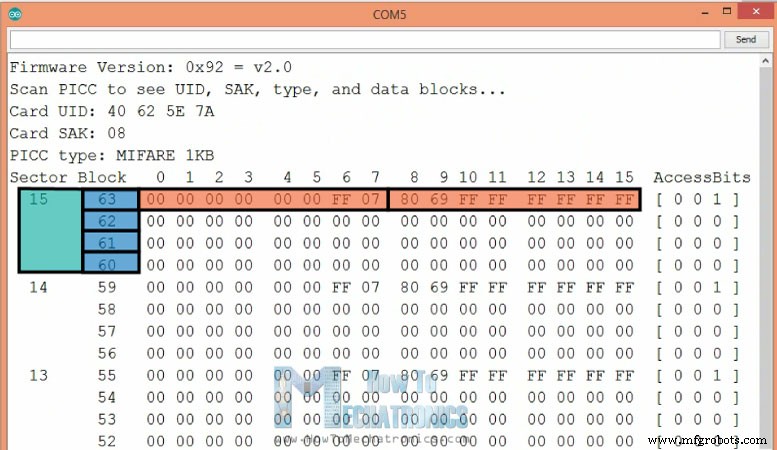
먼저 "DumpInfo" 예제를 업로드하고 시스템이 제대로 작동하는지 테스트할 수 있습니다. 이제 직렬 모니터를 실행하고 태그를 모듈 근처에 가져오면 리더가 태그를 읽기 시작하고 태그의 모든 정보가 직렬 모니터에 표시됩니다.

여기에서 태그의 UID 번호와 실제로 16개의 섹터로 분할된 1KB의 메모리를 알 수 있습니다. 각 섹터는 4개의 블록으로, 각 블록은 2바이트의 데이터를 저장할 수 있습니다. 이 튜토리얼에서는 태그의 메모리를 사용하지 않고 태그의 UID 번호만 사용합니다.

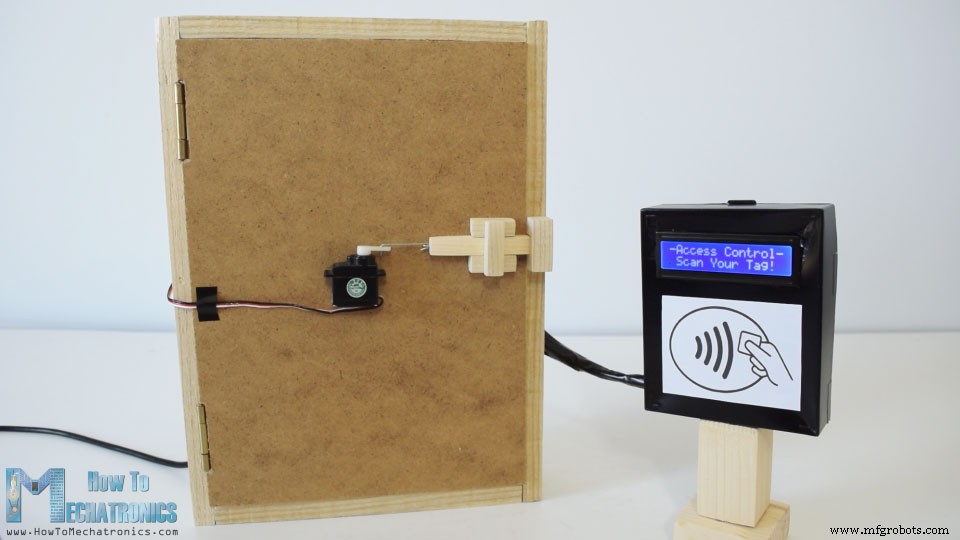
Arduino RFID 도어록 액세스 제어 프로젝트

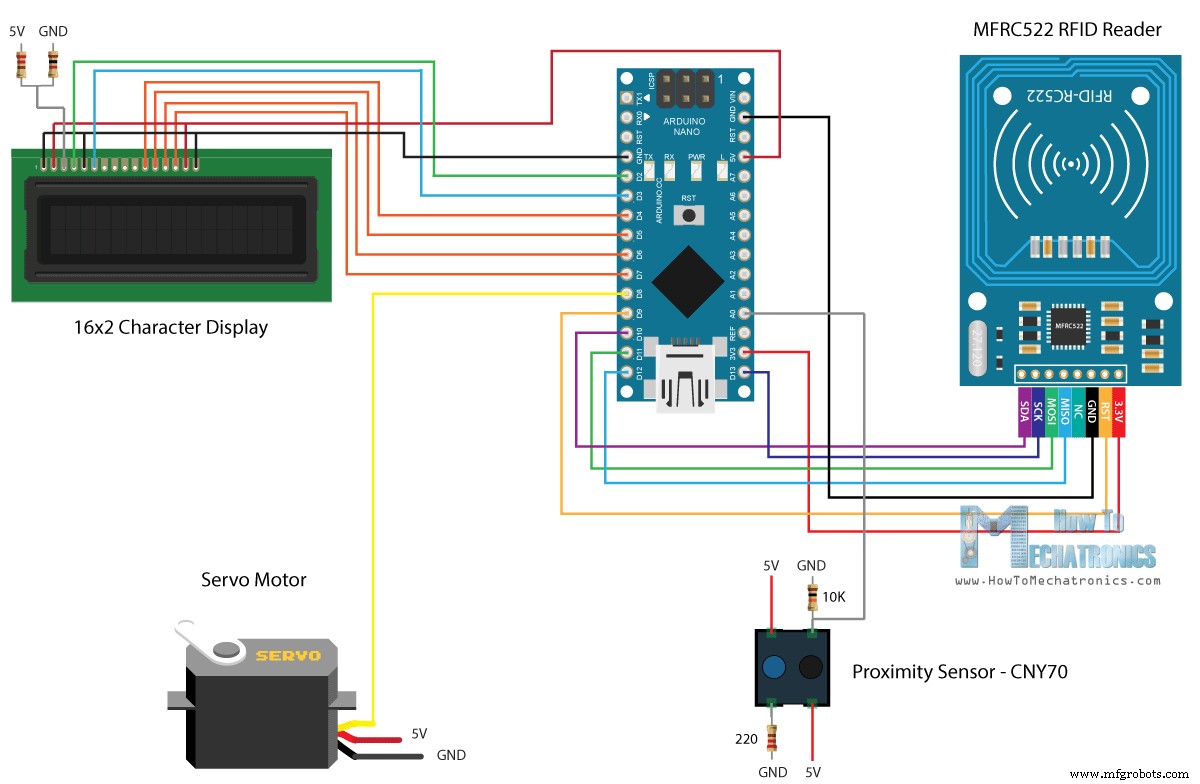
RFID 도어록 프로젝트의 코드를 살펴보기 전에 이 프로젝트의 구성 요소와 회로도를 살펴보겠습니다.

RFID 모듈 외에도 문이 닫혔는지 열렸는지 확인하기 위한 근접 센서, 잠금 장치 및 문자 표시를 위한 서보 모터를 사용할 것입니다.

아래 링크에서 이 Arduino 튜토리얼에 필요한 구성요소를 얻을 수 있습니다.

프로젝트에는 다음과 같은 워크플로가 있습니다. 먼저 마스터 태그를 설정한 다음 시스템이 일반 모드로 들어갑니다. 알 수 없는 태그를 스캔하면 액세스가 거부되지만 마스터를 스캔하면 알 수 없는 태그를 추가하고 인증할 수 있는 프로그램 모드로 들어갑니다. 이제 태그를 다시 스캔하면 액세스 권한이 부여되어 문을 열 수 있습니다.

문을 닫으면 자동으로 문이 잠깁니다. 시스템에서 태그를 제거하려면 프로그램 모드로 다시 돌아가서 알고 있는 태그를 스캔하면 제거됩니다.

소스 코드

이제 코드를 살펴보겠습니다.  따라서 먼저 RFID 모듈, 디스플레이 및 서보 모터용 라이브러리를 포함하고 아래 프로그램에 필요한 변수를 정의하고 라이브러리의 인스턴스를 생성해야 합니다.

#include <SPI.h>
#include <MFRC522.h>
#include <LiquidCrystal.h>
#include <Servo.h>

#define RST_PIN   9
#define SS_PIN    10

byte readCard[4];
char* myTags[100] = {};
int tagsCount = 0;
String tagID = "";
boolean successRead = false;
boolean correctTag = false;
int proximitySensor;
boolean doorOpened = false;

// Create instances
MFRC522 mfrc522(SS_PIN, RST_PIN);
LiquidCrystal lcd(2, 3, 4, 5, 6, 7); //Parameters: (rs, enable, d4, d5, d6, d7)
Servo myServo; // Servo motorCode language: Arduino (arduino)

설정 섹션에서 먼저 모듈을 초기화하고 서보 모터의 초기 값을 잠금 위치로 설정합니다. 그런 다음 초기 메시지를 디스플레이에 인쇄하고 다음 "while" 루프를 사용하여 마스터 태그가 스캔될 때까지 기다립니다. getID() 사용자 정의 함수는 태그 UID를 가져와 myTags[0] 배열의 첫 번째 위치에 넣습니다.

void setup() {
  // Initiating
  SPI.begin();        // SPI bus
  mfrc522.PCD_Init(); //  MFRC522
  lcd.begin(16, 2);   // LCD screen
  myServo.attach(8);  // Servo motor

  myServo.write(10); // Initial lock position of the servo motor
  // Prints the initial message
  lcd.print("-No Master Tag!-");
  lcd.setCursor(0, 1);
  lcd.print("    SCAN NOW");
  // Waits until a master card is scanned
  while (!successRead) {
    successRead = getID();
    if ( successRead == true) {
      myTags[tagsCount] = strdup(tagID.c_str()); // Sets the master tag into position 0 in the array
      lcd.clear();
      lcd.setCursor(0, 0);
      lcd.print("Master Tag Set!");
      tagsCount++;
    }
  }
  successRead = false;
  printNormalModeMessage();
}Code language: Arduino (arduino)

getID() 사용자 정의 함수를 살펴보겠습니다. 먼저 리더 근처에 새 태그가 있는지 확인하고 태그의 UID를 가져오는 "for" 루프를 계속 진행합니다. 우리가 사용하는 태그는 4바이트 UID 번호를 가지므로 이 루프를 4번 반복해야 하고 concat() 함수를 사용하여 4바이트를 단일 String 변수에 추가합니다. 또한 문자열의 모든 문자를 대문자로 설정하고 끝에서 읽기를 중지합니다.

uint8_t getID() {
  // Getting ready for Reading PICCs
  if ( ! mfrc522.PICC_IsNewCardPresent()) { //If a new PICC placed to RFID reader continue
    return 0;
  }
  if ( ! mfrc522.PICC_ReadCardSerial()) {   //Since a PICC placed get Serial and continue
    return 0;
  }
  tagID = "";
  for ( uint8_t i = 0; i < 4; i++) {  // The MIFARE PICCs that we use have 4 byte UID
    readCard[i] = mfrc522.uid.uidByte[i];
    tagID.concat(String(mfrc522.uid.uidByte[i], HEX)); // Adds the 4 bytes in a single String variable
  }
  tagID.toUpperCase();
  mfrc522.PICC_HaltA(); // Stop reading
  return 1;
}Code language: Arduino (arduino)

메인 루프에 들어가기 전에 설정 섹션의 끝에서 디스플레이에 "액세스 제어" 메시지를 인쇄하는 printNormalModeMessage() 사용자 정의 함수도 호출합니다.

void printNormalModeMessage() {
  delay(1500);
  lcd.clear();
  lcd.print("-Access Control-");
  lcd.setCursor(0, 1);
  lcd.print(" Scan Your Tag!");
}Code language: Arduino (arduino)

메인 루프에서 문이 닫혔는지 여부를 알려주는 근접 센서의 값을 읽는 것으로 시작합니다.

int proximitySensor = analogRead(A0);Code language: Arduino (arduino)

따라서 문이 닫히면 getID() 사용자 정의 함수에서 설명한 것과 동일한 행을 사용하여 새 태그의 UID를 스캔하고 가져옵니다. 여기서 "if" 문의 "return" 행 때문에 태그를 스캔할 때까지 코드가 더 이상 진행되지 않는다는 것을 알 수 있습니다.

태그를 스캔하면 해당 태그가 이전에 등록한 마스터인지 확인하고, 사실이면 프로그램 모드로 들어갑니다. 이 모드에서 이미 승인된 태그를 스캔하면 시스템에서 제거되고 태그를 알 수 없는 경우 승인된 것으로 시스템에 추가됩니다.

// Checks whether the scanned tag is the master tag
    if (tagID == myTags[0]) {
      lcd.clear();
      lcd.print("Program mode:");
      lcd.setCursor(0, 1);
      lcd.print("Add/Remove Tag");
      while (!successRead) {
        successRead = getID();
        if ( successRead == true) {
          for (int i = 0; i < 100; i++) {
            if (tagID == myTags[i]) {
              myTags[i] = "";
              lcd.clear();
              lcd.setCursor(0, 0);
              lcd.print("  Tag Removed!");
              printNormalModeMessage();
              return;
            }
          }
          myTags[tagsCount] = strdup(tagID.c_str());
          lcd.clear();
          lcd.setCursor(0, 0);
          lcd.print("   Tag Added!");
          printNormalModeMessage();
          tagsCount++;
          return;
        }
      }
    }Code language: Arduino (arduino)

프로그램 모드 외부에서 다음 "for" 루프를 사용하여 스캔한 태그가 등록된 태그와 동일한지 확인하고 문을 잠금 해제하거나 액세스가 거부된 상태로 유지합니다. "else" 문의 끝에서 문이 닫힐 때까지 기다렸다가 문을 잠그고 일반 모드 메시지를 다시 인쇄합니다.

// Checks whether the scanned tag is authorized
    for (int i = 0; i < 100; i++) {
      if (tagID == myTags[i]) {
        lcd.clear();
        lcd.setCursor(0, 0);
        lcd.print(" Access Granted!");
        myServo.write(170); // Unlocks the door
        printNormalModeMessage();
        correctTag = true;
      }
    }
    if (correctTag == false) {
      lcd.clear();
      lcd.setCursor(0, 0);
      lcd.print(" Access Denied!");
      printNormalModeMessage();
    }
  }
  // If door is open...
  else {
    lcd.clear();
    lcd.setCursor(0, 0);
    lcd.print(" Door Opened!");
    while (!doorOpened) {
      proximitySensor = analogRead(A0);
      if (proximitySensor > 200) {
        doorOpened = true;
      }
    }
    doorOpened = false;
    delay(500);
    myServo.write(10); // Locks the door
    printNormalModeMessage();
  }Code language: Arduino (arduino)

이것이 거의 모든 것이며 프로젝트의 전체 코드는 다음과 같습니다.

/*
* Arduino Door Lock Access Control Project
*                
* by Dejan Nedelkovski, www.HowToMechatronics.com
* 
* Library: MFRC522, https://github.com/miguelbalboa/rfid
*/

#include <SPI.h>
#include <MFRC522.h>
#include <LiquidCrystal.h>
#include <Servo.h>

#define RST_PIN   9
#define SS_PIN    10

byte readCard[4];
char* myTags[100] = {};
int tagsCount = 0;
String tagID = "";
boolean successRead = false;
boolean correctTag = false;
int proximitySensor;
boolean doorOpened = false;

// Create instances
MFRC522 mfrc522(SS_PIN, RST_PIN);
LiquidCrystal lcd(2, 3, 4, 5, 6, 7); //Parameters: (rs, enable, d4, d5, d6, d7)
Servo myServo; // Servo motor

void setup() {
  // Initiating
  SPI.begin();        // SPI bus
  mfrc522.PCD_Init(); //  MFRC522
  lcd.begin(16, 2);   // LCD screen
  myServo.attach(8);  // Servo motor

  myServo.write(10); // Initial lock position of the servo motor
  // Prints the initial message
  lcd.print("-No Master Tag!-");
  lcd.setCursor(0, 1);
  lcd.print("    SCAN NOW");
  // Waits until a master card is scanned
  while (!successRead) {
    successRead = getID();
    if ( successRead == true) {
      myTags[tagsCount] = strdup(tagID.c_str()); // Sets the master tag into position 0 in the array
      lcd.clear();
      lcd.setCursor(0, 0);
      lcd.print("Master Tag Set!");
      tagsCount++;
    }
  }
  successRead = false;
  printNormalModeMessage();
}

void loop() {
  int proximitySensor = analogRead(A0);
  // If door is closed...
  if (proximitySensor > 200) {
    if ( ! mfrc522.PICC_IsNewCardPresent()) { //If a new PICC placed to RFID reader continue
      return;
    }
    if ( ! mfrc522.PICC_ReadCardSerial()) {   //Since a PICC placed get Serial and continue
      return;
    }
    tagID = "";
    // The MIFARE PICCs that we use have 4 byte UID
    for ( uint8_t i = 0; i < 4; i++) {  //
      readCard[i] = mfrc522.uid.uidByte[i];
      tagID.concat(String(mfrc522.uid.uidByte[i], HEX)); // Adds the 4 bytes in a single String variable
    }
    tagID.toUpperCase();
    mfrc522.PICC_HaltA(); // Stop reading

    correctTag = false;
    // Checks whether the scanned tag is the master tag
    if (tagID == myTags[0]) {
      lcd.clear();
      lcd.print("Program mode:");
      lcd.setCursor(0, 1);
      lcd.print("Add/Remove Tag");
      while (!successRead) {
        successRead = getID();
        if ( successRead == true) {
          for (int i = 0; i < 100; i++) {
            if (tagID == myTags[i]) {
              myTags[i] = "";
              lcd.clear();
              lcd.setCursor(0, 0);
              lcd.print("  Tag Removed!");
              printNormalModeMessage();
              return;
            }
          }
          myTags[tagsCount] = strdup(tagID.c_str());
          lcd.clear();
          lcd.setCursor(0, 0);
          lcd.print("   Tag Added!");
          printNormalModeMessage();
          tagsCount++;
          return;
        }
      }
    }
    successRead = false;
    // Checks whether the scanned tag is authorized
    for (int i = 0; i < 100; i++) {
      if (tagID == myTags[i]) {
        lcd.clear();
        lcd.setCursor(0, 0);
        lcd.print(" Access Granted!");
        myServo.write(170); // Unlocks the door
        printNormalModeMessage();
        correctTag = true;
      }
    }
    if (correctTag == false) {
      lcd.clear();
      lcd.setCursor(0, 0);
      lcd.print(" Access Denied!");
      printNormalModeMessage();
    }
  }
  // If door is open...
  else {
    lcd.clear();
    lcd.setCursor(0, 0);
    lcd.print(" Door Opened!");
    while (!doorOpened) {
      proximitySensor = analogRead(A0);
      if (proximitySensor > 200) {
        doorOpened = true;
      }
    }
    doorOpened = false;
    delay(500);
    myServo.write(10); // Locks the door
    printNormalModeMessage();
  }
}

uint8_t getID() {
  // Getting ready for Reading PICCs
  if ( ! mfrc522.PICC_IsNewCardPresent()) { //If a new PICC placed to RFID reader continue
    return 0;
  }
  if ( ! mfrc522.PICC_ReadCardSerial()) {   //Since a PICC placed get Serial and continue
    return 0;
  }
  tagID = "";
  for ( uint8_t i = 0; i < 4; i++) {  // The MIFARE PICCs that we use have 4 byte UID
    readCard[i] = mfrc522.uid.uidByte[i];
    tagID.concat(String(mfrc522.uid.uidByte[i], HEX)); // Adds the 4 bytes in a single String variable
  }
  tagID.toUpperCase();
  mfrc522.PICC_HaltA(); // Stop reading
  return 1;
}

void printNormalModeMessage() {
  delay(1500);
  lcd.clear();
  lcd.print("-Access Control-");
  lcd.setCursor(0, 1);
  lcd.print(" Scan Your Tag!");
}Code language: Arduino (arduino)

이 튜토리얼이 도움이 되었기를 바라며 아래의 댓글 섹션에 언제든지 질문을 남겨주세요.


제조공정

  1. Arduino RFID 잠금(RC522 포함) - MIFARE 프로토콜 13.56Mhz
  2. Arduino RFID 잠금 자습서
  3. 사용자 정의 가능한 펀치 키보드 버튼을 만드는 방법
  4. 암호 기반 도어록
  5. Arduino 및 OLED 기반 Cellular Automata
  6. eDOT - Arduino 기반 정밀 시계 및 기상 관측소
  7. Arduino 및 Google 스프레드시트 기반 출석 시스템
  8. Arduino로 음악을 만드는 방법
  9. Arduino 기반 자동 문 열림을 만드는 방법
  10. Arduino 및 Processing IDE를 사용하여 나침반을 만드는 방법