

제조공정

산업 제조
<메인 클래스="사이트 메인" id="메인">
이 Arduino 터치 스크린 튜토리얼에서는 Arduino와 함께 TFT LCD 터치 스크린을 사용하는 방법을 배웁니다. 다음 비디오를 보거나 아래에 작성된 튜토리얼을 읽을 수 있습니다.
이 튜토리얼에서는 세 가지 예제를 작성했습니다. 첫 번째 예는 초음파 센서를 이용한 거리 측정입니다. 센서의 출력 또는 거리가 화면에 인쇄되고 터치 스크린을 사용하여 센티미터 또는 인치 단위를 선택할 수 있습니다.
<그림 클래스="aligncenter">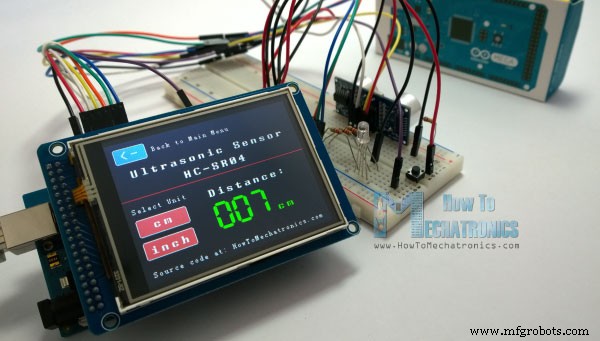
다음 예는 이 3개의 RGB 슬라이더를 사용하여 RGB LED를 제어하는 것입니다. 예를 들어 파란색 슬라이더를 움직이기 시작하면 LED가 파란색으로 켜지고 최대값으로 갈수록 빛이 증가합니다. 따라서 슬라이더는 0에서 255까지 이동할 수 있으며 이 조합을 사용하여 RGB LED에 모든 색상을 설정할 수 있지만 LED가 색상을 그렇게 정확하게 표현할 수 없다는 점을 염두에 두십시오.
<그림 클래스="aligncenter">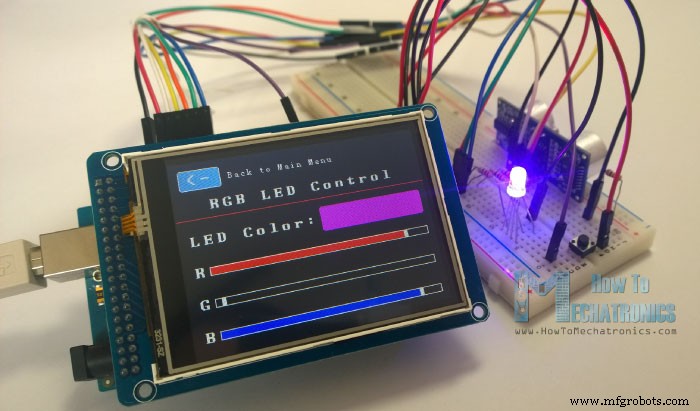
세 번째 예는 게임입니다. 사실 이것은 스마트폰용으로 인기 있는 Flappy Bird 게임의 복제품입니다. 푸시 버튼을 사용하거나 터치 스크린 자체를 사용하여 게임을 할 수 있습니다.
<그림 클래스="aligncenter">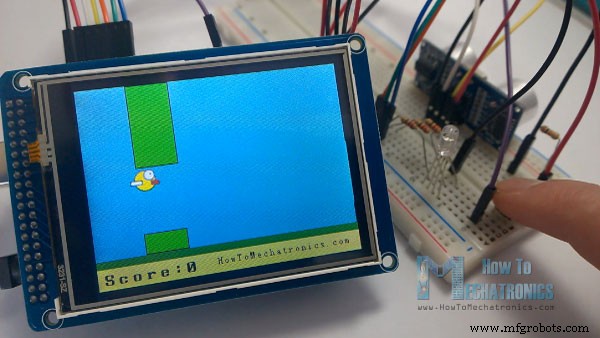
이제 이러한 각 예를 살펴보고 그 이면의 코드를 단계별로 설명하겠습니다.
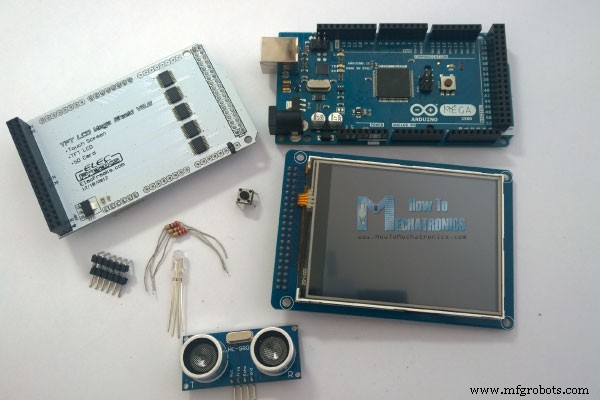
예를 들어 TFT LCD Arduino Mega Shield와 함께 3.2인치 TFT 터치 스크린을 사용하고 있습니다. TFT 터치 스크린이 3.3V에서 작동하고 Arduino Mega 출력이 5V이기 때문에 실드가 필요합니다. 첫 번째 예에는 HC-SR04 초음파 센서가 있고 두 번째 예에는 3개의 저항과 푸시 버튼이 있는 RGB LED가 있습니다. 게임 예를 들어. 또한 핀 헤더를 납땜하여 구부려서 Arduino 보드와 TFT Shield 사이에 삽입할 수 있도록 이와 같이 맞춤형 핀 헤더를 만들어야 했습니다.
다음 사이트에서 이러한 구성요소를 얻을 수 있습니다.
다음은 회로도입니다. 우리는 GND 핀, 8에서 13까지의 디지털 핀, 핀 번호 14를 사용할 것입니다. 5V 핀은 이미 TFT 화면에서 사용하고 있으므로 핀 번호 13을 VCC로 사용하고 바로 높게 설정합니다. 코드의 설정 섹션에서.
<그림 클래스="aligncenter">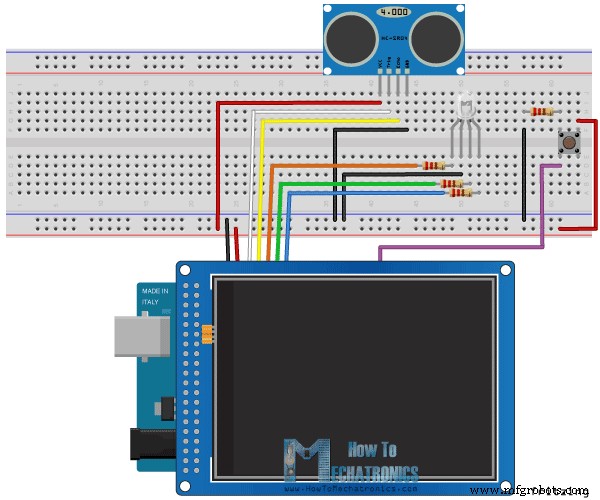
코드가 조금 더 길고 이해를 돕기 위해 각 섹션에 대한 설명과 함께 섹션에 프로그램의 소스 코드를 게시합니다. 그리고 이 기사의 마지막에 전체 소스 코드를 게시할 것입니다.
Henning Karlsen이 만든 UTFT 및 URTouch 라이브러리를 사용하겠습니다. 여기서 나는 그가 한 놀라운 일에 대해 그에게 감사의 말을 전하고 싶습니다. 라이브러리를 사용하면 TFT 화면을 정말 쉽게 사용할 수 있으며 다양한 TFT 화면 크기, 실드 및 컨트롤러와 함께 작동합니다. 그의 웹사이트인 RinkyDinkElectronics.com에서 이러한 라이브러리를 다운로드할 수 있으며 데모 예제와 사용 방법에 대한 자세한 문서도 찾을 수 있습니다.
라이브러리를 포함한 후에는 UTFT 및 URTouch 개체를 만들어야 합니다. 이러한 개체의 매개변수는 TFT 스크린 및 실드의 모델에 따라 다르며 이러한 세부 정보는 라이브러리 문서에서도 찾을 수 있습니다.
다음으로 라이브러리와 함께 제공되는 글꼴을 정의하고 프로그램에 필요한 일부 변수도 정의해야 합니다. 설정 섹션에서 화면과 터치를 시작하고 연결된 센서, LED 및 버튼에 대한 핀 모드를 정의하고 처음에 프로그램의 홈 화면을 그릴 drawHomeSreen() 사용자 정의 함수를 호출해야 합니다.
#include <UTFT.h>
#include <URTouch.h>

//==== Creating Objects
UTFT    myGLCD(SSD1289,38,39,40,41); //Parameters should be adjusted to your Display/Schield model
URTouch  myTouch( 6, 5, 4, 3, 2);

//==== Defining Variables
extern uint8_t SmallFont[];
extern uint8_t BigFont[];
extern uint8_t SevenSegNumFont[];

extern unsigned int bird01[0x41A];

int x, y;

char currentPage, selectedUnit;

//Ultrasonic Sensor
const int VCC = 13;
const int trigPin = 11;
const int echoPin = 12;

long duration;
int distanceInch, distanceCm;

// RGB LEDs
const int redLed = 10;
const int greenLed = 9;
const int blueLed = 8;
int xR=38;
int xG=38;
int xB=38;

// Floppy Bird
int xP = 319;
int yP = 100;
int yB = 30;
int fallRateInt = 0;
float fallRate =0;
int score=0;
const int button = 14;
int buttonState = 0;

void setup() {
// Initial setup
  myGLCD.InitLCD();
  myGLCD.clrScr();
  myTouch.InitTouch();
  myTouch.setPrecision(PREC_MEDIUM);

  // Defining Pin Modes
  pinMode(VCC, OUTPUT); // VCC
  pinMode(trigPin, OUTPUT); // Sets the trigPin as an Output
  pinMode(echoPin, INPUT); // Sets the echoPin as an Input
  pinMode(redLed, OUTPUT);
  pinMode(greenLed, OUTPUT);
  pinMode(blueLed, OUTPUT);
  pinMode(button, INPUT);
  digitalWrite(VCC, HIGH); // +5V - Pin 13 as VCC

  drawHomeScreen();  // Draws the Home Screen
  currentPage = '0'; // Indicates that we are at Home Screen
  selectedUnit = '0'; // Indicates the selected unit for the first example, cms or inches
}Code language: Arduino (arduino)
이제 프로그램의 홈 화면을 만드는 방법을 설명하겠습니다. setBackColor() 함수를 사용하여 텍스트의 배경색을 설정해야 합니다. 우리의 경우 검정색입니다. 그런 다음 색상을 흰색으로 설정하고 큰 글꼴을 설정하고 print() 함수를 사용하여 화면 중앙에 "Arduino TFT Tutorial" 문자열을 인쇄하고 화면의 Y축 아래로 10픽셀을 인쇄해야 합니다. 다음으로 색상을 빨간색으로 설정하고 텍스트 아래에 빨간색 선을 그립니다. 그런 다음 색상을 다시 흰색으로 설정하고 작은 글꼴을 사용하는 "by HowToMechatronics.com"과 큰 글꼴을 사용하는 "Select Example"이라는 두 개의 다른 문자열을 인쇄해야 합니다.
다음은 거리 센서 버튼입니다. 먼저 색상을 설정한 다음 fillRoundRect() 함수를 사용하여 둥근 사각형을 그립니다. 그런 다음 색상을 다시 흰색으로 설정하고 drawRoundRect() 함수를 사용하여 이전 사각형 위에 또 다른 둥근 사각형을 그립니다. 그러나 이것은 채우기가 없으므로 버튼의 전체 모양이 프레임이 있는 것처럼 보입니다. . 버튼 상단에 버튼 채우기와 동일한 배경색과 큰 글꼴을 사용하여 텍스트를 인쇄합니다. 다른 두 버튼에도 동일한 절차가 적용됩니다.
// drawHomeScreen - Custom Function
void drawHomeScreen() {
  // Title
  myGLCD.setBackColor(0,0,0); // Sets the background color of the area where the text will be printed to black
  myGLCD.setColor(255, 255, 255); // Sets color to white
  myGLCD.setFont(BigFont); // Sets font to big
  myGLCD.print("Arduino TFT Tutorial", CENTER, 10); // Prints the string on the screen
  myGLCD.setColor(255, 0, 0); // Sets color to red
  myGLCD.drawLine(0,32,319,32); // Draws the red line
  myGLCD.setColor(255, 255, 255); // Sets color to white
  myGLCD.setFont(SmallFont); // Sets the font to small
  myGLCD.print("by HowToMechatronics.com", CENTER, 41); // Prints the string
  myGLCD.setFont(BigFont);
  myGLCD.print("Select Example", CENTER, 64);

  // Button - Distance Sensor
  myGLCD.setColor(16, 167, 103); // Sets green color
  myGLCD.fillRoundRect (35, 90, 285, 130); // Draws filled rounded rectangle
  myGLCD.setColor(255, 255, 255); // Sets color to white
  myGLCD.drawRoundRect (35, 90, 285, 130); // Draws rounded rectangle without a fill, so the overall appearance of the button looks like it has a frame
  myGLCD.setFont(BigFont); // Sets the font to big
  myGLCD.setBackColor(16, 167, 103); // Sets the background color of the area where the text will be printed to green, same as the button
  myGLCD.print("DISTANCE SENSOR", CENTER, 102); // Prints the string

  // Button - RGB LED Control
  myGLCD.setColor(16, 167, 103);
  myGLCD.fillRoundRect (35, 140, 285, 180);
  myGLCD.setColor(255, 255, 255);
  myGLCD.drawRoundRect (35, 140, 285, 180);
  myGLCD.setFont(BigFont);
  myGLCD.setBackColor(16, 167, 103);
  myGLCD.print("RGB LED CONTROL", CENTER, 152);

  // Button - Birduino
  myGLCD.setColor(16, 167, 103);
  myGLCD.fillRoundRect (35, 190, 285, 230);
  myGLCD.setColor(255, 255, 255);
  myGLCD.drawRoundRect (35, 190, 285, 230);
  myGLCD.setFont(BigFont);
  myGLCD.setBackColor(16, 167, 103);
  myGLCD.print("BIRDUINO GAME", CENTER, 202);
}Code language: Arduino (arduino)
이제 버튼을 누르면 적절한 예제로 보내질 수 있도록 버튼을 기능적으로 만들어야 합니다. 설정 섹션에서 문자 '0'을 currentPage 변수로 설정하여 홈 화면에 있음을 나타냅니다. 따라서 그것이 사실이고 화면에서 이 if 문이 참이 되고 여기에서 이 줄을 사용하면 화면이 눌려진 X 및 Y 좌표를 얻을 수 있습니다. 그것이 첫 번째 버튼을 덮는 영역이라면 거리 센서 예제를 활성화할 drawDistanceSensor() 사용자 정의 함수를 호출합니다. 또한 첫 번째 예에 있음을 나타내는 변수 currentPage에 문자 '1'을 설정합니다. drawFrame() 사용자 정의 함수는 버튼을 눌렀을 때 강조 표시하는 데 사용됩니다. 다른 두 버튼에도 동일한 절차가 적용됩니다.
//========== The loop section ========
void loop() {
  // Home Screen
  if (currentPage == '0') {
    if (myTouch.dataAvailable()) {
      myTouch.read();
      x=myTouch.getX(); // X coordinate where the screen has been pressed
      y=myTouch.getY(); // Y coordinates where the screen has been pressed
      // If we press the Distance Sensor Button
      if ((x>=35) && (x<=285) && (y>=90) && (y<=130)) {
        drawFrame(35, 90, 285, 130); // Custom Function -Highlighs the buttons when it's pressed
        currentPage = '1'; // Indicates that we are the first example
        myGLCD.clrScr(); // Clears the screen
        drawDistanceSensor(); // It is called only once, because in the next iteration of the loop, this above if statement will be false so this funtion won't be called. This function will draw the graphics of the first example.
      }
      // If we press the RGB LED Control Button
      if ((x>=35) && (x<=285) && (y>=140) && (y<=180)) {
        drawFrame(35, 140, 285, 180);
        currentPage = '2';
        myGLCD.clrScr();
        drawLedControl();
      }
      // If we press the Birduino Game Button
      if ((x>=35) && (x<=285) && (y>=190) && (y<=230)) {
        drawFrame(35, 190, 285, 230);
        currentPage = '3';
        myGLCD.clrScr();
        myGLCD.setColor(114, 198, 206);
        myGLCD.fillRect(0,0,319,239);
        drawGround();
        drawPilars(xP,yP);
        drawBird(30);
        delay(1000);
      }
    }
  }
  // Distance Sensor Example
  if (currentPage == '1') {
      getDistance(); // Gets distance from the sensor and this function is repeatedly called while we are at the first example in order to print the lasest results from the distance sensor
      if (myTouch.dataAvailable()) {
        myTouch.read();
        x=myTouch.getX();
        y=myTouch.getY();

        // If we press the Centimeters Button
        if ((x>=10) && (x<=135) &&(y>=90) && (y<=163)) {
          selectedUnit = '0';
        }
        // If we press the Inches Button
        if ((x>=10) && (x<=135) &&(y>=173) && (y<=201)) {
          selectedUnit = '1';
        }
        // If we press the Back Button
        if ((x>=10) && (x<=60) &&(y>=10) && (y<=36)) {
          drawFrame(10, 10, 60, 36);
          currentPage = '0'; // Indicates we are at home screen
          myGLCD.clrScr();
          drawHomeScreen(); // Draws the home screen
        }
      }
  }

  // RGB LED Control
  if (currentPage == '2') {
    setLedColor();
    if (myTouch.dataAvailable()) {
        myTouch.read();
        x=myTouch.getX();
        y=myTouch.getY();

        //Back button
        if ((x>=10) && (x<=60) &&(y>=10) && (y<=36)) {
          drawFrame(10, 10, 60, 36);
          currentPage = '0';
          myGLCD.clrScr();
          drawHomeScreen();
          // Turns the LED off
          analogWrite(redLed, 0);
          analogWrite(greenLed, 0);
          analogWrite(blueLed, 0);
        }
    }
  }
//==== This section of the code, for the game example, is explained in my next tutorial
  // Birduino Game
  if (currentPage == '3') {
    //delay(1);
    xP=xP-3;
    drawPilars(xP, yP);

    yB+=fallRateInt;
    fallRate=fallRate+0.4;
    fallRateInt= int(fallRate);
    if (yB>=220) {
      yB=220;
    }
    if(yB>=180 || yB<=0){
      restartGame();
    }
    if((xP<=85) && (xP>=30) && (yB<=yP-2)){
      restartGame();
    }
    if((xP<=85) && (xP>=30) && (yB>=yP+60)){
      restartGame();
    }
    drawBird(yB);

    if (xP<=-51){
      xP=319;
      yP = rand() % 100+20;
      score++;
    }
    if (myTouch.dataAvailable()) {
        myTouch.read();
        x=myTouch.getX();
        y=myTouch.getY();
        if ((x>=0) && (x<=319) &&(y>=50) && (y<=239)) {
          fallRate=-5;
        }
    }
    buttonState = digitalRead(button);
    if (buttonState == HIGH) {
      fallRate=-5;
      }
  }
    if (myTouch.dataAvailable()) {
        myTouch.read();
        x=myTouch.getX();
        y=myTouch.getY();
        if ((x>=10) && (x<=60) &&(y>=10) && (y<=36)) {
          drawFrame(10, 10, 60, 36);
          currentPage = '0';
          myGLCD.clrScr();
          drawHomeScreen();
          analogWrite(redLed, 0);
          analogWrite(greenLed, 0);
          analogWrite(blueLed, 0);
        }
    }
}Code language: Arduino (arduino)
따라서 홈 화면에 대해 설명한 것과 유사한 방식으로 이 예제의 모든 그래픽을 그리려면 버튼을 눌렀을 때 drawDistanceSensor() 사용자 정의 함수를 한 번만 호출하면 됩니다. 단, 센서가 측정한 거리의 최신 결과를 출력하기 위해서는 getDistance() 커스텀 함수를 반복적으로 호출해야 합니다.
다음은 초음파 센서를 사용하여 거리를 계산하고 SevenSegNum 글꼴로 값을 녹색으로 센티미터 또는 인치로 인쇄하는 기능입니다. 초음파 센서의 작동 방식에 대한 자세한 내용이 필요한 경우 내 특정 자습서를 확인할 수 있습니다. 루프 섹션으로 돌아가서 단위 선택 버튼과 뒤로 버튼을 누를 때 어떤 일이 발생하는지 볼 수 있습니다.
//===== getDistance() - Custom Function
void getDistance() {
  // Clears the trigPin
  digitalWrite(trigPin, LOW);
  delayMicroseconds(2);
  // Sets the trigPin on HIGH state for 10 micro seconds
  digitalWrite(trigPin, HIGH);
  delayMicroseconds(10);
  digitalWrite(trigPin, LOW);
  // Reads the echoPin, returns the sound wave travel time in microseconds
  duration = pulseIn(echoPin, HIGH);
  // Calculating the distance
  distanceCm= duration*0.034/2;
  distanceInch= distanceCm/2.53;
  // Prints the distance in centimeters
  if (selectedUnit == '0' && distanceCm <=400) {
    myGLCD.setFont(SevenSegNumFont);
    myGLCD.setColor(0, 255, 0);
    myGLCD.setBackColor(0, 0, 0);
    myGLCD.printNumI(distanceCm,130, 145, 3,'0');
    myGLCD.setFont(BigFont);
    myGLCD.print("cm  ", 235, 178);

  }
  // Prints the distance in inches
  if (selectedUnit == '1' && distanceCm <=160) {
    myGLCD.setFont(SevenSegNumFont);
    myGLCD.setColor(0, 255, 0);
    myGLCD.setBackColor(0, 0, 0);
    myGLCD.printNumI(distanceInch,130, 145, 3,'0');
    myGLCD.setFont(BigFont);
    myGLCD.print("inch", 235, 178);
  }
  delay(10);
}Code language: Arduino (arduino)
다음은 RGB LED 제어 예입니다. 두 번째 버튼을 누르면 해당 예제의 그래픽을 그리기 위해 drawLedControl() 사용자 정의 함수가 한 번만 호출되고 setLedColor() 사용자 정의 함수가 반복적으로 호출됩니다. 이 함수에서 터치 스크린을 사용하여 3개의 슬라이더 값을 0에서 255까지 설정합니다. if 문을 사용하여 각 슬라이더의 영역을 제한하고 슬라이더의 X 값을 얻습니다. 따라서 각 슬라이더의 X 좌표 값은 38~310픽셀이며 이 값을 0~255 사이의 값으로 매핑해야 LED를 켜기 위한 PWM 신호로 사용할 수 있습니다. RGB LED 작동 방식에 대한 자세한 내용이 필요한 경우 내 특정 자습서를 확인할 수 있습니다. 이 사용자 정의 함수의 나머지 코드는 슬라이더를 그리기 위한 것입니다. 루프 섹션으로 돌아가면 눌렀을 때 LED가 꺼지는 뒤로 버튼만 있습니다.
//============= setLedColor() - Custom Funtion
void setLedColor() {
  if (myTouch.dataAvailable()) {
    myTouch.read();
    x=myTouch.getX();
    y=myTouch.getY();
    // Area of the Red color slider
    if( (y>=130) && (y<=156)) {
      xR=x; // Stores the X value where the screen has been pressed in to variable xR
      if (xR<=38) { // Confines the area of the slider to be above 38 pixels
        xR=38;
      }
      if (xR>=303){ /// Confines the area of the slider to be under 310 pixels
        xR=303;
      }
    }
    // Area of the Green color slider
    if( (y>=170) && (y<=196)) {
      xG=x;
      if (xG<=38) {
        xG=38;
      }
      if (xG>=303){
        xG=303;
      }
    }
    // Area of the Blue color slider
    if( (y>=210) && (y<=236)) {
      xB=x;
      if (xB<=38) {
        xB=38;
      }
      if (xB>=303){
        xB=303;
      }
    }
  }
  // Maps the values of the X - Axis from 38 to 0 and 310 to 255, because we need values from 0 to 255 for turning on the led
  int xRC = map(xR,38,310,0,255);
  int xGC = map(xG,38,310,0,255);
  int xBC = map(xB,38,310,0,255);

  // Sends PWM signal to the pins of the led
  analogWrite(redLed, xRC);
  analogWrite(greenLed, xGC);
  analogWrite(blueLed, xBC);

  // Draws a rectangle with the latest color combination
  myGLCD.setColor(xRC, xGC, xBC);
  myGLCD.fillRoundRect(175, 87, 310, 119);

  // Draws the positioners
  myGLCD.setColor(255, 255, 255);
  myGLCD.fillRect(xR,139,(xR+4),147); // Positioner
  myGLCD.setColor(xRC, 0, 0);
  myGLCD.fillRect(31, 139, (xR-1), 147);
  myGLCD.setColor(0, 0, 0);
  myGLCD.fillRect((xR+5), 139, 309, 147);

  myGLCD.setColor(255, 255, 255);
  myGLCD.fillRect(xG,179,(xG+4),187);
  myGLCD.setColor(0, xGC, 0);
  myGLCD.fillRect(31, 179, (xG-1), 187);
  myGLCD.setColor(0, 0, 0);
  myGLCD.fillRect((xG+5), 179, 309, 187);


  myGLCD.setColor(255, 255, 255);
  myGLCD.fillRect(xB,219,(xB+4),227);
  myGLCD.setColor(0, 0, xBC);
  myGLCD.fillRect(31, 219, (xB-1), 227);
  myGLCD.setColor(0, 0, 0);
  myGLCD.fillRect((xB+5), 219, 309, 227);
}Code language: Arduino (arduino)
다음은 Arduino 게임 예제이지만 조금 더 복잡하므로 더 잘 이해할 수 있도록 다음 자습서로 남겨 두겠습니다.
코드가 작동하고 컴파일하려면 Arduino 스케치와 동일한 디렉토리에 추가 ".c" 파일을 포함해야 합니다. 이 파일은 세 번째 게임 예제용으로 새의 비트맵입니다. 코드의 이 부분이 어떻게 작동하는지 자세히 알아보려면 내 특정 튜토리얼을 확인하세요. 여기에서 해당 파일을 다운로드할 수 있습니다.
프로그램의 전체 소스 코드는 다음과 같습니다.
/*  Arduino TFT Tutorial
 *  Program made by Dejan Nedelkovski,
 *  www.HowToMechatronics.com
 */

/*  This program uses the UTFT and URTouch libraries
 *  made by Henning Karlsen.
 *  You can find and download them at:
 *  www.RinkyDinkElectronics.com
 */

#include <UTFT.h>
#include <URTouch.h>

//==== Creating Objects
UTFT    myGLCD(SSD1289,38,39,40,41); //Parameters should be adjusted to your Display/Schield model
URTouch  myTouch( 6, 5, 4, 3, 2);

//==== Defining Variables
extern uint8_t SmallFont[];
extern uint8_t BigFont[];
extern uint8_t SevenSegNumFont[];

extern unsigned int bird01[0x41A];

int x, y;

char currentPage, selectedUnit;

//Ultrasonic Sensor
const int VCC = 13;
const int trigPin = 11;
const int echoPin = 12;

long duration;
int distanceInch, distanceCm;

// RGB LEDs
const int redLed = 10;
const int greenLed = 9;
const int blueLed = 8;
int xR=38;
int xG=38;
int xB=38;

// Floppy Bird
int xP = 319;
int yP = 100;
int yB = 30;
int fallRateInt = 0;
float fallRate =0;
int score=0;
const int button = 14;
int buttonState = 0;

void setup() {
// Initial setup
  myGLCD.InitLCD();
  myGLCD.clrScr();
  myTouch.InitTouch();
  myTouch.setPrecision(PREC_MEDIUM);

  // Defining Pin Modes
  pinMode(VCC, OUTPUT); // VCC
  pinMode(trigPin, OUTPUT); // Sets the trigPin as an Output
  pinMode(echoPin, INPUT); // Sets the echoPin as an Input
  pinMode(redLed, OUTPUT);
  pinMode(greenLed, OUTPUT);
  pinMode(blueLed, OUTPUT);
  pinMode(button, INPUT);
  digitalWrite(VCC, HIGH); // +5V - Pin 13 as VCC

  drawHomeScreen();  // Draws the Home Screen
  currentPage = '0'; // Indicates that we are at Home Screen
  selectedUnit = '0'; // Indicates the selected unit for the first example, cms or inches
}

void loop() {
  // Home Screen
  if (currentPage == '0') {
    if (myTouch.dataAvailable()) {
      myTouch.read();
      x=myTouch.getX(); // X coordinate where the screen has been pressed
      y=myTouch.getY(); // Y coordinates where the screen has been pressed
      // If we press the Distance Sensor Button
      if ((x>=35) && (x<=285) && (y>=90) && (y<=130)) {
        drawFrame(35, 90, 285, 130); // Custom Function -Highlighs the buttons when it's pressed
        currentPage = '1'; // Indicates that we are the first example
        myGLCD.clrScr(); // Clears the screen
        drawDistanceSensor(); // It is called only once, because in the next iteration of the loop, this above if statement will be false so this funtion won't be called. This function will draw the graphics of the first example.
      }
      // If we press the RGB LED Control Button
      if ((x>=35) && (x<=285) && (y>=140) && (y<=180)) {
        drawFrame(35, 140, 285, 180);
        currentPage = '2';
        myGLCD.clrScr();
        drawLedControl();
      }
      // If we press the Birduino Game Button
      if ((x>=35) && (x<=285) && (y>=190) && (y<=230)) {
        drawFrame(35, 190, 285, 230);
        currentPage = '3';
        myGLCD.clrScr();
        myGLCD.setColor(114, 198, 206);
        myGLCD.fillRect(0,0,319,239);
        drawGround();
        drawPilars(xP,yP);
        drawBird(30);
        delay(1000);
      }
    }
  }
  // Distance Sensor Example
  if (currentPage == '1') {
      getDistance(); // Gets distance from the sensor and this function is repeatedly called while we are at the first example in order to print the lasest results from the distance sensor
      if (myTouch.dataAvailable()) {
        myTouch.read();
        x=myTouch.getX();
        y=myTouch.getY();

        // If we press the Centimeters Button
        if ((x>=10) && (x<=135) &&(y>=90) && (y<=163)) {
          selectedUnit = '0';
        }
        // If we press the Inches Button
        if ((x>=10) && (x<=135) &&(y>=173) && (y<=201)) {
          selectedUnit = '1';
        }
        // If we press the Back Button
        if ((x>=10) && (x<=60) &&(y>=10) && (y<=36)) {
          drawFrame(10, 10, 60, 36);
          currentPage = '0'; // Indicates we are at home screen
          myGLCD.clrScr();
          drawHomeScreen(); // Draws the home screen
        }
      }
  }

  // RGB LED Control
  if (currentPage == '2') {
    setLedColor();
    if (myTouch.dataAvailable()) {
        myTouch.read();
        x=myTouch.getX();
        y=myTouch.getY();

        //Back button
        if ((x>=10) && (x<=60) &&(y>=10) && (y<=36)) {
          drawFrame(10, 10, 60, 36);
          currentPage = '0';
          myGLCD.clrScr();
          drawHomeScreen();
          // Turns the LED off
          analogWrite(redLed, 0);
          analogWrite(greenLed, 0);
          analogWrite(blueLed, 0);
        }
    }
  }
//==== This section of the code, for the game example, is explained in my next tutorial
  // Birduino Game
  if (currentPage == '3') {
    //delay(1);
    xP=xP-3;
    drawPilars(xP, yP);

    yB+=fallRateInt;
    fallRate=fallRate+0.4;
    fallRateInt= int(fallRate);
    if (yB>=220) {
      yB=220;
    }
    if(yB>=180 || yB<=0){
      restartGame();
    }
    if((xP<=85) && (xP>=30) && (yB<=yP-2)){
      restartGame();
    }
    if((xP<=85) && (xP>=30) && (yB>=yP+60)){
      restartGame();
    }
    drawBird(yB);

    if (xP<=-51){
      xP=319;
      yP = rand() % 100+20;
      score++;
    }
    if (myTouch.dataAvailable()) {
        myTouch.read();
        x=myTouch.getX();
        y=myTouch.getY();
        if ((x>=0) && (x<=319) &&(y>=50) && (y<=239)) {
          fallRate=-5;
        }
    }
    buttonState = digitalRead(button);
    if (buttonState == HIGH) {
      fallRate=-5;
      }
  }
    if (myTouch.dataAvailable()) {
        myTouch.read();
        x=myTouch.getX();
        y=myTouch.getY();
        if ((x>=10) && (x<=60) &&(y>=10) && (y<=36)) {
          drawFrame(10, 10, 60, 36);
          currentPage = '0';
          myGLCD.clrScr();
          drawHomeScreen();
          analogWrite(redLed, 0);
          analogWrite(greenLed, 0);
          analogWrite(blueLed, 0);
        }
    }
}

// ====== Custom Funtions ======
// drawHomeScreen - Custom Function
void drawHomeScreen() {
  // Title
  myGLCD.setBackColor(0,0,0); // Sets the background color of the area where the text will be printed to black
  myGLCD.setColor(255, 255, 255); // Sets color to white
  myGLCD.setFont(BigFont); // Sets font to big
  myGLCD.print("Arduino TFT Tutorial", CENTER, 10); // Prints the string on the screen
  myGLCD.setColor(255, 0, 0); // Sets color to red
  myGLCD.drawLine(0,32,319,32); // Draws the red line
  myGLCD.setColor(255, 255, 255); // Sets color to white
  myGLCD.setFont(SmallFont); // Sets the font to small
  myGLCD.print("by HowToMechatronics.com", CENTER, 41); // Prints the string
  myGLCD.setFont(BigFont);
  myGLCD.print("Select Example", CENTER, 64);

  // Button - Distance Sensor
  myGLCD.setColor(16, 167, 103); // Sets green color
  myGLCD.fillRoundRect (35, 90, 285, 130); // Draws filled rounded rectangle
  myGLCD.setColor(255, 255, 255); // Sets color to white
  myGLCD.drawRoundRect (35, 90, 285, 130); // Draws rounded rectangle without a fill, so the overall appearance of the button looks like it has a frame
  myGLCD.setFont(BigFont); // Sets the font to big
  myGLCD.setBackColor(16, 167, 103); // Sets the background color of the area where the text will be printed to green, same as the button
  myGLCD.print("DISTANCE SENSOR", CENTER, 102); // Prints the string

  // Button - RGB LED Control
  myGLCD.setColor(16, 167, 103);
  myGLCD.fillRoundRect (35, 140, 285, 180);
  myGLCD.setColor(255, 255, 255);
  myGLCD.drawRoundRect (35, 140, 285, 180);
  myGLCD.setFont(BigFont);
  myGLCD.setBackColor(16, 167, 103);
  myGLCD.print("RGB LED CONTROL", CENTER, 152);

  // Button - Birduino
  myGLCD.setColor(16, 167, 103);
  myGLCD.fillRoundRect (35, 190, 285, 230);
  myGLCD.setColor(255, 255, 255);
  myGLCD.drawRoundRect (35, 190, 285, 230);
  myGLCD.setFont(BigFont);
  myGLCD.setBackColor(16, 167, 103);
  myGLCD.print("BIRDUINO GAME", CENTER, 202);
}

// Highlights the button when pressed
void drawFrame(int x1, int y1, int x2, int y2) {
  myGLCD.setColor(255, 0, 0);
  myGLCD.drawRoundRect (x1, y1, x2, y2);
  while (myTouch.dataAvailable())
    myTouch.read();
    myGLCD.setColor(255, 255, 255);
    myGLCD.drawRoundRect (x1, y1, x2, y2);
}
//====================================================
void drawDistanceSensor() {
  myGLCD.setColor(100, 155, 203);
  myGLCD.fillRoundRect (10, 10, 60, 36);
  myGLCD.setColor(255, 255, 255);
  myGLCD.drawRoundRect (10, 10, 60, 36);
  myGLCD.setFont(BigFont);
  myGLCD.setBackColor(100, 155, 203);
  myGLCD.print("<-", 18, 15);
  myGLCD.setBackColor(0, 0, 0);
  myGLCD.setFont(SmallFont);
  myGLCD.print("Back to Main Menu", 70, 18);
  myGLCD.setFont(BigFont);
  myGLCD.print("Ultrasonic Sensor", CENTER, 50);
  myGLCD.print("HC-SR04", CENTER, 76);
  myGLCD.setColor(255, 0, 0);
  myGLCD.drawLine(0,100,319,100);
  myGLCD.setBackColor(0, 0, 0);
  myGLCD.setColor(255, 255, 255);
  myGLCD.setFont(SmallFont);
  myGLCD.print("Select Unit", 10, 114);
  myGLCD.setFont(BigFont);
  myGLCD.print("Distance:", 130, 120);
  myGLCD.setColor(223, 77, 55);
  myGLCD.fillRoundRect (10, 135, 90, 163);
  myGLCD.setColor(225, 255, 255);
  myGLCD.drawRoundRect (10, 135, 90, 163);
  myGLCD.setBackColor(223, 77, 55);
  myGLCD.setColor(255, 255, 255);
  myGLCD.print("cm", 33, 140);
  myGLCD.setColor(223, 77, 55);
  myGLCD.fillRoundRect (10, 173, 90, 201);
  myGLCD.setColor(255, 255, 255);
  myGLCD.drawRoundRect (10, 173, 90, 201);
  myGLCD.setBackColor(223, 77, 55);
  myGLCD.setColor(255, 255, 255);
  myGLCD.print("inch", 17, 180);
  myGLCD.setBackColor(0, 0, 0);
  myGLCD.setFont(SmallFont);
  myGLCD.print("Source code at: HowToMechatronics.com", CENTER, 220);
}
//====================================================
//===== getDistance - Custom Function
void getDistance() {
  // Clears the trigPin
  digitalWrite(trigPin, LOW);
  delayMicroseconds(2);
  // Sets the trigPin on HIGH state for 10 micro seconds
  digitalWrite(trigPin, HIGH);
  delayMicroseconds(10);
  digitalWrite(trigPin, LOW);
  // Reads the echoPin, returns the sound wave travel time in microseconds
  duration = pulseIn(echoPin, HIGH);
  // Calculating the distance
  distanceCm= duration*0.034/2;
  distanceInch= distanceCm/2.53;
  // Prints the distance in centimeters
  if (selectedUnit == '0' && distanceCm <=400) {
    myGLCD.setFont(SevenSegNumFont);
    myGLCD.setColor(0, 255, 0);
    myGLCD.setBackColor(0, 0, 0);
    myGLCD.printNumI(distanceCm,130, 145, 3,'0');
    myGLCD.setFont(BigFont);
    myGLCD.print("cm  ", 235, 178);

  }
  // Prints the distance in inches
  if (selectedUnit == '1' && distanceCm <=160) {
    myGLCD.setFont(SevenSegNumFont);
    myGLCD.setColor(0, 255, 0);
    myGLCD.setBackColor(0, 0, 0);
    myGLCD.printNumI(distanceInch,130, 145, 3,'0');
    myGLCD.setFont(BigFont);
    myGLCD.print("inch", 235, 178);
  }
  delay(10);
}
//====================================================
void drawLedControl() {
  myGLCD.setColor(100, 155, 203);
  myGLCD.fillRoundRect (10, 10, 60, 36);
  myGLCD.setColor(255, 255, 255);
  myGLCD.drawRoundRect (10, 10, 60, 36);
  myGLCD.setFont(BigFont);
  myGLCD.setBackColor(100, 155, 203);
  myGLCD.print("<-", 18, 15);
  myGLCD.setBackColor(0, 0, 0);
  myGLCD.setFont(SmallFont);
  myGLCD.print("Back to Main Menu", 70, 18);
  myGLCD.setFont(BigFont);
  myGLCD.print("RGB LED Control", CENTER, 50);
  myGLCD.print("LED Color:", 10, 95);
  myGLCD.print("R", 10, 135);
  myGLCD.print("G", 10, 175);
  myGLCD.print("B", 10, 215);
  myGLCD.setColor(255, 0, 0);
  myGLCD.drawLine(0,75,319,75);
  myGLCD.setColor(255, 255, 255);
  myGLCD.drawRect(30, 138, 310, 148); // R - Slider
  myGLCD.drawRect(30, 178, 310, 188);
  myGLCD.drawRect(30, 218, 310, 228);
}
//====================================================
//============= setLedColor() - Custom Funtion
void setLedColor() {
  if (myTouch.dataAvailable()) {
    myTouch.read();
    x=myTouch.getX();
    y=myTouch.getY();
    // Area of the Red color slider
    if( (y>=130) && (y<=156)) {
      xR=x; // Stores the X value where the screen has been pressed in to variable xR
      if (xR<=38) { // Confines the area of the slider to be above 38 pixels
        xR=38;
      }
      if (xR>=303){ /// Confines the area of the slider to be under 310 pixels
        xR=303;
      }
    }
    // Area of the Green color slider
    if( (y>=170) && (y<=196)) {
      xG=x;
      if (xG<=38) {
        xG=38;
      }
      if (xG>=303){
        xG=303;
      }
    }
    // Area of the Blue color slider
    if( (y>=210) && (y<=236)) {
      xB=x;
      if (xB<=38) {
        xB=38;
      }
      if (xB>=303){
        xB=303;
      }
    }
  }
  // Maps the values of the X - Axis from 38 to 0 and 310 to 255, because we need values from 0 to 255 for turning on the led
  int xRC = map(xR,38,310,0,255);
  int xGC = map(xG,38,310,0,255);
  int xBC = map(xB,38,310,0,255);

  // Sends PWM signal to the pins of the led
  analogWrite(redLed, xRC);
  analogWrite(greenLed, xGC);
  analogWrite(blueLed, xBC);

  // Draws a rectangle with the latest color combination
  myGLCD.setColor(xRC, xGC, xBC);
  myGLCD.fillRoundRect(175, 87, 310, 119);

  // Draws the positioners
  myGLCD.setColor(255, 255, 255);
  myGLCD.fillRect(xR,139,(xR+4),147); // Positioner
  myGLCD.setColor(xRC, 0, 0);
  myGLCD.fillRect(31, 139, (xR-1), 147);
  myGLCD.setColor(0, 0, 0);
  myGLCD.fillRect((xR+5), 139, 309, 147);

  myGLCD.setColor(255, 255, 255);
  myGLCD.fillRect(xG,179,(xG+4),187);
  myGLCD.setColor(0, xGC, 0);
  myGLCD.fillRect(31, 179, (xG-1), 187);
  myGLCD.setColor(0, 0, 0);
  myGLCD.fillRect((xG+5), 179, 309, 187);


  myGLCD.setColor(255, 255, 255);
  myGLCD.fillRect(xB,219,(xB+4),227);
  myGLCD.setColor(0, 0, xBC);
  myGLCD.fillRect(31, 219, (xB-1), 227);
  myGLCD.setColor(0, 0, 0);
  myGLCD.fillRect((xB+5), 219, 309, 227);
}
//====================================================
void drawGround() {
  myGLCD.setColor(221,216,148);
  myGLCD.fillRect(0, 215, 319, 239);
  myGLCD.setColor(47,175,68);
  myGLCD.fillRect(0, 205, 319, 214);
  myGLCD.setColor(0, 0, 0);
  myGLCD.setBackColor(221, 216, 148);
  myGLCD.setFont(BigFont);
  myGLCD.print("Score:",5,220);
  myGLCD.setFont(SmallFont);
  myGLCD.print("HowToMechatronics.com", 140, 220);
}
void drawPilars(int x, int y) {

    if (x>=270){
      myGLCD.setColor(0, 200, 20);
      myGLCD.fillRect(318, 0, x, y-1);
      myGLCD.setColor(0, 0, 0);
      myGLCD.drawRect(319, 0, x-1, y);

      myGLCD.setColor(0, 200, 20);
      myGLCD.fillRect(318, y+81, x, 203);
      myGLCD.setColor(0, 0, 0);
      myGLCD.drawRect(319, y+80, x-1, 204);
    }
    else if( x<=268) {
    myGLCD.setColor(114, 198, 206);
    myGLCD.fillRect(x+51, 0, x+53, y);
    myGLCD.setColor(0, 200, 20);
    myGLCD.fillRect(x+49, 1, x+1, y-1);
    myGLCD.setColor(0, 0, 0);
    myGLCD.drawRect(x+50, 0, x, y);
    myGLCD.setColor(114, 198, 206);
    myGLCD.fillRect(x-1, 0, x-3, y);

    myGLCD.setColor(114, 198, 206);
    myGLCD.fillRect(x+51, y+80, x+53, 204);
    myGLCD.setColor(0, 200, 20);
    myGLCD.fillRect(x+49, y+81, x+1, 203);
    myGLCD.setColor(0, 0, 0);
    myGLCD.drawRect(x+50, y+80, x, 204);
    myGLCD.setColor(114, 198, 206);
    myGLCD.fillRect(x-1, y+80, x-3, 204);
  }
  myGLCD.setColor(0, 0, 0);
  myGLCD.setBackColor(221, 216, 148);
  myGLCD.setFont(BigFont);
  myGLCD.printNumI(score, 100, 220);
}
//====================================================
void drawBird(int y) {
  if(y<=219) {
    myGLCD.drawBitmap (50, y, 35, 30, bird01);
    myGLCD.setColor(114, 198, 206);
    myGLCD.fillRoundRect(50,y,85,y-6);
    myGLCD.fillRoundRect(50,y+30,85,y+36);
  }
  else if(y>=200) {
    myGLCD.drawBitmap (50, 200, 35, 30, bird01);
    myGLCD.setColor(114, 198, 206);
    myGLCD.fillRoundRect(50,200,85,200-6);
    myGLCD.fillRoundRect(50,200+30,85,200+36);
  }
}
void gameOver() {
  myGLCD.clrScr();
  myGLCD.setColor(255, 255, 255);
  myGLCD.setBackColor(0, 0, 0);
  myGLCD.setFont(BigFont);
  myGLCD.print("GAME OVER", CENTER, 40);
  myGLCD.print("Score:", 100, 80);
  myGLCD.printNumI(score,200, 80);
  myGLCD.print("Restarting...", CENTER, 120);
  myGLCD.setFont(SevenSegNumFont);
  myGLCD.printNumI(2,CENTER, 150);
  delay(1000);
  myGLCD.printNumI(1,CENTER, 150);
  delay(1000);
  myGLCD.setColor(114, 198, 206);
  myGLCD.fillRect(0,0,319,239);
  drawBird(30);
  drawGround();
  delay(1000);
}
//====================================================
void restartGame() {
  delay(1000);
  gameOver();
  xP=319;
  yB=30;
  fallRate=0;
  score=0;
}
Code language: Arduino (arduino)제조공정
이 프로젝트에서는 Arduino 터치 스크린 MP3 음악 플레이어와 알람 시계를 만드는 방법을 보여 드리겠습니다. 다음 비디오를 보거나 아래에 작성된 튜토리얼을 읽을 수 있습니다. 개요 홈 화면에는 큰 시계, 날짜 및 온도 정보, 뮤직 플레이어 및 알람 시계용 버튼 2개가 있습니다. 뮤직 플레이어에 들어가면 화면 중앙에 있는 큰 재생 버튼을 눌러 음악 재생을 시작할 수 있습니다. 바로 옆에는 이전 또는 다음 곡을 재생할 수 있는 두 개의 버튼이 더 있습니다. 이 버튼 위에는 노래 진행률 표시줄이 있고 화면 하단에는 볼
디스플레이 화면은 오늘날 어디에나 있습니다. 20년 전 TV나 컴퓨터 모니터를 아직도 기억하십니까? 그것들은 사각형이고 거대하고 무거웠습니다. 이제 눈앞의 납작하고 얇고 가벼운 화면을 보겠습니다. 왜 이렇게 큰 차이가 나는지 궁금하지 않으셨나요? 사실 20년 전의 모니터는 CRT였습니다. (Cathode Ray Tube) 디스플레이는 내부 구성 요소를 실행하기 위해 큰 공간이 필요합니다. 이제 여기에 있는 화면은 LCD 입니다. (액정 디스플레이) 화면. LCD란 무엇입니까? 위에서 언급했듯이 LCD는 Liquid Crystal