

제조공정

산업 제조
<메인 클래스="사이트 메인" id="메인">
이 프로젝트에서는 Arduino 터치 스크린 MP3 음악 플레이어와 알람 시계를 만드는 방법을 보여 드리겠습니다. 다음 비디오를 보거나 아래에 작성된 튜토리얼을 읽을 수 있습니다.
홈 화면에는 큰 시계, 날짜 및 온도 정보, 뮤직 플레이어 및 알람 시계용 버튼 2개가 있습니다.
<그림 클래스="aligncenter">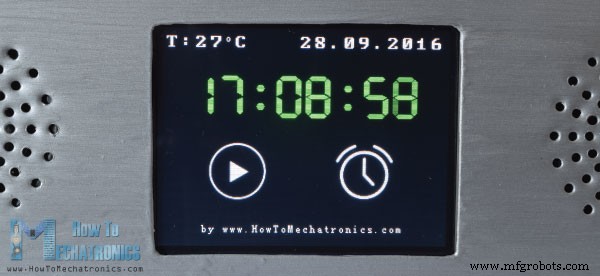
뮤직 플레이어에 들어가면 화면 중앙에 있는 큰 "재생" 버튼을 눌러 음악 재생을 시작할 수 있습니다. 바로 옆에는 이전 또는 다음 곡을 재생할 수 있는 두 개의 버튼이 더 있습니다.
<그림 클래스="aligncenter">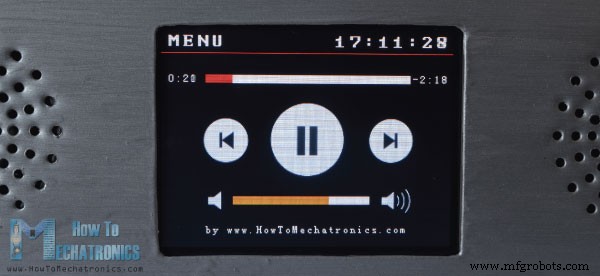
이 버튼 위에는 노래 진행률 표시줄이 있고 화면 하단에는 볼륨 표시줄과 볼륨을 낮추고 높이는 두 개의 버튼이 있습니다. 오른쪽 상단에는 시계가 있고 왼쪽에는 홈 화면으로 돌아가는 "메뉴" 버튼이 있습니다.
반면에 알람 시계에 들어가면 시간과 분을 설정하는 두 개의 버튼을 사용하여 알람을 설정할 수 있습니다.
<그림 클래스="aligncenter">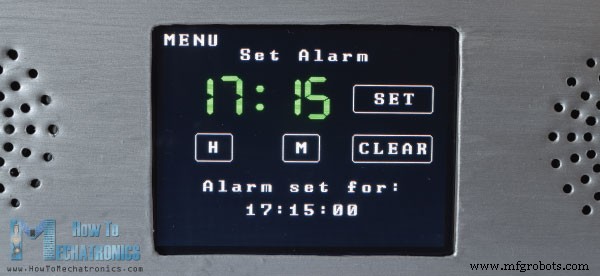
알람이 활성화되면 노래가 더 높은 볼륨으로 재생되기 시작하고 "닫기" 버튼을 누를 때까지 계속 재생됩니다.
<그림 클래스="aligncenter">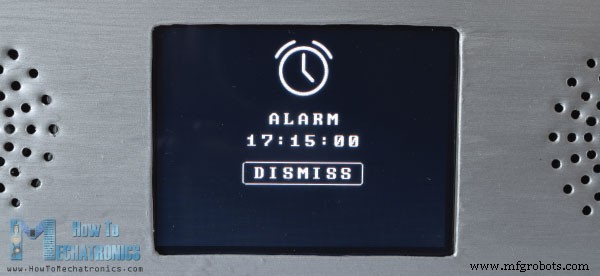
이제 이 장치가 어떻게 작동하는지 살펴보겠습니다. 아두이노 메가 보드와 스크린을 아두이노 보드와 연결하기 위한 적절한 실드가 있는 3.2인치 TFT 터치 스크린을 사용합니다. 음악 재생에는 BY8001 MP3 Player 모듈을 사용하고 알람 시계에는 DS3231 Real Time Clock 모듈을 사용합니다.
<그림 클래스="aligncenter">
아래 링크에서 이 Arduino 프로젝트에 필요한 구성요소를 얻을 수 있습니다.
이 프로젝트의 회로도는 다음과 같습니다.

여기에서 TFT 실드가 Arduino 보드의 자유 핀을 차단하고 있음을 알 수 있습니다. 따라서 실드와 Arduino 사이에 삽입할 수 있도록 맞춤형 핀 헤더를 만들어야 합니다.
<그림 클래스="aligncenter">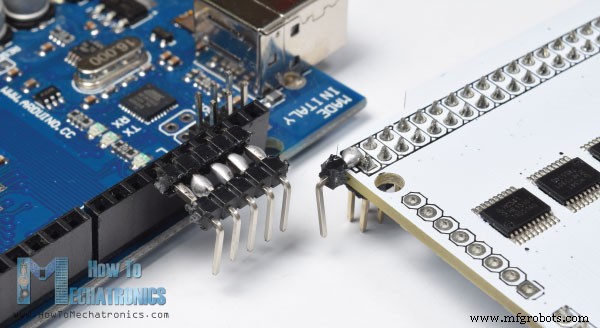
또한 쉴드는 이미 모든 Arduino VCC 핀을 사용하고 있으므로 Arduino에 전원을 공급하려면 추가 핀 헤더를 쉴드의 5V 핀에 납땜해야 합니다.
모든 것을 함께 연결하면 Arduino 프로그래밍을 진행할 수 있습니다. 그러나 계속하기 전에 TFT 터치 스크린 및 DS3231 실시간 클록 모듈에 대한 이전의 자세한 자습서를 확인하는 것이 좋습니다. 그리고 MP3 플레이어 모듈에 관해서는 이 기사에서 간단히 설명하겠습니다.
BY8001-16P는 MicroSD 카드와 함께 작동하고 MP3 및 WAV 오디오 형식 파일을 지원하는 MP3 모듈입니다. 모듈에는 3W 파워 앰프가 내장되어 있으며 단일 3W 스피커를 직접 구동할 수 있습니다.
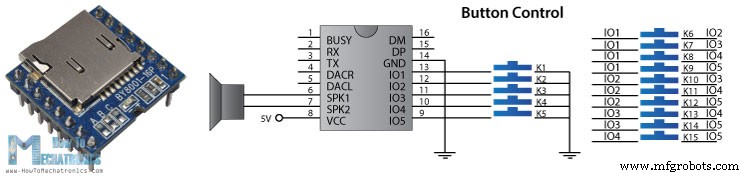
MP3 플레이어 모듈은 5개의 입력 핀을 사용하거나 직렬 통신을 통해 마이크로 컨트롤러를 사용하여 버튼으로 제어할 수 있습니다.
<그림 클래스="aligncenter">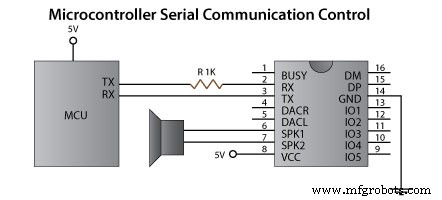
모듈의 직렬 포트 핀은 3.3V에서 작동하므로 모듈의 RX 핀은 1K 저항을 통해 Arduino TX 핀에 연결해야 합니다. 또한 제어 모드를 선택하는 데 사용되는 3개의 포트 A, B 및 C에 유의하십시오. 마이크로컨트롤러를 사용하여 모듈을 제어하려면 이 패드에서 3개의 저항을 제거해야 합니다. 핀 번호 6과 7은 저전력 스피커를 직접 연결하는 데 사용할 수 있으며 핀 번호 4와 5는 외부 앰프를 사용하는 경우 사용할 수 있습니다.
Arduino 부분의 경우 가장 쉬운 방법은 GitHub에서 다운로드할 수 있는 BY8001 라이브러리를 사용하는 것입니다. 데모 예제 중 일부를 열면 작동 방식을 볼 수 있습니다. 따라서 설정 섹션에서 모듈을 초기화한 후 모듈을 제어하기 위해 사용자 정의 기능을 사용할 수 있습니다.
이제 이 Arduino 터치 스크린 MP3 화면 음악 플레이어 및 알람 시계의 코드를 살펴볼 준비가 되었습니다. 코드가 조금 더 길기 때문에 이해를 돕기 위해 프로그램의 소스 코드를 섹션별로 설명과 함께 게시하겠습니다. 그리고 이 기사의 마지막에 전체 소스 코드를 게시할 것입니다.
따라서 먼저 TFT 터치 스크린용 라이브러리, BY8001-16P MP3 플레이어 및 DS3231 실시간 클록 모듈과 직렬 통신용 라이브러리를 포함해야 합니다. 그런 다음 적절한 개체를 만들고 프로그램에 필요한 몇 가지 변수를 정의해야 합니다.
#include <UTFT.h>
#include <URTouch.h>
#include <SoftwareSerial.h>
#include <BY8001.h>
#include <DS3231.h>

//==== Creating Objects
UTFT     myGLCD(SSD1289, 38, 39, 40, 41); //Parameters should be adjusted to your Display/Schield model
URTouch  myTouch( 6, 5, 4, 3, 2);


SoftwareSerial mp3Serial(11, 10);  // RX, TX
BY8001 mp3;  // creating an instance of class BY8001 and call it 'mp3'

DS3231  rtc(SDA, SCL);

//==== Defining Fonts
extern uint8_t SmallFont[];
extern uint8_t BigFont[];
extern uint8_t SevenSegNumFont[];

extern unsigned int MusicPlayerButton[0x1040];
extern unsigned int AlarmButton[0x1040];
extern unsigned int ButtonPlay[0x1AE9];
extern unsigned int ButtonPause[0x1AE9];
extern unsigned int PreviousButton[0x9C4];
extern unsigned int NextButton[0x9C4];
extern unsigned int VolumeDown[0x170];
extern unsigned int VolumeUp[0x3B8];

int x, y; // Variables for the coordinates where the display has been pressed
char currentPage, playStatus;
int iV = 15;
int trackNum = 1;
int b = 16;
int aHours = 0;
int aMinutes = 0;
boolean alarmNotSet = true;
String alarmString = "";
float currentTemperature, temperature;
static word totalTime, elapsedTime, playback, minutes, seconds, lastSeconds, minutesR, secondsR;
String currentClock, currentHours, currentMinutes, currentSeconds, currentDate;
String timeString, hoursString, minutesString, secondsString, hoursS, minutesS, secondsS, dateS;Code language: Arduino (arduino)
여기서 비트맵의 정의를 확인할 수 있습니다. 프로그램의 일부 버튼은 실제로 TFT 라이브러리와 함께 제공되는 ImageConverter565 도구를 사용하여 비트맵으로 변환되는 이미지입니다.
<그림 클래스="aligncenter">
따라서 이러한 ".c" 파일은 스케치를 시작할 때 로드할 수 있도록 코드 파일의 디렉토리에 포함되어야 합니다. 여기에서 이러한 이미지와 '.c' 파일을 다운로드할 수 있습니다.
객체 초기화 후 설정 섹션에서 홈 화면의 모든 그래픽을 그리는 drawHomeScreen() 사용자 정의 함수를 호출합니다. 또한 여기에서 playStatus, currentTemp 및 Date와 같은 일부 변수의 초기 값, 볼륨의 초기 값 등을 설정합니다.
void setup() {
  // Initiate display
  myGLCD.InitLCD();
  myGLCD.clrScr();
  myTouch.InitTouch();
  myTouch.setPrecision(PREC_MEDIUM);

  // Initialize the rtc object
  rtc.begin();

  // Music
  Serial.begin(9600);  // set serial monitor baud rate to Arduino IDE
  mp3Serial.begin(9600);  // BY8001 set to 9600 baud (required)
  mp3.setup(mp3Serial); // tell BY8001 library which serial port to use.
  delay(800);  // allow time for BY8001 cold boot; may adjust depending on flash storage size

  drawHomeScreen();  // Draws the Home Screen
  currentPage = '0'; // Indicates that we are at Home Screen
  playStatus = '0';

  mp3.setVolume(15);
  delay(100);
  currentTemperature = rtc.getTemp();
  currentDate = rtc.getDateStr();
  currentClock = rtc.getTimeStr();
  timeString = rtc.getTimeStr();
  currentHours = timeString.substring(0, 2);
  currentMinutes = timeString.substring(3, 5);
  currentSeconds = timeString.substring(6, 8);
}Code language: Arduino (arduino)
다음은 루프 섹션입니다. 첫 번째 if 문은 현재 페이지 변수를 홈 화면에 있음을 나타내는 0으로 설정했기 때문에 true입니다. 여기 다음 if 문을 사용하여 시계에 변경 사항이 있는지 확인하고 이것은 매초 발생합니다. 이제 숫자를 제외한 어떤 문자도 지원하지 않는 TFT 라이브러리의 7세그먼트 글꼴을 사용하므로 DS3231에서 시계를 읽기 위해 getTimeStr() 함수와 함께 제공되는 문자열에서 숫자만 추출해야 합니다. RTC 모듈.
<그림 클래스="aligncenter">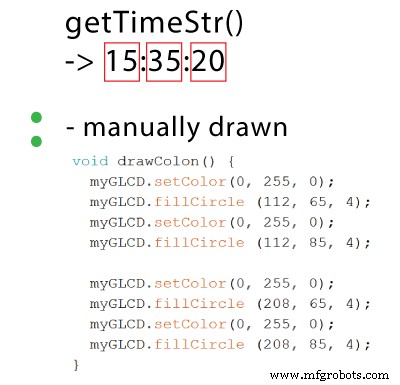
따라서 substring() 함수를 사용하여 시, 분 및 초를 별도의 변수로 가져오고 초, 분 또는 시간에 변경 사항이 발생할 때마다 인쇄합니다.
날짜 및 온도에 관해서도 유사합니다. , 이전 상태와 비교하여 변화가 있는지 확인합니다.
void loop() {
  // Homes Screen
  if (currentPage == '0') {
    // Checks for change of the clock
    if ( currentClock != rtc.getTimeStr()) {
      timeString = rtc.getTimeStr();
      hoursS = timeString.substring(0, 2);
      minutesS = timeString.substring(3, 5);
      secondsS = timeString.substring(6, 8);

      myGLCD.setFont(SevenSegNumFont);
      myGLCD.setColor(0, 255, 0);

      myGLCD.print(secondsS, 224, 50);

      if ( currentMinutes != minutesS ) {
        myGLCD.print(minutesS, 128, 50);
        currentMinutes = minutesS;
      }
      if ( currentHours != hoursS ) {
        myGLCD.print(hoursS, 32, 50);
        currentHours = hoursS;
      }
      // Checks for change of the date
      dateS = rtc.getDateStr();
      delay(10);
      if ( currentDate != dateS){
          myGLCD.setColor(255, 255, 255); // Sets color to white
          myGLCD.setFont(BigFont); // Sets font to big
          myGLCD.print(rtc.getDateStr(), 153, 7);
        }
      // Checks for change of the temperature
      temperature = rtc.getTemp();
      delay(10);
      if ( currentTemperature != temperature ){
        myGLCD.setColor(255, 255, 255); // Sets color to white
        myGLCD.setFont(BigFont); // Sets font to big
        myGLCD.printNumI(temperature, 39, 7);
        currentTemperature = temperature;
      }
      delay(10);
      currentClock = rtc.getTimeStr();
    }Code language: Arduino (arduino)
다음으로 myTouch.dataAvailable() 함수를 사용하여 화면을 터치했는지 확인하고 음악 플레이어인지 알람 버튼인지도 확인합니다. 그래서 그것이 뮤직 플레이어 버튼이라면 먼저 버튼이 눌렸음을 나타내는 버튼 주위에 빨간색 원을 그리는 drawFrame() 사용자 정의 함수를 호출합니다. 또한 이 사용자 정의 함수에는 버튼을 놓을 때까지 누적된 프로그램을 유지하는 while 루프가 있습니다. 그 직후에 currentPage 변수를 1로 설정하고 화면을 지우고 Music Player 화면의 모든 그래픽을 그리는 drawMusicPlayerScreen() 사용자 정의 함수를 호출합니다. 마찬가지로 알람 버튼을 누르면 currentPage 변수를 2로 설정하고 화면을 지웁니다.
// Checks whether the screen has been touched
    if (myTouch.dataAvailable()) {
      myTouch.read();
      x = myTouch.getX(); // X coordinate where the screen has been pressed
      y = myTouch.getY(); // Y coordinates where the screen has been pressed
      // If we press the Music Player Button
      if ((x >= 55) && (x <= 120) && (y >= 125) && (y <= 190)) {
          drawFrame(87, 157, 33);
          currentPage = '1';
          myGLCD.clrScr();
          delay(100);
          drawMusicPlayerScreen();
          delay(100);
        }
      // If we press the Alarm Button
      if ((x >= 195) && (x <= 260) && (y >= 125) && (y <= 190)) {
          drawFrame(227, 160, 29);
          currentPage = '2';
          myGLCD.clrScr();
        }
    }Code language: Arduino (arduino)
다음으로 뮤직 플레이어 화면에서 어떤 일이 일어나는지 봅시다. 여기서 우리는 화면을 터치했는지 여부를 지속적으로 확인합니다. 재생 버튼을 터치하고 현재 playStatus 변수가 0이면 mp3.playTrackFromFolder() 함수를 호출하여 MicroSD 카드의 첫 번째 노래를 재생하기 시작합니다. 동시에 일시 중지 버튼을 그리는 drawPauseButton() 사용자 정의 함수를 호출하고 playStatus 변수를 2로 설정합니다. 다음 두 개의 if 문을 사용하여 playStatues 변수에 따라 노래 재생과 일시 중지 사이를 전환합니다.
// Music Player Screen
  if (currentPage == '1') {
    if (myTouch.dataAvailable()) {
      myTouch.read();
      x = myTouch.getX(); // X coordinate where the screen has been pressed
      y = myTouch.getY(); // Y coordinates where the screen has been pressed
      // If we press the Play Button
      if ((x >= 116) && (x <= 204) && (y >= 77) && (y <= 165)) {
        if (playStatus == '0') {
          drawFrame(159, 121, 42);
          drawPauseButton();
          mp3.playTrackFromFolder(00, 001);
          delay(100);
          playStatus = '2';
          return;
        }
        if (playStatus == '1') {
          drawFrame(159, 121, 42);
          drawPauseButton();
          mp3.play();
          delay(100);
          playStatus = '2';
          return;
        }
        if (playStatus == '2') {
          drawFrame(159, 121, 42);
          drawPlayButton();
          mp3.pause();
          delay(100);
          playStatus = '1';
          return;
        }
      }Code language: Arduino (arduino)
비슷한 방식으로 눌려진 각 버튼에 대해 이전 또는 다음 트랙을 재생하기 위한 적절한 기능을 호출하고, 볼륨을 줄이거나 늘리고, 홈 화면으로 돌아가게 하는 "메뉴" 버튼을 호출합니다.
// If we press the Previous Button
      if ((x >= 45) && (x <= 95) && (y >= 97) && (y <= 147)) {
        drawFrame(70, 121, 26);
        mp3.previousTrack();
        delay(100);
        drawTrackBar();
      }
      // If we press the Next Button
      if ((x >= 227) && (x <= 277) && (y >= 97) && (y <= 147)) {
        drawFrame(252, 122, 26);
        mp3.nextTrack();
        delay(100);
        drawTrackBar();
      }
      // If we press the VolumeDown Button
      if ((x >= 35) && (x <= 75) && (y >= 165) && (y <= 209)) {
        drawUnderline(45, 205, 65, 205);
        if (iV >= 0 & iV <= 30) {
          iV--;
          drawVolume(iV);
        }
        mp3.decreaseVolume();
        delay(100);
      }
      // If we press the VolumeUp Button
      if ((x >= 230) && (x <= 280) && (y >= 165) && (y <= 209)) {
        drawUnderline(235, 205, 275, 205);
        if (iV >= 0 & iV <= 30) {
          iV++;
          drawVolume(iV);
        }
        mp3.increaseVolume();
        delay(100);
      }
      // If we press the MENU Button
      if ((x >= 0) && (x <= 75) && (y >= 0) && (y <= 30)) {
        myGLCD.clrScr();
        drawHomeScreen();  // Draws the Home Screen
        currentPage = '0';
        return;
      }Code language: Arduino (arduino)
다음 if 문은 트랙 진행률 표시줄을 업데이트하는 데 사용됩니다.
// Updates the track bar
    if (playStatus == '1' || playStatus == '2') {
      trackPlayTime();
    }
따라서 음악이 재생 중이면 mp3.getElapsedTrackPlaybackTime()과 같은 일부 음악 플레이어 라이브러리 기능을 사용하여 경과 및 남은 시간과 트랙 진행률 표시줄 그래픽을 계산하고 인쇄하는 trackPlayTime() 사용자 정의 함수를 호출합니다. printClock() 사용자 정의 함수를 사용하여 오른쪽 상단 모서리에 시계를 인쇄합니다.
// Updates the track bar
void trackPlayTime() {
  totalTime = mp3.getTotalTrackPlaybackTime();
  delay(10);
  elapsedTime = mp3.getElapsedTrackPlaybackTime();
  delay(10);
  minutes = (int)elapsedTime / 60;
  seconds = (((float)elapsedTime / 60) - minutes) * 60;
  playback = totalTime - elapsedTime;
  minutesR = (int)playback / 60;
  secondsR = (((float)playback / 60) - minutesR) * 60;

  myGLCD.setFont(SmallFont);
  myGLCD.setColor(255, 255, 255);
  myGLCD.printNumI(minutes, 8, 48);

  myGLCD.print(":", 16, 48);
  myGLCD.printNumI((int)seconds, 24, 48, 2, '0');

  myGLCD.print("-", 276, 48);
  myGLCD.printNumI(minutesR, 284, 48);
  myGLCD.print(":", 292, 48);
  myGLCD.printNumI((int)secondsR, 300, 48, 2, '0');

  int trackBarX = map(elapsedTime, 0, totalTime, 0, 224);
  myGLCD.setColor(255, 0, 0);
  myGLCD.fillRect (48, 50, 48 + trackBarX, 50 + 8);

  if (totalTime == elapsedTime) {
    mp3.nextTrack();
    delay(30);
    myGLCD.setColor(255, 255, 255);
    myGLCD.fillRect (48, 50, 48 + 224, 50 + 8);
  }
}Code language: Arduino (arduino)
다음은 알람 시계 화면입니다. 여기에서 먼저 모든 그래픽, 시계, 텍스트 및 버튼을 그리고 다음 while 루프에 들어갈 수 있도록 변수 alarmNotSet을 true로 설정합니다. 여기서 H와 M이라는 두 개의 버튼을 사용하여 알람을 설정하고 "설정" 버튼을 클릭하면 알람 값이 alarmString 변수에 저장됩니다.
// Alarm Clock Screen
  if (currentPage == '2') {
    myGLCD.setFont(BigFont);
    myGLCD.setColor(255, 255, 255);
    myGLCD.print("MENU", 5, 5);
    myGLCD.print("Set Alarm", CENTER, 20);

    // Draws a colon between the hours and the minutes
    myGLCD.setColor(0, 255, 0);
    myGLCD.fillCircle (112, 65, 4);
    myGLCD.setColor(0, 255, 0);
    myGLCD.fillCircle (112, 85, 4);

    myGLCD.setFont(SevenSegNumFont);
    myGLCD.setColor(0, 255, 0);
    myGLCD.printNumI(aHours, 32, 50, 2, '0');
    myGLCD.printNumI(aMinutes, 128, 50, 2, '0');
    myGLCD.setColor(255, 255, 255);
    myGLCD.drawRoundRect (42, 115, 82, 145);
    myGLCD.drawRoundRect (138, 115, 178, 145);
    myGLCD.setFont(BigFont);
    myGLCD.print("H", 54, 122);
    myGLCD.print("M", 150, 122);

    myGLCD.drawRoundRect (215, 60, 303, 90);
    myGLCD.print("SET", 236, 67);
    myGLCD.drawRoundRect (215, 115, 303, 145);
    myGLCD.print("CLEAR", 220, 122);

    alarmNotSet = true;

    while (alarmNotSet){
      if (myTouch.dataAvailable()) {
        myTouch.read();
        x = myTouch.getX(); // X coordinate where the screen has been pressed
        y = myTouch.getY(); // Y coordinates where the screen has been pressed
        //Set hours button
        if ((x >= 42) && (x <= 82) && (y >= 115) && (y <= 145)) {
          drawRectFrame(42, 115, 82, 145);
          aHours++;
          if(aHours >=24){
            aHours = 0;
          }
          myGLCD.setFont(SevenSegNumFont);
          myGLCD.setColor(0, 255, 0);
          myGLCD.printNumI(aHours, 32, 50, 2, '0');
        }
        // Set minutes buttons
        if ((x >= 138) && (x <= 178) && (y >= 115) && (y <= 145)) {
          drawRectFrame(138, 115, 178, 145);
          aMinutes++;
          if(aMinutes >=60){
            aMinutes = 0;
          }
          myGLCD.setFont(SevenSegNumFont);
          myGLCD.setColor(0, 255, 0);
          myGLCD.printNumI(aMinutes, 128, 50, 2, '0');
      }
      // Set alarm button
      if ((x >= 215) && (x <= 303) && (y >= 60) && (y <= 80)) {
        drawRectFrame(215, 60, 303, 90);
        if (aHours < 10 && aMinutes < 10){
          alarmString = "0"+(String)aHours + ":" + "0"+ (String)aMinutes + ":" + "00";
        }
        else if (aHours < 10 && aMinutes > 9){
          alarmString = "0"+(String)aHours + ":" + (String)aMinutes + ":" + "00";
        }
        else if (aHours > 9 && aMinutes < 10){
          alarmString = (String)aHours + ":" + "0"+ (String)aMinutes + ":" + "00";
        }
        else {
          alarmString = (String)aHours + ":" + (String)aMinutes + ":" + "00";
        }
        myGLCD.setFont(BigFont);
        myGLCD.print("Alarm set for:", CENTER, 165);
        myGLCD.print(alarmString, CENTER, 191);

      }
      // Clear alarm button
      if ((x >= 215) && (x <= 303) && (y >= 115) && (y <= 145)) {
        drawRectFrame(215, 115, 303, 145);
        alarmString="";
        myGLCD.setColor(0, 0, 0);
        myGLCD.fillRect(45, 165, 275, 210);
      }
      // If we press the MENU Button
      if ((x >= 0) && (x <= 75) && (y >= 0) && (y <= 30)) {
        alarmNotSet = false;
        currentPage = '0';
        myGLCD.clrScr();
        drawHomeScreen();  // Draws the Home Screen
      }
      }
  }
}Code language: Arduino (arduino)
getTimeString() 함수에서 얻은 문자열과 동일한 형식을 갖도록 이 문자열을 조정해야 합니다. 이러한 방식으로 시계가 동일한 값이나 시간에 도달하면 이를 비교하고 알람을 활성화할 수 있습니다.
<그림 클래스="aligncenter">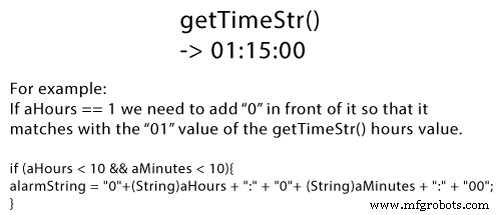
지우기 버튼을 누르면 alarmString이 지워지고 메뉴 버튼을 누르면 while 루프에서 빠져 나와 홈 화면으로 돌아갑니다.
알람 활성화를 위해 알람이 설정되었는지 확인하고 알람이 시계와 일치하면 MicroSD 카드의 첫 번째 노래가 더 높은 볼륨으로 재생되기 시작합니다. 또한 "닫기" 버튼으로 모든 그래픽을 그리고 alarmOn 변수를 true로 설정합니다. 이렇게 하면 "닫기" 버튼을 누를 때까지 노래를 계속 재생할 수 있는 다음 while 루프로 이동합니다.
// Alarm activation
    if (alarmNotSet == false) {
      if (alarmString == rtc.getTimeStr()){
        myGLCD.clrScr();
        mp3.setVolume(25);
        mp3.playTrackByIndexNumber(1);
        delay(100);
        myGLCD.setFont(BigFont);
        myGLCD.setColor(255, 255, 255);
        myGLCD.print("ALARM", CENTER, 90);
        myGLCD.drawBitmap (127, 10, 65, 64, AlarmButton);
        myGLCD.print(alarmString, CENTER, 114);
        myGLCD.drawRoundRect (94, 146, 226, 170);
        myGLCD.print("DISMISS", CENTER, 150);
        boolean alarmOn = true;
        while (alarmOn){
          if (myTouch.dataAvailable()) {
          myTouch.read();
          x = myTouch.getX(); // X coordinate where the screen has been pressed
          y = myTouch.getY(); // Y coordinates where the screen has been pressed

          // Stop alarm button
          if ((x >= 94) && (x <= 226) && (y >= 146) && (y <= 170)) {
          drawRectFrame(94, 146, 226, 170);
          alarmOn = false;
          alarmString="";
          myGLCD.clrScr();
          mp3.stopPlayback();
          delay(100);
          currentPage = '0';
          playStatus = '0';
          mp3.setVolume(15);
          drawHomeScreen();
          }

      }
     }
  }
}Code language: Arduino (arduino)
이것이 코드가 작동하는 방식이며 기사 하단에서 전체 소스 코드를 찾을 수 있습니다.
Solidworks를 사용하여 디자인을 만들었으며 다음과 같습니다.
<그림 클래스="aligncenter">
여기에서 측정할 수 있도록 이 모델을 다운로드할 수 있습니다.
이 프로젝트에서는 멀티 도구를 사용하여 크기에 맞게 자른 알루미늄 판금을 사용하기로 선택했습니다. 그런 다음 책상 가장자리에서 클램프와 선반을 사용하여 판금을 구부렸습니다.
<그림 클래스="aligncenter">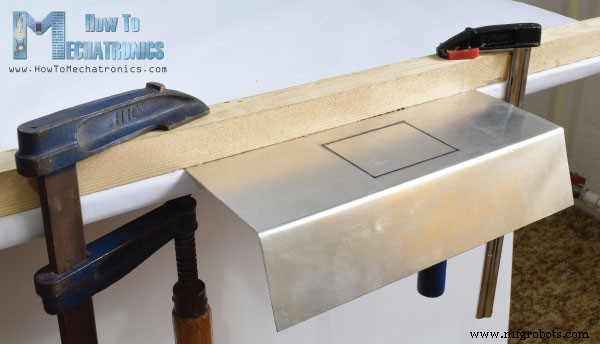
스피커는 원형 패턴을 인쇄하여 제자리에 붙이고 드릴로 구멍을 모두 뚫었습니다.
<그림 클래스="aligncenter">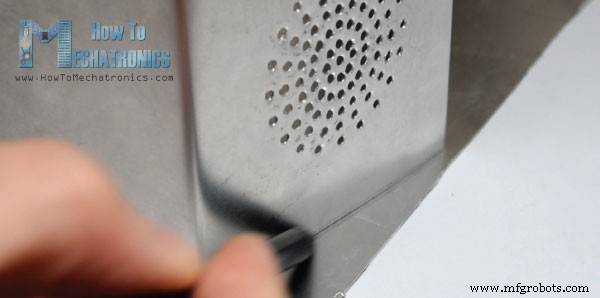
그런 다음 측면을 적절한 형태로 자르고 글루건을 사용하여 이전에 구부린 판금에 고정했습니다.
결국 나는 판금 상자를 칠했고 전자 부품을 부착할 준비가 되었습니다. 다시 글루건을 사용하여 모든 구성 요소를 고정하고 모든 것을 함께 연결하고 두 개의 볼트를 사용하여 장치의 후면 덮개를 고정했습니다.
<그림 클래스="aligncenter">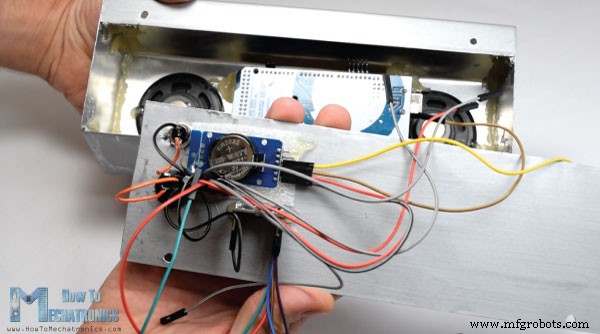
그게 전부입니다. 아래 댓글 섹션에서 언제든지 질문하세요.
장치의 전체 소스 코드는 다음과 같습니다.
/*
* Arduino Touch Screen MP3 Music Player and Alarm Clock
*
* Crated by Dejan Nedelkovski,
* www.HowToMechatronics.com
*
* UFTF, URTouch and DS3231 libraries made by Henning Karlsen which can be found and downloaded from his website, www.rinkydinkelectronics.com.
* BY8001 MP3 Player Library made by borland of Arduino forum, Released in public domain. Dowload link: https://github.com/r0ndL/BY8001
*/

#include <UTFT.h>
#include <URTouch.h>
#include <SoftwareSerial.h>
#include <BY8001.h>
#include <DS3231.h>

//==== Creating Objects
UTFT     myGLCD(SSD1289, 38, 39, 40, 41); //Parameters should be adjusted to your Display/Schield model
URTouch  myTouch( 6, 5, 4, 3, 2);


SoftwareSerial mp3Serial(11, 10);  // RX, TX
BY8001 mp3;  // creating an instance of class BY8001 and call it 'mp3'

DS3231  rtc(SDA, SCL);

//==== Defining Fonts
extern uint8_t SmallFont[];
extern uint8_t BigFont[];
extern uint8_t SevenSegNumFont[];

extern unsigned int MusicPlayerButton[0x1040];
extern unsigned int AlarmButton[0x1040];
extern unsigned int ButtonPlay[0x1AE9];
extern unsigned int ButtonPause[0x1AE9];
extern unsigned int PreviousButton[0x9C4];
extern unsigned int NextButton[0x9C4];
extern unsigned int VolumeDown[0x170];
extern unsigned int VolumeUp[0x3B8];

int x, y; // Variables for the coordinates where the display has been pressed
char currentPage, playStatus;
int iV = 15;
int trackNum = 1;
int b = 16;
int aHours = 0;
int aMinutes = 0;
boolean alarmNotSet = true;
String alarmString = "";
float currentTemperature, temperature;
static word totalTime, elapsedTime, playback, minutes, seconds, lastSeconds, minutesR, secondsR;
String currentClock, currentHours, currentMinutes, currentSeconds, currentDate;
String timeString, hoursString, minutesString, secondsString, hoursS, minutesS, secondsS, dateS;

void setup() {
  // Initiate display
  myGLCD.InitLCD();
  myGLCD.clrScr();
  myTouch.InitTouch();
  myTouch.setPrecision(PREC_MEDIUM);

  // Initialize the rtc object
  rtc.begin();

  // Music
  Serial.begin(9600);  // set serial monitor baud rate to Arduino IDE
  mp3Serial.begin(9600);  // BY8001 set to 9600 baud (required)
  mp3.setup(mp3Serial); // tell BY8001 library which serial port to use.
  delay(800);  // allow time for BY8001 cold boot; may adjust depending on flash storage size

  drawHomeScreen();  // Draws the Home Screen
  currentPage = '0'; // Indicates that we are at Home Screen
  playStatus = '0';

  mp3.setVolume(15);
  delay(100);
  currentTemperature = rtc.getTemp();
  currentDate = rtc.getDateStr();
  currentClock = rtc.getTimeStr();
  timeString = rtc.getTimeStr();
  currentHours = timeString.substring(0, 2);
  currentMinutes = timeString.substring(3, 5);
  currentSeconds = timeString.substring(6, 8);
}


void loop() {
  // Homes Screen
  if (currentPage == '0') {
    // Checks for change of the clock
    if ( currentClock != rtc.getTimeStr()) {
      timeString = rtc.getTimeStr();
      hoursS = timeString.substring(0, 2);
      minutesS = timeString.substring(3, 5);
      secondsS = timeString.substring(6, 8);

      myGLCD.setFont(SevenSegNumFont);
      myGLCD.setColor(0, 255, 0);

      myGLCD.print(secondsS, 224, 50);

      if ( currentMinutes != minutesS ) {
        myGLCD.print(minutesS, 128, 50);
        currentMinutes = minutesS;
      }
      if ( currentHours != hoursS ) {
        myGLCD.print(hoursS, 32, 50);
        currentHours = hoursS;
      }
      // Checks for change of the date
      dateS = rtc.getDateStr();
      delay(10);
      if ( currentDate != dateS){
          myGLCD.setColor(255, 255, 255); // Sets color to white
          myGLCD.setFont(BigFont); // Sets font to big
          myGLCD.print(rtc.getDateStr(), 153, 7);
        }
      // Checks for change of the temperature
      temperature = rtc.getTemp();
      delay(10);
      if ( currentTemperature != temperature ){
        myGLCD.setColor(255, 255, 255); // Sets color to white
        myGLCD.setFont(BigFont); // Sets font to big
        myGLCD.printNumI(temperature, 39, 7);
        currentTemperature = temperature;
      }
      delay(10);
      currentClock = rtc.getTimeStr();
    }
    // Checks whether the screen has been touched
    if (myTouch.dataAvailable()) {
      myTouch.read();
      x = myTouch.getX(); // X coordinate where the screen has been pressed
      y = myTouch.getY(); // Y coordinates where the screen has been pressed
      // If we press the Music Player Button
      if ((x >= 55) && (x <= 120) && (y >= 125) && (y <= 190)) {
          drawFrame(87, 157, 33);
          currentPage = '1';
          myGLCD.clrScr();
          delay(100);
          drawMusicPlayerScreen();
          delay(100);
        }
      // If we press the Alarm Button
      if ((x >= 195) && (x <= 260) && (y >= 125) && (y <= 190)) {
          drawFrame(227, 160, 29);
          currentPage = '2';
          myGLCD.clrScr();
        }
    }
  }

  // Music Player Screen
  if (currentPage == '1') {
    if (myTouch.dataAvailable()) {
      myTouch.read();
      x = myTouch.getX(); // X coordinate where the screen has been pressed
      y = myTouch.getY(); // Y coordinates where the screen has been pressed
      // If we press the Play Button
      if ((x >= 116) && (x <= 204) && (y >= 77) && (y <= 165)) {
        if (playStatus == '0') {
          drawFrame(159, 121, 42);
          drawPauseButton();
          mp3.playTrackFromFolder(00, 001);
          delay(100);
          playStatus = '2';
          return;
        }
        if (playStatus == '1') {
          drawFrame(159, 121, 42);
          drawPauseButton();
          mp3.play();
          delay(100);
          playStatus = '2';
          return;
        }
        if (playStatus == '2') {
          drawFrame(159, 121, 42);
          drawPlayButton();
          mp3.pause();
          delay(100);
          playStatus = '1';
          return;
        }
      }
      // If we press the Previous Button
      if ((x >= 45) && (x <= 95) && (y >= 97) && (y <= 147)) {
        drawFrame(70, 121, 26);
        mp3.previousTrack();
        delay(100);
        drawTrackBar();
      }
      // If we press the Next Button
      if ((x >= 227) && (x <= 277) && (y >= 97) && (y <= 147)) {
        drawFrame(252, 122, 26);
        mp3.nextTrack();
        delay(100);
        drawTrackBar();
      }
      // If we press the VolumeDown Button
      if ((x >= 35) && (x <= 75) && (y >= 165) && (y <= 209)) {
        drawUnderline(45, 205, 65, 205);
        if (iV >= 0 & iV <= 30) {
          iV--;
          drawVolume(iV);
        }
        mp3.decreaseVolume();
        delay(100);
      }
      // If we press the VolumeUp Button
      if ((x >= 230) && (x <= 280) && (y >= 165) && (y <= 209)) {
        drawUnderline(235, 205, 275, 205);
        if (iV >= 0 & iV <= 30) {
          iV++;
          drawVolume(iV);
        }
        mp3.increaseVolume();
        delay(100);
      }
      // If we press the MENU Button
      if ((x >= 0) && (x <= 75) && (y >= 0) && (y <= 30)) {
        myGLCD.clrScr();
        drawHomeScreen();  // Draws the Home Screen
        currentPage = '0';
        return;
      }
    }
    // Updates the track bar
    if (playStatus == '1' || playStatus == '2') {
      trackPlayTime();
    }
    // Printing the clock in the upper right corner
    myGLCD.setFont(BigFont);
    myGLCD.setColor(255, 255, 255);
    printClock(187, 5);
  }
  // Alarm Clock Screen
  if (currentPage == '2') {
    myGLCD.setFont(BigFont);
    myGLCD.setColor(255, 255, 255);
    myGLCD.print("MENU", 5, 5);
    myGLCD.print("Set Alarm", CENTER, 20);

    // Draws a colon between the hours and the minutes
    myGLCD.setColor(0, 255, 0);
    myGLCD.fillCircle (112, 65, 4);
    myGLCD.setColor(0, 255, 0);
    myGLCD.fillCircle (112, 85, 4);

    myGLCD.setFont(SevenSegNumFont);
    myGLCD.setColor(0, 255, 0);
    myGLCD.printNumI(aHours, 32, 50, 2, '0');
    myGLCD.printNumI(aMinutes, 128, 50, 2, '0');
    myGLCD.setColor(255, 255, 255);
    myGLCD.drawRoundRect (42, 115, 82, 145);
    myGLCD.drawRoundRect (138, 115, 178, 145);
    myGLCD.setFont(BigFont);
    myGLCD.print("H", 54, 122);
    myGLCD.print("M", 150, 122);

    myGLCD.drawRoundRect (215, 60, 303, 90);
    myGLCD.print("SET", 236, 67);
    myGLCD.drawRoundRect (215, 115, 303, 145);
    myGLCD.print("CLEAR", 220, 122);

    alarmNotSet = true;

    while (alarmNotSet){
      if (myTouch.dataAvailable()) {
        myTouch.read();
        x = myTouch.getX(); // X coordinate where the screen has been pressed
        y = myTouch.getY(); // Y coordinates where the screen has been pressed
        //Set hours button
        if ((x >= 42) && (x <= 82) && (y >= 115) && (y <= 145)) {
          drawRectFrame(42, 115, 82, 145);
          aHours++;
          if(aHours >=24){
            aHours = 0;
          }
          myGLCD.setFont(SevenSegNumFont);
          myGLCD.setColor(0, 255, 0);
          myGLCD.printNumI(aHours, 32, 50, 2, '0');
        }
        // Set minutes buttons
        if ((x >= 138) && (x <= 178) && (y >= 115) && (y <= 145)) {
          drawRectFrame(138, 115, 178, 145);
          aMinutes++;
          if(aMinutes >=60){
            aMinutes = 0;
          }
          myGLCD.setFont(SevenSegNumFont);
          myGLCD.setColor(0, 255, 0);
          myGLCD.printNumI(aMinutes, 128, 50, 2, '0');
      }
      // Set alarm button
      if ((x >= 215) && (x <= 303) && (y >= 60) && (y <= 80)) {
        drawRectFrame(215, 60, 303, 90);
        if (aHours < 10 && aMinutes < 10){
          alarmString = "0"+(String)aHours + ":" + "0"+ (String)aMinutes + ":" + "00";
        }
        else if (aHours < 10 && aMinutes > 9){
          alarmString = "0"+(String)aHours + ":" + (String)aMinutes + ":" + "00";
        }
        else if (aHours > 9 && aMinutes < 10){
          alarmString = (String)aHours + ":" + "0"+ (String)aMinutes + ":" + "00";
        }
        else {
          alarmString = (String)aHours + ":" + (String)aMinutes + ":" + "00";
        }
        myGLCD.setFont(BigFont);
        myGLCD.print("Alarm set for:", CENTER, 165);
        myGLCD.print(alarmString, CENTER, 191);

      }
      // Clear alarm button
      if ((x >= 215) && (x <= 303) && (y >= 115) && (y <= 145)) {
        drawRectFrame(215, 115, 303, 145);
        alarmString="";
        myGLCD.setColor(0, 0, 0);
        myGLCD.fillRect(45, 165, 275, 210);
      }
      // If we press the MENU Button
      if ((x >= 0) && (x <= 75) && (y >= 0) && (y <= 30)) {
        alarmNotSet = false;
        currentPage = '0';
        myGLCD.clrScr();
        drawHomeScreen();  // Draws the Home Screen
      }
      }
    }

    }
    // Alarm activation
    if (alarmNotSet == false) {
      if (alarmString == rtc.getTimeStr()){
        myGLCD.clrScr();
        mp3.setVolume(25);
        mp3.playTrackByIndexNumber(1);
        delay(100);
        myGLCD.setFont(BigFont);
        myGLCD.setColor(255, 255, 255);
        myGLCD.print("ALARM", CENTER, 90);
        myGLCD.drawBitmap (127, 10, 65, 64, AlarmButton);
        myGLCD.print(alarmString, CENTER, 114);
        myGLCD.drawRoundRect (94, 146, 226, 170);
        myGLCD.print("DISMISS", CENTER, 150);
        boolean alarmOn = true;
        while (alarmOn){
          if (myTouch.dataAvailable()) {
          myTouch.read();
          x = myTouch.getX(); // X coordinate where the screen has been pressed
          y = myTouch.getY(); // Y coordinates where the screen has been pressed

          // Stop alarm button
          if ((x >= 94) && (x <= 226) && (y >= 146) && (y <= 170)) {
          drawRectFrame(94, 146, 226, 170);
          alarmOn = false;
          alarmString="";
          myGLCD.clrScr();
          mp3.stopPlayback();
          delay(100);
          currentPage = '0';
          playStatus = '0';
          mp3.setVolume(15);
          drawHomeScreen();
          }

      }
        }
      }
    }
}

void drawHomeScreen() {
  myGLCD.setBackColor(0, 0, 0); // Sets the background color of the area where the text will be printed to black
  myGLCD.setColor(255, 255, 255); // Sets color to white
  myGLCD.setFont(BigFont); // Sets font to big
  myGLCD.print(rtc.getDateStr(), 153, 7);
  myGLCD.print("T:", 7, 7);
  myGLCD.printNumI(rtc.getTemp(), 39, 7);
  myGLCD.print("C", 82, 7);
  myGLCD.setFont(SmallFont);
  myGLCD.print("o", 74, 5);
  if (alarmString == "" ) {
    myGLCD.setColor(255, 255, 255);
    myGLCD.print("by www.HowToMechatronics.com", CENTER, 215);
  }
  else {
    myGLCD.setColor(255, 255, 255);
    myGLCD.print("Alarm set for: ", 68, 215);
    myGLCD.print(alarmString, 188, 215);
  }
  drawMusicPlayerButton();
  drawAlarmButton();
  drawHomeClock();
}

void drawMusicPlayerScreen() {
  // Title
  myGLCD.setBackColor(0, 0, 0); // Sets the background color of the area where the text will be printed to black
  myGLCD.setColor(255, 255, 255); // Sets color to white
  myGLCD.setFont(BigFont); // Sets font to big
  myGLCD.print("MENU", 5, 5); // Prints the string on the screen
  myGLCD.setColor(255, 0, 0); // Sets color to red
  myGLCD.drawLine(0, 26, 319, 26); // Draws the red line

  myGLCD.setColor(255, 255, 255); // Sets color to white
  myGLCD.setFont(SmallFont); // Sets font to big
  myGLCD.print("by www.HowToMechatronics.com", CENTER, 215); // Prints the string on the screen

  // Volume Bar
  myGLCD.setColor(255, 255, 255);
  myGLCD.fillRect (78, 184, 78 + 150, 184 + 8);
  myGLCD.setColor(240, 196, 30);
  myGLCD.fillRect (78, 184, 78 + 75, 184 + 8);

  // Track Bar
  myGLCD.setColor(255, 255, 255);
  myGLCD.fillRect (48, 50, 48 + 224, 50 + 8);
  myGLCD.setFont(SmallFont);
  myGLCD.setColor(255, 255, 255);
  myGLCD.print("0:00", 8, 48);
  myGLCD.print("-0:00", 276, 48);

  drawPlayButton();
  if (playStatus == '2') {
    drawPauseButton();
  }
  drawPreviousButton();
  drawNextButton();
  drawVolumeDown();
  drawVolumeUp();
}

void drawMusicPlayerButton() {
  myGLCD.drawBitmap (55, 125, 65, 64, MusicPlayerButton);
}
void drawAlarmButton() {
  myGLCD.drawBitmap (195, 125, 65, 64, AlarmButton);
}
void drawPlayButton() {
  myGLCD.drawBitmap (118, 79, 83, 83, ButtonPlay);
}
void drawPauseButton() {
  myGLCD.drawBitmap (118, 79, 83, 83, ButtonPause);
}
void drawNextButton() {
  myGLCD.drawBitmap (227, 97, 50, 50, NextButton);
}
void drawPreviousButton() {
  myGLCD.drawBitmap (45, 97, 50, 50, PreviousButton);
}
void drawVolumeDown() {
  myGLCD.drawBitmap (50, 177, 16, 23, VolumeDown);
}
void drawVolumeUp() {
  myGLCD.drawBitmap (241, 175, 34, 28, VolumeUp);
}
// check for if Mp3 Player is stopped
bool checkFor_mp3IsStopped() {
  if (mp3Serial.available() > 0) {
    if (mp3.getPlaybackStatus() == 0) {
      return true;
    }
  }
  else return false;
}

// Highlights the button when pressed
void drawFrame(int x, int y, int r) {
  myGLCD.setColor(255, 0, 0);
  myGLCD.drawCircle (x, y, r);
  while (myTouch.dataAvailable())
    myTouch.read();
  myGLCD.setColor(0, 0, 0);
  myGLCD.drawCircle (x, y, r);
}
void drawRectFrame(int x1, int y1, int x2, int y2) {
  myGLCD.setColor(255, 0, 0);
  myGLCD.drawRoundRect (x1, y1, x2, y2);
  while (myTouch.dataAvailable())
    myTouch.read();
  myGLCD.setColor(255, 255, 255);
  myGLCD.drawRoundRect (x1, y1, x2, y2);
}
void drawUnderline(int x1, int y1, int x2, int y2) {
  myGLCD.setColor(255, 0, 0);
  myGLCD.drawLine (x1, y1, x2, y2);
  while (myTouch.dataAvailable())
    myTouch.read();
  myGLCD.setColor(0, 0, 0);
  myGLCD.drawLine (x1, y1, x2, y2);
}

// Sound bar
void drawVolume(int x) {
  myGLCD.setColor(255, 255, 255);
  myGLCD.fillRect (78 + 5 * x, 184, 78 + 150, 184 + 8);
  myGLCD.setColor(240, 196, 30);
  myGLCD.fillRect (78, 184, 78 + 5 * x, 184 + 8);
}

// Clears the track bar
void drawTrackBar() {
  myGLCD.setColor(255, 255, 255);
  myGLCD.fillRect (48, 50, 48 + 224, 50 + 8);
}
// Updates the track bar
void trackPlayTime() {
  totalTime = mp3.getTotalTrackPlaybackTime();
  delay(10);
  elapsedTime = mp3.getElapsedTrackPlaybackTime();
  delay(10);
  minutes = (int)elapsedTime / 60;
  seconds = (((float)elapsedTime / 60) - minutes) * 60;
  playback = totalTime - elapsedTime;
  minutesR = (int)playback / 60;
  secondsR = (((float)playback / 60) - minutesR) * 60;

  myGLCD.setFont(SmallFont);
  myGLCD.setColor(255, 255, 255);
  myGLCD.printNumI(minutes, 8, 48);

  myGLCD.print(":", 16, 48);
  myGLCD.printNumI((int)seconds, 24, 48, 2, '0');

  myGLCD.print("-", 276, 48);
  myGLCD.printNumI(minutesR, 284, 48);
  myGLCD.print(":", 292, 48);
  myGLCD.printNumI((int)secondsR, 300, 48, 2, '0');

  int trackBarX = map(elapsedTime, 0, totalTime, 0, 224);
  myGLCD.setColor(255, 0, 0);
  myGLCD.fillRect (48, 50, 48 + trackBarX, 50 + 8);

  if (totalTime == elapsedTime) {
    mp3.nextTrack();
    delay(30);
    myGLCD.setColor(255, 255, 255);
    myGLCD.fillRect (48, 50, 48 + 224, 50 + 8);
  }
}

void printClock(int x, int y) {
  if ( currentClock != rtc.getTimeStr()) {
    myGLCD.print(rtc.getTimeStr(), x, y);
    currentClock = rtc.getTimeStr();
  }
}

void drawColon() {
  myGLCD.setColor(0, 255, 0);
  myGLCD.fillCircle (112, 65, 4);
  myGLCD.setColor(0, 255, 0);
  myGLCD.fillCircle (112, 85, 4);

  myGLCD.setColor(0, 255, 0);
  myGLCD.fillCircle (208, 65, 4);
  myGLCD.setColor(0, 255, 0);
  myGLCD.fillCircle (208, 85, 4);
}
void drawHomeClock() {
  timeString = rtc.getTimeStr();
  currentHours = timeString.substring(0, 2);
  currentMinutes = timeString.substring(3, 5);
  currentSeconds = timeString.substring(6, 8);
  myGLCD.setFont(SevenSegNumFont);
  myGLCD.setColor(0, 255, 0);
  myGLCD.print(currentSeconds, 224, 50);
  myGLCD.print(currentMinutes, 128, 50);
  myGLCD.print(currentHours, 32, 50);
  drawColon();
}Code language: Arduino (arduino)
Feel free to ask any question in the comments section below and don’t forget to check out my collection of Arduino Projects.
제조공정
이 프로젝트에서는 Arduino 보안 및 경보 시스템을 만드는 방법을 배웁니다. 다음 비디오를 보거나 아래에 작성된 튜토리얼을 읽을 수 있습니다. 개요 알람은 A 버튼을 누른 후 10초 후에 활성화됩니다. 물체를 감지하기 위해 초음파 센서를 사용하고 알람이 무언가를 감지하면 부저가 소리를 내기 시작합니다. 알람을 중지하려면 4자리 비밀번호를 삽입해야 합니다. 사전 설정된 비밀번호는 1234이지만 변경할 수도 있습니다. B 버튼을 눌러 암호 변경 메뉴로 들어갑니다. 계속하려면 현재 암호를 입력해야 하고 새 4자리 암호를 입력
이 Arduino 자습서에서는 Arduino 보드와 처리 개발 환경을 사용하여 이 멋진 레이더를 만드는 방법을 보여 드리겠습니다. 자세한 내용은 다음 동영상을 보거나 아래에 작성된 튜토리얼을 참조하세요. 개요 이 Arduino 프로젝트에 필요한 것은 물체를 감지하기 위한 초음파 센서, 센서를 회전시키기 위한 작은 취미 생활자 서보 모터 및 이를 제어하기 위한 Arduino 보드뿐입니다. 다음 동영상을 보거나 아래에 작성된 튜토리얼을 읽을 수 있습니다.[/column] 이 Arduino 프로젝트에 필요한 구성요소 다음 사이트에서