

제조공정

산업 제조
<메인 클래스="사이트 메인" id="메인">
이 Arduino 프로젝트에서는 Arduino와 TFT 터치 스크린을 사용하여 스마트폰용으로 인기 있는 Flappy Bird 게임을 실제로 복제한 멋진 Arduino 게임을 만들 것입니다. 다음 동영상을 보거나 아래에 작성된 텍스트를 읽으면 작동 방식을 배울 수 있습니다.
게임은 매우 간단하지만 흥미롭고 중독성이 있습니다. 터치 스크린을 사용하여 우리는 새를 제어하고 우리가 진행함에 따라 속도가 증가하는 움직이는 기둥을 피하려고 노력합니다. 또한 게임은 전원을 뽑더라도 최고 점수를 저장할 수 있습니다.[/column]
<그림 클래스="aligncenter">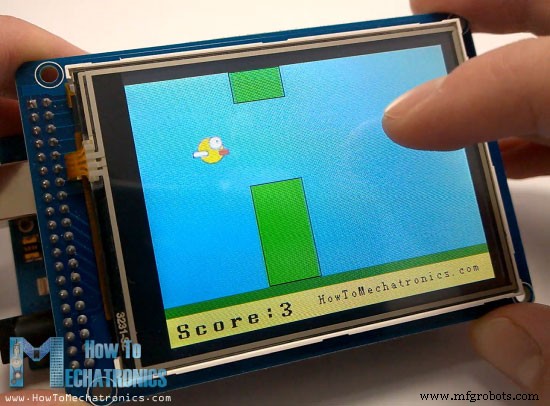
이전 튜토리얼(Arduino TFT 튜토리얼)에서 우리는 Arduino와 함께 TFT 터치 스크린을 사용하는 방법을 자세히 배웠고 이 튜토리얼에서 설명할 게임 예제를 남겨두었습니다. 이제 이전 튜토리얼과 마찬가지로 이 Arduino 게임의 코드를 차근차근 설명하겠습니다.
코드가 조금 더 길고 이해를 돕기 위해 각 섹션에 대한 설명과 함께 섹션에 프로그램의 소스 코드를 게시합니다. 그리고 이 기사의 마지막에 전체 소스 코드를 게시할 것입니다.
Henning Karlsen이 만든 UTFT 및 URTouch 라이브러리를 사용합니다. 그의 웹사이트 www.RinkyDinkElectronics.com에서 이러한 라이브러리를 다운로드할 수 있습니다. 또한 EEPROM에 가장 높은 점수를 저장하기 위해 EEPROM 라이브러리를 사용할 것입니다. EEPROM은 보드가 꺼져 있어도 데이터를 저장할 수 있는 메모리입니다.
라이브러리를 포함시킨 후에는 UTFT 및 URTouch 개체를 생성하고 게임에 필요한 변수를 정의해야 합니다. 설정 섹션에서 디스플레이와 터치를 시작하고, EEPROM에서 최고 점수를 읽고, initialGame() 사용자 정의 함수를 사용하여 게임을 시작해야 합니다.
 #include <UTFT.h>
#include <URTouch.h>
#include <EEPROM.h>

//==== Creating Objects
UTFT    myGLCD(SSD1289,38,39,40,41); //Parameters should be adjusted to your Display/Schield model
URTouch  myTouch( 6, 5, 4, 3, 2);

//==== Defining Fonts
extern uint8_t SmallFont[];
extern uint8_t BigFont[];
extern uint8_t SevenSegNumFont[];

extern unsigned int bird01[0x41A]; // Bird Bitmap

int x, y; // Variables for the coordinates where the display has been pressed

// Floppy Bird
int xP = 319;
int yP = 100;
int yB = 50;
int movingRate = 3;
int fallRateInt = 0;
float fallRate = 0;
int score = 0;
int lastSpeedUpScore = 0;
int highestScore;
boolean screenPressed = false;
boolean gameStarted = false;

void setup() {
  // Initiate display
  myGLCD.InitLCD();
  myGLCD.clrScr();
  myTouch.InitTouch();
  myTouch.setPrecision(PREC_MEDIUM);

  highestScore = EEPROM.read(0); // Read the highest score from the EEPROM

  initiateGame(); // Initiate the game
}Code language: Arduino (arduino)
따라서 initialGame() 맞춤 함수를 사용하여 게임의 초기 상태를 그리고 다음은 이를 수행하는 방법입니다. 먼저 화면을 지우고 파란색 배경을 그리고 맨 아래 섹션을 그리고 텍스트를 추가하고 drawBird() 사용자 정의 함수를 호출하여 새를 그립니다. 그런 다음 화면을 탭할 때까지 게임이 시작되지 않도록 하는 while 루프가 필요합니다. 따라서 이 상태에 있는 동안 오른쪽 상단 모서리를 누르면 최고 점수를 0으로 재설정할 수 있으며 화면의 다른 곳을 누르면 while 루프에서 나와 코드의 메인 루프로 들어갑니다. 게임을 시작합니다.
<그림 클래스="aligncenter">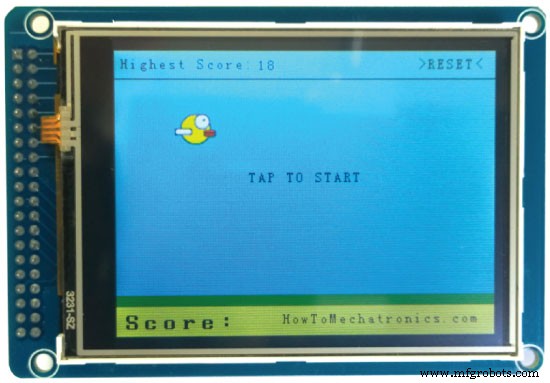
// ===== initiateGame - Custom Function
void initiateGame() {
  myGLCD.clrScr();
  // Blue background
  myGLCD.setColor(114, 198, 206);
  myGLCD.fillRect(0,0,319,239);
  // Ground
  myGLCD.setColor(221,216,148);
  myGLCD.fillRect(0, 215, 319, 239);
  myGLCD.setColor(47,175,68);
  myGLCD.fillRect(0, 205, 319, 214);
  // Text
  myGLCD.setColor(0, 0, 0);
  myGLCD.setBackColor(221, 216, 148);
  myGLCD.setFont(BigFont);
  myGLCD.print("Score:",5,220);
  myGLCD.setFont(SmallFont);
  myGLCD.print("HowToMechatronics.com", 140, 220);
  myGLCD.setColor(0, 0, 0);
  myGLCD.setBackColor(114, 198, 206);
  myGLCD.print("Highest Score: ",5,5);
  myGLCD.printNumI(highestScore, 120, 6);
  myGLCD.print(">RESET<",255,5);
  myGLCD.drawLine(0,23,319,23);
  myGLCD.print("TAP TO START",CENTER,100);

  drawBird(yB); // Draws the bird

  // Wait until we tap the sreen
  while (!gameStarted) {
    if (myTouch.dataAvailable()) {
    myTouch.read();
    x=myTouch.getX();
    y=myTouch.getY();
    // Reset higest score
    if ((x>=250) && (x<=319) &&(y>=0) && (y<=28)) {
    highestScore = 0;
    myGLCD.setColor(114, 198, 206);
    myGLCD.fillRect(120, 0, 150, 22);
    myGLCD.setColor(0, 0, 0);
    myGLCD.printNumI(highestScore, 120, 5);
    }
    if ((x>=0) && (x<=319) &&(y>=30) && (y<=239)) {
    gameStarted = true;
    myGLCD.setColor(114, 198, 206);
    myGLCD.fillRect(0, 0, 319, 32);
    }
  }
  }
  // Clears the text "TAP TO START" before the game start
  myGLCD.setColor(114, 198, 206);
  myGLCD.fillRect(85, 100, 235, 116);

}Code language: Arduino (arduino)
메인 루프 섹션에는 기둥을 그리는 데 사용되는 xP 변수와 yP 변수가 있습니다. 초기에 xP 변수는 화면 크기로 319의 값을 가지며, yP 변수는 첫 번째 기둥의 높이인 100의 값을 갖는다. 반복할 때마다 xP 변수의 값은 처음에 값이 3인 MovingRate 변수의 값만큼 감소하고 게임을 진행하면서 증가합니다.
// The Main Loop Section
void loop() {
    xP=xP-movingRate; // xP - x coordinate of the pilars; range: 319 - (-51)
    drawPilars(xP, yP); // Draws the pillars

    // yB - y coordinate of the bird which depends on value of the fallingRate variable
    yB+=fallRateInt;
    fallRate=fallRate+0.4; // Each inetration the fall rate increase so that we can the effect of acceleration/ gravity
    fallRateInt= int(fallRate);

    // Checks for collision
    if(yB>=180 || yB<=0){ // top and bottom
      gameOver();
    }
    if((xP<=85) && (xP>=5) && (yB<=yP-2)){ // upper pillar
      gameOver();
    }
    if((xP<=85) && (xP>=5) && (yB>=yP+60)){ // lower pillar
      gameOver();
    }

    // Draws the bird
    drawBird(yB);

    // After the pillar has passed through the screen
    if (xP<=-51){
      xP=319; // Resets xP to 319
      yP = rand() % 100+20; // Random number for the pillars height
      score++; // Increase score by one
    }
    //==== Controlling the bird
    if (myTouch.dataAvailable()&& !screenPressed) {
       fallRate=-6; // Setting the fallRate negative will make the bird jump
       screenPressed = true;
    }
    // Doesn't allow holding the screen / you must tap it
    else if ( !myTouch.dataAvailable() && screenPressed){
      screenPressed = false;
    }

    // After each five points, increases the moving rate of the pillars
    if ((score - lastSpeedUpScore) == 5) {
      lastSpeedUpScore = score;
      movingRate++;
    }
}Code language: Arduino (arduino)
게임의 작동 원리는 다음과 같습니다. 오른쪽에서 왼쪽으로 움직이는 50픽셀 너비의 기둥이 있고 모든 다음 기둥은 다른 임의의 높이를 갖습니다. 논리적으로 움직이게 하려면 각 반복 후에 화면을 지우고 기둥이 새 위치에 있는 그래픽을 다시 그려야 합니다. 그러나 화면의 재생 빈도가 낮아 그래픽이 깜박일 수 있으므로 그렇게 할 수 없습니다. 모든 픽셀을 활성화하려면 화면에 시간이 조금 더 필요하므로 즉석에서 움직이는 것만 다시 그려야 합니다.
<그림 클래스="aligncenter">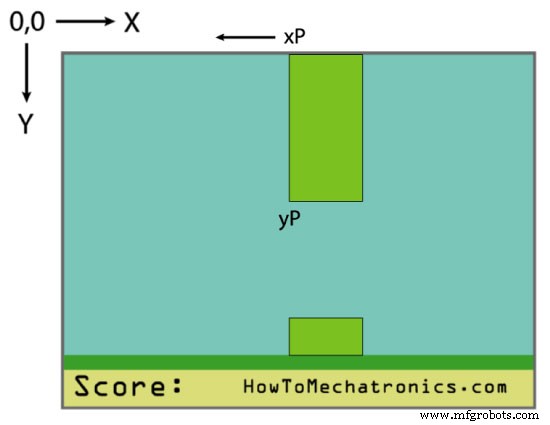
이제 drawPilars() 사용자 정의 함수가 이를 수행하는 방법을 살펴보겠습니다. xP 및 yP 변수를 사용하고 이를 사용하여 기둥을 그릴 fillRect() 함수를 사용합니다. 따라서 반복할 때마다 왼쪽과 오른쪽에서 추가 파란색 직사각형으로 새 위치에 기둥을 그려 이전에 그린 기둥을 지우고 이러한 방식으로 실제로 움직이는 기둥을 다시 그리는 즉흥 연주를 수행합니다. 여기의 if 문은 'x2' 매개변수에 화면 크기를 벗어난 값이 있는 경우 어떤 이유로 fillRect() 함수가 작동하지 않기 때문에 추가 즉석입니다. 또한 이 사용자 정의 함수의 끝에서 도달한 점수의 값을 인쇄해야 합니다.
// ===== drawPlillars - Custom Function
void drawPilars(int x, int y) {
    if (x>=270){
      myGLCD.setColor(0, 200, 20);
      myGLCD.fillRect(318, 0, x, y-1);
      myGLCD.setColor(0, 0, 0);
      myGLCD.drawRect(319, 0, x-1, y);

      myGLCD.setColor(0, 200, 20);
      myGLCD.fillRect(318, y+81, x, 203);
      myGLCD.setColor(0, 0, 0);
      myGLCD.drawRect(319, y+80, x-1, 204);
    }
    else if( x<=268) {
      // Draws blue rectangle right of the pillar
      myGLCD.setColor(114, 198, 206);
      myGLCD.fillRect(x+51, 0, x+60, y);
      // Draws the pillar
      myGLCD.setColor(0, 200, 20);
      myGLCD.fillRect(x+49, 1, x+1, y-1);
      // Draws the black frame of the pillar
      myGLCD.setColor(0, 0, 0);
      myGLCD.drawRect(x+50, 0, x, y);
      // Draws the blue rectangle left of the pillar
      myGLCD.setColor(114, 198, 206);
      myGLCD.fillRect(x-1, 0, x-3, y);

      // The bottom pillar
      myGLCD.setColor(114, 198, 206);
      myGLCD.fillRect(x+51, y+80, x+60, 204);
      myGLCD.setColor(0, 200, 20);
      myGLCD.fillRect(x+49, y+81, x+1, 203);
      myGLCD.setColor(0, 0, 0);
      myGLCD.drawRect(x+50, y+80, x, 204);
      myGLCD.setColor(114, 198, 206);
      myGLCD.fillRect(x-1, y+80, x-3, 204);
  }
  // Draws the score
  myGLCD.setColor(0, 0, 0);
  myGLCD.setBackColor(221, 216, 148);
  myGLCD.setFont(BigFont);
  myGLCD.printNumI(score, 100, 220);
}Code language: Arduino (arduino)
루프 섹션으로 돌아가면 새의 y 위치인 yB 변수가 있으며 각 반복 후에 증가하는 낙하 속도에 따라 달라지며 이러한 방식으로 가속 또는 중력의 효과를 얻습니다. 또한 여기에서 충돌을 확인하고 if 문을 사용하여 새가 상단에 부딪히면 게임이 종료되도록 새를 제한합니다.
<그림 클래스="aligncenter">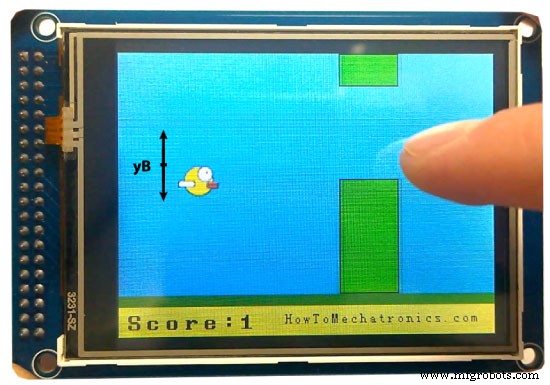
다음은 drawBird() 사용자 정의 함수이며 어떻게 작동하는지 봅시다. 새는 실제로 Henning Karlsen이 만든 ImageConverter565 도구를 사용하여 비트맵으로 변환된 사진입니다. 이 도구를 사용하여 만든 ".c" 파일은 스케치를 시작할 때 로드할 수 있도록 디렉터리에 포함되어야 합니다. 또한 이와 같이 비트맵을 정의하고 drawBitmap() 함수를 사용하여 화면에 사진을 그립니다. 새는 고정된 X 좌표와 Y 좌표로 yB 변수를 갖습니다. 기둥과 유사하게 새의 위와 아래에 두 개의 파란색 직사각형을 그려 새의 이전 상태를 지웁니다.
//====== drawBird() - Custom Function
void drawBird(int y) {
  // Draws the bird - bitmap
  myGLCD.drawBitmap (50, y, 35, 30, bird01);
  // Draws blue rectangles above and below the bird in order to clear its previus state
  myGLCD.setColor(114, 198, 206);
  myGLCD.fillRoundRect(50,y,85,y-6);
  myGLCD.fillRoundRect(50,y+30,85,y+36);
}Code language: Arduino (arduino)
루프로 돌아가서 기둥이 화면을 통과한 후 xP 변수가 319로 재설정되고 yP가 기둥 높이에 대해 20에서 100 사이의 새로운 임의 값을 얻고 점수가 1씩 증가함을 알 수 있습니다. 다음 if 문으로 새를 제어합니다. 화면을 탭하면 떨어지는 비율을 음수로 설정하여 새를 점프하게 하고 else if 문은 화면을 잡고 있기만 하면 그런 일이 발생하지 않도록 합니다. 마지막 if 문은 게임의 난이도에 대한 것으로, 각 미세 포인트 이후 기둥의 이동 속도를 증가시킵니다.
이제 남은 것은 gameOver() 사용자 정의 함수가 어떻게 작동하는지 보는 것입니다. 1초의 지연 후에 화면을 지우고 점수와 일부 텍스트를 인쇄합니다. 점수가 가장 높은 점수보다 높으면 EEPROM에 기록하고 모든 변수를 시작 위치 값으로 재설정하고 끝에 게임을 다시 시작하기 위해 initialGame() 사용자 정의 함수를 호출합니다.
<그림 클래스="aligncenter">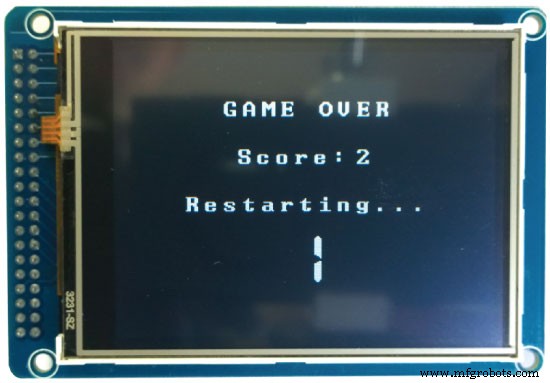
//======== gameOver() - Custom Function
void gameOver() {
  delay(1000); // 1 second
  // Clears the screen and prints the text
  myGLCD.clrScr();
  myGLCD.setColor(255, 255, 255);
  myGLCD.setBackColor(0, 0, 0);
  myGLCD.setFont(BigFont);
  myGLCD.print("GAME OVER", CENTER, 40);
  myGLCD.print("Score:", 100, 80);
  myGLCD.printNumI(score,200, 80);
  myGLCD.print("Restarting...", CENTER, 120);
  myGLCD.setFont(SevenSegNumFont);
  myGLCD.printNumI(2,CENTER, 150);
  delay(1000);
  myGLCD.printNumI(1,CENTER, 150);
  delay(1000);

  // Writes the highest score in the EEPROM
  if (score > highestScore) {
    highestScore = score;
    EEPROM.write(0,highestScore);
  }
  // Resets the variables to start position values
  xP=319;
  yB=50;
  fallRate=0;
  score = 0;
  lastSpeedUpScore = 0;
  movingRate = 3;
  gameStarted = false;
  // Restart game
  initiateGame();
}Code language: Arduino (arduino)
이것이 전부이며 코드에 대한 설명이 충분히 명확했으면 합니다. 질문이 있는 경우 아래의 댓글 섹션에 자유롭게 질문하세요.
/*  Arduino Game Proejct
 *  Program made by Dejan Nedelkovski,
 *  www.HowToMechatronics.com
 */

/*  This program uses the UTFT and URTouch libraries
 *  made by Henning Karlsen.
 *  You can find and download them at:
 *  www.RinkyDinkElectronics.com
 */

#include <UTFT.h>
#include <URTouch.h>
#include <EEPROM.h>

//==== Creating Objects
UTFT    myGLCD(SSD1289,38,39,40,41); //Parameters should be adjusted to your Display/Schield model
URTouch  myTouch( 6, 5, 4, 3, 2);

//==== Defining Fonts
extern uint8_t SmallFont[];
extern uint8_t BigFont[];
extern uint8_t SevenSegNumFont[];

extern unsigned int bird01[0x41A]; // Bird Bitmap

int x, y; // Variables for the coordinates where the display has been pressed

// Floppy Bird
int xP = 319;
int yP = 100;
int yB = 50;
int movingRate = 3;
int fallRateInt = 0;
float fallRate = 0;
int score = 0;
int lastSpeedUpScore = 0;
int highestScore;
boolean screenPressed = false;
boolean gameStarted = false;

void setup() {
  // Initiate display
  myGLCD.InitLCD();
  myGLCD.clrScr();
  myTouch.InitTouch();
  myTouch.setPrecision(PREC_MEDIUM);

  highestScore = EEPROM.read(0); // Read the highest score from the EEPROM

  initiateGame(); // Initiate the game
}

void loop() {
    xP=xP-movingRate; // xP - x coordinate of the pilars; range: 319 - (-51)
    drawPilars(xP, yP); // Draws the pillars

    // yB - y coordinate of the bird which depends on value of the fallingRate variable
    yB+=fallRateInt;
    fallRate=fallRate+0.4; // Each inetration the fall rate increase so that we can the effect of acceleration/ gravity
    fallRateInt= int(fallRate);

    // Checks for collision
    if(yB>=180 || yB<=0){ // top and bottom
      gameOver();
    }
    if((xP<=85) && (xP>=5) && (yB<=yP-2)){ // upper pillar
      gameOver();
    }
    if((xP<=85) && (xP>=5) && (yB>=yP+60)){ // lower pillar
      gameOver();
    }

    // Draws the bird
    drawBird(yB);

    // After the pillar has passed through the screen
    if (xP<=-51){
      xP=319; // Resets xP to 319
      yP = rand() % 100+20; // Random number for the pillars height
      score++; // Increase score by one
    }
    //==== Controlling the bird
    if (myTouch.dataAvailable()&& !screenPressed) {
       fallRate=-6; // Setting the fallRate negative will make the bird jump
       screenPressed = true;
    }
    // Doesn't allow holding the screen / you must tap it
    else if ( !myTouch.dataAvailable() && screenPressed){
      screenPressed = false;
    }

    // After each five points, increases the moving rate of the pillars
    if ((score - lastSpeedUpScore) == 5) {
      lastSpeedUpScore = score;
      movingRate++;
    }
}
// ===== initiateGame - Custom Function
void initiateGame() {
  myGLCD.clrScr();
  // Blue background
  myGLCD.setColor(114, 198, 206);
  myGLCD.fillRect(0,0,319,239);
  // Ground
  myGLCD.setColor(221,216,148);
  myGLCD.fillRect(0, 215, 319, 239);
  myGLCD.setColor(47,175,68);
  myGLCD.fillRect(0, 205, 319, 214);
  // Text
  myGLCD.setColor(0, 0, 0);
  myGLCD.setBackColor(221, 216, 148);
  myGLCD.setFont(BigFont);
  myGLCD.print("Score:",5,220);
  myGLCD.setFont(SmallFont);
  myGLCD.print("HowToMechatronics.com", 140, 220);
  myGLCD.setColor(0, 0, 0);
  myGLCD.setBackColor(114, 198, 206);
  myGLCD.print("Highest Score: ",5,5);
  myGLCD.printNumI(highestScore, 120, 6);
  myGLCD.print(">RESET<",255,5);
  myGLCD.drawLine(0,23,319,23);
  myGLCD.print("TAP TO START",CENTER,100);

  drawBird(yB); // Draws the bird

  // Wait until we tap the sreen
  while (!gameStarted) {
    if (myTouch.dataAvailable()) {
    myTouch.read();
    x=myTouch.getX();
    y=myTouch.getY();
    // Reset higest score
    if ((x>=250) && (x<=319) &&(y>=0) && (y<=28)) {
    highestScore = 0;
    myGLCD.setColor(114, 198, 206);
    myGLCD.fillRect(120, 0, 150, 22);
    myGLCD.setColor(0, 0, 0);
    myGLCD.printNumI(highestScore, 120, 5);
    }
    if ((x>=0) && (x<=319) &&(y>=30) && (y<=239)) {
    gameStarted = true;
    myGLCD.setColor(114, 198, 206);
    myGLCD.fillRect(0, 0, 319, 32);
    }
  }
  }
  // Clears the text "TAP TO START" before the game start
  myGLCD.setColor(114, 198, 206);
  myGLCD.fillRect(85, 100, 235, 116);

}
// ===== drawPlillars - Custom Function
void drawPilars(int x, int y) {
    if (x>=270){
      myGLCD.setColor(0, 200, 20);
      myGLCD.fillRect(318, 0, x, y-1);
      myGLCD.setColor(0, 0, 0);
      myGLCD.drawRect(319, 0, x-1, y);

      myGLCD.setColor(0, 200, 20);
      myGLCD.fillRect(318, y+81, x, 203);
      myGLCD.setColor(0, 0, 0);
      myGLCD.drawRect(319, y+80, x-1, 204);
    }
    else if( x<=268) {
      // Draws blue rectangle right of the pillar
      myGLCD.setColor(114, 198, 206);
      myGLCD.fillRect(x+51, 0, x+60, y);
      // Draws the pillar
      myGLCD.setColor(0, 200, 20);
      myGLCD.fillRect(x+49, 1, x+1, y-1);
      // Draws the black frame of the pillar
      myGLCD.setColor(0, 0, 0);
      myGLCD.drawRect(x+50, 0, x, y);
      // Draws the blue rectangle left of the pillar
      myGLCD.setColor(114, 198, 206);
      myGLCD.fillRect(x-1, 0, x-3, y);

      // The bottom pillar
      myGLCD.setColor(114, 198, 206);
      myGLCD.fillRect(x+51, y+80, x+60, 204);
      myGLCD.setColor(0, 200, 20);
      myGLCD.fillRect(x+49, y+81, x+1, 203);
      myGLCD.setColor(0, 0, 0);
      myGLCD.drawRect(x+50, y+80, x, 204);
      myGLCD.setColor(114, 198, 206);
      myGLCD.fillRect(x-1, y+80, x-3, 204);
  }
  // Draws the score
  myGLCD.setColor(0, 0, 0);
  myGLCD.setBackColor(221, 216, 148);
  myGLCD.setFont(BigFont);
  myGLCD.printNumI(score, 100, 220);
}

//====== drawBird() - Custom Function
void drawBird(int y) {
  // Draws the bird - bitmap
  myGLCD.drawBitmap (50, y, 35, 30, bird01);
  // Draws blue rectangles above and below the bird in order to clear its previus state
  myGLCD.setColor(114, 198, 206);
  myGLCD.fillRoundRect(50,y,85,y-6);
  myGLCD.fillRoundRect(50,y+30,85,y+36);
}
//======== gameOver() - Custom Function
void gameOver() {
  delay(3000); // 1 second
  // Clears the screen and prints the text
  myGLCD.clrScr();
  myGLCD.setColor(255, 255, 255);
  myGLCD.setBackColor(0, 0, 0);
  myGLCD.setFont(BigFont);
  myGLCD.print("GAME OVER", CENTER, 40);
  myGLCD.print("Score:", 100, 80);
  myGLCD.printNumI(score,200, 80);
  myGLCD.print("Restarting...", CENTER, 120);
  myGLCD.setFont(SevenSegNumFont);
  myGLCD.printNumI(2,CENTER, 150);
  delay(1000);
  myGLCD.printNumI(1,CENTER, 150);
  delay(1000);

  // Writes the highest score in the EEPROM
  if (score > highestScore) {
    highestScore = score;
    EEPROM.write(0,highestScore);
  }
  // Resets the variables to start position values
  xP=319;
  yB=50;
  fallRate=0;
  score = 0;
  lastSpeedUpScore = 0;
  movingRate = 3;
  gameStarted = false;
  // Restart game
  initiateGame();
}Code language: Arduino (arduino)
다음은 Arduino sketck, 새 이미지 및 새 비트맵 파일이 포함된 다운로드 파일입니다.
제조공정
이 Arduino 프로젝트에서는 Arduino와 TFT 터치 스크린을 사용하여 스마트폰용으로 인기 있는 Flappy Bird 게임을 실제로 복제한 멋진 Arduino 게임을 만들 것입니다. 다음 동영상을 보거나 아래에 작성된 텍스트를 읽으면 작동 방식을 배울 수 있습니다. 개요 게임은 매우 간단하지만 흥미롭고 중독성이 있습니다. 터치 스크린을 사용하여 우리는 새를 제어하고 우리가 진행함에 따라 속도가 증가하는 움직이는 기둥을 피하려고 노력합니다. 또한 게임은 전원을 뽑더라도 최고 점수를 저장할 수 있습니다.[/column]
이 Arduino 자습서에서는 Arduino 보드와 처리 개발 환경을 사용하여 이 멋진 레이더를 만드는 방법을 보여 드리겠습니다. 자세한 내용은 다음 동영상을 보거나 아래에 작성된 튜토리얼을 참조하세요. 개요 이 Arduino 프로젝트에 필요한 것은 물체를 감지하기 위한 초음파 센서, 센서를 회전시키기 위한 작은 취미 생활자 서보 모터 및 이를 제어하기 위한 Arduino 보드뿐입니다. 다음 동영상을 보거나 아래에 작성된 튜토리얼을 읽을 수 있습니다.[/column] 이 Arduino 프로젝트에 필요한 구성요소 다음 사이트에서