

python

산업 제조
파이 테스트 사용자가 Python 프로그래밍 언어를 사용하여 테스트 코드를 작성할 수 있는 테스트 프레임워크입니다. 데이터베이스, API 또는 UI에 대한 간단하고 확장 가능한 테스트 케이스를 작성하는 데 도움이 됩니다. PyTest는 주로 API 테스트를 작성하는 데 사용됩니다. 간단한 단위 테스트에서 복잡한 기능 테스트까지 테스트를 작성하는 데 도움이 됩니다.
pytest의 장점 중 일부는 다음과 같습니다.
이 Python PyTest 자습서에서는 다음을 배우게 됩니다.
다음은 PyTest를 설치하는 방법에 대한 프로세스입니다.
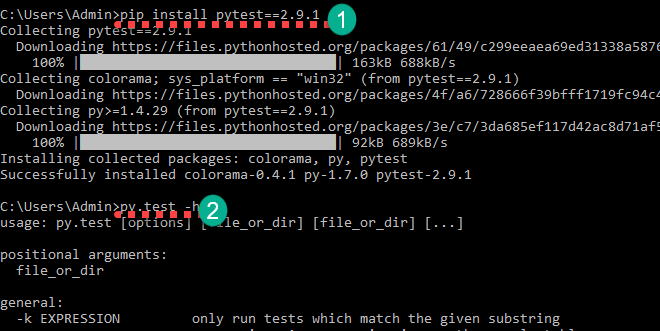
1단계) pytest는 다음과 같이 설치할 수 있습니다.
pip install pytest==2.9.1
설치가 완료되면 다음을 통해 확인할 수 있습니다.
py.test -h
도움말이 표시됩니다.
이제 기본 PyTest 예제와 함께 Pytest를 사용하는 방법을 배웁니다.
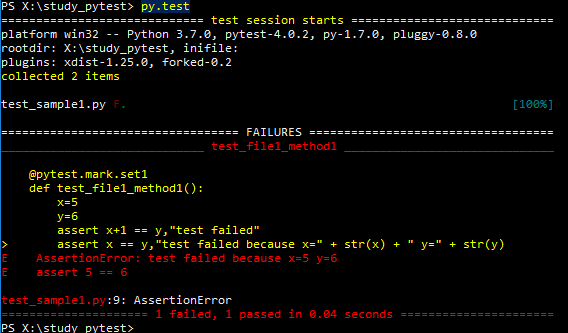
study_pytest 폴더를 만듭니다. 이 폴더 안에 테스트 파일을 만들 것입니다.
명령줄에서 해당 폴더로 이동하십시오.
폴더 안에 test_sample1.py라는 파일을 만드십시오.
아래 코드를 추가하고 저장하십시오.
import pytest
def test_file1_method1():
	x=5
	y=6
	assert x+1 == y,"test failed"
	assert x == y,"test failed"
def test_file1_method2():
	x=5
	y=6
	assert x+1 == y,"test failed"
명령을 사용하여 테스트 실행
py.test
다음과 같이 출력됩니다.
test_sample1.py F.
============================================== FAILURES ========================================
____________________________________________ test_sample1 ______________________________________
    def test_file1_method1():
    	x=5
    	y=6
       	assert x+1 == y,"test failed"
>      	assert x == y,"test failed"
E       AssertionError: test failed
E       assert 5 == 6
test_sample1.py:6: AssertionError
여기 test_sample1.py F.
F는 실패라고 말합니다.
점(.)은 성공을 나타냅니다.
실패 섹션에서 실패한 메소드와 실패 라인을 볼 수 있습니다. 여기서 x==y는 5==6을 의미하며 이는 거짓입니다.
다음 PyTest 튜토리얼에서는 PyTest의 assertion에 대해 알아보겠습니다.
Pytest 주장은 True 또는 False 상태를 반환하는 검사입니다. Python Pytest에서 테스트 메서드에서 어설션이 실패하면 해당 메서드 실행이 그곳에서 중지됩니다. 해당 테스트 메소드의 나머지 코드는 실행되지 않으며 Pytest 주장은 다음 테스트 메소드에서 계속됩니다.
Pytest Assert의 예:
assert "hello" == "Hai" is an assertion failure.
assert 4==4 is a successful assertion
assert True is a successful assertion
assert False is an assertion failure.
고려
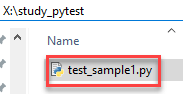
assert x == y,"test failed because x=" + str(x) + " y=" + str(y)
이 코드를 어설션 대신 test_file1_method1()에 배치합니다.
assert x == y,"test failed"
테스트를 실행하면 AssertionError:test failed x=5 y=6으로 실패합니다.
기본적으로 pytest는 test_로 시작하는 파일 이름만 식별합니다. 또는 _test로 끝나는 테스트 파일로. 하지만 다른 파일 이름을 명시적으로 언급할 수 있습니다(나중에 설명). Pytest는 테스트 메소드 이름이 “test로 시작해야 합니다. .” 다른 모든 메서드 이름은 명시적으로 해당 메서드를 실행하도록 요청하더라도 무시됩니다.
유효하거나 유효하지 않은 pytest 파일 이름의 몇 가지 예를 참조하십시오.
test_login.py - valid
login_test.py - valid
testlogin.py -invalid
logintest.py -invalid
참고:예, 명시적으로 pytest에 testlogin.py 및 logintest.py를 선택하도록 요청할 수 있습니다.
유효하고 유효하지 않은 pytest 테스트 방법의 몇 가지 예를 참조하십시오.
def test_file1_method1(): - valid
def testfile1_method1(): - valid
def file1_method1(): - invalid
참고:file1_method1()을 명시적으로 언급하더라도 pytest는 이 메서드를 실행하지 않습니다.
현재 study_pytest 폴더 안에 test_sample1.py 파일이 있습니다. test_sample2.py , test_sample3.py 와 같이 여러 파일이 있다고 가정합니다. 폴더와 하위 폴더의 모든 파일에서 모든 테스트를 실행하려면 pytest 명령을 실행하기만 하면 됩니다.
py.test
그러면 test_로 시작하는 모든 파일 이름과 _test로 끝나는 파일 이름이 해당 폴더와 해당 폴더 아래의 하위 폴더에서 실행됩니다.
특정 파일에서만 테스트를 실행하려면 py.test
py.test test_sample1.py
때때로 우리는 전체 테스트 스위트를 실행하고 싶지 않습니다. Pytest를 사용하면 특정 테스트를 실행할 수 있습니다. 2가지 방법으로 할 수 있습니다.
이미 test_sample1.py가 있습니다. test_sample2.py 파일을 만들고 아래 코드를 추가하세요.
def test_file2_method1():
	x=5
	y=6
	assert x+1 == y,"test failed"
	assert x == y,"test failed because x=" + str(x) + " y=" + str(y)
def test_file2_method2():
	x=5
	y=6
	assert x+1 == y,"test failed"
그래서 우리는 현재
옵션 1) 하위 문자열 일치로 테스트 실행
여기에서 이름에 method1이 있는 모든 테스트를 실행하려면 실행해야 합니다.
py.test -k method1 -v
-k <expression> is used to represent the substring to match
-v increases the verbosity
따라서 py.test -k method1 -v를 실행하면 다음 결과가 표시됩니다.
test_sample2.py::test_file2_method1 FAILED
test_sample1.py::test_file1_method1 FAILED

============================================== FAILURES ==============================================
_________________________________________ test_file2_method1 _________________________________________
    def test_file2_method1():
    	x=5
    	y=6
       	assert x+1 == y,"test failed"
>      	assert x == y,"test failed because x=" + str(x) + " y=" + str(y)
E       AssertionError: test failed because x=5 y=6
E       assert 5 == 6
test_sample2.py:5: AssertionError

_________________________________________ test_file1_method1 _________________________________________
    @pytest.mark.only
    def test_file1_method1():
    	x=5
    	y=6
       	assert x+1 == y,"test failed"
>      	assert x == y,"test failed because x=" + str(x) + " y=" + str(y)
E       AssertionError: test failed because x=5 y=6
E       assert 5 == 6
test_sample1.py:8: AssertionError

================================= 2 tests deselected by '-kmethod1' ==================================
=============================== 2 failed, 2 deselected in 0.02 seconds ===============================
여기에서 '-kmethod1'에 의해 선택 해제된 2개의 테스트 를 볼 수 있습니다. test_file1_method2 및 test_file2_method2
다음과 같은 다양한 조합으로 실행해 보세요.-
py.test -k method -v - will run all the four methods
py.test -k methods -v – will not run any test as there is no test name matches the substring 'methods'
옵션 2) 마커로 테스트 실행
Pytest를 사용하면 pytest 마커 @pytest.mark를 사용하여 테스트 방법에 대한 다양한 속성을 설정할 수 있습니다. 테스트 파일에서 마커를 사용하려면 테스트 파일에서 pytest를 가져와야 합니다.
여기에서는 테스트 방법에 다른 마커 이름을 적용하고 마커 이름을 기반으로 특정 테스트를 실행합니다.
를 사용하여 각 테스트 이름에 마커를 정의할 수 있습니다.@pytest.mark.<name>.
테스트 메소드에 마커 set1 및 set2를 정의하고 있으며 마커 이름을 사용하여 테스트를 실행할 것입니다. 다음 코드로 테스트 파일 업데이트
test_sample1.py
import pytest
@pytest.mark.set1
def test_file1_method1():
	x=5
	y=6
	assert x+1 == y,"test failed"
	assert x == y,"test failed because x=" + str(x) + " y=" + str(y)

@pytest.mark.set2
def test_file1_method2():
	x=5
	y=6
	assert x+1 == y,"test failed"
test_sample2.py
import pytest
@pytest.mark.set1
def test_file2_method1():
	x=5
	y=6
	assert x+1 == y,"test failed"
	assert x == y,"test failed because x=" + str(x) + " y=" + str(y)

@pytest.mark.set1
def test_file2_method2():
	x=5
	y=6
	assert x+1 == y,"test failed"
표시된 테스트를 실행할 수 있습니다.
py.test -m <name>
-m <name> mentions the marker name
py.test -m set1을 실행합니다. 이렇게 하면 test_file1_method1, test_file2_method1, test_file2_method2 메서드가 실행됩니다.
py.test -m set2를 실행하면 test_file1_method2가 실행됩니다.
일반적으로 테스트 스위트에는 실행하는 데 상당한 시간이 소요되는 여러 테스트 파일과 수백 개의 테스트 메서드가 있습니다. Pytest를 사용하면 테스트를 병렬로 실행할 수 있습니다.
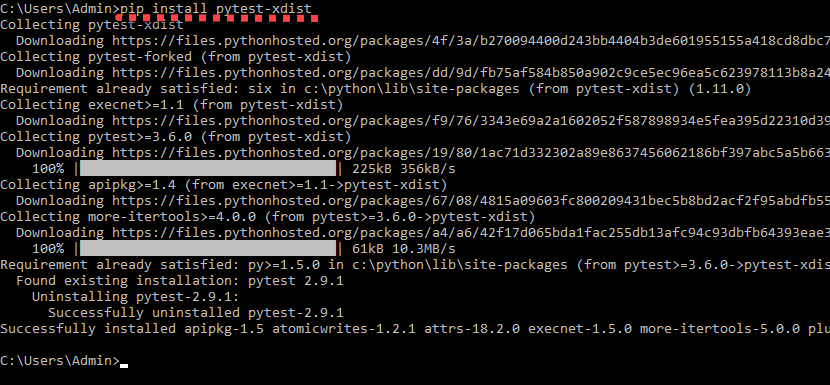
이를 위해 먼저 pytest-xdist를 실행하여 설치해야 합니다.
pip install pytest-xdist
지금 테스트를 실행할 수 있습니다.
py.test -n 4
-n
모든 테스트 방법 전에 일부 코드를 실행하려는 경우 Fixture가 사용됩니다. 따라서 모든 테스트에서 동일한 코드를 반복하는 대신 고정 장치를 정의합니다. 일반적으로 조명기는 데이터베이스 연결을 초기화하고 기본을 전달하는 데 사용됩니다.
메소드는
로 표시하여 Pytest 고정 장치로 표시됩니다.@pytest.fixture
테스트 방법은 픽스처를 입력 매개변수로 언급하여 Pytest 픽스처를 사용할 수 있습니다.
다음 코드를 사용하여 새 파일 test_basic_fixture.py를 만듭니다.
import pytest
@pytest.fixture
def supply_AA_BB_CC():
	aa=25
	bb =35
	cc=45
	return [aa,bb,cc]

def test_comparewithAA(supply_AA_BB_CC):
	zz=35
	assert supply_AA_BB_CC[0]==zz,"aa and zz comparison failed"

def test_comparewithBB(supply_AA_BB_CC):
	zz=35
	assert supply_AA_BB_CC[1]==zz,"bb and zz comparison failed"

def test_comparewithCC(supply_AA_BB_CC):
	zz=35
	assert supply_AA_BB_CC[2]==zz,"cc and zz comparison failed"
여기
각 테스트 함수에는 사용 가능한 고정 장치와 이름이 일치하는 입력 인수가 있습니다. 그런 다음 Pytest는 해당 조명기 메서드를 호출하고 반환된 값은 입력 인수에 저장됩니다. 여기에서는 [25,35,45] 목록이 표시됩니다. 이제 목록 항목은 비교를 위한 테스트 방법에서 사용됩니다.
이제 테스트를 실행하고 결과를 확인하십시오.
py.test test_basic_fixture
test_basic_fixture.py::test_comparewithAA FAILED
test_basic_fixture.py::test_comparewithBB PASSED
test_basic_fixture.py::test_comparewithCC FAILED

============================================== FAILURES ==============================================
_________________________________________ test_comparewithAA _________________________________________
supply_AA_BB_CC = [25, 35, 45]
    def test_comparewithAA(supply_AA_BB_CC):
    	zz=35
>   	assert supply_AA_BB_CC[0]==zz,"aa and zz comparison failed"
E    AssertionError: aa and zz comparison failed
E    assert 25 == 35
test_basic_fixture.py:10: AssertionError

_________________________________________ test_comparewithCC _________________________________________
supply_AA_BB_CC = [25, 35, 45]
    def test_comparewithCC(supply_AA_BB_CC):
    	zz=35
>   	assert supply_AA_BB_CC[2]==zz,"cc and zz comparison failed"
E    AssertionError: cc and zz comparison failed
E    assert 45 == 35
test_basic_fixture.py:16: AssertionError
================================= 2 failed, 1 passed in 0.05 seconds =================================
test_comparewithBB 테스트는 zz=BB=35 이후에 통과했으며 나머지 2개 테스트는 실패했습니다.
Fixture 메서드는 정의된 테스트 파일 내에서만 범위를 갖습니다. 다른 테스트 파일의 고정 장치에 액세스하려고 하면 고정 장치 'supply_AA_BB_CC'를 찾을 수 없음 이라는 오류가 발생합니다. 다른 파일의 테스트 방법에 대해.
여러 테스트 파일에 대해 동일한 픽스처를 사용하기 위해 conftest.py라는 파일에 픽스처 메서드를 생성합니다.
아래 PyTest 예제를 통해 이를 살펴보겠습니다. 다음 코드로 conftest.py, test_basic_fixture.py, test_basic_fixture2.py 3개 파일을 만듭니다.
conftest.py
import pytest
@pytest.fixture
def supply_AA_BB_CC():
	aa=25
	bb =35
	cc=45
	return [aa,bb,cc]
test_basic_fixture.py
import pytest
def test_comparewithAA(supply_AA_BB_CC):
	zz=35
	assert supply_AA_BB_CC[0]==zz,"aa and zz comparison failed"

def test_comparewithBB(supply_AA_BB_CC):
	zz=35
	assert supply_AA_BB_CC[1]==zz,"bb and zz comparison failed"

def test_comparewithCC(supply_AA_BB_CC):
	zz=35
	assert supply_AA_BB_CC[2]==zz,"cc and zz comparison failed"
test_basic_fixture2.py
import pytest
def test_comparewithAA_file2(supply_AA_BB_CC):
	zz=25
	assert supply_AA_BB_CC[0]==zz,"aa and zz comparison failed"

def test_comparewithBB_file2(supply_AA_BB_CC):
	zz=25
	assert supply_AA_BB_CC[1]==zz,"bb and zz comparison failed"

def test_comparewithCC_file2(supply_AA_BB_CC):
	zz=25
	assert supply_AA_BB_CC[2]==zz,"cc and zz comparison failed"
pytest는 먼저 테스트 파일에서 조명기를 찾고 찾지 못하면 conftest.py에서 찾습니다.
py.test -k test_comparewith -v로 테스트를 실행하여 아래와 같은 결과를 얻습니다.
test_basic_fixture.py::test_comparewithAA FAILED
test_basic_fixture.py::test_comparewithBB PASSED
test_basic_fixture.py::test_comparewithCC FAILED
test_basic_fixture2.py::test_comparewithAA_file2 PASSED
test_basic_fixture2.py::test_comparewithBB_file2 FAILED
test_basic_fixture2.py::test_comparewithCC_file2 FAILED
테스트 매개변수화의 목적은 여러 인수 집합에 대해 테스트를 실행하는 것입니다. @pytest.mark.parametrize를 통해 이 작업을 수행할 수 있습니다.
아래 PyTest 예제에서 이를 확인할 수 있습니다. 여기서 우리는 테스트 메소드에 3개의 인수를 전달할 것입니다. 이 테스트 방법은 처음 2개의 인수를 추가하고 세 번째 인수와 비교합니다.
아래 코드로 test_addition.py 테스트 파일 생성
import pytest
@pytest.mark.parametrize("input1, input2, output",[(5,5,10),(3,5,12)])
def test_add(input1, input2, output):
	assert input1+input2 == output,"failed"
여기에서 테스트 메소드는 3개의 인수인 input1, input2, output을 받습니다. input1과 input2를 추가하고 출력과 비교합니다.
py.test -k test_add -v로 테스트를 실행하고 결과를 확인합시다.
test_addition.py::test_add[5-5-10] PASSED
test_addition.py::test_add[3-5-12] FAILED
============================================== FAILURES ==============================================
__________________________________________ test_add[3-5-12] __________________________________________
input1 = 3, input2 = 5, output = 12
    @pytest.mark.parametrize("input1, input2, output",[(5,5,10),(3,5,12)])
    def test_add(input1, input2, output):
>   	assert input1+input2 == output,"failed"
E    AssertionError: failed
E    assert (3 + 5) == 12
test_addition.py:5: AssertionError
테스트가 2번 실행된 것을 볼 수 있습니다. 하나는 5+5 ==10이고 다른 하나는 3+5 ==12입니다.
test_addition.py::test_add[5-5-10] 합격
test_addition.py::test_add[3-5-12] 실패
테스트를 실행하고 싶지 않거나 테스트 케이스가 특정 시간과 관련이 없는 상황이 있을 것입니다. 이러한 상황에서 테스트를 Xfail하거나 테스트를 건너뛸 수 있는 옵션이 있습니다.
xfailed 테스트가 실행되지만 부분적으로 실패하거나 통과한 테스트로 계산되지 않습니다. 해당 테스트가 실패하면 트레이스백이 표시되지 않습니다.
를 사용하여 테스트를 실패할 수 있습니다.@pytest.mark.xfail.
테스트를 건너뛰면 테스트가 실행되지 않습니다.
를 사용하여 테스트를 건너뛸 수 있습니다.@pytest.mark.skip.
아래 코드로 test_addition.py를 수정하세요.
import pytest
@pytest.mark.skip
def test_add_1():
	assert 100+200 == 400,"failed"

@pytest.mark.skip
def test_add_2():
	assert 100+200 == 300,"failed"

@pytest.mark.xfail
def test_add_3():
	assert 15+13 == 28,"failed"

@pytest.mark.xfail
def test_add_4():
	assert 15+13 == 100,"failed"

def test_add_5():
	assert 3+2 == 5,"failed"

def test_add_6():
	assert 3+2 == 6,"failed"
여기
py.test test_addition.py -v로 테스트를 실행하고 결과를 확인하십시오.
test_addition.py::test_add_1 SKIPPED
test_addition.py::test_add_2 SKIPPED
test_addition.py::test_add_3 XPASS
test_addition.py::test_add_4 xfail
test_addition.py::test_add_5 PASSED
test_addition.py::test_add_6 FAILED

============================================== FAILURES ==============================================
_____________________________________________ test_add_6 _____________________________________________
    def test_add_6():
>   	assert 3+2 == 6,"failed"
E    AssertionError: failed
E    assert (3 + 2) == 6
test_addition.py:24: AssertionError

================ 1 failed, 1 passed, 2 skipped, 1 xfailed, 1 xpassed in 0.07 seconds =================
추가 처리 등을 위해 지속적 통합 서버에 제공할 수 있는 XML 형식의 테스트 결과를 생성할 수 있습니다. 이 작업은
에 의해 수행될 수 있습니다.py.test test_sample1.py -v –junitxml=”result.xml”
result.xml은 테스트 실행 결과를 기록합니다. 아래에서 샘플 result.xml 찾기
<?xml version="1.0" encoding="UTF-8"?>
<testsuite errors="0" failures="1" name="pytest" skips="0" tests="2" time="0.046">
   <testcase classname="test_sample1" file="test_sample1.py" line="3" name="test_file1_method1" time="0.001384973526">
     <failure message="AssertionError:test failed because x=5 y=6 assert 5 ==6">
    @pytest.mark.set1
    def test_file1_method1():
    	x=5
    	y=6
       	assert x+1 == y,"test failed"
>      	assert x == y,"test failed because x=" + str(x) + " y=" + str(y)
E       AssertionError: test failed because x=5 y=6
E       assert 5 == 6
         test_sample1.py:9: AssertionError
    </failure>
   </testcase>
   <testcase classname="test_sample1" file="test_sample1.py" line="10" name="test_file1_method2" time="0.000830173492432" />
</testsuite>
이제 API를 테스트하기 위해 작은 pytest 프레임워크를 만들 것입니다. 여기에 사용된 API는 https://reqres.in/에서 무료로 제공되는 API입니다. 이 웹사이트는 테스트 가능한 API를 제공하기 위한 것입니다. 이 웹사이트는 데이터를 저장하지 않습니다.
여기에서 몇 가지 테스트를 작성할 것입니다.
주어진 코드로 아래 파일 생성
conftest.py – 모든 테스트 방법에 대한 기본 URL을 제공하는 고정 장치가 있습니다.
import pytest
@pytest.fixture
def supply_url():
	return "https://reqres.in/api"
test_list_user.py – 유효하고 무효한 사용자를 나열하기 위한 테스트 방법이 포함되어 있습니다.
import pytest
import requests
import json
@pytest.mark.parametrize("userid, firstname",[(1,"George"),(2,"Janet")])
def test_list_valid_user(supply_url,userid,firstname):
	url = supply_url + "/users/" + str(userid)
	resp = requests.get(url)
	j = json.loads(resp.text)
	assert resp.status_code == 200, resp.text
	assert j['data']['id'] == userid, resp.text
	assert j['data']['first_name'] == firstname, resp.text

def test_list_invaliduser(supply_url):
	url = supply_url + "/users/50"
	resp = requests.get(url)
	assert resp.status_code == 404, resp.text
test_login_user.py – 로그인 기능을 테스트하기 위한 테스트 방법이 포함되어 있습니다.
import pytest
import requests
import json
def test_login_valid(supply_url):
	url = supply_url + "/login/"
	data = {'email':'test@test.com','password':'something'}
	resp = requests.post(url, data=data)
	j = json.loads(resp.text)
	assert resp.status_code == 200, resp.text
	assert j['token'] == "QpwL5tke4Pnpja7X", resp.text

def test_login_no_password(supply_url):
	url = supply_url + "/login/"
	data = {'email':'test@test.com'}
	resp = requests.post(url, data=data)
	j = json.loads(resp.text)
	assert resp.status_code == 400, resp.text
	assert j['error'] == "Missing password", resp.text

def test_login_no_email(supply_url):
	url = supply_url + "/login/"
	data = {}
	resp = requests.post(url, data=data)
	j = json.loads(resp.text)
	assert resp.status_code == 400, resp.text
	assert j['error'] == "Missing email or username", resp.text
py.test -v
를 사용하여 테스트 실행결과 보기
test_list_user.py::test_list_valid_user[1-George] PASSED
test_list_user.py::test_list_valid_user[2-Janet] PASSED
test_list_user.py::test_list_invaliduser PASSED
test_login_user.py::test_login_valid PASSED
test_login_user.py::test_login_no_password PASSED
test_login_user.py::test_login_no_email PASSED
테스트 업데이트 및 다양한 출력 시도
이 PyTest 튜토리얼에서 다뤘습니다.
python
megohmmeter 또는 megger는 더 일반적으로 알려져 있으며 300볼트에서 15,000볼트 사이의 DC(직류) 전압을 생성하여 극도로 높은 저항을 테스트하도록 설계된 전기 테스트 장비입니다. 저항계는 전기 모터 권선 또는 케이블 절연 테스트에서 일반적으로 발생하는 테스트 저항을 허용하는 고전압, 저전류 DC 전하를 생성합니다. 저항계는 배터리로 작동되는 내부 회로 또는 수동으로 작동되는 발전기를 통해 이 고전압을 생성합니다. 일반 저항계로 전기 장비, 기계 또는 설비의 권선, 접지 또는 절연 저항을 테스트하는 것은 이러
수년 동안 구리 튜브와 피팅을 연결하는 가장 일반적인 두 가지 방법은 납땜과 납땜이었습니다. 이러한 검증된 방법은 여러 면에서 유사하지만 이들을 구별하는 몇 가지 뚜렷한 차이점도 있습니다. 이 백서에서는 가장 바람직한 결합 방법을 결정하는 데 도움이 되도록 두 결합 프로세스 간의 유사점과 차이점을 설명합니다. 구리 납땜이란 무엇입니까 ? 구리 튜브를 연결하는 가장 일반적인 방법은 소켓 유형, 구리 또는 구리 합금 피팅을 사용하는 것입니다. 여기에 튜브 섹션이 삽입되고 솔더링 또는 브레이징 공정을 사용하여 용가재로 고정됩니다.