이 프로젝트 정보
최신 업데이트 11월 2021년
이 프로젝트는 엔터테인먼트로 시작하여 본격적인 장비가 되었습니다.
컨트롤러는 두 개의 회전식 인코더(방위각 및 고도)를 통해 안테나를 수동으로 배치할 수 있습니다. 위성 추적 소프트웨어를 실행하는 PC에 USB로 연결하면 자동으로 위성을 추적할 수 있습니다.
EasyComm2 프로토콜/9600 보드를 사용하는 모든 추적 소프트웨어와 호환됩니다. PstRotator, WXtrack, HRD, MacDoppler... WXtoIMG도 회전자를 제어할 수 있습니다.
http://tripsintech.com/orbitron-dde-azimuth-elevation-to-serial/
의 DDE 플러그인을 사용하여 Orbitron과 직접 작동합니다.
컨트롤러는 추적 소프트웨어가 화면에 실제 안테나 위치를 표시할 수 있도록 직렬로 응답을 출력합니다. 지금까지는 PstRotator만이 그렇게 했습니다.
코드는 어떤 라이브러리(LCD 제외)도 사용하지 않으며 아래 전기 다이어그램에 따라 핀이 있는 그대로 정확하게 실행됩니다. 방위각 인코더의 버튼을 누르면 모든 안테나의 움직임이 즉시 멈추고 방위각 명령은 10deg로 설정할 수 있습니다. 단계.
여기에서 DC 모터용 버전과 AC 모터용 버전(릴레이만)의 두 가지 버전을 찾을 수 있습니다. 후자는 기존 상용 안테나 회전자와 인터페이스할 수 있습니다.
DC 모터 버전은 더 부드럽고 부드러운 안테나 움직임을 위해 PWM을 사용하는 이점이 있습니다. 각도 오차에 비례하는 전력 응답을 출력합니다(Target<->Antenna). 따라서 안테나가 움직이기 시작하면 점진적으로 가속하고 원하는 위치에 가까워지면 완전히 멈출 때까지 속도를 줄입니다. 이를 소프트 스타트/소프트 스톱이라고 합니다. . 조정 가능한 데드 존이 있어 안테나가 약간의 목표 오프셋에도 움직이지 않습니다.

베타가 있습니다. Soft-Start / Soft-Stop 버전 AC 모터의 경우 이 AC-Dimmer 모듈을 활용하지만 지금은 방위각에서만 작동합니다. 사용해 보고 싶으시면 이메일로 알려주세요.
당신이 180deg. 고도 시스템, 당신은 좋습니다, 나에게 이메일을 제공합니다. 0.1deg 버전도 있습니다. 정밀도는 높지만, 당신이 완전히 견고한 전위차계 판독값과 편집증적 컨트롤러 구성 설계가 없는 한 권장하지 않습니다. 내 웹 페이지에서 더 많은 버전을 찾을 수 있습니다.
공사를 마친 후에는 교정 절차를 적용해야 합니다. .
<울> 전위차계 교정 필수이며 0-359deg의 정확한 판독을 보장합니다. / 0-90도, 어떤 종류의 전위차계를 사용하든 상관없습니다.
<울> 모터 보정 Soft-Start-Stop 조정 전용입니다. 특징. 기본 설정이 마음에 들지 않는 경우 필요합니다.
영상에 더 자세한 설명이 있습니다. 시간이 지남에 따라 코드가 개선되었고 비디오를 더 이상 업데이트할 수 없기 때문에 이 컨트롤러와 함께 생활하는 최신 정보와 개인적인 경험에 대해서는 내 웹 페이지를 확인하십시오. https://racov.ro/index.php/2020/12/09/arduino-based-antenna-rotator-part3-software-tracking-update/
이 플랫폼은 새로운 의견을 알려주지 않습니다. 이유를 모르기 때문에 더 알고 싶다면 저에게 이메일을 주십시오. 작은 문제는 최선을 다해 해결해 드리겠습니다. [email protected]
이 프로젝트를 보다 안정적으로 만들 수 있도록 피드백을 보내주신 모든 분들께 진심으로 감사드립니다. 모든 피드백을 높이 평가합니다.
<섹션 클래스="섹션 컨테이너 섹션 축소 가능" id="코드"> 코드
<울> ant-rot-DC-nov2021
ant-rot-AC-aug2021
전위차계 교정 절차
모터 보정 절차
ant-rot-DC-nov2021Arduino
이 코드는 DC 모터용이며 소프트 스타트-스톱 PWM 출력<사전>/* Arduino용 AZ/EL 안테나 회전자 컨트롤러 - DC 모터 * ==========================================================컴퓨터용 EasyComm 프로토콜 사용 - 추적 소프트웨어 * 수동 명령 2개의 로터리 인코더 AZ - EL * * Viorel Racoviteannu * https://www.youtube.com/channel/UCiRLZX0bV9rS04BGAyUf-fA * https://racov.ro * [email protected] * * 이 코드의 오용 * 또는 이 코드를 사용하여 발생할 수 있는 모든 종류의 손상. * * 2020년 12월 v2 - 직렬 통신 안정성 개선 * 2021년 1월 - 안테나가 움직이지 않는 대상 근처 데드존 개선 * 2021년 4월 - 직렬 통신 안정성 개선 * 2021년 6월 - 움직임 추적을 위한 오류 비례 전력. Real Soft-Stop * 2021년 8월 - 더 빠른 USB 업데이트, Az/El 방향 콜드 스위칭, 코드의 작은 최적화 * 2021년 11월 - Soft-Start의 비밀을 깨뜨렸습니다. 어렵지 않았어요. 거기에 있습니다 */ #include // I2C 통신용 라이브러리#include // LCD용 라이브러리// 배선:SDA 핀은 A4에 연결되고 SCL 핀은 A5.// 연결 I2C를 통해 LCD로, 기본 주소 0x27(A0-A2는 점퍼되지 않음)LiquidCrystal_I2C lcd(0x27, 16, 2); // address, chars, rows.// 위/아래 화살표 바이트에 대한 사용자 정의 기호 선언 DownArrow[8] ={ B00000, B00100, B00100, B00100, B10101, B01110, B00100, B00000}; 바이트 위쪽 화살표[8] ={ B00000, B00100, B01110, B10101, B00100, B00100, B00100, B00000};/**************************** **********여기에서 안테나 움직임을 실제로 조정할 수 있습니다.*****************/// 안테나 전위차계 CALIBRATION int AzMin =1; // 전위차계 시작 int AzMax =1023; // 전위차계의 끝 int ElMin =1; int ElMax =1023; // 안테나가 움직이지 않는 허용 오류 int AzErr =8; int ElErr =4;// 소프트 스톱이 시작되는 각도 차이 int Amax =25; // 방위각 정수 Emax =15; //고도// 모터의 최소 및 최대 출력, 퍼센트; 정수 PwAzMin =30; //모터가 부하에서 멈추고 시작하지 않는 최소 전력 int PwAzMax =100; //가장 빠른 속도를 위한 최대 전력 int PwElMin =30; 정수 PwElMax =100; 정수 PwAz =0; //모터에 전달할 계산된 전력(퍼센트); 정수 PwEl =0;/******************************************** ************************************************** *****/// 인코더 변수 enum AzPinAssignments { AzEncoderPinA =2, // 오른쪽 Az 인코더 AzEncoderPinB =3, // 인코더 왼쪽 AzClearButton =4, // 인코더 푸시 ElEncoderPinA =6, // 엘 인코더 오른쪽 ElEncoderPinB =5 }; // 인코더 왼쪽 // 인터럽트 서비스 루틴 vars unsigned int lastReportedPos =1; // 변경 관리 정적 부울 회전 =false; // 디바운스 관리 부울 A_set =false; 부울 B_set =거짓; int 상태; int LastState; // 다른 변수 int AzPotPin =A0; // azim의 입력 핀을 선택합니다. 전위차계 int AzRotPin =12; // 회전 방향에 대한 출력 핀 선택 int AzPWMPin =11; // 방위각 PWM 명령을 위한 출력 핀 선택 int TruAzim =0; // 계산된 실제 방위각 값 int Comazim =0; // 명령된 방위각 값 int OldTruAzim =0; // 이전 방위각 값을 저장하기 위해 int OldComAzim =0; char AzDir; // azim rot 표시를 위한 기호 int AzEncBut =1; // 인코더 푸시 버튼으로 토글할 변수 int ElPotPin =A1; // elev의 입력 핀을 선택합니다. 전위차계 int ElRotPin =13; // 고도 회전 방향에 대한 출력 핀을 선택합니다. int ElPWMPin =10; // 고도 회전 PWM 명령을 위한 출력 핀 선택 int TruElev =0; // 계산된 실제 고도 값 int ComElev =0; // 명령된 고도 값 int OldTruElev =0; // 이전 고도 값을 저장하기 위해 int OldComElev =0; char ElDir; // elev 기호. rot display // AZ, EL 허용오차에 대한 플래그 bool AzStop =false; 부울 ElStop =거짓; 정수 ElUp =1; // 1 - 고도 Dn, 0 - 고도 STOP, 2 - 고도 상승 int StaAzim =0; // 모터의 시작 방위각 Soft-Start int PwAzStop =0; // 소프트 스톱에 대해 계산된 PWM(퍼센트) int PwAzStar =0; // 소프트 스타트에 대해 계산된 PWM(퍼센트) int StaElev =0; // 모터의 시작 고도 각도 Soft-Start int PwElStop =0; // 소프트 스톱에 대해 계산된 PWM(퍼센트) int PwElStar =0; // 소프트 스타트를 위해 계산된 PWM(퍼센트) // 루프 평균화 const int numReadings =25; 정수 읽기 인덱스 =0; // 현재 판독값의 인덱스 int azimuth[numReadings]; // 아날로그 입력의 판독값 int 고도[numReadings]; int totalAz =0; // 실행 총계 int totalEl =0;// 직렬 통신용 변수 String Azimuth =""; 문자열 표고 =""; 문자열 ComputerRead; 문자열 ComputerWrite; 부울 AZser =거짓; 부울 ELser =거짓; bool ANTser =false;/*************** 종료 변수 선언 ************/void setup() { Serial.begin(9600); Serial.setTimeout(50); // USB sata를 기다리는 밀리초. 기본값 1000// LCD 시작 // lcd.begin(16,2); //화살표가 제대로 표시되지 않으면 이것을 선택하십시오. lcd.init(); lcd.backlight();// 표시 이름 및 버전에 쓰기 lcd.setCursor(0, 0); // 첫 번째 열의 첫 번째 행에 커서를 설정합니다.(카운트는 0부터 시작합니다!) lcd.print("EasyCom AntRotor"); // "..." 표시 lcd.setCursor(0, 1); // 첫 번째 열에 커서를 두 번째 행으로 설정 lcd.print("*Racov* Nov.2021");//위/아래 화살표에 대한 사용자 지정 기호 만들기 lcd.createChar(1, DownArrow); lcd.createChar(2, 위쪽 화살표); // 핀 선언 pinMode(AzRotPin, OUTPUT); //아짐 선언. 회전 방향 핀 OUTPUT pinMode(AzPWMPin, OUTPUT); // 방위각 PWM 명령 핀을 OUTPUT pinMode(ElRotPin, OUTPUT)로 선언; //elev 선언. 회전 방향 핀 OUTPUT pinMode(ElPWMPin, OUTPUT); 핀모드(AzPotPin, INPUT); 핀모드(엘팟핀, 입력); 핀모드(AzEncoderPinA, INPUT); 핀모드(AzEncoderPinB, INPUT); 핀모드(AzClearButton, 입력); 핀모드(ElEncoderPinA, INPUT); pinMode(ElEncoderPinB, INPUT);// 인터럽트 0의 AzEncoder 핀(핀 A) attachInterrupt(0, doEncoderA, CHANGE);// 인터럽트 1의 AzEncoder 핀(핀 B) attachInterrupt(1, doEncoderB, CHANGE);// 읽기 ElEncoderPinA의 초기 상태 aLastState =digitalRead(ElEncoderPinA);/* 평균화 루프의 초기화 */ TruAzim =(map(analogRead(AzPotPin), AzMin, AzMax, 0, 359)); // 방위각 값 0-359 if (TruAzim<0) {TruAzim=0;} if (TruAzim>359) {TruAzim=359;} // 한계 사이의 값 유지 TruElev =(map(analogRead(ElPotPin), ElMin, ElMax , 0, 90)); // elev 값 0-90 if (TruElev<0) {TruElev=0;} if (TruElev>90) {TruElev=90;} // 값을 한계 사이로 유지 for (int thisReading =0; thisReading 359) {TruAzim=359;} if (TruElev<0) {TruElev=0;} if (TruElev>90) {TruElev =90;} // 배열의 다음 위치로 이동합니다. readIndex =readIndex + 1; // 배열의 끝에 있으면 시작 부분으로 감쌉니다. if (readIndex>=numReadings) {readIndex =0;} // 인코더에서 명령을 읽기 위한 것입니다. ReadAzimEncoder(); 읽기ElevEncoder(); if (Serial.available()) {SerComm();} // USB 데이터 읽기 // 값이 변경되는 경우에만 안테나 위치 표시 업데이트 if ((millis()%500)<10){ //디스플레이 깜박임 방지 if (OldTruAzim!=TruAzim) { DisplAzim(TruAzim,4,0); OldTruAzim =TruAzim; } if (OldTruElev!=TruElev) { DisplElev(TruElev,5,1); OldTruElev =TruElev; } }// 값이 변경된 경우에만 대상 위치 표시 업데이트 if (OldComAzim !=ComAzim) { DisplAzim(ComAzim,12,0); OldComAzim =ComAzim; } if (OldComElev !=ComElev) { DisplElev(ComElev,13,1); OldComElev =ComElev; }// 방위각으로 회전하는 것입니다. if (TruAzim ==Comazim) { // 같으면 이동 중지 AzStop =true; analogWrite(AzPWMPin, 0); // Az 모터 전력 =0 StaAzim =TruAzim; // 이것은 소프트 스타트의 시작 방위각이 됩니다. lcd.setCursor(8, 0); lcd.print("="); } else if ((abs(TruAzim - ComAzim)<=AzErr)&&(AzStop ==false)) { // 허용 오차 범위에 있지만 동일하지 않은 경우 회전 AzimRotate();} else if (abs(TruAzim - Comazim)>AzErr){ // 대상이 허용 오차를 벗어난 경우 AzStop =false; // 같지 않음 AzimRotate(); // 회전 }// 고도로 회전합니다. if (TruElev ==ComElev) { // 같으면 이동 중지 ElStop =true; analogWrite(ElPWMPin, 0); // 엘 모터 파워 =0 StaElev =TruElev; // 이것은 soft-start의 시작 고도가 됩니다. lcd.setCursor(8, 1); lcd.print("="); 엘업 =0; // 고도 플래그 STOP } else if ((abs(TruElev - ComElev)<=ElErr)&&(ElStop ==false)) { // 허용 오차 범위에 있지만 동일하지 않은 경우 회전 ElevRotate();} else if (abs(TruElev - ComElev)>ElErr){ // 대상이 허용 오차를 벗어난 경우 ElStop =false; // 같지 않음 ElevRotate(); // 회전 } // 이것은 Az 인코더 x10 곱셈을 해석하기 위한 것입니다. while (AzEncBut ==10) { // x10으로 전환되는 동안 analogWrite(AzPWMPin, 0); // 안테나 회전 중지 StaAzim =TruAzim; // 이것은 소프트 스타트의 시작 방위각이 됩니다. analogWrite(ElPWMPin, 0); lcd.setCursor(8, 0); lcd.print("*"); ReadAzimEncoder(); if (OldComAzim !=ComAzim){ // 숫자가 변경된 경우에만 디스플레이 업데이트 DisplAzim(ComAzim, 12, 0); OldComAzim =ComAzim; } 지연(100); }}// end main LOOP//__________________________________________________________________// ___________절차 정의____void DisplAzim(int x, int y, int z) { char displayString[7] =""; sprintf(디스플레이 문자열, "%03d", x); //고정된 길이의 숫자(정수 3)를 출력합니다. lcd.setCursor(y, z); // 선행 0이 없는 경우 "__7" 사용 "%3d" lcd.print(displayString); // ************** 교정 목적 **************// Serial.print("Az");// Serial.println( analogRead(AzPotPin));} 무효 DisplElev(int x, int y, int z){ char displayString[7] =""; sprintf(디스플레이 문자열, "%02d", x); //고정된 길이 숫자(2 정수)를 출력합니다. lcd.setCursor(y, z); // 선행 0이 없는 경우 "_7" 사용 "%2d" lcd.print(displayString);// ************** 캘리브레이션 목적으로 ********** ****// Serial.print("El");// Serial.println(analogRead(ElPotPin));}void ReadElevEncoder() { aState =digitalRead(ElEncoderPinA); // ElEncoderPinA의 "현재" 상태를 읽습니다. // ElEncoderPinA의 이전 상태와 현재 상태가 다르면 Pulse가 발생했음을 의미합니다. if (aState !=aLastState){ // ElEncoderPinB 상태가 다른 경우 ElEncoderPinA 상태, 즉 인코더가 시계 방향으로 회전하고 있음을 의미합니다. if (digitalRead(ElEncoderPinB) !=aState) { ComElev ++;} else { ComElev --;} if (ComElev <0) {ComElev =0;} if (ComElev>90 ) {ComElev =90;} } 마지막 상태 =상태; // ElEncoderPinA의 이전 상태를 현재 상태로 업데이트합니다.}void ReadAzimEncoder() { 회전 =true; // 디바운서를 재설정 if (lastReportedPos !=Comazim) { lastReportedPos =Comazim; } 지연(10); if (digitalRead(AzClearButton) ==LOW ) { // 인코더 스위치가 눌린 경우 지연(250); // 디바운스 스위치 if (AzEncBut ==1){ AzEncBut =10; ComAzim =int(ComAzim/10)*10; // 10deg의 Comazim. 단계 } else { AzEncBut =1; } }} // ReadAzimEncoder()// 인터럽트 종료 statevoid doEncoderA() { // 디바운스 if ( 회전 ) 지연 (1); // 바운싱이 완료될 때까지 잠시 기다리십시오. // 테스트 전환, 실제로 변경되었습니까? if ( digitalRead(AzEncoderPinA) !=A_set ) { // 한 번 더 디바운스 A_set =!A_set; // A가 B보다 앞서면 카운터 + 조정 if ( A_set &&!B_set ) Comazim +=AzEncBut; ComAzim =((ComAzim + 360) % 360); // 0에서 359도 사이의 encoderPos. 회전 =거짓; // 루프()가 다시 히트할 때까지 더 이상 디바운싱하지 않음 }}// A와 동일한 상태 변경 B에서 인터럽트 위의 무효 doEncoderB() { if ( 회전 ) 지연 (1); if ( digitalRead(AzEncoderPinB) !=B_set ) { B_set =!B_set; // 카운터 조정 - B가 A를 앞서면 1 if ( B_set &&!A_set ) ComAzim -=AzEncBut; ComAzim =((ComAzim + 360) % 360); // 0에서 359도 사이의 encoderPos. 회전 =거짓; } }void AzimRotate() { if (ComAzim> TruAzim) { // 이것은 회전 방향을 결정하기 위해 // 콜드 스위칭 - 방향을 바꾸기 전에 모터를 정지 - 기계 및 전기 부품을 보호하기 위해 if (AzDir ==char(127)) { // 이전에 반대 방향으로 회전한 경우 analogWrite(AzPWMPin, 0); // 모터 정지 StaAzim =TruAzim; // 이것은 soft-start delay(200)의 시작 방위각이 됩니다. // 사전 전환 지연 digitalWrite(AzRotPin, LOW); // 회전 핀 비활성화 - 오른쪽 회전 지연(200); // 스위치 후 지연 } else { // 동일한 지시, 중지 없음, 지연 없음 digitalWrite(AzRotPin, LOW); // 회전 핀 비활성화 - 오른쪽으로 회전 } AzDir =char(126); // "->" } else { if (AzDir ==char(126)) { // 이전에 반대 방향으로 회전한 경우 analogWrite(AzPWMPin, 0); // 모터 정지 StaAzim =TruAzim; // 이것은 soft-start delay(200)의 시작 방위각이 됩니다. // 사전 전환 지연 digitalWrite(AzRotPin, HIGH); // 회전 핀 활성화 - 왼쪽 회전 지연(200); // 전환 후 지연 } else { // 동일한 지시, 중지 없음, 지연 없음 digitalWrite(AzRotPin, HIGH); // 회전 핀 활성화 - 왼쪽으로 회전 } AzDir =char(127); // "<-" } lcd.setCursor(8, 0); lcd.print(문자열(AzDir)); // 각도 오차에 비례하여 azim PWM 핀을 활성화합니다(퍼센트 %로 계산) PwAzStop =PwAzMin + round((abs(ComAzim-TruAzim))*(PwAzMax-PwAzMin)/Amax); //Soft-Stop 각도 차이에 비례하는 전력을 출력하는 공식 PwAzStar =PwAzMin + round((abs(StaAzim-TruAzim))*(PwAzMax-PwAzMin)/Amax); //Soft-Start를 위한 각도 차이에 비례하는 전력을 출력하는 공식 if (PwAzStar> PwAzStop){ PwAz =PwAzStop; //가장 작은 값을 선택 } else {PwAz =PwAzStar;} if (PwAz> PwAzMax) {PwAz =PwAzMax;} analogWrite(AzPWMPin, round(2.55*PwAz)); // Azim 드라이브 PWM 핀 활성화 }// end AzimRotate()void ElevRotate() {// 이것은 회전 방향을 결정하기 위해 if (ComElev> TruElev) { if (ElUp ==1) { // 이전에 반대 방향으로 회전했다면 방향 analogWrite(ElPWMPin, 0); // 모터 정지 StaElev =TruElev; // 이것은 soft-start delay(200)의 시작 고도가 됩니다. // 사전 전환 지연 digitalWrite(ElRotPin, LOW); // 회전 핀 비활성화 - UP 지연(200) 회전; // 스위치 후 지연 } else { // 동일한 지시, 중지 없음, 지연 없음 digitalWrite(ElRotPin, LOW); // 회전 핀 비활성화 - 위로 회전 } lcd.setCursor(8, 1); lcd.write(2); // 위쪽 화살표 ElUp =2; // 고도 UP 플래그 } else { if (ElUp ==2) { // 이전에 반대 방향으로 회전한 경우 analogWrite(ElPWMPin, 0); // 모터 정지 StaElev =TruElev; // 이것은 soft-start delay(200)의 시작 고도가 됩니다. // 사전 전환 지연 digitalWrite(ElRotPin, HIGH); // 회전 핀 비활성화 - UP 지연(200) 회전; // 스위치 후 지연 } else { // 동일한 지시, 중지 없음, 지연 없음 digitalWrite(ElRotPin, HIGH); // 회전 핀 비활성화 - 위로 회전 } lcd.setCursor(8, 1); lcd.write(1); // 아래쪽 화살표 ElUp =1; // 고도 DN에 대한 플래그 } // 각도 오류에 비례하여 azim PWM 핀을 활성화합니다(퍼센트 %로 계산) PwElStop =PwElMin + round((abs(ComElev-TruElev))*(PwElMax-PwElMin)/Emax); //Soft-Stop에 대한 각도 차이에 비례하는 전력을 출력하는 공식 PwElStar =PwElMin + round((abs(StaElev-TruElev))*(PwElMax-PwElMin)/Emax); //Soft-Start의 경우 각도 차이에 비례하는 전력을 출력하는 공식 if (PwElStar> PwElStop){ PwEl =PwElStop; //가장 작은 값을 선택 } else {PwEl =PwElStar;} if (PwEl> PwElMax) {PwEl =PwElMax;} analogWrite(ElPWMPin, round(2.55*PwEl)); // Elev 드라이브 PWM 핀 활성화}// end ElevRotate()void SerComm() { // 판독값 초기화 ComputerRead =""; 방위각 =""; 고도 =""; while(Serial.available()) { ComputerRead=Serial.readString(); // 들어오는 데이터를 문자열로 읽습니다. // Serial.println(ComputerRead); // 테스트 목적으로 수신을 에코 } // 명령 찾기 for (int i =0; i <=ComputerRead.length(); i++) { if ((ComputerRead.charAt(i) ==' A')&&(ComputerRead.charAt(i+1) =='Z')){ // AZ를 읽는 경우 for (int j =i+2; j <=ComputerRead.length(); j++) { if (isDigit (ComputerRead.charAt(j))) { // 문자가 숫자인 경우 Azimuth =Azimuth + ComputerRead.charAt(j); } else {break;} } } } // 명령 찾기 for (int i =0; i <=(ComputerRead.length()-2); i++) { if ((ComputerRead.charAt(i ) =='E')&&(ComputerRead.charAt(i+1) =='L')){ // EL을 읽는 경우 if ((ComputerRead.charAt(i+2)) =='-') { ComElev =0; // 고도가 음수인 경우 break; } for (int j =i+2; j <=ComputerRead.length(); j++) { if (isDigit(ComputerRead.charAt(j))) { // 문자가 숫자인 경우 Elevation =Elevation + ComputerRead.charAt( 제이); } else {break;} } } } // 가 수신된 경우 if (Azimuth !=""){ ComAzim =Azimuth.toInt(); Comazim =Comazim%360; // 한계 사이의 값 유지(360도 이상 회전하는 추적기용) }// if 수신 if (Elevation !=""){ ComElev =Elevation.toInt(); if (ComElev>180) { ComElev =0;} if (ComElev>90) { //90도 이상을 받았을 경우. (180도 고도를 가진 추적기의 경우) ComElev =180-ComElev; //90도 이하로 유지합니다. ComAzim =(ComAzim+180)%360; //그리고 안테나를 뒤쪽으로 회전 } }// 안테나 위치에 대한 질문을 찾습니다. for (int i =0; i <=(ComputerRead.length()-4); i++) { if ((ComputerRead .charAt(i) =='A')&&(ComputerRead.charAt(i+1) =='Z')&&(ComputerRead.charAt(i+3) =='E')&&(ComputerRead.charAt(i) +4) =='L')){ // 안테나 위치를 다시 보냅니다. <+xxx.x xx.x> ComputerWrite ="+"+String(TruAzim)+".0 "+String(TruElev)+". 0"; Serial.println(컴퓨터 쓰기); } }}// SerComm() 종료 ant-rot-AC-aug2021Arduino
AC 모터의 전기 다이어그램을 사용하는지 확인하십시오.
건식 접점 제공(ON/OFF). 상용 회전자와 쉽게 인터페이스할 수 있습니다.<사전>/* Arduino용 AZ/EL 안테나 회전자 컨트롤러 - AC 모터 * =========================================================컴퓨터용 EasyComm 프로토콜 사용 - 추적 소프트웨어 * 2개의 로터리 인코더를 통한 수동 명령 AZ - EL * * 스위치 박스 로테이터 * 또는 AC 모터와 호환 가능 * 좌-우, 상-하를 위한 건식 접촉 * * Viorel Racoviteannu / * https://www.youtube.com/channel/UCiRLZX0bV9rS04BGAyUf-fA * https://racov.ro * [email protected] * * 이 코드의 오용 * 또는 이 코드를 사용하여 발생할 수 있는 모든 종류의 손상에 대해 나는 어떠한 책임도 지지 않습니다. * * 2020년 12월 v2 - 직렬 통신 안정성 개선 * 2021년 1월 - 모터 활성화를 위한 AZ, EL 허용 오차 수정 * 2021년 4월 - 직렬 통신 안정성 개선 * 2021년 8월 - 더 빠른 USB 업데이트, 콜드 스위칭 Az/El 방향, 코드의 작은 최적화 */ #include // I2C 통신용 라이브러리#include // https://www.arduinolibraries.info/libraries/liquid-crystal-i2-c (Library for LCD)// 배선:SDA 핀은 A4에 연결되고 SCL 핀은 A5에 연결됩니다.// I2C를 통해 LCD에 연결, 기본 주소 0x27(A0-A2는 점퍼되지 않음)LiquidCrystal_I2C lcd(0x27, 16, 2); // address, chars, rows.// 위/아래 화살표 바이트에 대한 사용자 정의 기호 선언 DownArrow[8] ={ B00000, B00100, B00100, B00100, B10101, B01110, B00100, B00000}; byte UpArrow[8] ={ B00000, B00100, B01110, B10101, B00100, B00100, B00100, B00000};// 안테나 전위차계 CALIBRATION int AzMin =1; // 전위차계 시작 int AzMax =1023; // 전위차계의 끝 int ElMin =1; int ElMax =1023;// 안테나가 움직이지 않는 허용된 오류 int AzErr =8; int ElErr =4;// Azim 인코더 변수 enum AzPinAssignments { AzEncoderPinA =2, // 인코더 오른쪽 AzEncoderPinB =3, // 인코더 왼쪽 AzClearButton =4}; // 인코더 푸시 unsigned int lastReportedPos =1; // 변경 관리 정적 부울 회전 =false; // 디바운스 관리 // 인터럽트 서비스 루틴 vars 부울 A_set =false; 부울 B_set =거짓; //Elev 인코더 변수 enum ElPinAssignments{ ElEncoderPinA =6, // 인코더 오른쪽 ElEncoderPinB =5, // 인코더 왼쪽 ElClearButton =7}; // 인코더 푸시 int aState; int LastState; // 다른 변수 int AzPotPin =A0; // azim의 입력 핀을 선택합니다. 전위차계 int AzRotPinR =13; // 회전 방향에 대한 출력 핀 선택 int AzRotPinL =12; 정수 TruAzim =0; // 계산된 실제 방위각 값 int Comazim =0; // 명령된 방위각 값 int OldTruAzim =0; // 이전 방위각 값을 저장하기 위해 int OldComAzim =0; 문자 AzDir; // azim rot 표시를 위한 기호 int AzEncBut =1; // 인코더 푸시 버튼으로 토글할 변수 int ElPotPin =A1; // select the input pin for the elev. potentiometer int ElRotPinD =11; // select the out pin for elevation rotation direction int ElRotPinU =10; int TruElev =0; // calculated real elevation value int ComElev =0; // commanded elevation value int OldTruElev =0; // to store previous elevation value int OldComElev =0; char ElDir; // symbol for elev. rot display int ElEncBut =1; // variable to toggle with encoder push button // flags for AZ, EL tolerances bool AzStop =false; bool ElStop =false; int ElUp =0; // 1 =Elevation Dn, 0 =Elevation STOP, 2 =Elevation Up //averaging loop const int numReadings =25; int readIndex =0; // the index of the current reading int azimuth[numReadings]; // the readings from the analog input int elevation[numReadings]; int totalAz =0; // the running total int totalEl =0;// variables for serial comm String Azimuth =""; String Elevation =""; String ComputerRead; String ComputerWrite; bool AZser =false; bool ELser =false; bool ANTser =false;/*************** END VARIABLE DECLARATION ************/ void setup() { Serial.begin(9600); Serial.setTimeout(50); // miliseconds to wait for USB sata. Default 1000// Initiate the LCD:// lcd.begin(16,2); //select this one if the arrows are not displayed correctly lcd.init(); lcd.backlight();// write on display name and version lcd.setCursor(0, 0); // Set the cursor on the first column first row.(counting starts at 0!) lcd.print("EasyCom AntRotor"); lcd.setCursor(0, 1); // Set the cursor on the first column the second row lcd.print("*Racov* Aug.2021 ");//creating custom symbol for up/dwn arrow lcd.createChar(1, DownArrow); lcd.createChar(2, UpArrow); // pin declaration pinMode(AzRotPinR, OUTPUT); //declaring azim. rotation direction Pin as OUTPUT pinMode(AzRotPinL, OUTPUT); pinMode(ElRotPinD, OUTPUT); //declaring elev. rotation direction Pin as OUTPUT pinMode(ElRotPinU, OUTPUT); pinMode(AzPotPin, INPUT); pinMode(ElPotPin, INPUT); pinMode(AzEncoderPinA, INPUT); pinMode(AzEncoderPinB, INPUT); pinMode(AzClearButton, INPUT); pinMode(ElEncoderPinA, INPUT); pinMode(ElEncoderPinB, INPUT); pinMode(ElClearButton, INPUT);// AzEncoder pin on interrupt 0 (pin A) attachInterrupt(0, doEncoderA, CHANGE);// AzEncoder pin on interrupt 1 (pin B) attachInterrupt(1, doEncoderB, CHANGE);// Reads the initial state of the ElEncoderPinA aLastState =digitalRead(ElEncoderPinA);/* initialization of the averaging loop */ TruAzim =(map(analogRead(AzPotPin), AzMin, AzMax, 0, 359)); // azimuth value 0-359 if (TruAzim<0) {TruAzim=0;} if (TruAzim>359) {TruAzim=359;} // keep values between limits TruElev =(map(analogRead(ElPotPin), ElMin, ElMax, 0, 90)); // elev value 0-90 if (TruElev<0) {TruElev=0;} if (TruElev>90) {TruElev=90;} // keep values between limits for (int thisReading =0; thisReading 359) {TruAzim=359;} if (TruElev<0) {TruElev=0;} if (TruElev>90) {TruElev=90;} // advance to the next position in the array:readIndex =readIndex + 1; // if we're at the end of the array, wrap around to the beginning:if (readIndex>=numReadings) {readIndex =0;} // this is to read the command from encoder ReadAzimEncoder(); ReadElevEncoder(); if (Serial.available()) {SerComm();} // read USB data// update antenna position display only if value change if ((millis()%500)<10){ //not to flicker the display if (OldTruAzim!=TruAzim) { DisplAzim(TruAzim,4,0); OldTruAzim =TruAzim; } if (OldTruElev!=TruElev) { DisplElev(TruElev,5,1); OldTruElev =TruElev; } }// update target position display only if value change if (OldComAzim !=ComAzim) { DisplAzim(ComAzim,12,0); OldComAzim =ComAzim; } if (OldComElev !=ComElev) { DisplElev(ComElev,13,1); OldComElev =ComElev; }// this is to rotate in azimuth if (TruAzim ==ComAzim) { // if equal, stop moving AzStop =true; digitalWrite(AzRotPinL, LOW); // deactivate rotation pin digitalWrite(AzRotPinR, LOW); lcd.setCursor(8, 0); lcd.print("="); } else if ((abs(TruAzim - ComAzim)<=AzErr)&&(AzStop ==false)) { // if in tolerance, but it wasn't an equal, rotate AzimRotate();} else if (abs(TruAzim - ComAzim)>AzErr){ // if target is off tolerance AzStop =false; // it's not equal AzimRotate(); // rotate }// this is to rotate in elevation if (TruElev ==ComElev) { // if equal, stop moving ElStop =true; digitalWrite(ElRotPinD, LOW); // deactivate elevator pin digitalWrite(ElRotPinU, LOW); lcd.setCursor(8, 1); lcd.print("="); ElUp =0; // flag for elevation STOP } else if ((abs(TruElev - ComElev)<=ElErr)&&(ElStop ==false)) { // if in tolerance, but it wasn't an equal, rotate ElevRotate();} else if (abs(TruElev - ComElev)>ElErr){ // if target is off tolerance ElStop =false; // it's not equal ElevRotate(); // rotate }// this is to interpret x10 AZ ENC multiplication while (AzEncBut ==10) { // while toggled to x10 digitalWrite(AzRotPinL, LOW); // deactivate rotation pin digitalWrite(AzRotPinR, LOW); digitalWrite(ElRotPinD, LOW); // deactivate elevator pin digitalWrite(ElRotPinU, LOW); lcd.setCursor(8, 0); lcd.print("*"); ReadAzimEncoder(); if (OldComAzim !=ComAzim){ // update display only if numbers change DisplAzim(ComAzim, 12, 0); OldComAzim =ComAzim; } delay(100); }}// end main LOOP//____________________________________________________// ___________procedures definitions__________________void DisplAzim(int x, int y, int z) { char displayString[7] =""; sprintf(displayString, "%03d", x); //outputs a fixed lenght number (3 integer) lcd.setCursor(y, z); // for no leading zeros "__7" use "%3d" lcd.print(displayString); // ************** FOR CALIBRATION PURPOSES **************// Serial.print ("Az ");// Serial.println (analogRead(AzPotPin));}void DisplElev(int x, int y, int z){ char displayString[7] =""; sprintf(displayString, "%02d", x); //outputs a fixed lenght number (2 integer) lcd.setCursor(y, z); // for no leading zeros "_7" use "%2d" lcd.print(displayString);// ************** FOR CALIBRATION PURPOSES **************// Serial.print ("El ");// Serial.println (analogRead(ElPotPin));}void ReadElevEncoder() { aState =digitalRead(ElEncoderPinA); // Reads the "current" state of the ElEncoderPinA // If the previous and the current state of the ElEncoderPinA are different, that means a Pulse has occured if (aState !=aLastState){ // If the ElEncoderPinB state is different to the ElEncoderPinA state, that means the encoder is rotating clockwise if (digitalRead(ElEncoderPinB) !=aState) { ComElev ++;} else { ComElev --;} if (ComElev <0) {ComElev =0;} if (ComElev>90) {ComElev =90;} } aLastState =aState; // Updates the previous state of the ElEncoderPinA with the current state}void ReadAzimEncoder() { rotating =true; // reset the debouncer if (lastReportedPos !=ComAzim) { lastReportedPos =ComAzim; } 지연(10); if (digitalRead(AzClearButton) ==LOW ) { // if encoder switch depressed delay (250); // debounce switch if (AzEncBut ==1){ AzEncBut =10; ComAzim =int(ComAzim/10)*10; // ComAzim in 10deg. steps } else { AzEncBut =1; } }} //end ReadAzimEncoder()// Interrupt on A changing statevoid doEncoderA() { // debounce if ( rotating ) delay (1); // wait a little until the bouncing is done // Test transition, did things really change? if ( digitalRead(AzEncoderPinA) !=A_set ) { // debounce once more A_set =!A_set; // adjust counter + if A leads B if ( A_set &&!B_set ) ComAzim +=AzEncBut; ComAzim =((ComAzim + 360) % 360); // encoderPos between 0 and 359 deg. rotating =false; // no more debouncing until loop() hits again }}// Interrupt on B changing state, same as A abovevoid doEncoderB() { if ( rotating ) delay (1); if ( digitalRead(AzEncoderPinB) !=B_set ) { B_set =!B_set; // adjust counter - 1 if B leads A if ( B_set &&!A_set ) ComAzim -=AzEncBut; ComAzim =((ComAzim + 360) % 360); // encoderPos between 0 and 359 deg. rotating =false; } }void AzimRotate() { if ((ComAzim-TruAzim)> (TruAzim-ComAzim)) { // this to determine direction of rotation// cold switching - stop motor before changing direction - to protect mechanic and electric parts digitalWrite(AzRotPinL, LOW); // deactivate rotation pin Left if (AzDir ==char(127)) {delay(500);} // if previously rotating in the oposite direction, wait 0.5 seconds digitalWrite(AzRotPinR, HIGH); // activate rotation pin Right AzDir =char(126); // "->" } else { digitalWrite(AzRotPinR, LOW); if (AzDir ==char(126)) {delay(500);} digitalWrite(AzRotPinL, HIGH); AzDir =char(127); // "<-" } lcd.setCursor(8, 0); lcd.print(String(AzDir));}void ElevRotate() {// this to determine direction of rotation if ((ComElev-TruElev)> (TruElev-ComElev)) { digitalWrite(ElRotPinD, LOW); if (ElUp ==1) {delay(500);} digitalWrite(ElRotPinU, HIGH); lcd.setCursor(8, 1); lcd.write(2); // arrow up ElUp =2; } else { digitalWrite(ElRotPinU, LOW); if (ElUp ==2) {delay(500);} digitalWrite(ElRotPinD, HIGH); lcd.setCursor(8, 1); lcd.write(1); // arrow down ElUp =1; }}void SerComm() { // initialize readings ComputerRead =""; Azimuth =""; Elevation =""; while(Serial.available()) { ComputerRead=Serial.readString(); // read the incoming data as string Serial.println(ComputerRead); // echo the reception for testing purposes } // looking for command for (int i =0; i <=ComputerRead.length(); i++) { if ((ComputerRead.charAt(i) =='A')&&(ComputerRead.charAt(i+1) =='Z')){ // if read AZ for (int j =i+2; j <=ComputerRead.length(); j++) { if (isDigit(ComputerRead.charAt(j))) { // if the character is number Azimuth =Azimuth + ComputerRead.charAt(j); } else {break;} } } } // looking for command for (int i =0; i <=(ComputerRead.length()-2); i++) { if ((ComputerRead.charAt(i) =='E')&&(ComputerRead.charAt(i+1) =='L')){ // if read EL if ((ComputerRead.charAt(i+2)) =='-') { ComElev =0; // if elevation negative break; } for (int j =i+2; j <=ComputerRead.length(); j++) { if (isDigit(ComputerRead.charAt(j))) { // if the character is number Elevation =Elevation + ComputerRead.charAt(j); } else {break;} } } } // if received if (Azimuth !=""){ ComAzim =Azimuth.toInt(); ComAzim =ComAzim%360; // keeping values between limits }// if received if (Elevation !=""){ ComElev =Elevation.toInt(); if (ComElev>180) { ComElev =0;} if (ComElev>90) { //if received more than 90deg. (for trackers with 180deg. elevation) ComElev =180-ComElev; //keep below 90deg. ComAzim =(ComAzim+180)%360; //and rotate the antenna on the back } }// looking for interogation for antenna position for (int i =0; i <=(ComputerRead.length()-4); i++) { if ((ComputerRead.charAt(i) =='A')&&(ComputerRead.charAt(i+1) =='Z')&&(ComputerRead.charAt(i+3) =='E')&&(ComputerRead.charAt(i+4) =='L')){ // send back the antenna position <+xxx.x xx.x> ComputerWrite ="+"+String(TruAzim)+".0 "+String(TruElev)+".0"; Serial.println(ComputerWrite); } }}// end SerComm() Potentiometer calibration procedureArduino
AZ / EL Potentiometers limit calibration PROCEDURE for displaying the correct antenna angles and rotation limits ( 0-359ᴼ / 0-90ᴼ)
This is plain text, not a code :)AZ / EL Potentiometers limit calibration PROCEDURE ( 0-359ᴼ / 0-90ᴼ)This might seem complicated, but it only has to be done once.1. Open the code in Arduino and - Look for void DisplAzim(int x, int y, int z) {...// Serial.print ("Az ");// Serial.println (analogRead(AzPotPin)); - Uncoment these lines. Should look like this:Serial.print ("Az "); Serial.println (analogRead(AzPotPin)); - Look for void DisplElev(int x, int y, int z){...// Serial.print ("El ");// Serial.println (analogRead(ElPotPin));Uncoment these lines, too. Should look like this:Serial.print ("El "); Serial.println (analogRead(ElPotPin));2. Upload the code and open the Serial Monitor. There you will see a lot of numbers;3. With the help of the encoders, move the antenna to minimum values, 0ᴼ in azimuth and 0ᴼ in elevation.- Write down the values for Azimuth and Elevation. (in my case it was AzMin=90, ElMin=10)- These are the input values read by Arduino, not the real angles;4. Move the antenna again to maximum values, 359ᴼ in azimuth and 90ᴼ in elevation.- Again, write down the values for Azimuth and Elevation. (in my case it was AzMax=1000, ElMax=992);5. Look in the code, at the beginning, for the section// ANTENNA potentiometers CALIBRATION int AzMin =1; int AzMax =1023; int ElMin =1; int ElMax =1023;- Here input the values you wrote down for each situation;6. Now it is no longer necessary to send this on serial, so you have to comment back these lines, like this:// Serial.print ("Az "); // Serial.println (analogRead(AzPotPin));... // Serial.print ("El "); // Serial.println (analogRead(ElPotPin));7. Upload again the code.That's all.Now, in the serial monitor, there should be no more numbers, and the true antenna position is read correctly. Motor calibration procedureArduino
This procedure sets the parameters for the Antenna Speed-Up / Slow-Down Zone.
This is plain text, not a code :)Motor Calibration Procedure For Soft-Start / Soft-Stop feature.This procedure sets the parameters for the Antenna Speed-Up / Slow-Down and the Dead-Zone.You basically set how fast and how slow you want the antenna to start and to stop. You also set much the target can move, before the antenna will adjust again.It’s not strictly necessary, only if you don’t like the default settings.Make sure you first apply the Potentiometer Calibration Procedure !!! That one is strictly necessary.Look at the power diagram for a better understanding.***For Azimuth movement***-As the antenna starts to move towards the target, is picking up speed, reaching full power after degrees difference. -As the antenna closes in to the target, below degrees difference, it starts to slow down. should be higher for heavier antennas.-The power starts to decrease from to until the angle difference becomes zero. (in percents %) should be 100 for full speed. If you ever think your antenna rotates too fast, you can set a smaller . (in percents %) is the minimum power for which your motor doesn’t stall and can start under load. The power output never falls below this value.-Once the antenna reaches the target position (zero degrees error), it stops and doesn’t move again until the target travels more than degrees. This is a dead zone, to prevent continuously shaking the antenna for the smallest target movement, or potentiometer position jitter. The smaller the , the more precise tracking, the more frequent shacking of the motors.***For Elevation movement***Exactly as for the Azimuth.Look at the beginning of the code for this section. Here you can input your desired values./**************THIS IS WHERE YOU REALY TWEAK THE ANTENNA MOVEMENT************/...// Allowed error for which antennna won't move. int AzErr =8; int ElErr =4;// Angle difference where soft stop begins int Amax =25; //azimuth int Emax =15; //elevation// min and max power for motors, percents; int PwAzMin =30; //minimum power for which the motor doesn't stall and starts under load int PwAzMax =100; //full power for the fastest speed int PwElMin =30; int PwElMax =100;/****************************************************************************/
회로도
Make sure you use this diagram with the code for DC motors.
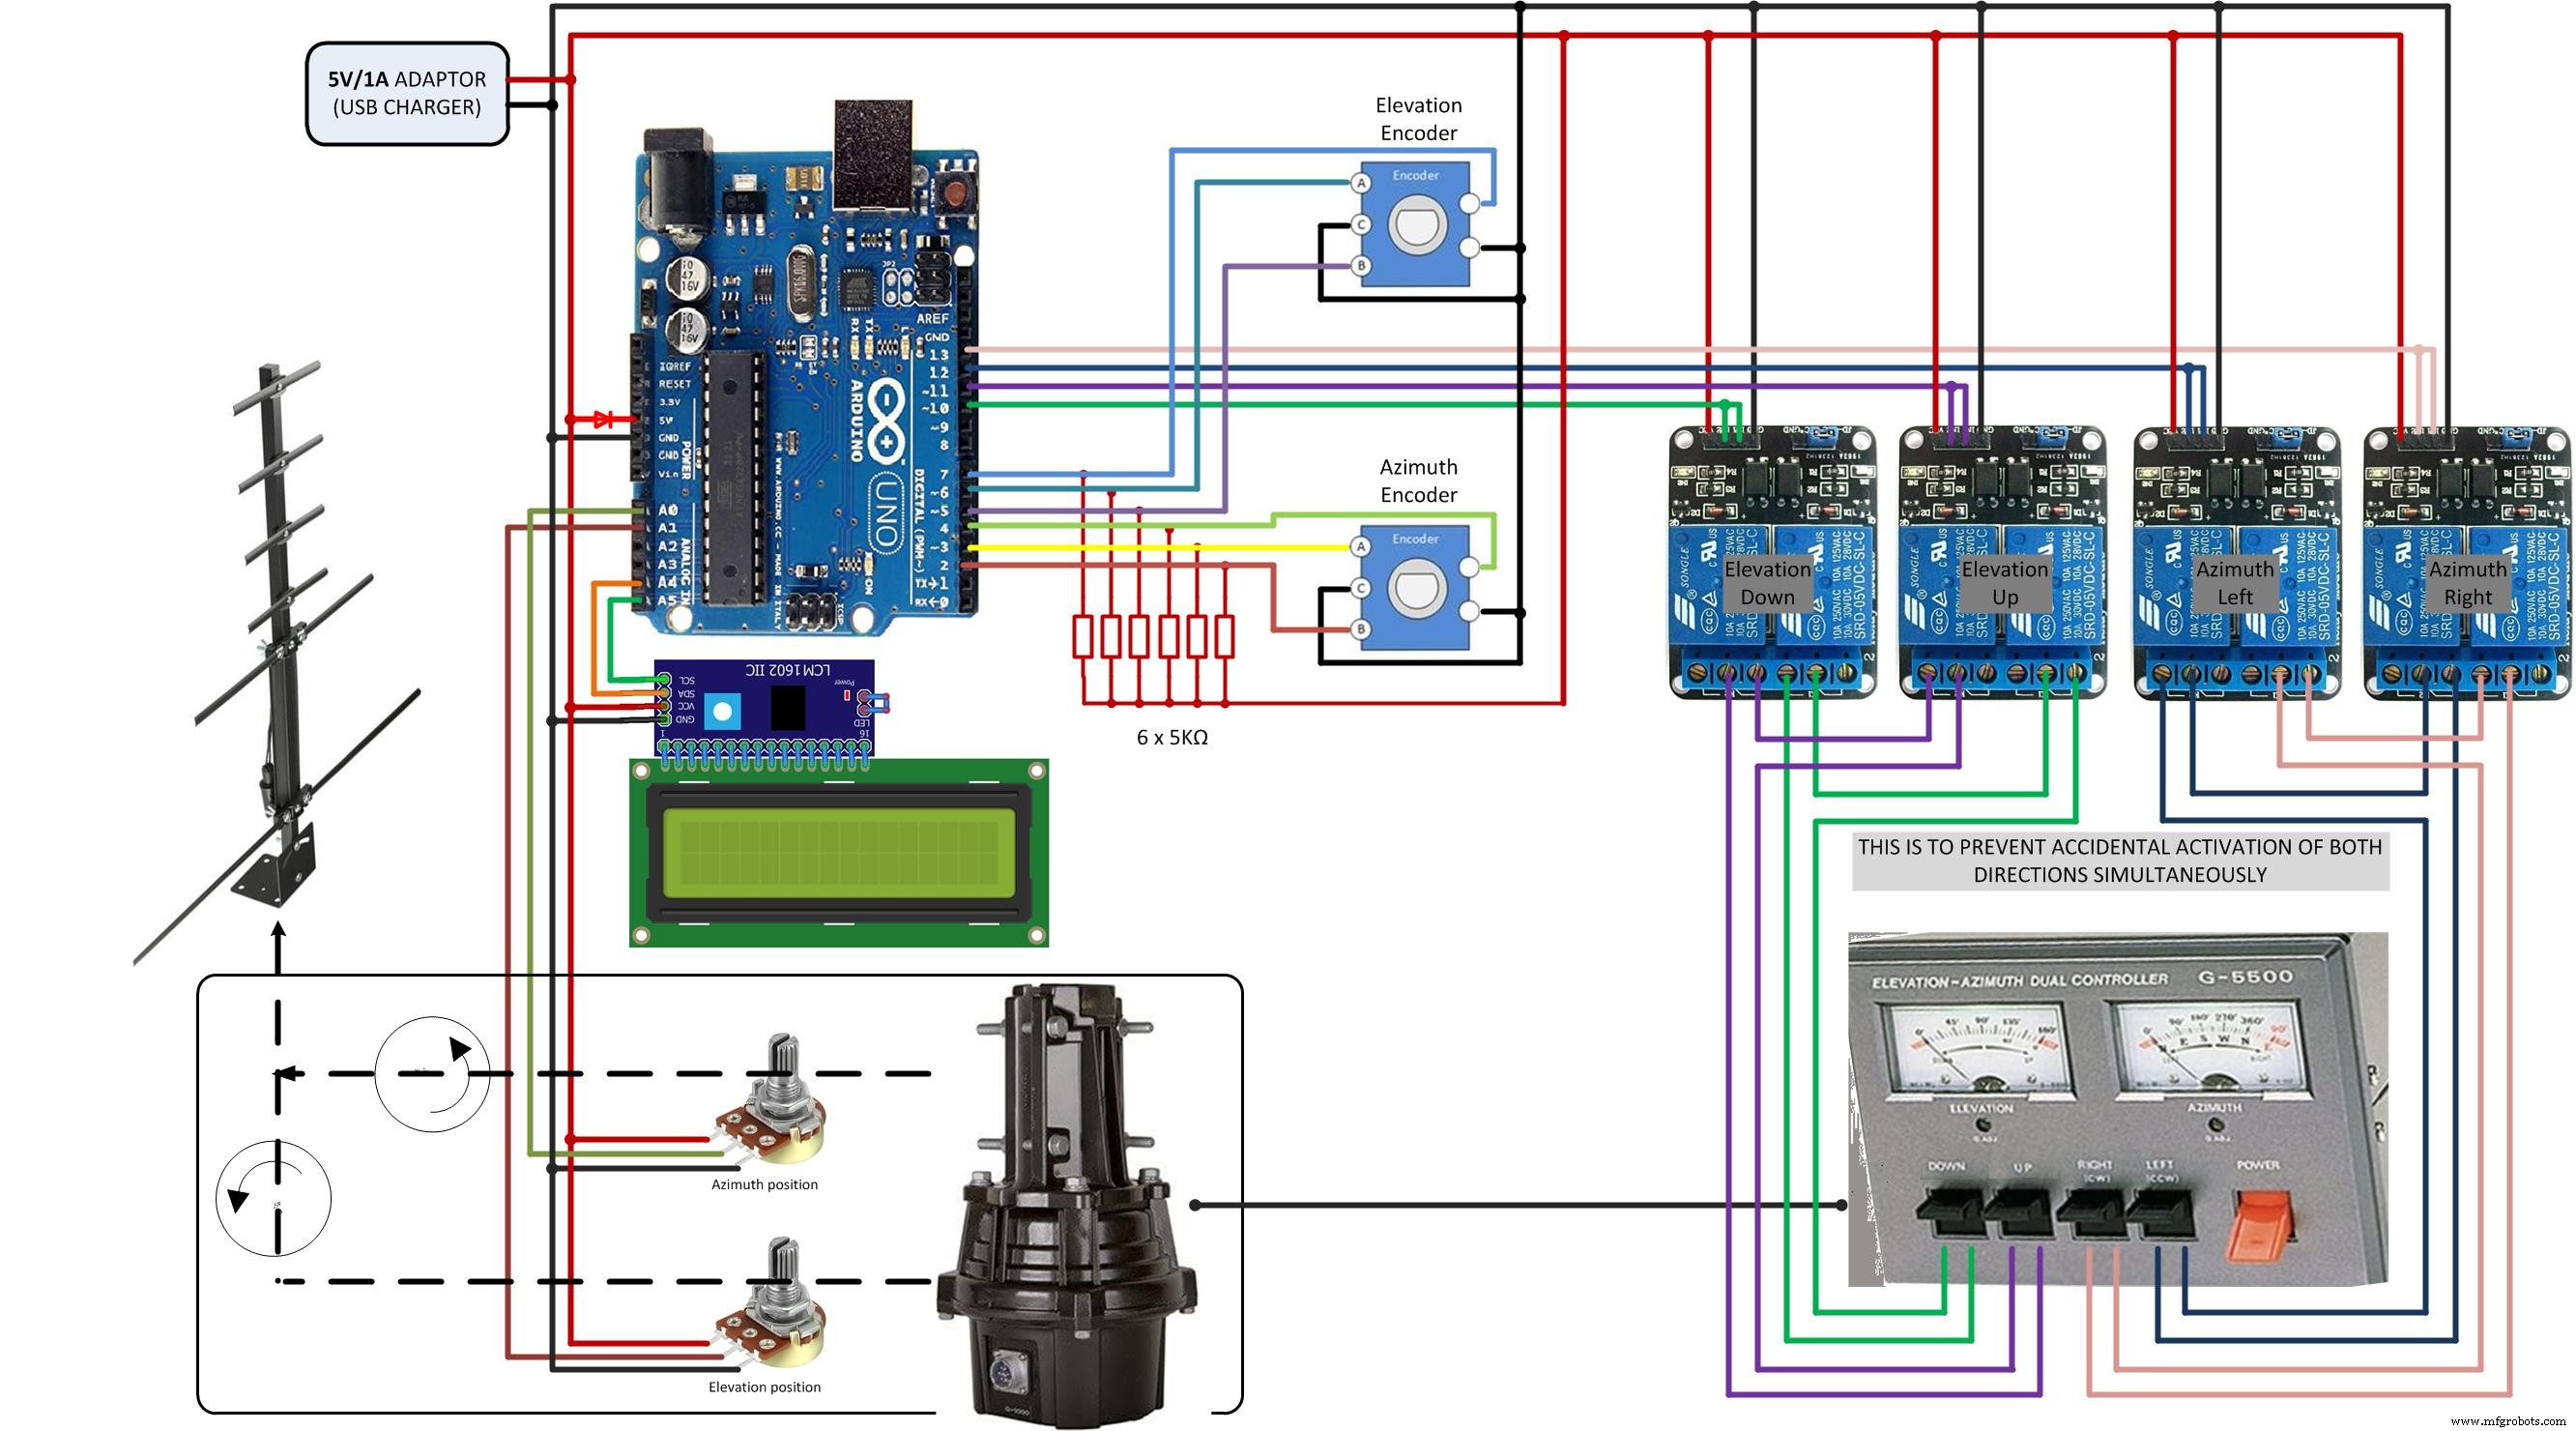
Connection of all the modules, encoders, LCD, relays, MosFet etc, 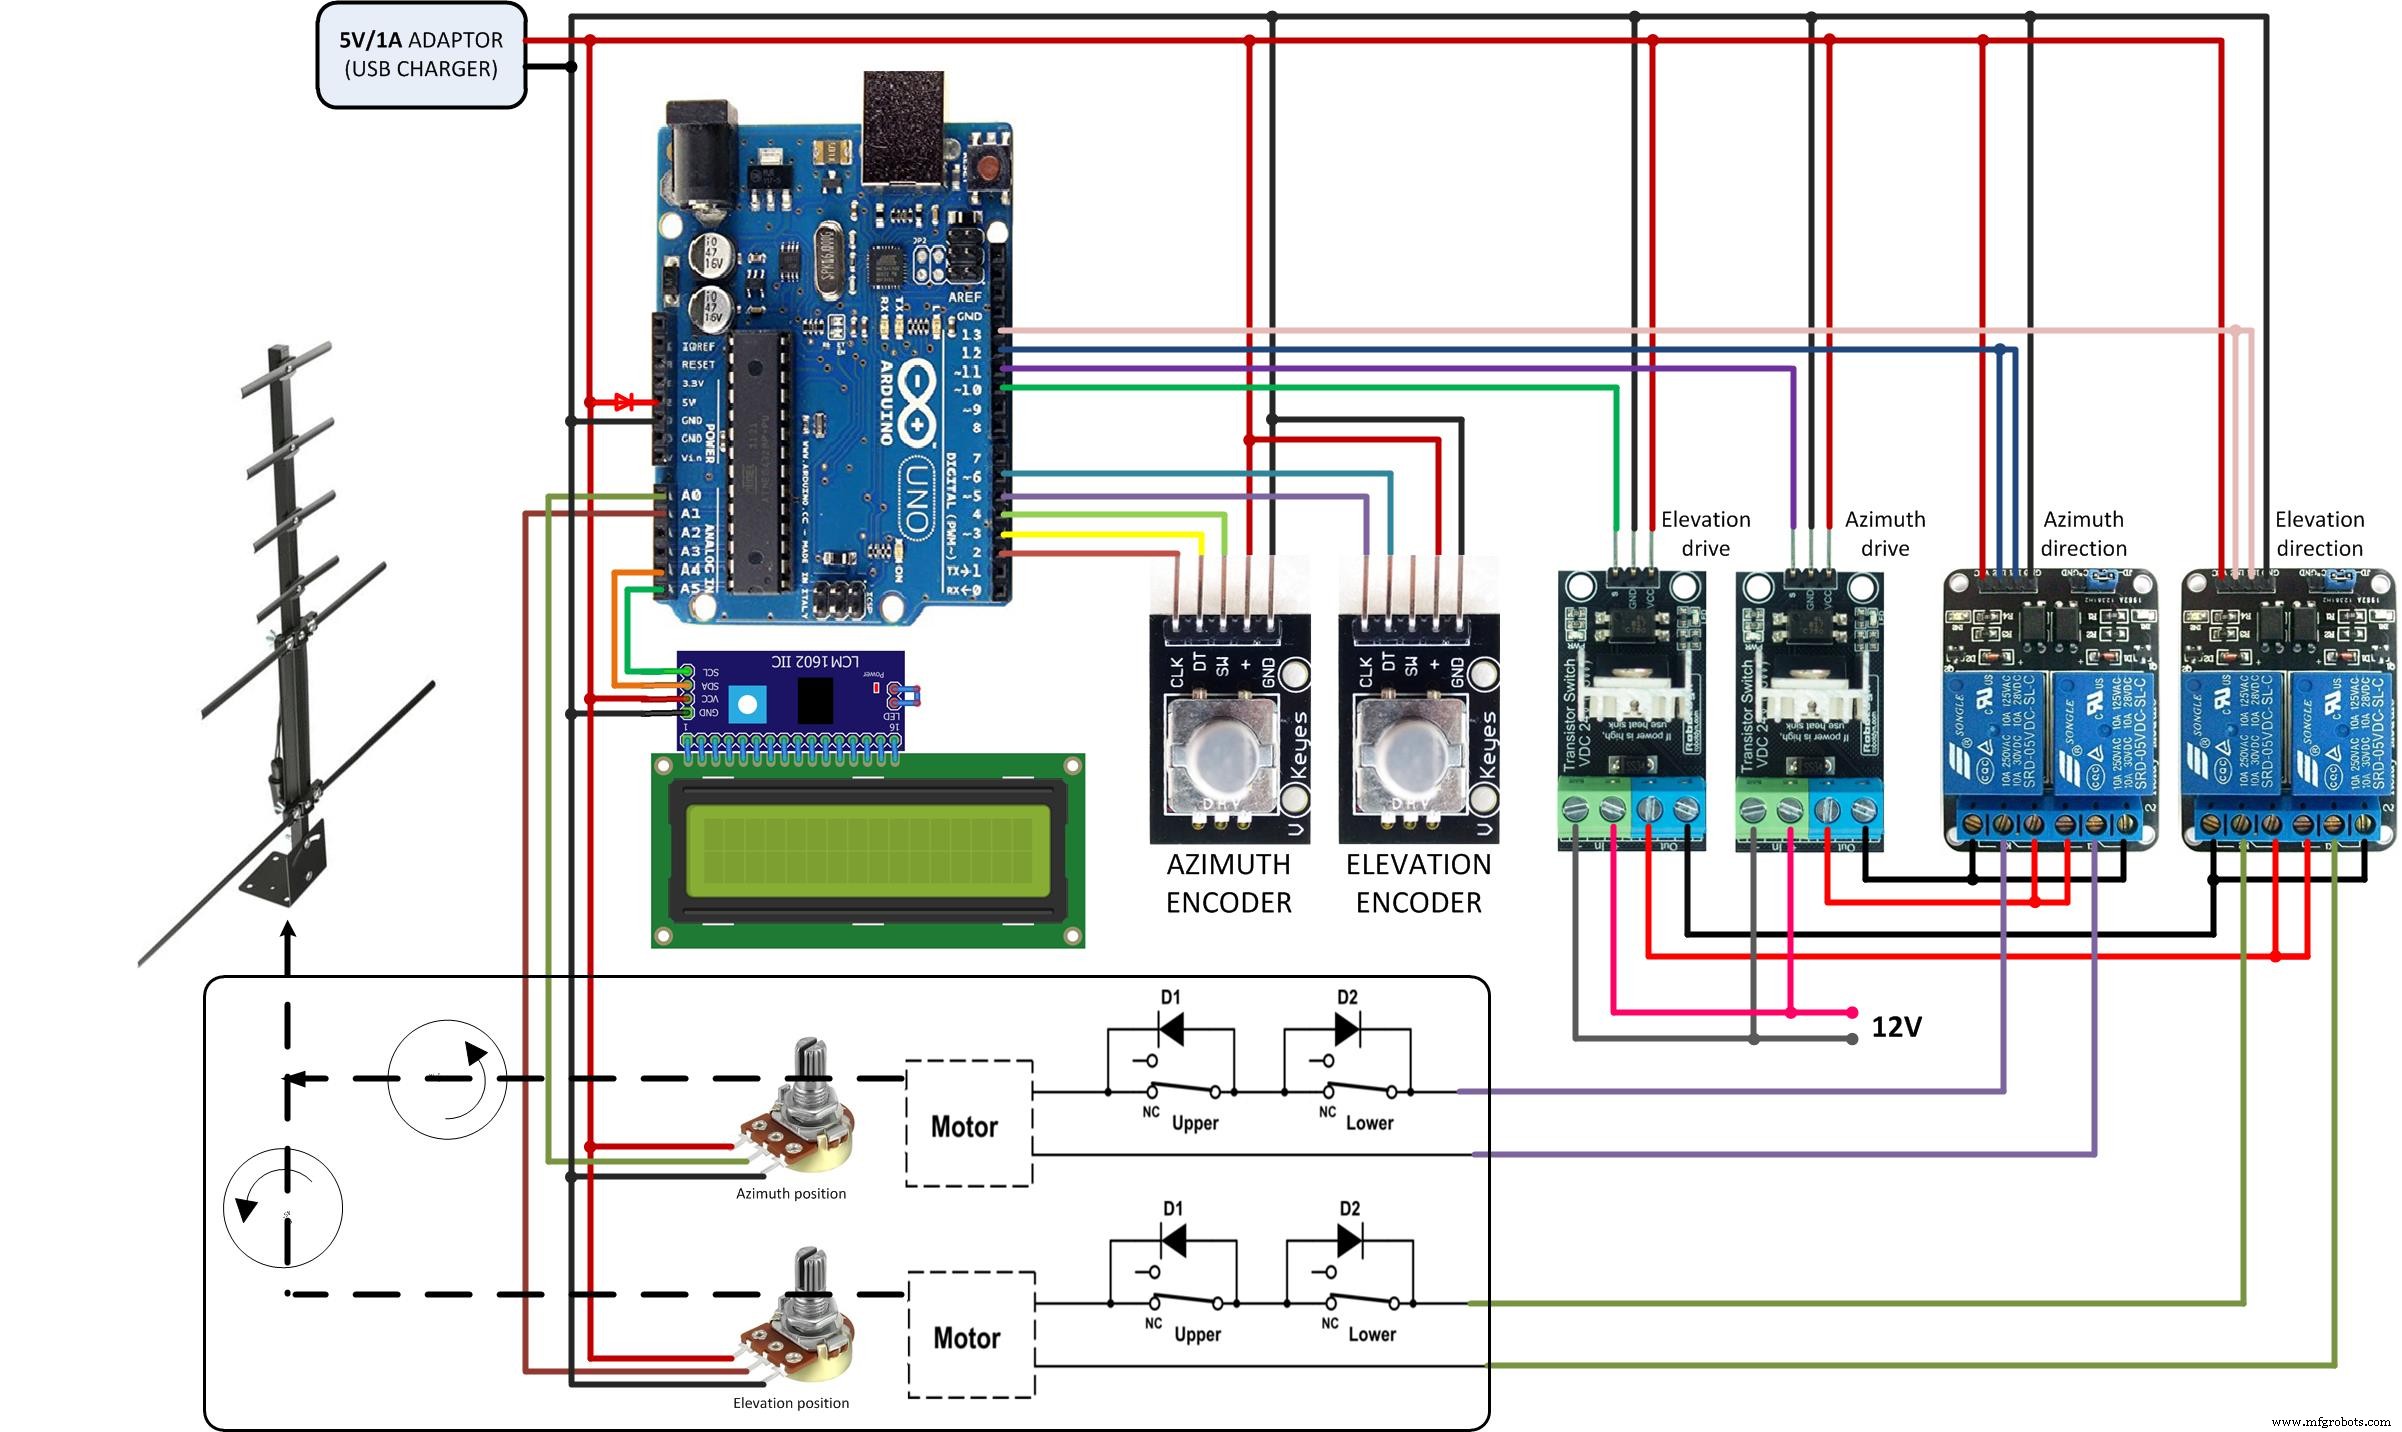 Make sure you use this diagram with the code for AC motors.
Offers dry contacts (ON/OFF). It can be easily interfaced with commercial rotators.