이 글에서는 아두이노로 프로젝트를 진행합니다. 구체적으로 조이스틱을 시뮬레이션하는 스티어링 휠을 만듭니다.
Steam(디지털 권리 관리, 멀티플레이어 및 통신 플랫폼)에서 컨트롤러처럼 사용할 수 있습니다. 레이싱 게임을 좋아하는데 키보드나 조이스틱으로만 하니 지루했고, 시중 드라이빙 시뮬레이터는 가격이 비쌌습니다. 며칠간 즐겁게 만들었습니다. 개선 제안이 있으면 언제든 연락 주세요!
아두이노를 컨트롤러로 변환하시겠습니까?
아두이노 통신 칩을 플래싱해 USB 게임패드로 인식되게 합니다. 절차는 안전하고 되돌릴 수 있지만, 문제 발생 시 책임지지 않습니다.
최신 버전 UnoJoy를 다운로드하세요. 특수 펌웨어로 아두이노를 USB 조이스틱으로 인식시킵니다. UnoJoy 폴더 안의 InstallUnoJoyDrivers.bat를 실행해 드라이버를 설치하세요.
ATmel FLIP 도구도 설치해야 합니다. UnoJoy 라이브러리가 아두이노 통신 칩에 펌웨어를 플래싱하는 데 사용합니다.
아두이노에 펌웨어 로드하기
아두이노를 DFU(Device Firmware Update) 모드로 진입시키세요: USB 소켓 옆 6핀 그룹 중 앞쪽 두 핀을 쇼트시킵니다(사진 참조). 그러면 아두이노 LED가 잠시 깜빡입니다. 이제 TurnIntoAJoystick.bat를 실행하고 아두이노를 재연결하면 조이스틱으로 인식됩니다. 원래 아두이노로 되돌리려면 TurnIntoAnArduino.bat를 실행하면 됩니다.
심플 컨트롤러
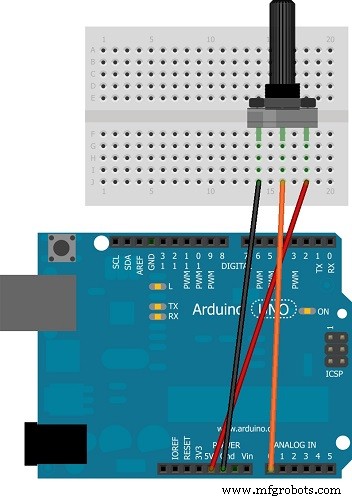
컨트롤러(스티어링 휠) 제작을 위해 10K옴 포텐셔미터를 A0 핀에 연결합니다(아래 그림 참조). UnoJoy 라이브러리를 사용하므로 UnoJoy.h 파일을 스케치 저장 폴더에 복사하세요.
Steam에서 플레이하기
Steam에서 XBOX360 게임패드로 인식시키려면 x360ce 프로그램을 사용합니다. 64비트/32비트 버전을 게임에 맞게 다운로드하세요. 압축 해제 후 x360ce.exe를 게임 실행 파일이 있는 폴더에 복사하고 실행하면 USB 조이스틱을 감지합니다.
스티어링 휠 제작 영상 튜토리얼은 제 유튜브 채널에 있습니다. 링크는 아래에 있습니다.
질문이나 조언은 여기나 유튜브 댓글로 남겨주세요.
앞으로의 프로젝트 업데이트를 위해 채널 구독 부탁드립니다. "여기" 클릭!
코드
코드
/* Arduino USB Joystick HID demo */
/* Author: Darran Hunt Public domain. Updated by RICLAMER 25/03/2014 for Analog/Digital ports */
/* This code is for Arduino UNO (6 axis, 13 buttons). Compatible with Mega. */
/* INSTALATION: 각 아날로그 포트에 POT 연결. _Grnd _Analog _5V 아두이노 핀 사용.
   버튼 설정: 선호하는 버튼 스위치를 GND와 디지털 포트 02~13에 연결.
   Flip으로 펌웨어 지우기/굽기 DFU: https://github.com/harlequin-tech/arduino-usb/blob/master/firmwares/Arduino-big-joystick.hex
   Atmega 16U2 장착 Arduino R3 사용. */
#undef DEBUG
#define NUM_BUTTONS 40
#define NUM_AXES 8
typedef struct joyReport_t {
  int16_t axis[NUM_AXES];
  uint8_t button[(NUM_BUTTONS + 7) / 8];
} joyReport_t;
joyReport_t joyReport;
uint8_t btn[12];
int fulloff = 0;

void setup(void); void loop(void);
void setButton(joyReport_t *joy, uint8_t button);
void clearButton(joyReport_t *joy, uint8_t button);
void sendJoyReport(joyReport_t *report);

void setup() {
  for (int portId = 2; portId < 13; portId++) { pinMode(portId, INPUT_PULLUP); }
  Serial.begin(115200); delay(200);
  for (uint8_t ind = 0; ind < 8; ind++) { joyReport.axis[ind] = ind * 1000; }
  for (uint8_t ind = 0; ind < sizeof(joyReport.button); ind++) { joyReport.button[ind] = 0; }
}

void sendJoyReport(struct joyReport_t *report) {
  #ifndef DEBUG
  Serial.write((uint8_t *)report, sizeof(joyReport_t));
  #else
  for (uint8_t ind = 0; ind < NUM_AXES; ind++) {
    Serial.print("axis["); Serial.print(ind); Serial.print("]= "); Serial.print(report->axis[ind]); Serial.print(" ");
  }
  Serial.println();
  for (uint8_t ind = 0; ind < NUM_BUTTONS / 8; ind++) {
    Serial.print("button["); Serial.print(ind); Serial.print("]= "); Serial.print(report->button[ind], HEX); Serial.print(" ");
  }
  Serial.println();
  #endif
}

void setButton(joyReport_t *joy, uint8_t button) {
  uint8_t index = button / 8;
  uint8_t bit = button - 8 * index;
  joy->button[index] |= 1 << bit;
}

void clearButton(joyReport_t *joy, uint8_t button) {
  uint8_t index = button / 8;
  uint8_t bit = button - 8 * index;
  joy->button[index] &= ~(1 << bit);
}

void loop() {
  for (int bt = 1; bt < 13; bt++) { btn[bt] = digitalRead(bt + 1); }
  for (int on = 1; on < 13; on++) {
    if (btn[on] == LOW) { setButton(&joyReport, on + 16); delay(1); }
  }
  for (int on = 1; on < 13; on++) {
    if (btn[on] == HIGH) { clearButton(&joyReport, on + 16); }
  }
  for (uint8_t axis = 0; axis < 2; axis++) { // A0 = 휠 = X축
    joyReport.axis[axis] = map(analogRead(axis), 350, 700, -32768, 32767);
  }
  joyReport.axis[3] = 0;
  joyReport.axis[4] = A0;
  joyReport.axis[5] = A3;
  joyReport.axis[6] = A2;
  joyReport.axis[7] = 0;
  joyReport.axis[8] = 0;
  sendJoyReport(&joyReport);
  delay(35);
  fulloff = 0;
}