

제조공정

산업 제조
<메인 클래스="사이트 메인" id="메인">
이 튜토리얼에서는 Arduino 범위 측정기와 디지털 수준기를 만드는 방법을 배웁니다. 다음 비디오를 보거나 아래에 작성된 튜토리얼을 읽을 수 있습니다.
이 장치는 가장 가까운 물체까지의 거리를 측정하기 위한 초음파 센서, 지면에 대한 각도를 측정하기 위한 가속도계, 결과를 표시하는 LCD 디스플레이 및 모든 구성 요소가 연결된 맞춤형 설계 PCB를 갖추고 있습니다.
버튼 하나만으로 기기를 조작할 수 있습니다. 장치에 전원을 공급하면 측정 단위를 선택해야 합니다.
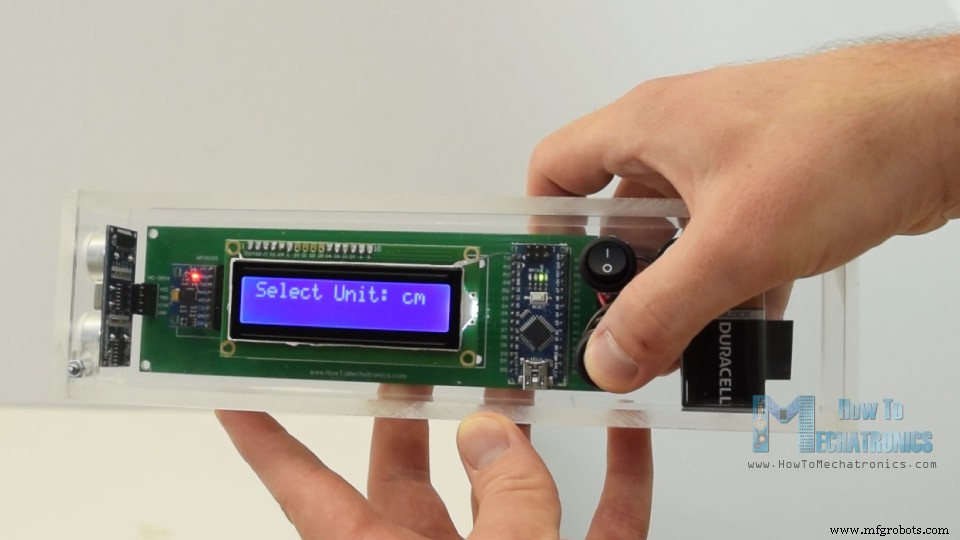
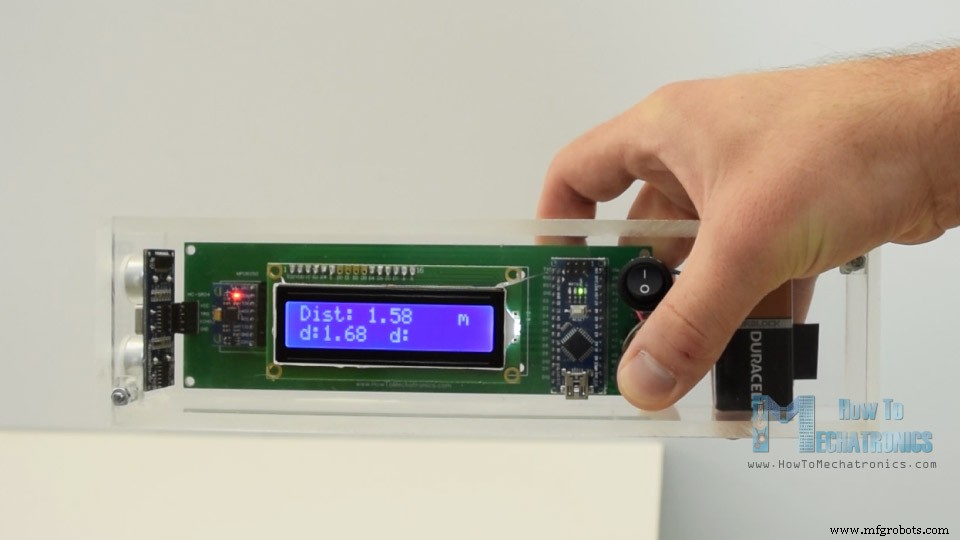
버튼을 눌러 단위를 전환할 수 있으며 잠시 동안 버튼을 누르고 있으면 첫 번째 프로그램으로 들어갑니다. 여기에서 거리를 측정할 수 있으며 마지막 두 측정값을 저장할 수도 있습니다.
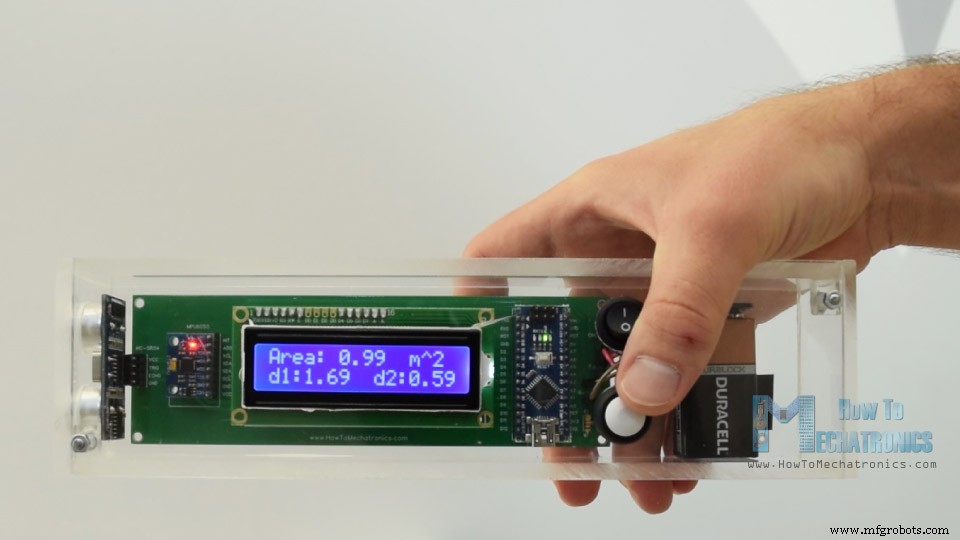
두 번째 프로그램에 들어가려면 다시 버튼을 잠시 누르고 있어야 합니다. 이 프로그램에서는 두 개의 수직 거리 측정을 수행하여 정사각형 영역을 측정할 수 있습니다.
다음 프로그램은 디지털 수준기이며 여기에서 지면에 대한 각도를 측정할 수 있습니다.
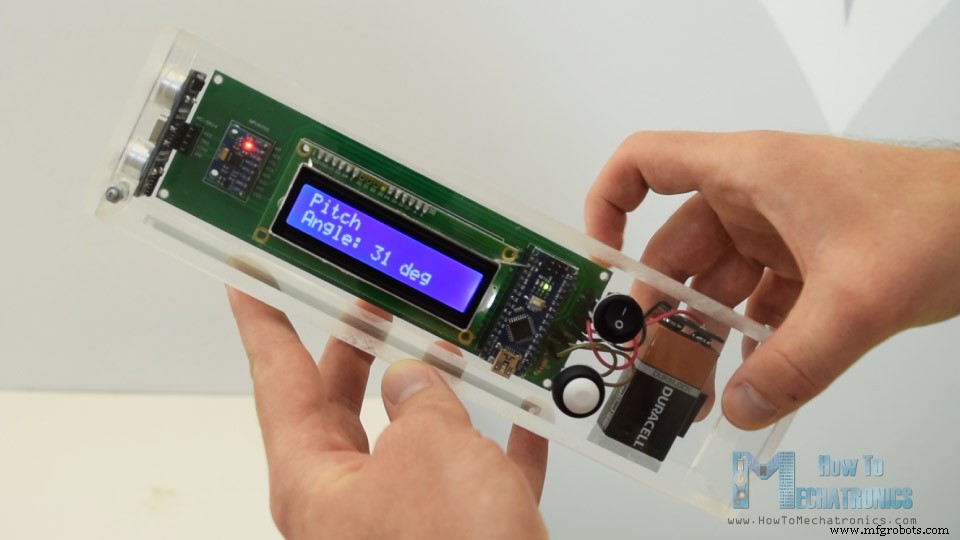
버튼을 사용하여 두 축 사이를 전환하거나 Pitch 또는 Roll을 측정할 수 있습니다.
다음은 이 Arduino 프로젝트의 회로도입니다.
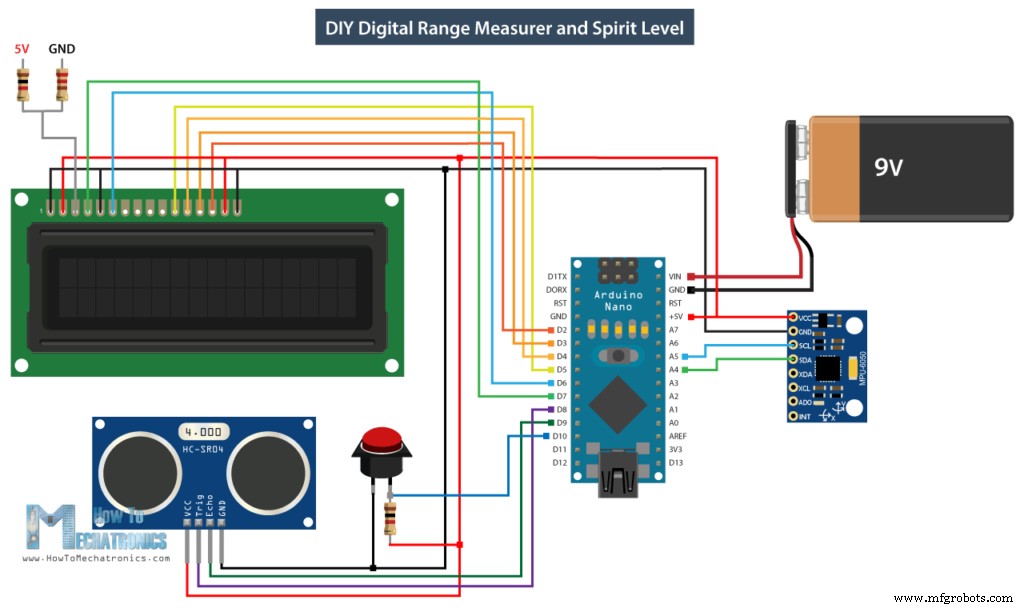
이러한 각 모듈의 작동 방식에 대한 자세한 자습서가 이미 있으며 초음파 센서 자습서, LCD 자습서, MEMS 가속도계 자습서에서 확인할 수 있습니다.
아래 링크에서 이 프로젝트에 필요한 구성요소를 얻을 수 있습니다.
회로도에 따르면 맞춤형 PCB를 설계해야 하며 저는 EasyEDA 무료 온라인 회로 설계 소프트웨어를 사용하여 이를 수행했습니다.
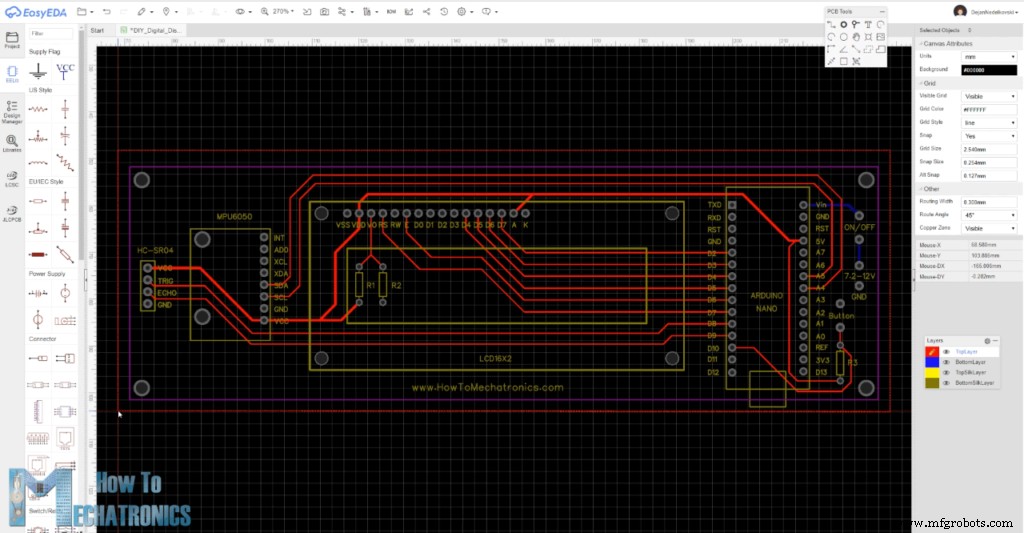
여기에서 설계가 끝나면 PCB 제조에 사용되는 Gerber 파일을 간단히 내보낼 수 있습니다. 이 프로젝트의 EasyEDA 프로젝트 파일은 여기에서 확인할 수 있습니다.
그러면 실제로 이 프로젝트의 후원자인 JLCPCB에서 PCB를 주문할 수 있습니다.
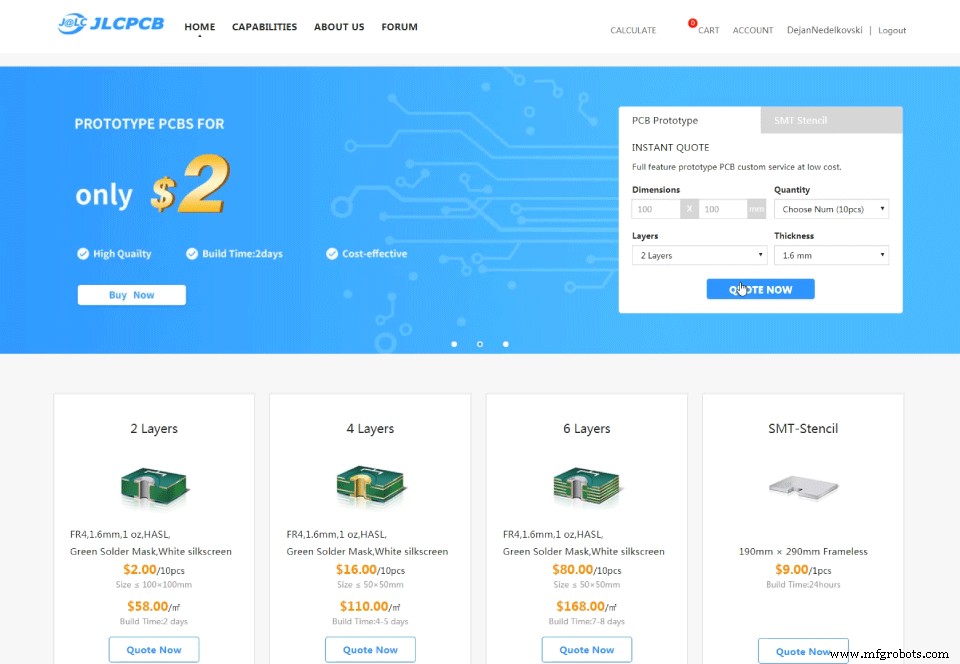
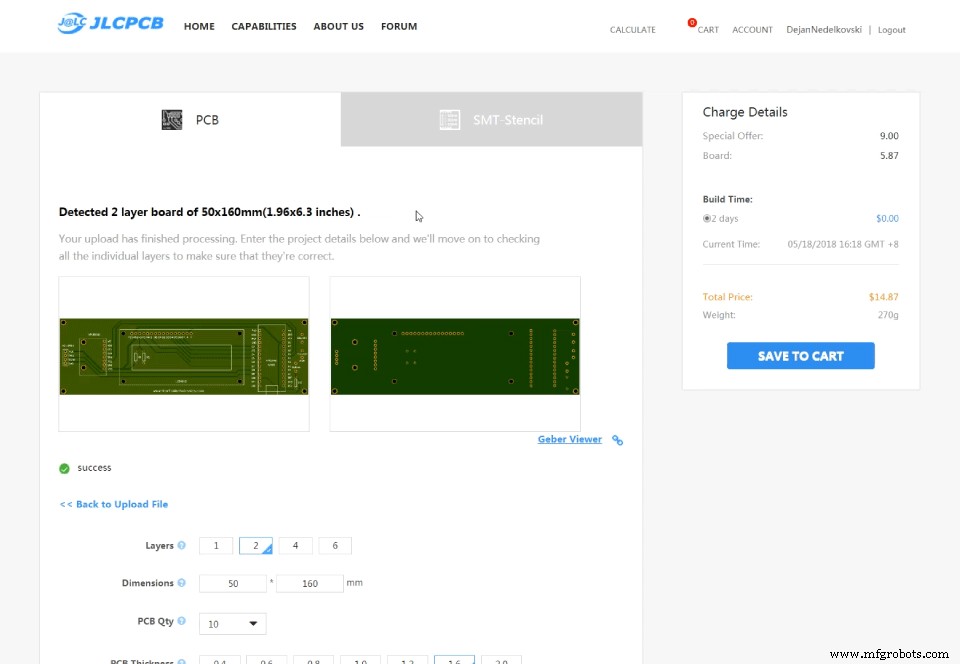
여기에서 Gerber 파일을 끌어다 놓기만 하면 됩니다. 업로드되면 Gerber 뷰어에서 PCB를 검토할 수 있습니다. 모든 것이 정상이면 계속해서 PCB에 대해 원하는 속성을 선택한 다음 합리적인 가격에 PCB를 주문할 수 있습니다. JLCPCB에서 처음 주문하는 경우 단돈 2달러에 최대 10개의 PCB를 얻을 수 있습니다.
그럼에도 불구하고 며칠 후에 PCB가 도착했습니다. PCB의 품질이 우수하고 모든 것이 디자인과 동일합니다.
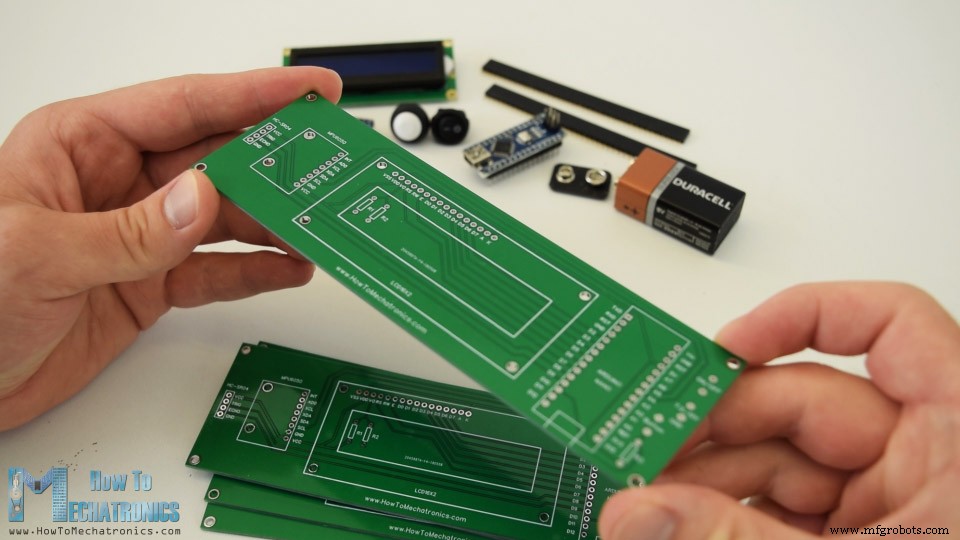
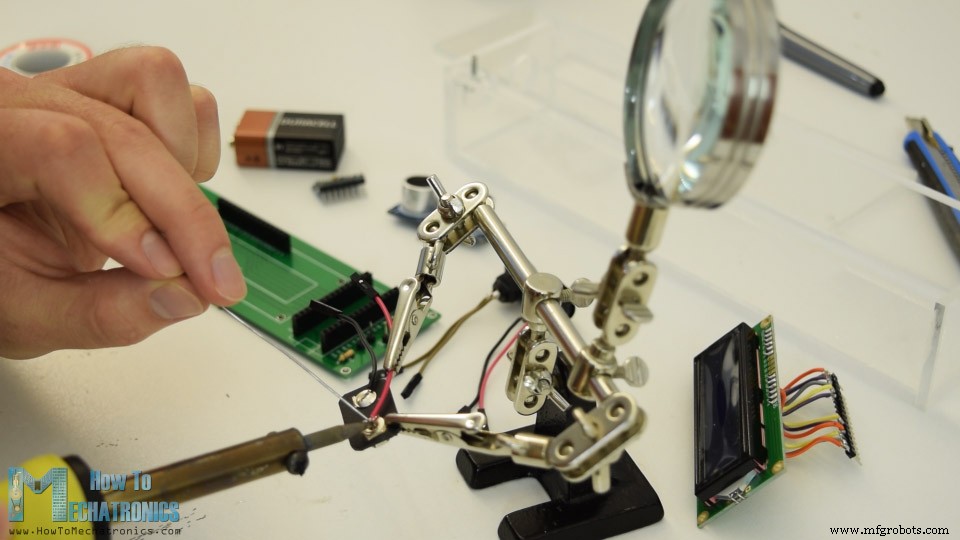
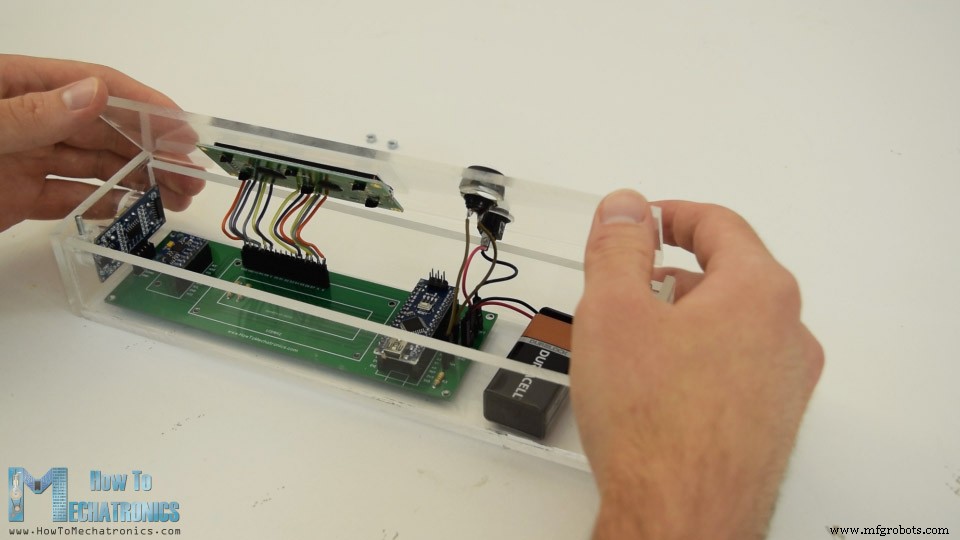
자, 이제 이 프로젝트를 위한 전자 장치 조립을 시작할 수 있습니다. 나는 PCB에 핀 헤더를 납땜하는 것으로 시작했습니다. 이런 식으로 필요할 때 구성 요소를 쉽게 연결하고 분리할 수 있습니다.
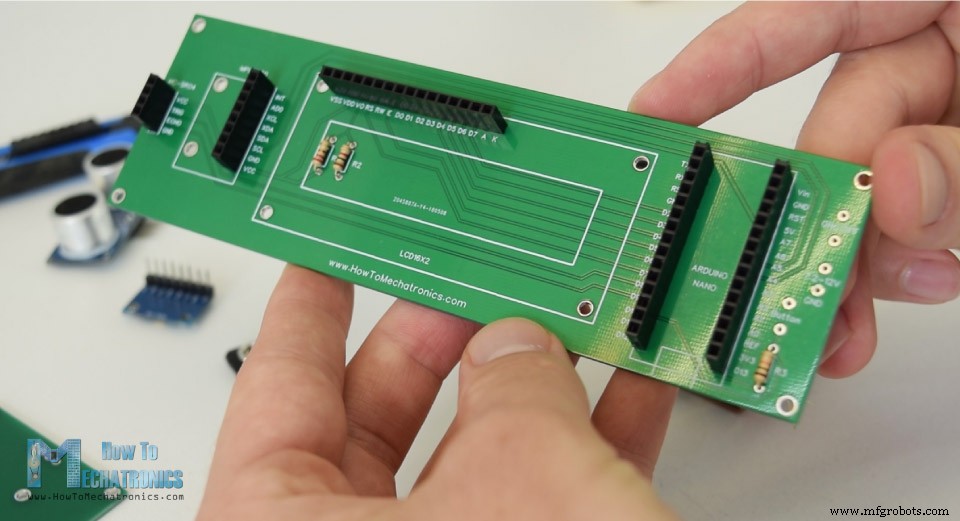
그런 다음 세 개의 저항을 삽입하고 납땜했습니다. 그 중 2개는 LCD 대비를 위한 분압기용입니다. 1k 저항은 R1에, 220옴은 R2에 배치해야 합니다. 세 번째는 버튼용 풀업 저항입니다.
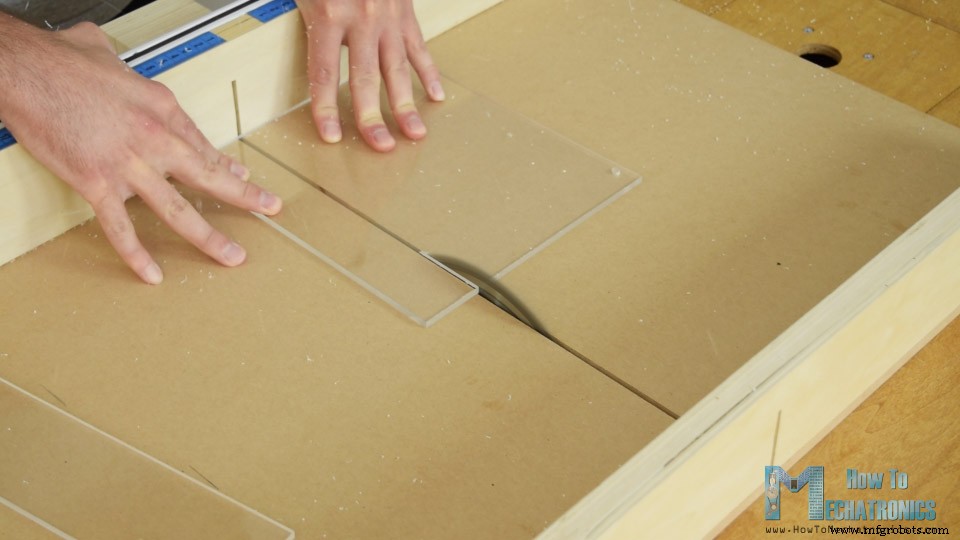
다음으로 장치 케이스를 만드는 작업을 진행했습니다. 나는 모든 전자 부품의 아름다움이 보이길 원했기 때문에 투명 아크릴을 사용하기로 결정했습니다. 예전 프로젝트에서 5mm 틱 아크릴이 있었는데 원형을 사용하여 크기에 맞게 잘라냈습니다.
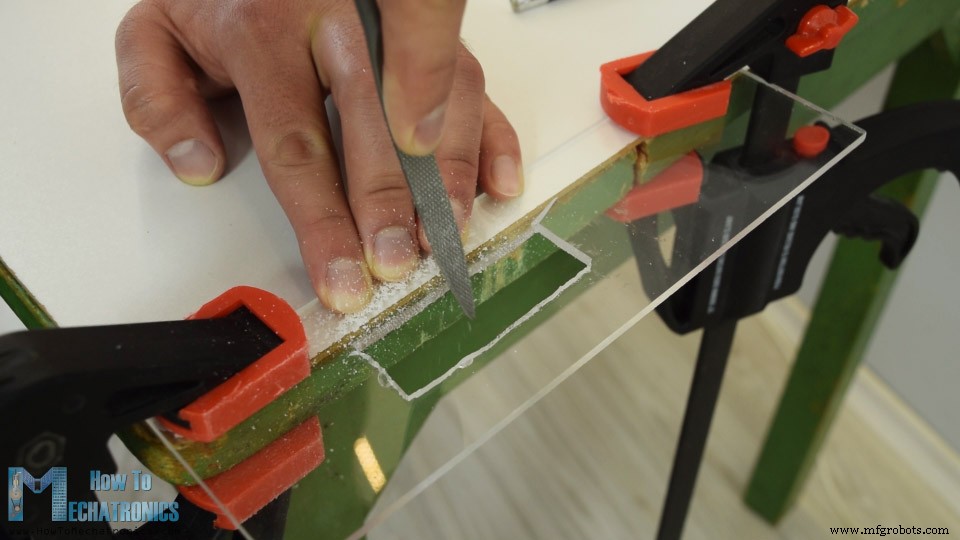
그런 다음 케이스 상단에 LCD를 위한 구멍을 만들어야 했습니다. LCD에 더 잘 맞기 때문에 실제로 4mm 눈금입니다. 그래서 먼저 드릴로 구멍을 2개 만든 다음 쇠톱으로 구멍을 뚫었습니다. 쇠톱으로 대충 구멍을 낸 다음 갈고리를 사용하여 LCD가 딱 맞도록 가는 직선을 그었습니다.
그런 다음 Forstner 비트를 사용하여 전원 스위치, 제어 버튼 및 초음파 센서를 위한 구멍을 만들었습니다.
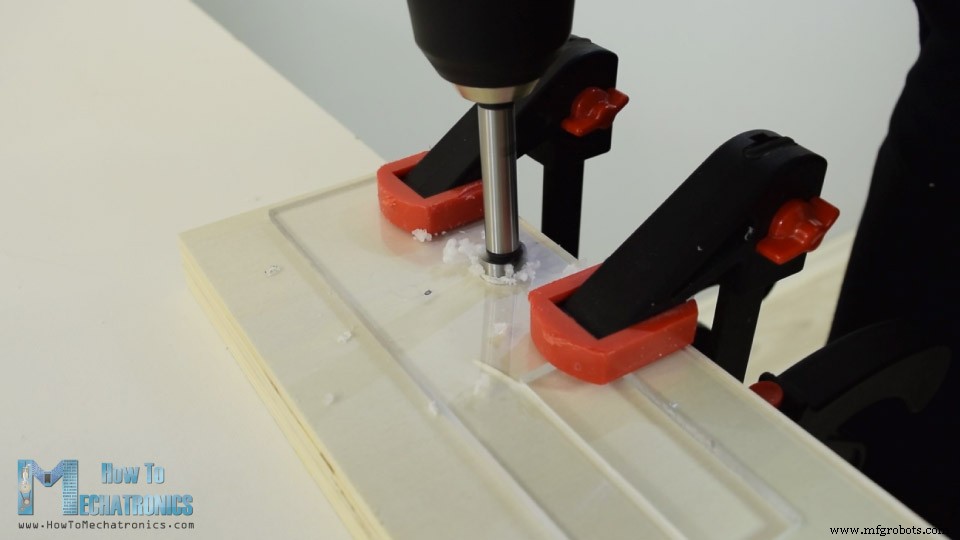
모든 조각이 준비되면 5분 에폭시를 사용하여 케이스에 조립했습니다. 상단은 상단 패널을 삽입하고 상단에 너트를 사용하여 고정할 수 있는 볼트 2개를 삽입하고 접착했습니다.
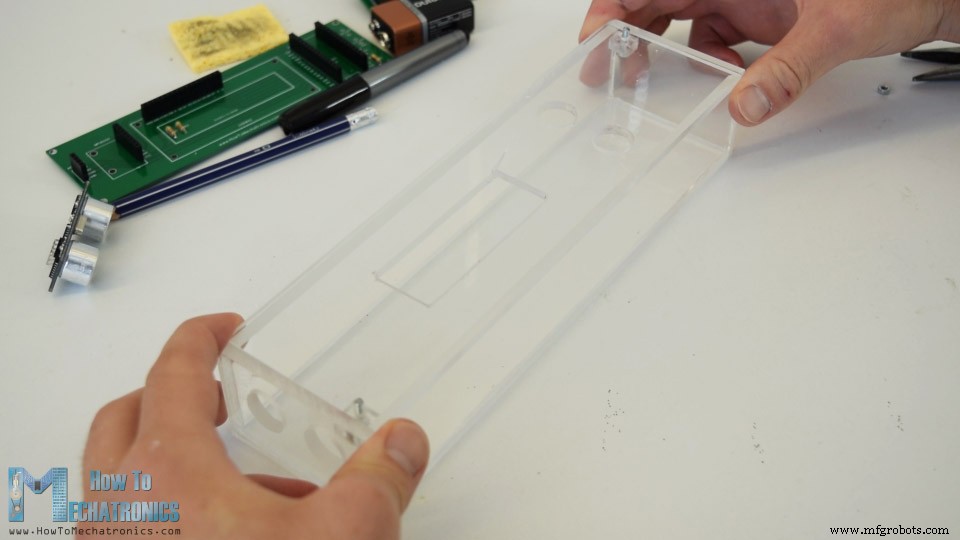
이제 케이스가 준비되었으므로 PCB에 쉽게 부착할 수 있도록 LCD에 핀 헤더를 계속 납땜했습니다. 또한 전원 스위치, 버튼 및 배터리 커넥터에 핀 헤더 또는 점프 와이어를 납땜했습니다.
마지막으로 장치를 조립할 모든 준비가 완료되었습니다. PCB에 초음파 센서를 삽입한 다음 측면 패널의 구멍을 통해 시작했습니다. 다음은 Arduino 보드, 가속도계 모듈 및 배터리 커넥터였습니다.
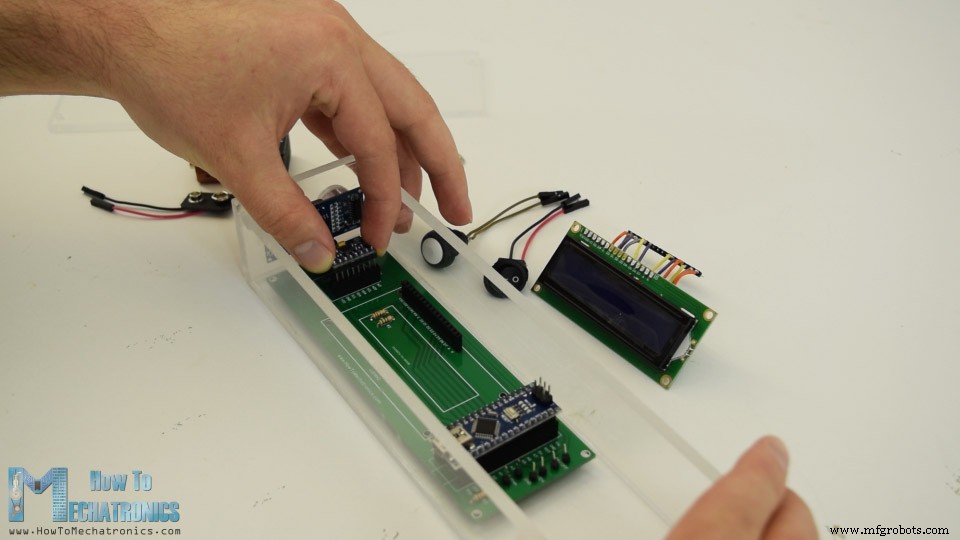
상단 패널에는 LCD, 전원 스위치, 버튼을 고정한 후 PCB에 연결했습니다. 마지막으로 9V 배터리를 커넥터에 삽입하고 상단 패널을 너트로 고정했습니다.
이상으로 아두이노 거리측정기 프로젝트는 끝났지만 이 영상에 남은 것은 프로그램이 어떻게 작동하는지 설명하는 것이므로 아두이노 코드를 살펴보겠습니다.
코드가 조금 더 길기 때문에 이해를 돕기 위해 프로그램의 소스 코드를 섹션별로 설명과 함께 게시하겠습니다. 그리고 이 기사의 끝에 완전한 소스 코드를 게시할 것입니다.
따라서 먼저 가속도계의 I2C 통신을 위한 Wire.h 라이브러리와 LCD 제어를 위한 LiquidCrystal.h 라이브러리를 포함해야 합니다. 그런 다음 LCD, MPU6050 가속도계 모듈의 I2C 주소, 초음파 센서 핀 및 아래 프로그램에 필요한 일부 변수를 정의해야 합니다.
#include<Wire.h> // I2C communication library
#include <LiquidCrystal.h> // includes the LiquidCrystal Library

LiquidCrystal lcd(7, 6, 5, 4, 3, 2); // Creates an LCD object. Parameters: (rs, enable, d4, d5, d6, d7)
const int MPU = 0x68; // I2C address of the MPU6050 accelerometer

#define trigPin 8
#define echoPin 9
#define selectButton 10

int16_t AcX, AcY, AcZ;
long duration;
float distance;
int program = 0;
float d = 0;
float d1 = 0;
float d2 = 0;
float area = 0;
int axis = 0;
int angle = 0;
int unitSelect = 0;
String unit = "cm";Code language: Arduino (arduino)
설정 섹션에서 가속도계와 액정 디스플레이의 I2C 인터페이스를 모두 초기화하고 초음파 센서 트리거 및 에코 핀과 버튼 핀에 대한 핀 모드를 정의해야 합니다.
void setup() {
  // Initialize interface to the MPU6050
  Wire.begin();
  Wire.beginTransmission(MPU);
  Wire.write(0x6B);
  Wire.write(0);
  Wire.endTransmission(true);

  lcd.begin(16, 2); // Initializes the interface to the LCD screen

  pinMode(trigPin, OUTPUT);
  pinMode(echoPin, INPUT);
  pinMode(selectButton, INPUT_PULLUP);
}Code language: Arduino (arduino)
메인 루프 섹션에는 장치의 다른 프로그램 사이를 토글할 수 있는 스위치 문이 있습니다. 첫 번째 또는 사례 번호 0에서 측정 단위를 선택합니다. lcd.print() 함수를 사용하여 LCD에 텍스트를 인쇄하고 if 문을 사용하여 4가지 측정 단위를 전환합니다.
switch (program) {  // Switch between different programs
    case 0:  // Select unit of measurement
      lcd.setCursor(0, 0); // Sets the location at which subsequent text written to the LCD will be displayed
      lcd.print("Select Unit: ");
      lcd.setCursor(13, 0);
      lcd.print(unit);
      lcd.print("  ");
      delay(10);
      // If button is pressed - change unit
      if (digitalRead(selectButton) == 0) {
        if (unitSelect == 0) {
          unit = "in";
          unitSelect = 1;
        }
        else if (unitSelect == 1) {
          unit = "m";
          unitSelect = 2;
        }
        else if (unitSelect == 2) {
          unit = "ft";
          unitSelect = 3;
        }
        else if (unitSelect == 3) {
          unit = "cm";
          unitSelect = 0;
        }
        // If button is held longer then half a second - change program
        delay(500);
        if (digitalRead(selectButton) == 0) {
          program = 1;
          lcd.clear();
          delay(500);
        }
      }
      break;Code language: Arduino (arduino)
여기서 unitSelect 변수는 getDistance() 사용자 정의 함수에서 작업을 수행합니다. 여기서 이 변수는 실제로 초음파 센서에서 가져온 기본 cm 단위를 변환해야 하는 단위를 알려줍니다.
/ Converting the units
  if (unitSelect == 1) {
    distance = distance; // cm to cm
    unit = "cm";
  }
  else if (unitSelect == 2) {
    distance = distance *  0.393701; // cm to in
    unit = "in";
  }
  else if (unitSelect == 3) {
    distance = distance * 0.01; // cm to m
    unit = "m";
  }
  else if (unitSelect == 0) {
    distance = distance * 0.0328; // cm to ft
    unit = "ft";
  }Code language: Arduino (arduino)
측정 단위를 선택하고 장치의 첫 번째 프로그램에 들어가려면 버튼을 0.5초 이상 누르고 있으면 됩니다.
// If button is held longer then half a second - change program
        delay(500);
        if (digitalRead(selectButton) == 0) {
          program = 1;
          lcd.clear();
          delay(500);
        }
      }
      break;Code language: Arduino (arduino)
1번의 경우 또는 거리 측정 프로그램에서 먼저 getDistance() 사용자 정의 함수를 사용하여 가장 가까운 물체까지의 거리를 얻습니다.
case 1:   // Distance measuring program
      distance = getDistance(); // Distance to the nearest object
      lcd.setCursor(0, 0);
      lcd.print("Dist: ");
      lcd.print(distance); // Prints the distance value from the sensor
      lcd.print("    ");
      lcd.setCursor(14, 0);
      lcd.print(unit);
      delay(10);
      lcd.setCursor(0, 1);
      lcd.print("d:");
      lcd.setCursor(8, 1);
      lcd.print("d:");
      delay(200);
      // Save distance 1
      if (digitalRead(selectButton) == 0) {
        if (d == 0) {
          lcd.setCursor(0, 1);
          lcd.print("d:     ");
          lcd.setCursor(2, 1);
          lcd.print(distance);
          d = 1;
          delay(100);
        }
        // Save distance 2
        else if (d == 1) {
          lcd.setCursor(8, 1);
          lcd.print("d:     ");
          lcd.setCursor(10, 1);
          lcd.print(distance);
          d = 0;
          delay(100);
        }
        // If button is held longer then half sencond change program
        delay(500);
        if (digitalRead(selectButton) == 0) {
          program = 2;
          d = 0;
          lcd.clear();
          delay(500);
        }
      }
      break;Code language: Arduino (arduino)
이 기능이 어떻게 작동하는지 봅시다.
//===== getDistance - Custom Function
float getDistance() {
  // Clears the trigPin
  digitalWrite(trigPin, LOW);
  // Sets the trigPin on HIGH state for 10 micro seconds
  digitalWrite(trigPin, HIGH);
  delayMicroseconds(10);
  digitalWrite(trigPin, LOW);
  // Reads the echoPin, returns the sound wave travel time in microseconds
  duration = pulseIn(echoPin, HIGH);
  // Calculating the distance
  distance = duration * 0.034 / 2; // distance in cm

  // Converting the units
  if (unitSelect == 1) {
    distance = distance; // cm to cm
    unit = "cm";
  }
  else if (unitSelect == 2) {
    distance = distance *  0.393701; // cm to in
    unit = "in";
  }
  else if (unitSelect == 3) {
    distance = distance * 0.01; // cm to m
    unit = "m";
  }
  else if (unitSelect == 0) {
    distance = distance * 0.0328; // cm to ft
    unit = "ft";
  }
  return distance;
}Code language: Arduino (arduino)
여기에서 트리거 핀을 사용하여 초음파 음파를 생성하도록 센서에 지시합니다.
<그림 클래스="aligncenter">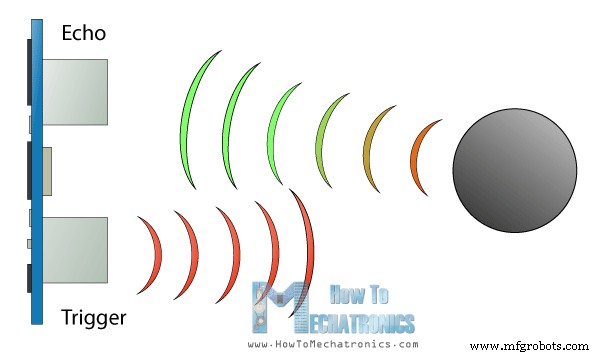
그런 다음 에코 핀과 pulseIn() 함수를 사용하여 파동이 센서에서 물체까지 이동한 시간을 측정합니다. 음속과 이동 시간을 고려하면 거리를 쉽게 계산할 수 있습니다. 따라서 LCD의 일부 텍스트와 함께 측정된 거리를 인쇄하고 "if" 문을 사용하여 버튼을 누르면 마지막 두 측정값을 인쇄하거나 저장합니다.
다음은 유사한 방법을 사용하는 면적 계산 프로그램입니다. 두 개의 수직 측정을 수행하고 이들이 형성하는 정사각형의 면적을 얻기 위해 단순히 곱해야 합니다.
case 2:   // Area measuring program
      distance = getDistance();
      lcd.setCursor(0, 0);
      lcd.print("Area: ");
      lcd.print(area); // Prints the calculated area from the two measurements
      lcd.setCursor(12, 0);
      lcd.print(unit); // Prints the selected unit and the square sign below
      lcd.print("^2");
      delay(200);
      if ( d == 0) {
        lcd.setCursor(0, 1);
        lcd.print("d1:       ");
        lcd.setCursor(3, 1);
        lcd.print(distance);
        delay(200);
      }
      else if (d == 1) {
        lcd.setCursor(9, 1);
        lcd.print("d2:      ");
        lcd.setCursor(12, 1);
        lcd.print(distance);
        delay(200);
      }
      else if (d == 2) {
        lcd.setCursor(6, 0);
        lcd.print(area);
        delay(200);
      }
      // Save distance 1
      if (digitalRead(selectButton) == 0) {
        if (d == 0) {
          lcd.setCursor(0, 1);
          lcd.print("d1:    ");
          lcd.setCursor(3, 1);
          lcd.print(distance);
          d = 1;
          d1 = distance;
          delay(100);
        }
        // Save distance 2
        else if (d == 1) {
          lcd.setCursor(9, 1);
          lcd.print("d2:    ");
          lcd.setCursor(12, 1);
          lcd.print(distance);
          d = 2;
          d2 = distance;
          area = d1 * d2; // Calculate the area
          delay(100);
        }
        else if (d == 2) {
          lcd.clear();
          d = 0;
          area = 0;
          delay(100);
        }
        // If button is held longer then half sencond change program
        delay(500);
        if (digitalRead(selectButton) == 0) {
          program = 3;
          d = 0;
          lcd.clear();
          delay(500);
        }
      }
      break;Code language: Arduino (arduino)
마지막 경우는 각도 측정 프로그램입니다. 여기서 우리는 실제로 지구 중력장의 세기인 가속도계 데이터를 X, Y, Z 세 개의 다른 축에서 읽어야 합니다. 각 축의 값은 2개의 레지스터에 저장되므로 총 6개의 레지스터를 읽어야 합니다. 적절한 가치를 얻기 위해 이들을 결합합니다.
case 3:    // Angle measuring program
      // Read the accelerometer data
      Wire.beginTransmission(MPU);
      Wire.write(0x3B); // Start with register 0x3B (ACCEL_XOUT_H)
      Wire.endTransmission(false);
      Wire.requestFrom(MPU, 6, true); // Read 6 registers total, each axis value is stored in 2 registers
      AcX = Wire.read() << 8 | Wire.read(); // X-axis value
      AcY = Wire.read() << 8 | Wire.read(); // Y-axis value
      AcZ = Wire.read() << 8 | Wire.read(); // Z-axis value

      if ( axis == 0) {
        // Calculating the Pitch angle (rotation around Y-axis)
        angle = atan(-1 * AcX / sqrt(pow(AcY, 2) + pow(AcZ, 2))) * 180 / PI;
        lcd.setCursor(0, 0);
        lcd.print("Pitch");
      }
      else if (axis == 1) {
        // Calculating the Roll angle (rotation around X-axis)
        angle = atan(-1 * AcY / sqrt(pow(AcX, 2) + pow(AcZ, 2))) * 180 / PI;
        lcd.setCursor(0, 0);
        lcd.print("Roll ");
      }
      lcd.setCursor(0, 1);
      lcd.print("Angle: ");
      lcd.print(abs(angle));
      lcd.print("     ");
      lcd.setCursor(10, 1);
      lcd.print("deg");
      delay(200);

      // Change axis
      if (digitalRead(selectButton) == 0) {
        if (axis == 0) {
          axis = 1;
          delay(100);
        }
        // Save distance 2
        else if (axis == 1) {
          axis = 0;
          delay(100);
        }
        // If button is held longer then half sencond change program
        delay(500);
        if (digitalRead(selectButton) == 0) {
          program = 0;
          lcd.clear();
          delay(500);
        }
      }
      break;Code language: Arduino (arduino)
가속도계의 X, Y 및 Z 값이 있으면 두 방정식을 사용하여 Pitch 각도 또는 Y축을 중심으로 한 회전과 Roll 각도 또는 X축을 중심으로 회전을 계산할 수 있습니다. 이러한 방정식에 대한 자세한 내용은 Freescale Semiconductor 애플리케이션 노트, 3축 가속도계를 사용한 기울기 감지에서 확인할 수 있습니다. . 그런 다음 LCD에 일부 텍스트와 함께 값을 인쇄하고 버튼을 눌러 피치 또는 롤 각도에 관계없이 LCD에 표시되는 내용을 변경합니다.
이 Arduino 범위 측정기 및 수준기 프로젝트의 전체 소스 코드는 다음과 같습니다.
/*
  DIY Digital Range Measurer and Spirit Level

  by Dejan Nedelkovski,
  www.HowToMechatronics.com

*/
#include<Wire.h> // I2C communication library
#include <LiquidCrystal.h> // includes the LiquidCrystal Library

LiquidCrystal lcd(7, 6, 5, 4, 3, 2); // Creates an LCD object. Parameters: (rs, enable, d4, d5, d6, d7)
const int MPU = 0x68; // I2C address of the MPU6050 accelerometer

#define trigPin 8
#define echoPin 9
#define selectButton 10

int16_t AcX, AcY, AcZ;
long duration;
float distance;
int program = 0;
float d = 0;
float d1 = 0;
float d2 = 0;
float area = 0;
int axis = 0;
int angle = 0;
int unitSelect = 0;
String unit = "cm";

void setup() {
  // Initialize interface to the MPU6050
  Wire.begin();
  Wire.beginTransmission(MPU);
  Wire.write(0x6B);
  Wire.write(0);
  Wire.endTransmission(true);

  lcd.begin(16, 2); // Initializes the interface to the LCD screen

  pinMode(trigPin, OUTPUT);
  pinMode(echoPin, INPUT);
  pinMode(selectButton, INPUT_PULLUP);
}
void loop() {
  switch (program) {  // Switch between different programs
    case 0:  // Select unit of measurement
      lcd.setCursor(0, 0); // Sets the location at which subsequent text written to the LCD will be displayed
      lcd.print("Select Unit: ");
      lcd.setCursor(13, 0);
      lcd.print(unit);
      lcd.print("  ");
      delay(10);
      // If button is pressed - change unit
      if (digitalRead(selectButton) == 0) {
        if (unitSelect == 0) {
          unit = "in";
          unitSelect = 1;
        }
        else if (unitSelect == 1) {
          unit = "m";
          unitSelect = 2;
        }
        else if (unitSelect == 2) {
          unit = "ft";
          unitSelect = 3;
        }
        else if (unitSelect == 3) {
          unit = "cm";
          unitSelect = 0;
        }
        // If button is held longer then half a second - change program
        delay(500);
        if (digitalRead(selectButton) == 0) {
          program = 1;
          lcd.clear();
          delay(500);
        }
      }
      break;

    case 1:   // Distance measuring program
      distance = getDistance(); // Distance to the nearest object
      lcd.setCursor(0, 0);
      lcd.print("Dist: ");
      lcd.print(distance); // Prints the distance value from the sensor
      lcd.print("    ");
      lcd.setCursor(14, 0);
      lcd.print(unit);
      delay(10);
      lcd.setCursor(0, 1);
      lcd.print("d:");
      lcd.setCursor(8, 1);
      lcd.print("d:");
      delay(200);
      // Save distance 1
      if (digitalRead(selectButton) == 0) {
        if (d == 0) {
          lcd.setCursor(0, 1);
          lcd.print("d:     ");
          lcd.setCursor(2, 1);
          lcd.print(distance);
          d = 1;
          delay(100);
        }
        // Save distance 2
        else if (d == 1) {
          lcd.setCursor(8, 1);
          lcd.print("d:     ");
          lcd.setCursor(10, 1);
          lcd.print(distance);
          d = 0;
          delay(100);
        }
        // If button is held longer then half sencond change program
        delay(500);
        if (digitalRead(selectButton) == 0) {
          program = 2;
          d = 0;
          lcd.clear();
          delay(500);
        }
      }
      break;

    case 2:   // Area measuring program
      distance = getDistance();
      lcd.setCursor(0, 0);
      lcd.print("Area: ");
      lcd.print(area); // Prints the calculated area from the two measurements
      lcd.setCursor(12, 0);
      lcd.print(unit); // Prints the selected unit and the square sign below
      lcd.print("^2");
      delay(200);
      if ( d == 0) {
        lcd.setCursor(0, 1);
        lcd.print("d1:       ");
        lcd.setCursor(3, 1);
        lcd.print(distance);
        delay(200);
      }
      else if (d == 1) {
        lcd.setCursor(9, 1);
        lcd.print("d2:      ");
        lcd.setCursor(12, 1);
        lcd.print(distance);
        delay(200);
      }
      else if (d == 2) {
        lcd.setCursor(6, 0);
        lcd.print(area);
        delay(200);
      }
      // Save distance 1
      if (digitalRead(selectButton) == 0) {
        if (d == 0) {
          lcd.setCursor(0, 1);
          lcd.print("d1:    ");
          lcd.setCursor(3, 1);
          lcd.print(distance);
          d = 1;
          d1 = distance;
          delay(100);
        }
        // Save distance 2
        else if (d == 1) {
          lcd.setCursor(9, 1);
          lcd.print("d2:    ");
          lcd.setCursor(12, 1);
          lcd.print(distance);
          d = 2;
          d2 = distance;
          area = d1 * d2; // Calculate the area
          delay(100);
        }
        else if (d == 2) {
          lcd.clear();
          d = 0;
          area = 0;
          delay(100);
        }
        // If button is held longer then half sencond change program
        delay(500);
        if (digitalRead(selectButton) == 0) {
          program = 3;
          d = 0;
          lcd.clear();
          delay(500);
        }
      }
      break;

    case 3:    // Angle measuring program
      // Read the accelerometer data
      Wire.beginTransmission(MPU);
      Wire.write(0x3B); // Start with register 0x3B (ACCEL_XOUT_H)
      Wire.endTransmission(false);
      Wire.requestFrom(MPU, 6, true); // Read 6 registers total, each axis value is stored in 2 registers
      AcX = Wire.read() << 8 | Wire.read(); // X-axis value
      AcY = Wire.read() << 8 | Wire.read(); // Y-axis value
      AcZ = Wire.read() << 8 | Wire.read(); // Z-axis value

      if ( axis == 0) {
        // Calculating the Pitch angle (rotation around Y-axis)
        angle = atan(-1 * AcX / sqrt(pow(AcY, 2) + pow(AcZ, 2))) * 180 / PI;
        lcd.setCursor(0, 0);
        lcd.print("Pitch");
      }
      else if (axis == 1) {
        // Calculating the Roll angle (rotation around X-axis)
        angle = atan(-1 * AcY / sqrt(pow(AcX, 2) + pow(AcZ, 2))) * 180 / PI;
        lcd.setCursor(0, 0);
        lcd.print("Roll ");
      }
      lcd.setCursor(0, 1);
      lcd.print("Angle: ");
      lcd.print(abs(angle));
      lcd.print("     ");
      lcd.setCursor(10, 1);
      lcd.print("deg");
      delay(200);

      // Change axis
      if (digitalRead(selectButton) == 0) {
        if (axis == 0) {
          axis = 1;
          delay(100);
        }
        // Save distance 2
        else if (axis == 1) {
          axis = 0;
          delay(100);
        }
        // If button is held longer then half sencond change program
        delay(500);
        if (digitalRead(selectButton) == 0) {
          program = 0;
          lcd.clear();
          delay(500);
        }
      }
      break;
  }
}

//===== getDistance - Custom Function
float getDistance() {
  // Clears the trigPin
  digitalWrite(trigPin, LOW);
  // Sets the trigPin on HIGH state for 10 micro seconds
  digitalWrite(trigPin, HIGH);
  delayMicroseconds(10);
  digitalWrite(trigPin, LOW);
  // Reads the echoPin, returns the sound wave travel time in microseconds
  duration = pulseIn(echoPin, HIGH);
  // Calculating the distance
  distance = duration * 0.034 / 2; // distance in cm

  // Converting the units
  if (unitSelect == 1) {
    distance = distance; // cm to cm
    unit = "cm";
  }
  else if (unitSelect == 2) {
    distance = distance *  0.393701; // cm to in
    unit = "in";
  }
  else if (unitSelect == 3) {
    distance = distance * 0.01; // cm to m
    unit = "m";
  }
  else if (unitSelect == 0) {
    distance = distance * 0.0328; // cm to ft
    unit = "ft";
  }
  return distance;
}Code language: Arduino (arduino)
그게 다야, 이 Arduino 프로젝트를 즐기고 새로운 것을 배웠기를 바랍니다. 아래 댓글 섹션에서 언제든지 질문하세요.
제조공정
이 프로젝트에서는 Arduino 터치 스크린 MP3 음악 플레이어와 알람 시계를 만드는 방법을 보여 드리겠습니다. 다음 비디오를 보거나 아래에 작성된 튜토리얼을 읽을 수 있습니다. 개요 홈 화면에는 큰 시계, 날짜 및 온도 정보, 뮤직 플레이어 및 알람 시계용 버튼 2개가 있습니다. 뮤직 플레이어에 들어가면 화면 중앙에 있는 큰 재생 버튼을 눌러 음악 재생을 시작할 수 있습니다. 바로 옆에는 이전 또는 다음 곡을 재생할 수 있는 두 개의 버튼이 더 있습니다. 이 버튼 위에는 노래 진행률 표시줄이 있고 화면 하단에는 볼
이 Arduino 자습서에서는 Arduino 보드와 처리 개발 환경을 사용하여 이 멋진 레이더를 만드는 방법을 보여 드리겠습니다. 자세한 내용은 다음 동영상을 보거나 아래에 작성된 튜토리얼을 참조하세요. 개요 이 Arduino 프로젝트에 필요한 것은 물체를 감지하기 위한 초음파 센서, 센서를 회전시키기 위한 작은 취미 생활자 서보 모터 및 이를 제어하기 위한 Arduino 보드뿐입니다. 다음 동영상을 보거나 아래에 작성된 튜토리얼을 읽을 수 있습니다.[/column] 이 Arduino 프로젝트에 필요한 구성요소 다음 사이트에서