

제조공정

산업 제조
 |
| × | 1 | |||
| × | 2 | ||||
| × | 5 | ||||
| × | 1 | ||||
| × | 2 | ||||
 |
| × | 2 | |||
| × | 1 | ||||
| × | 2 | ||||
| × | 2 | ||||
| × | 1 | ||||
| × | 1 | ||||
| × | 1 | ||||
| × | 1 | ||||
| × | 1 | ||||
| × | 1 | ||||
| × | 1 | ||||
| × | 1 | ||||
| × | 1 | ||||
| × | 1 | ||||
| × | 1 |
 |
| |||
| ||||
 |
|
 |
| |||
|
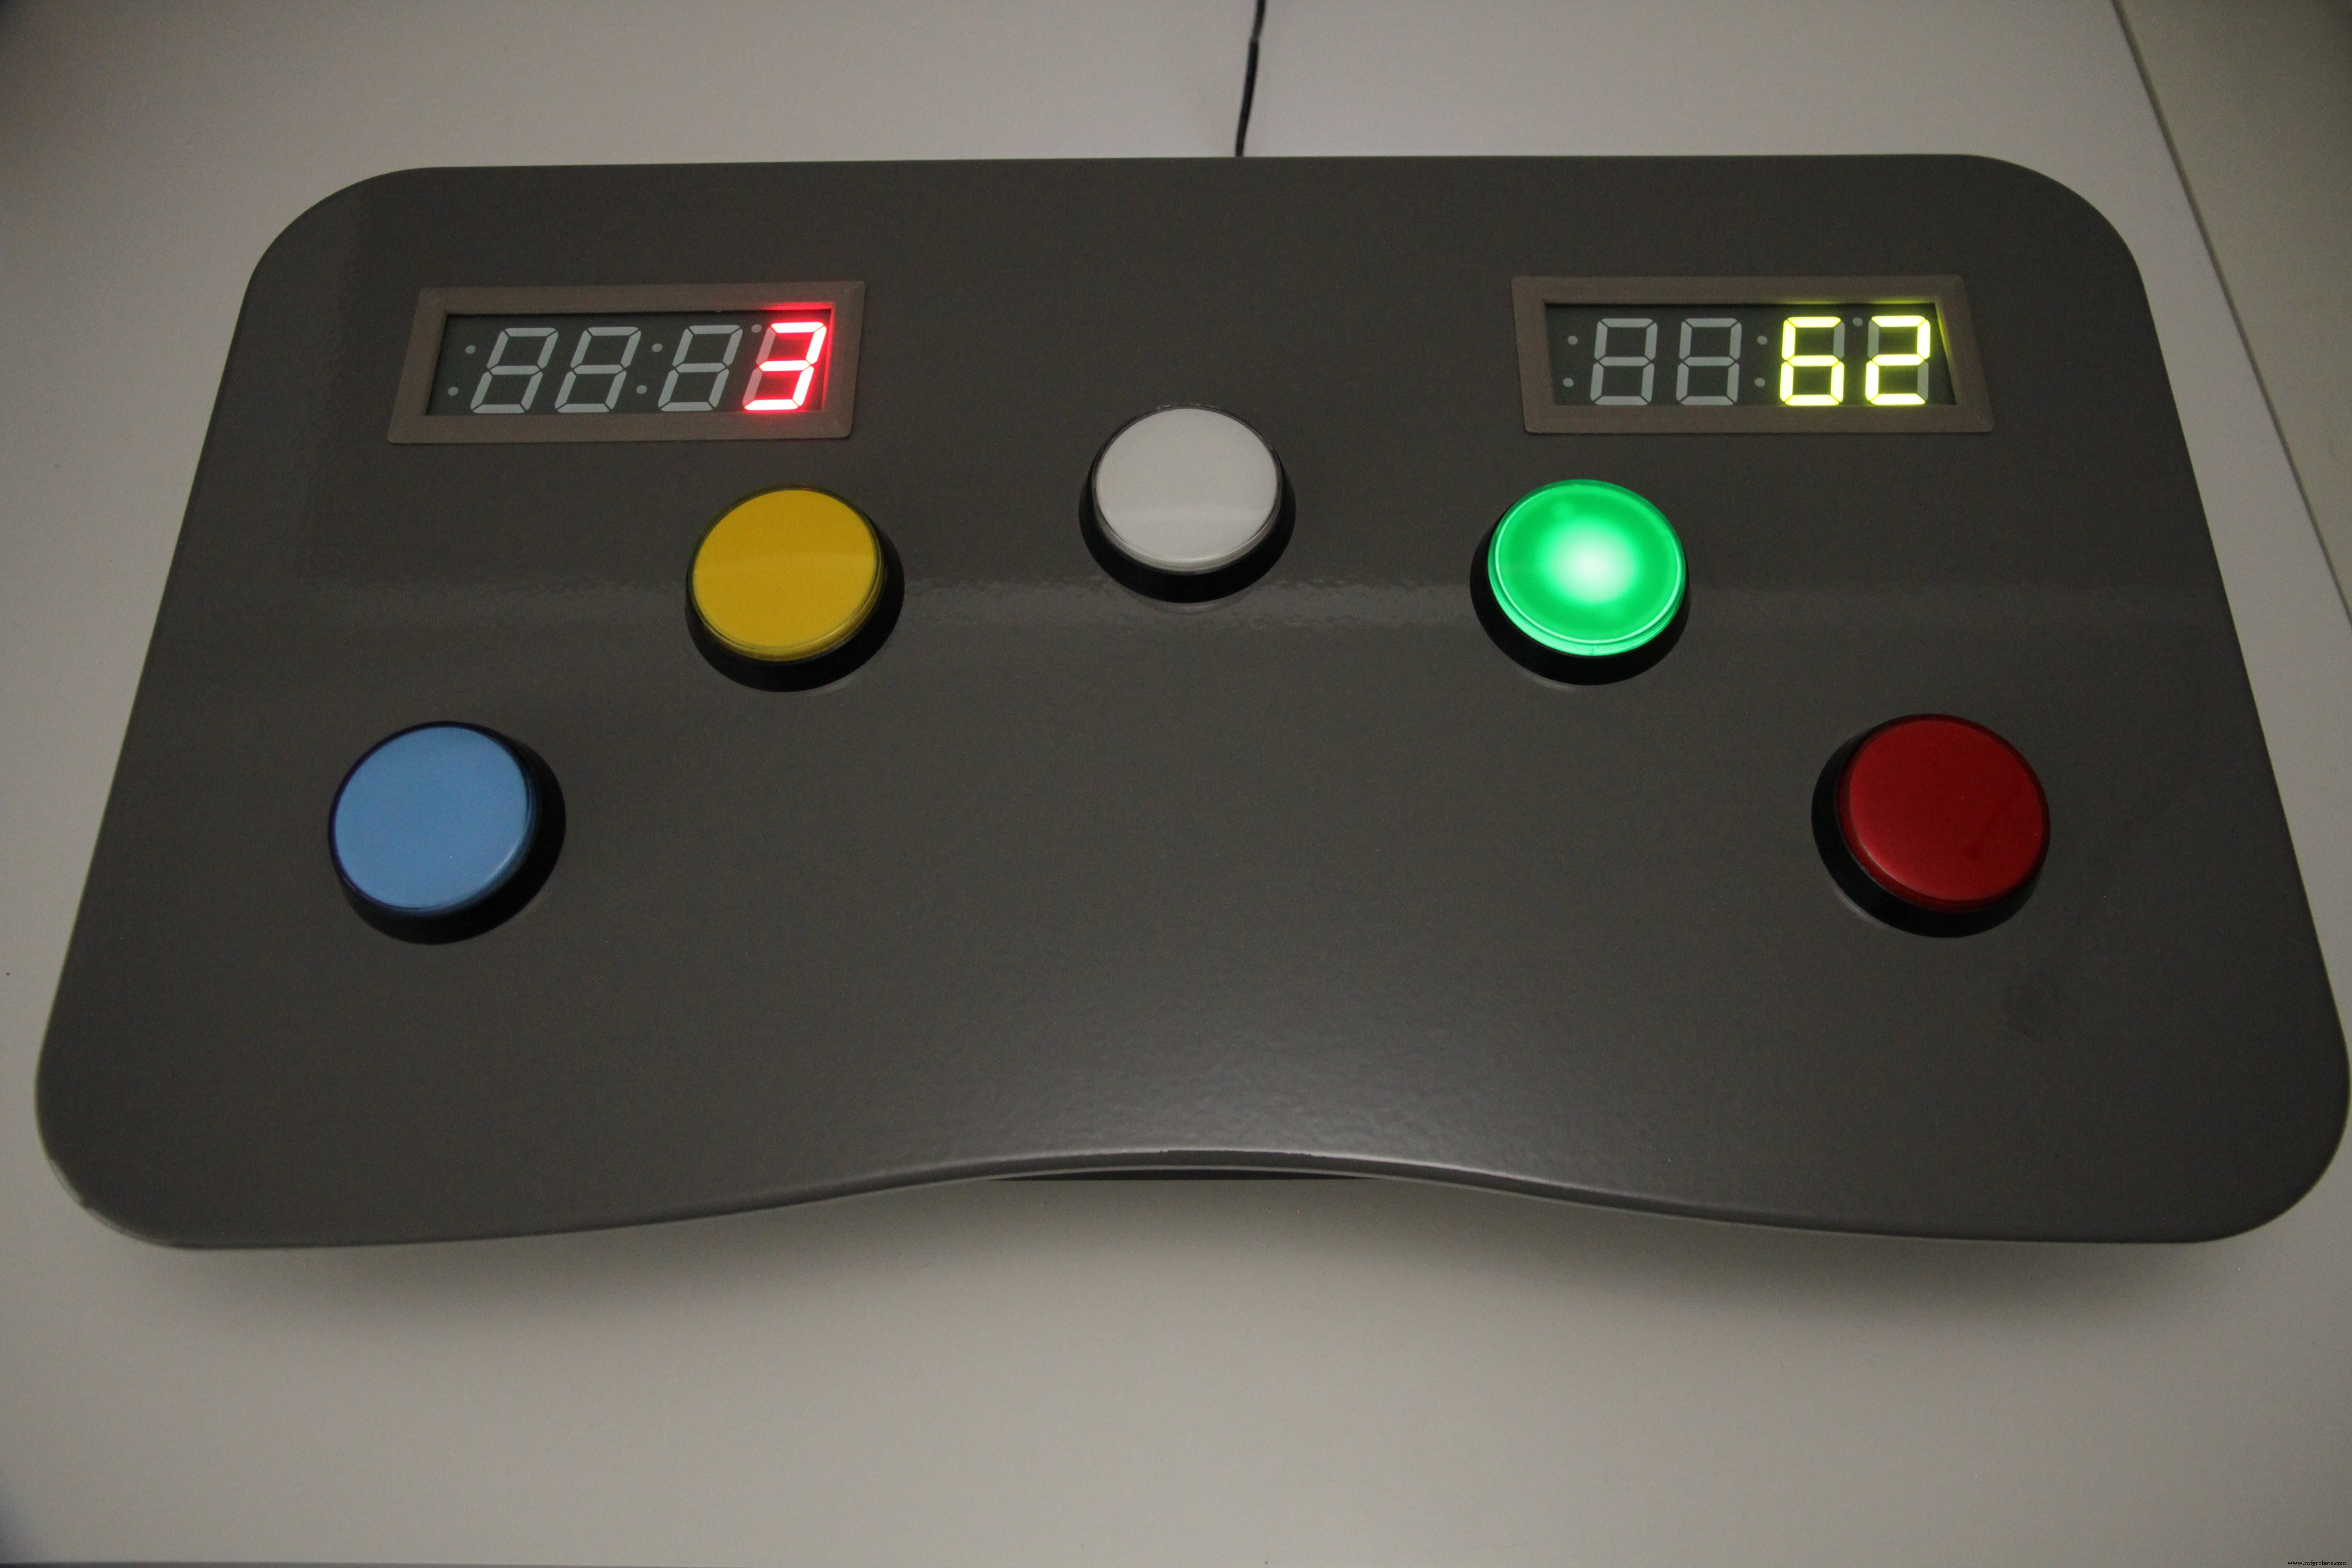
이것은 사용자 정의 두더지 게임입니다. 지금은 기본 게임으로 프로그래밍되어 있지만 기능에서 업데이트를 생성할 수 있습니다.
주요 기능: <울>
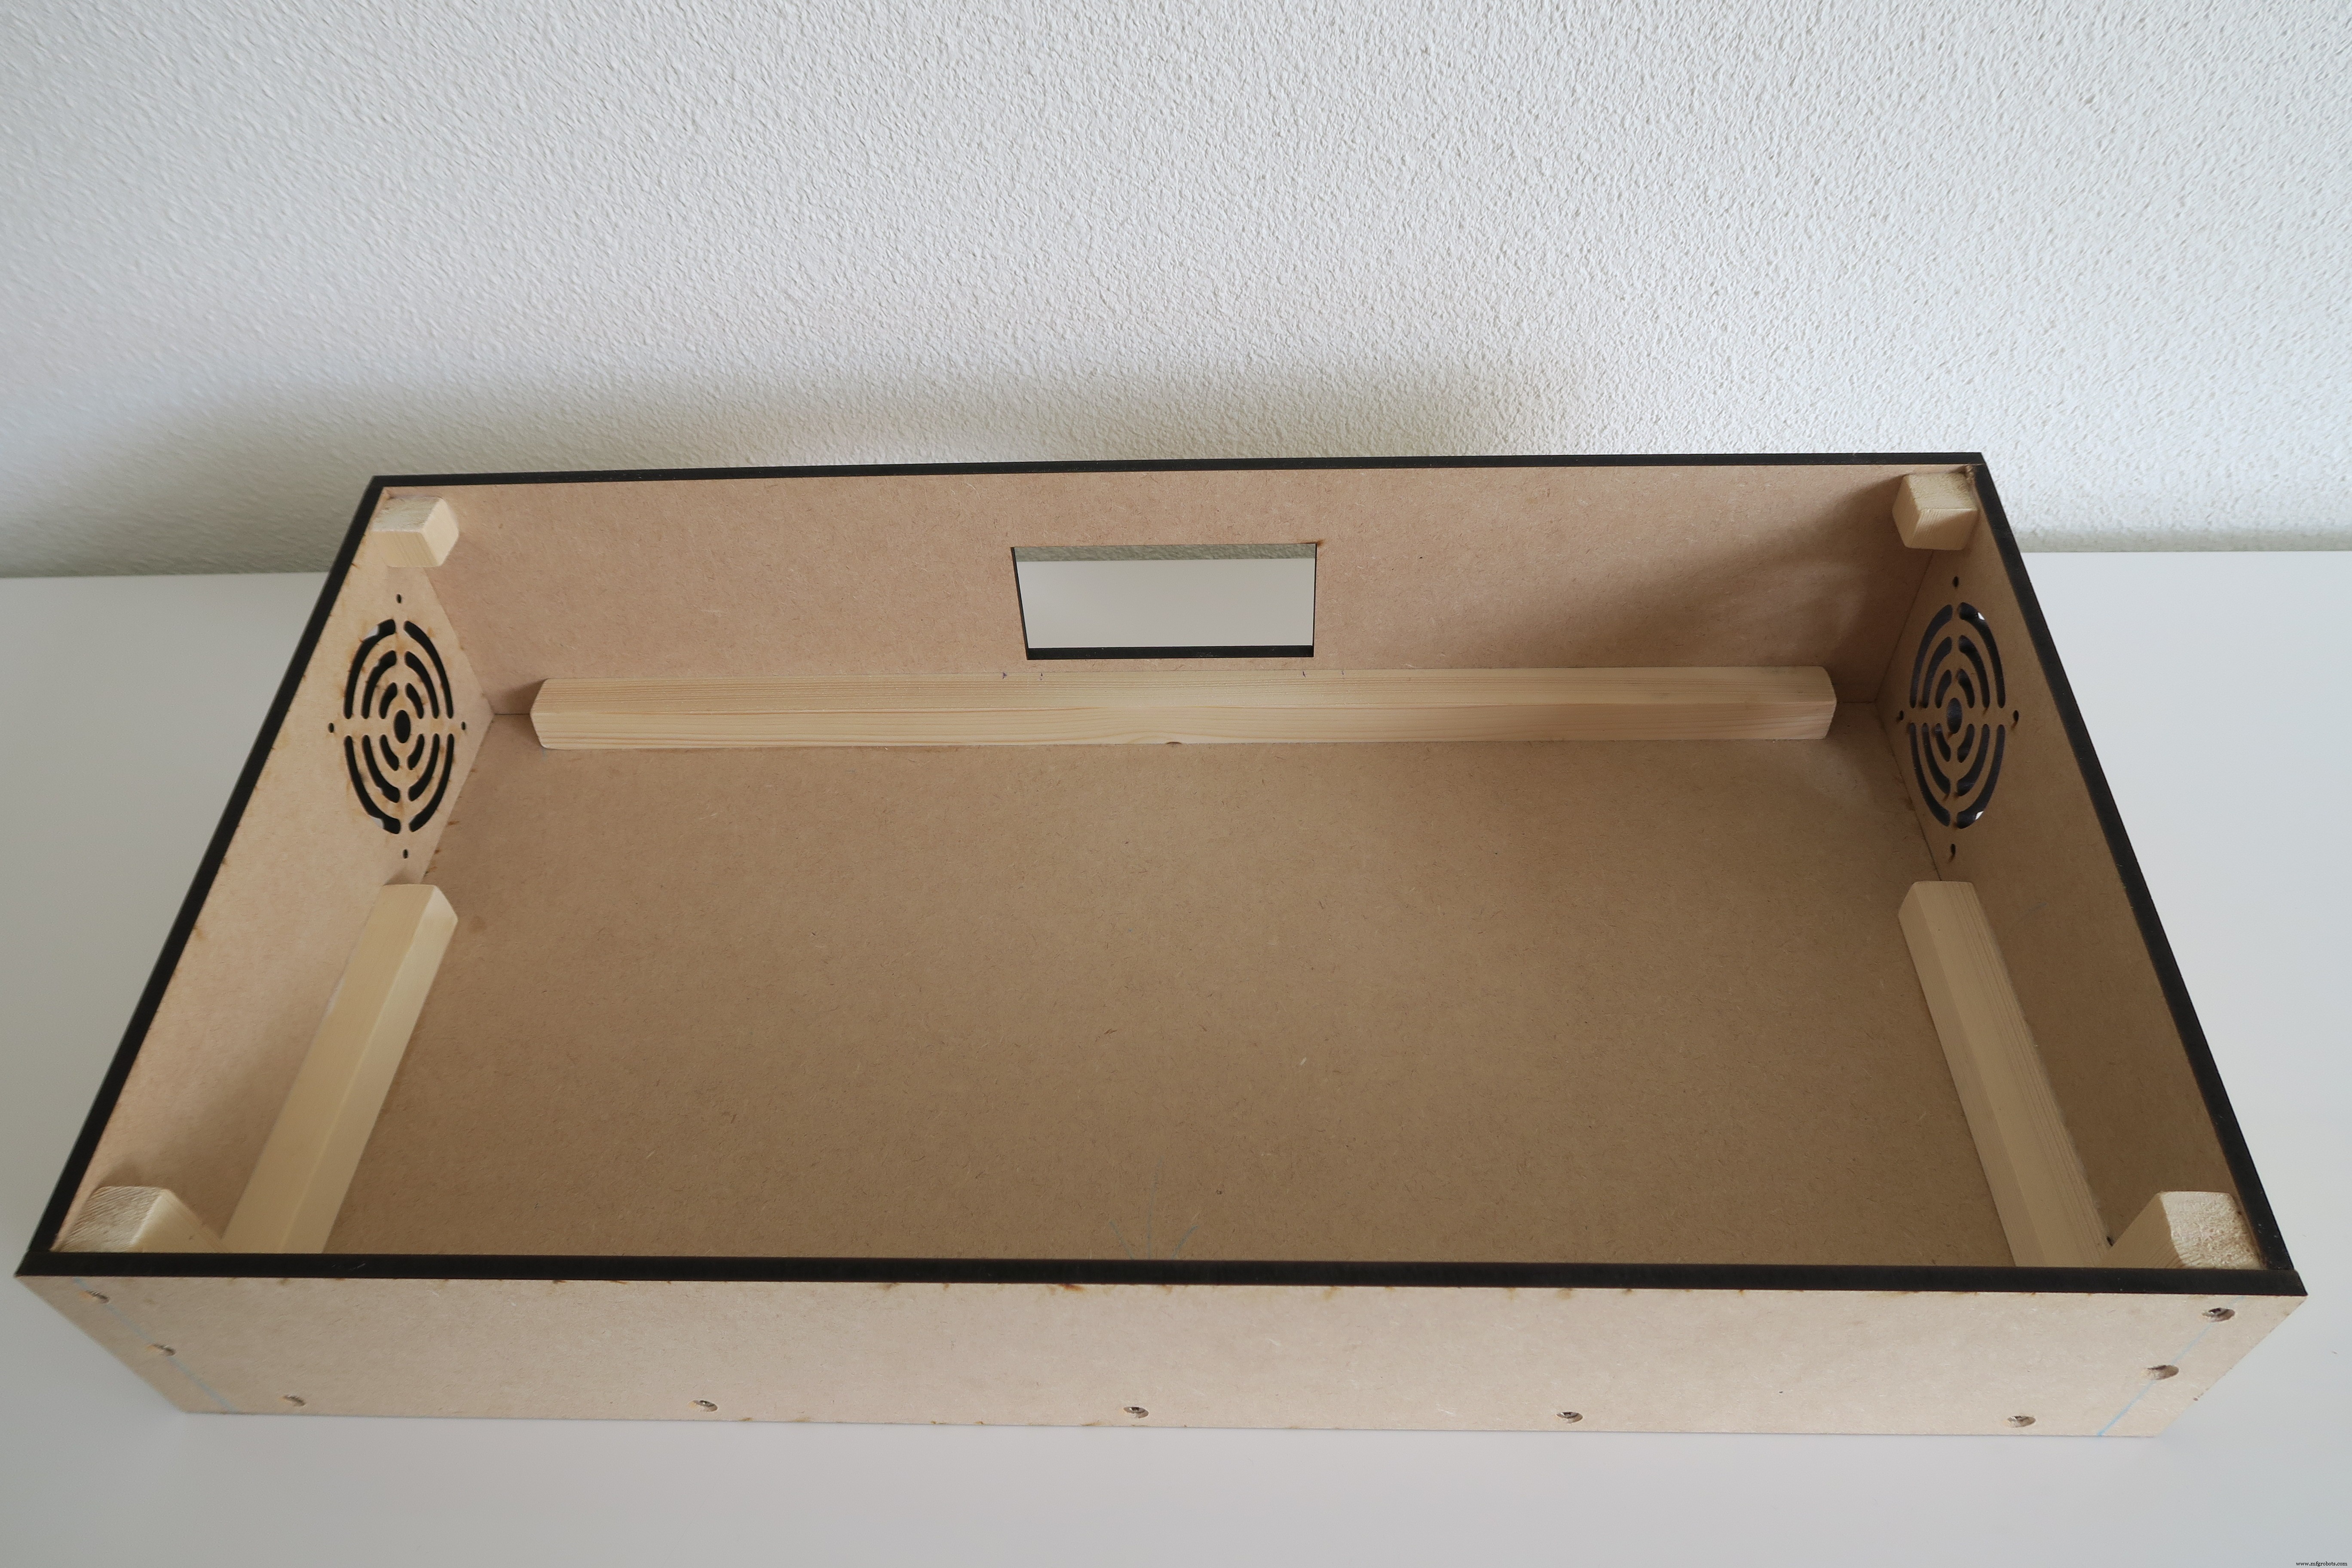
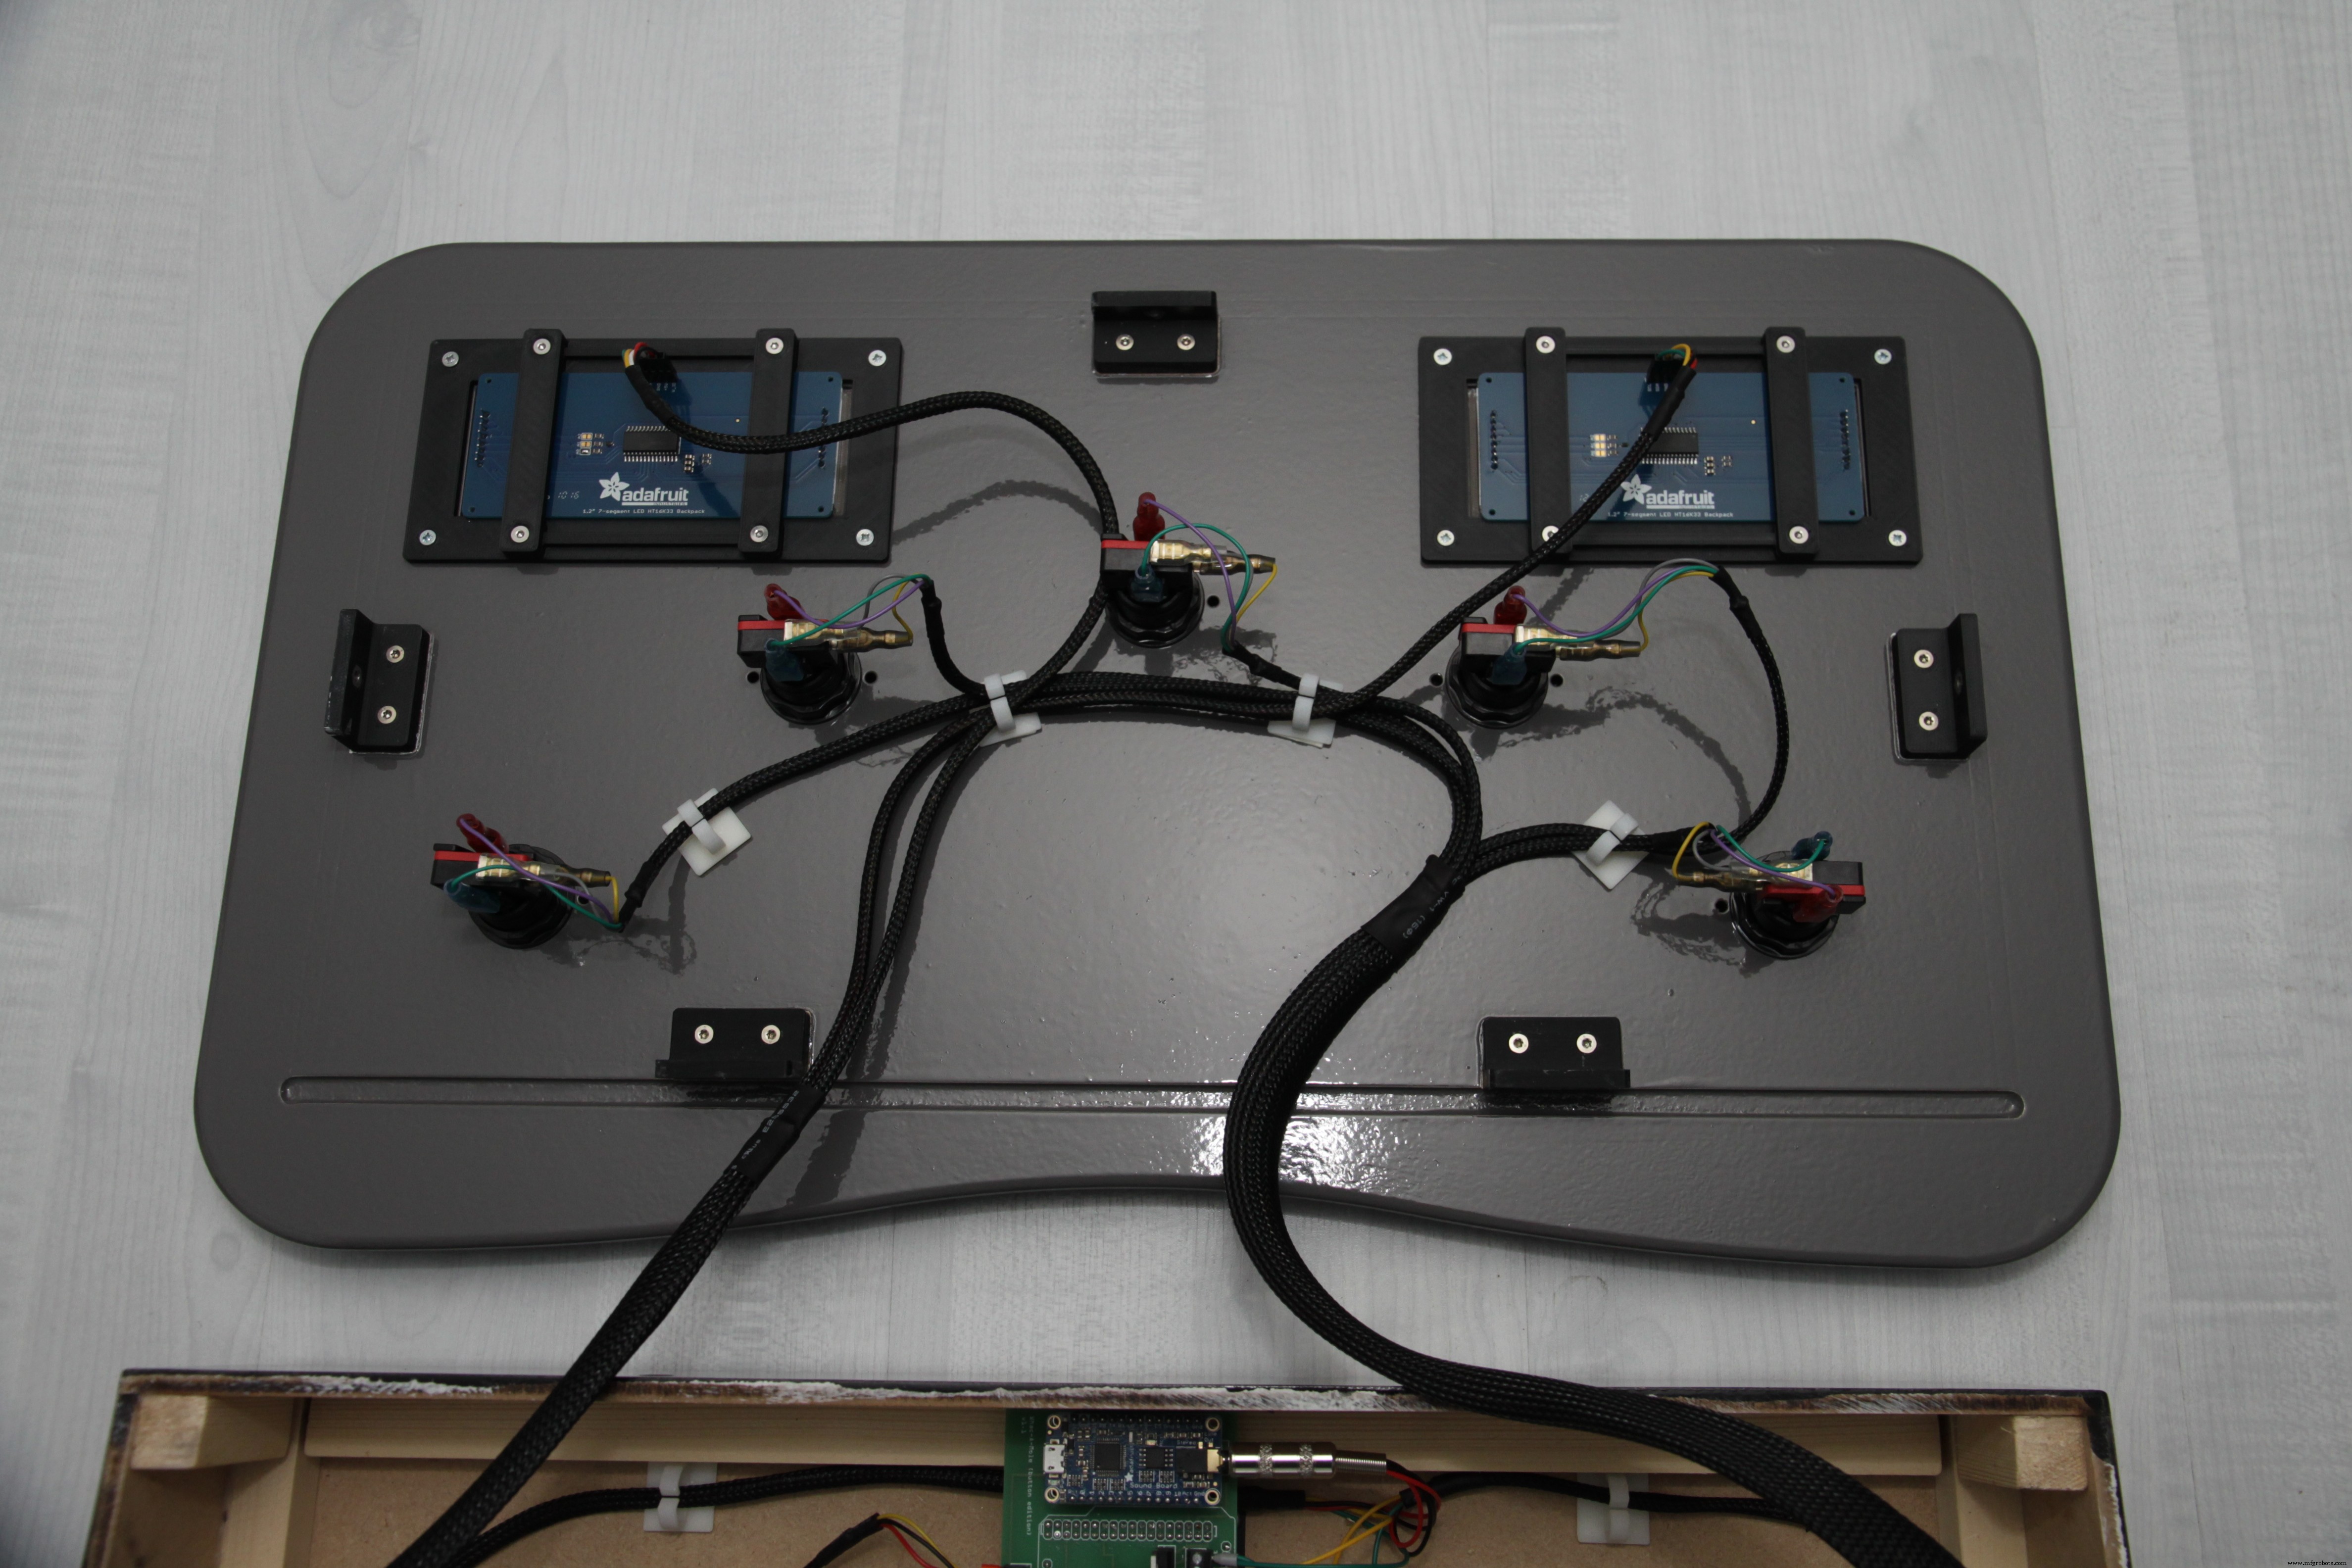
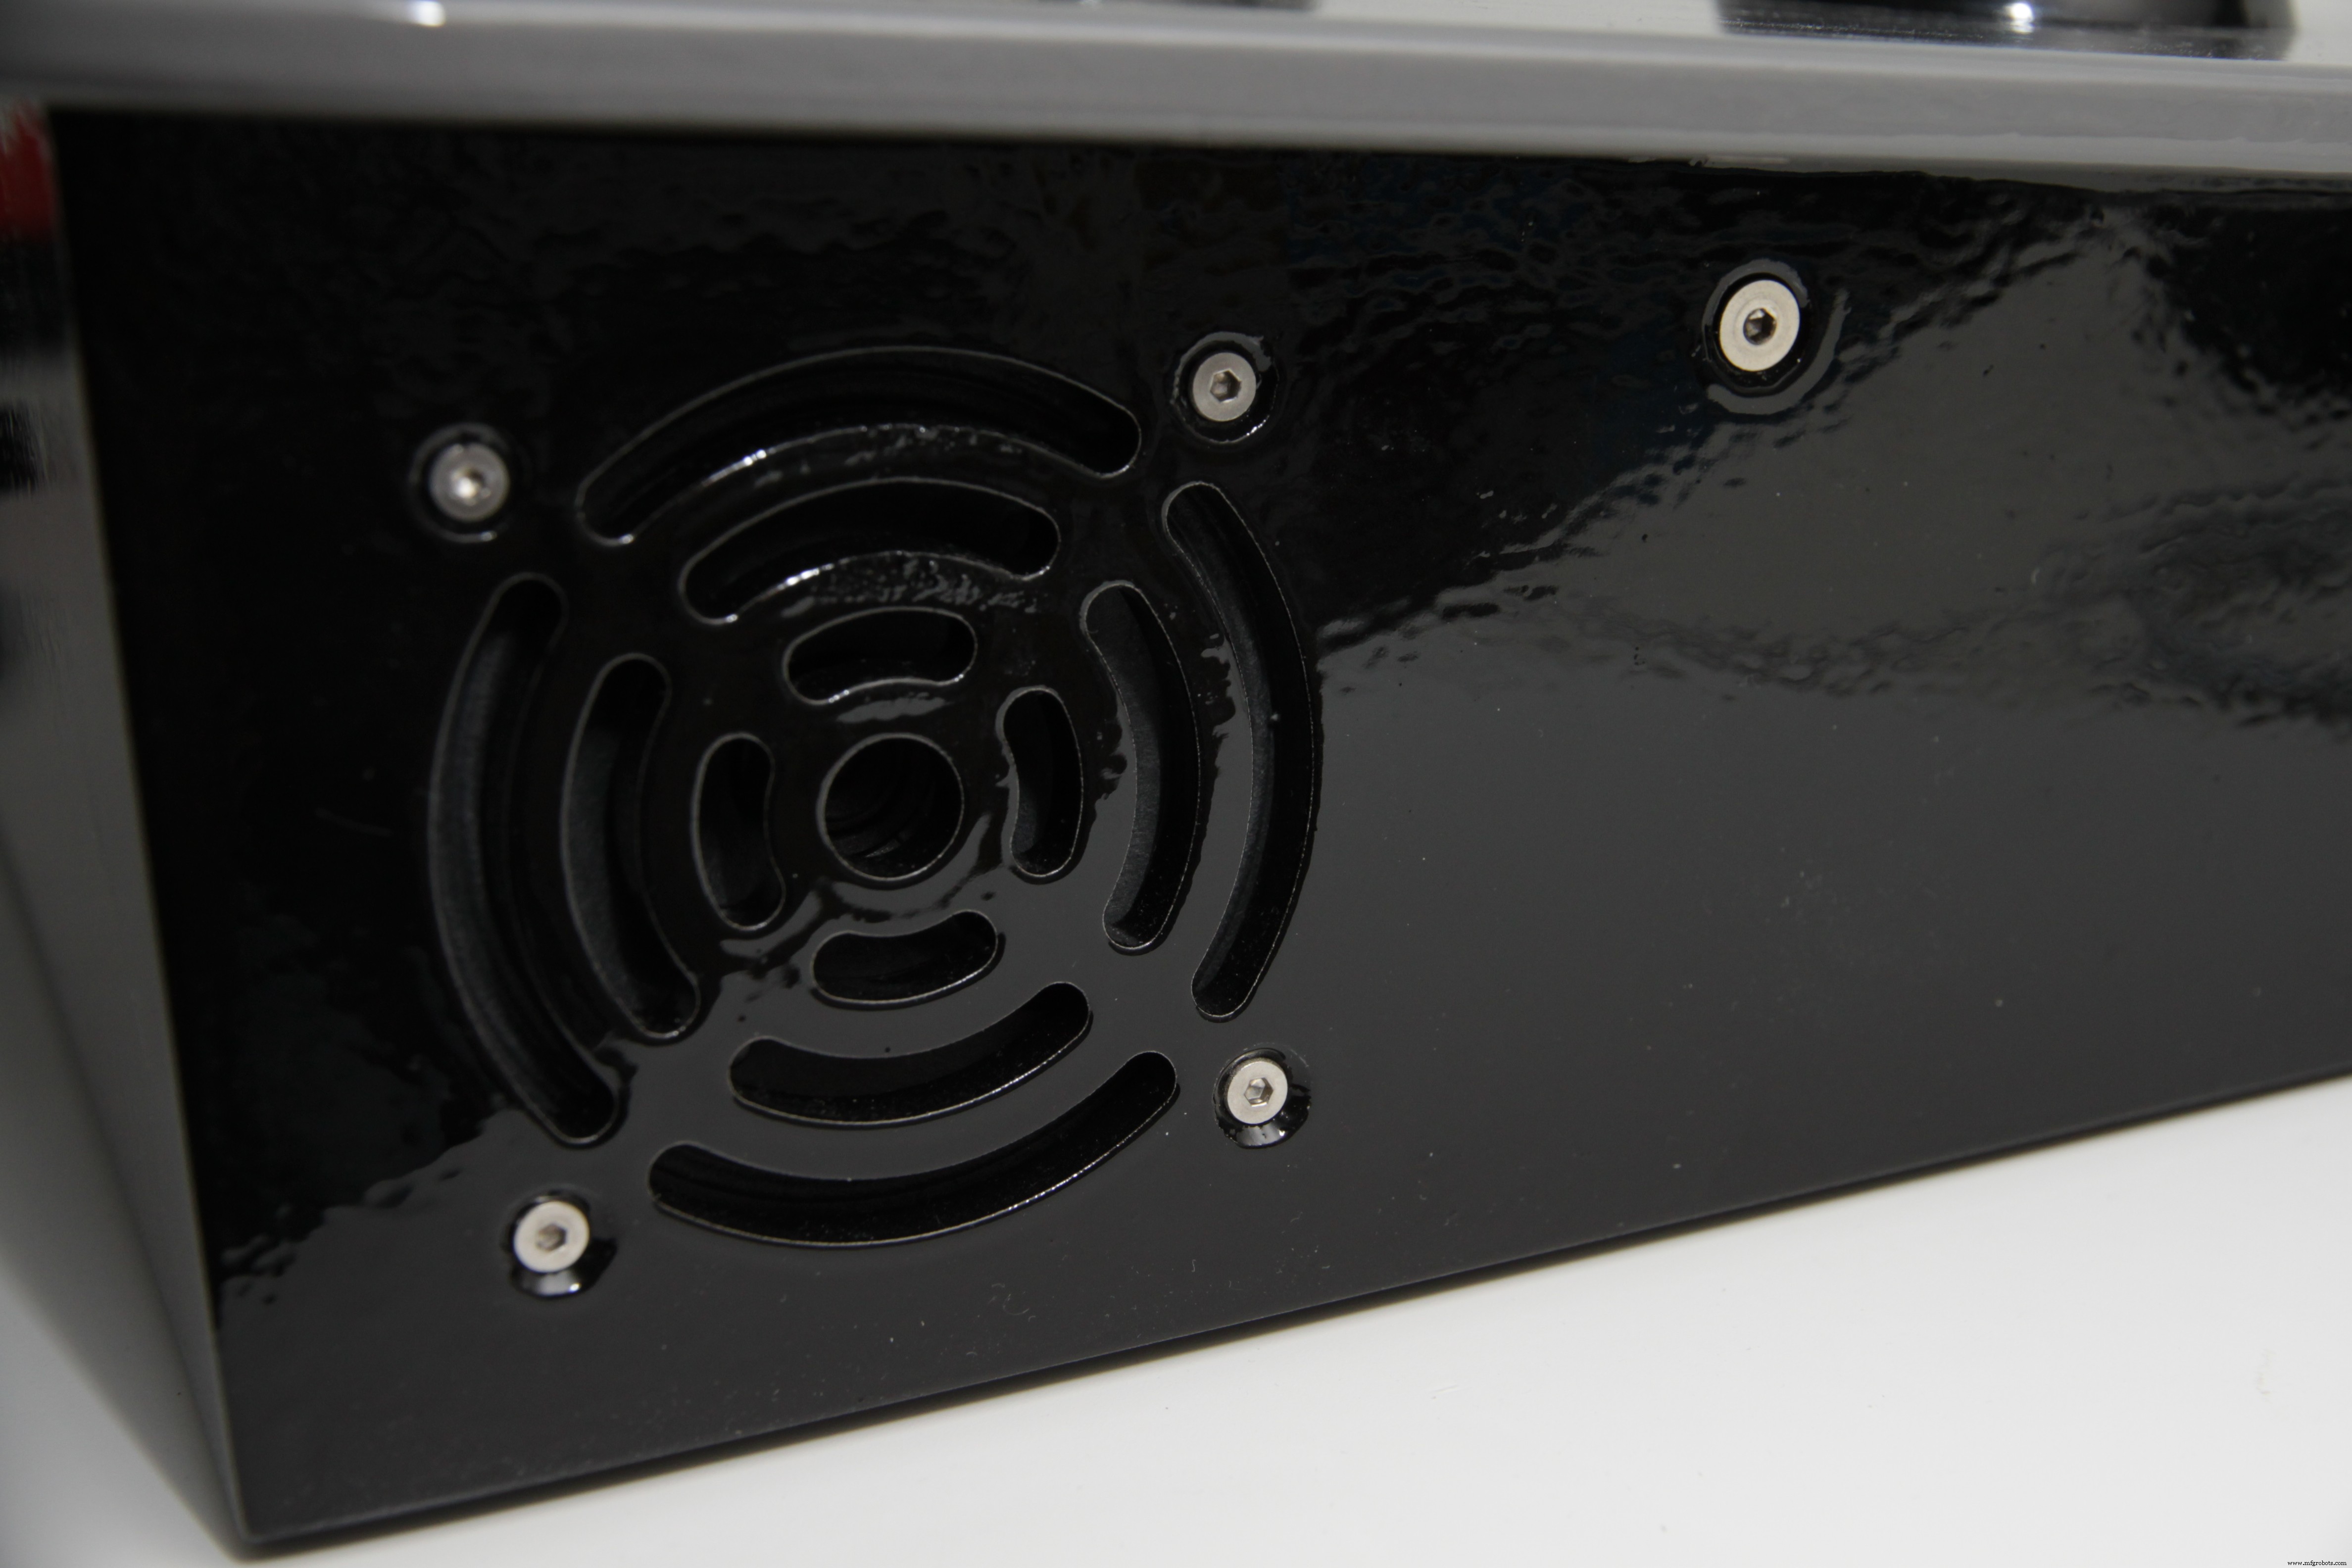
인클로저
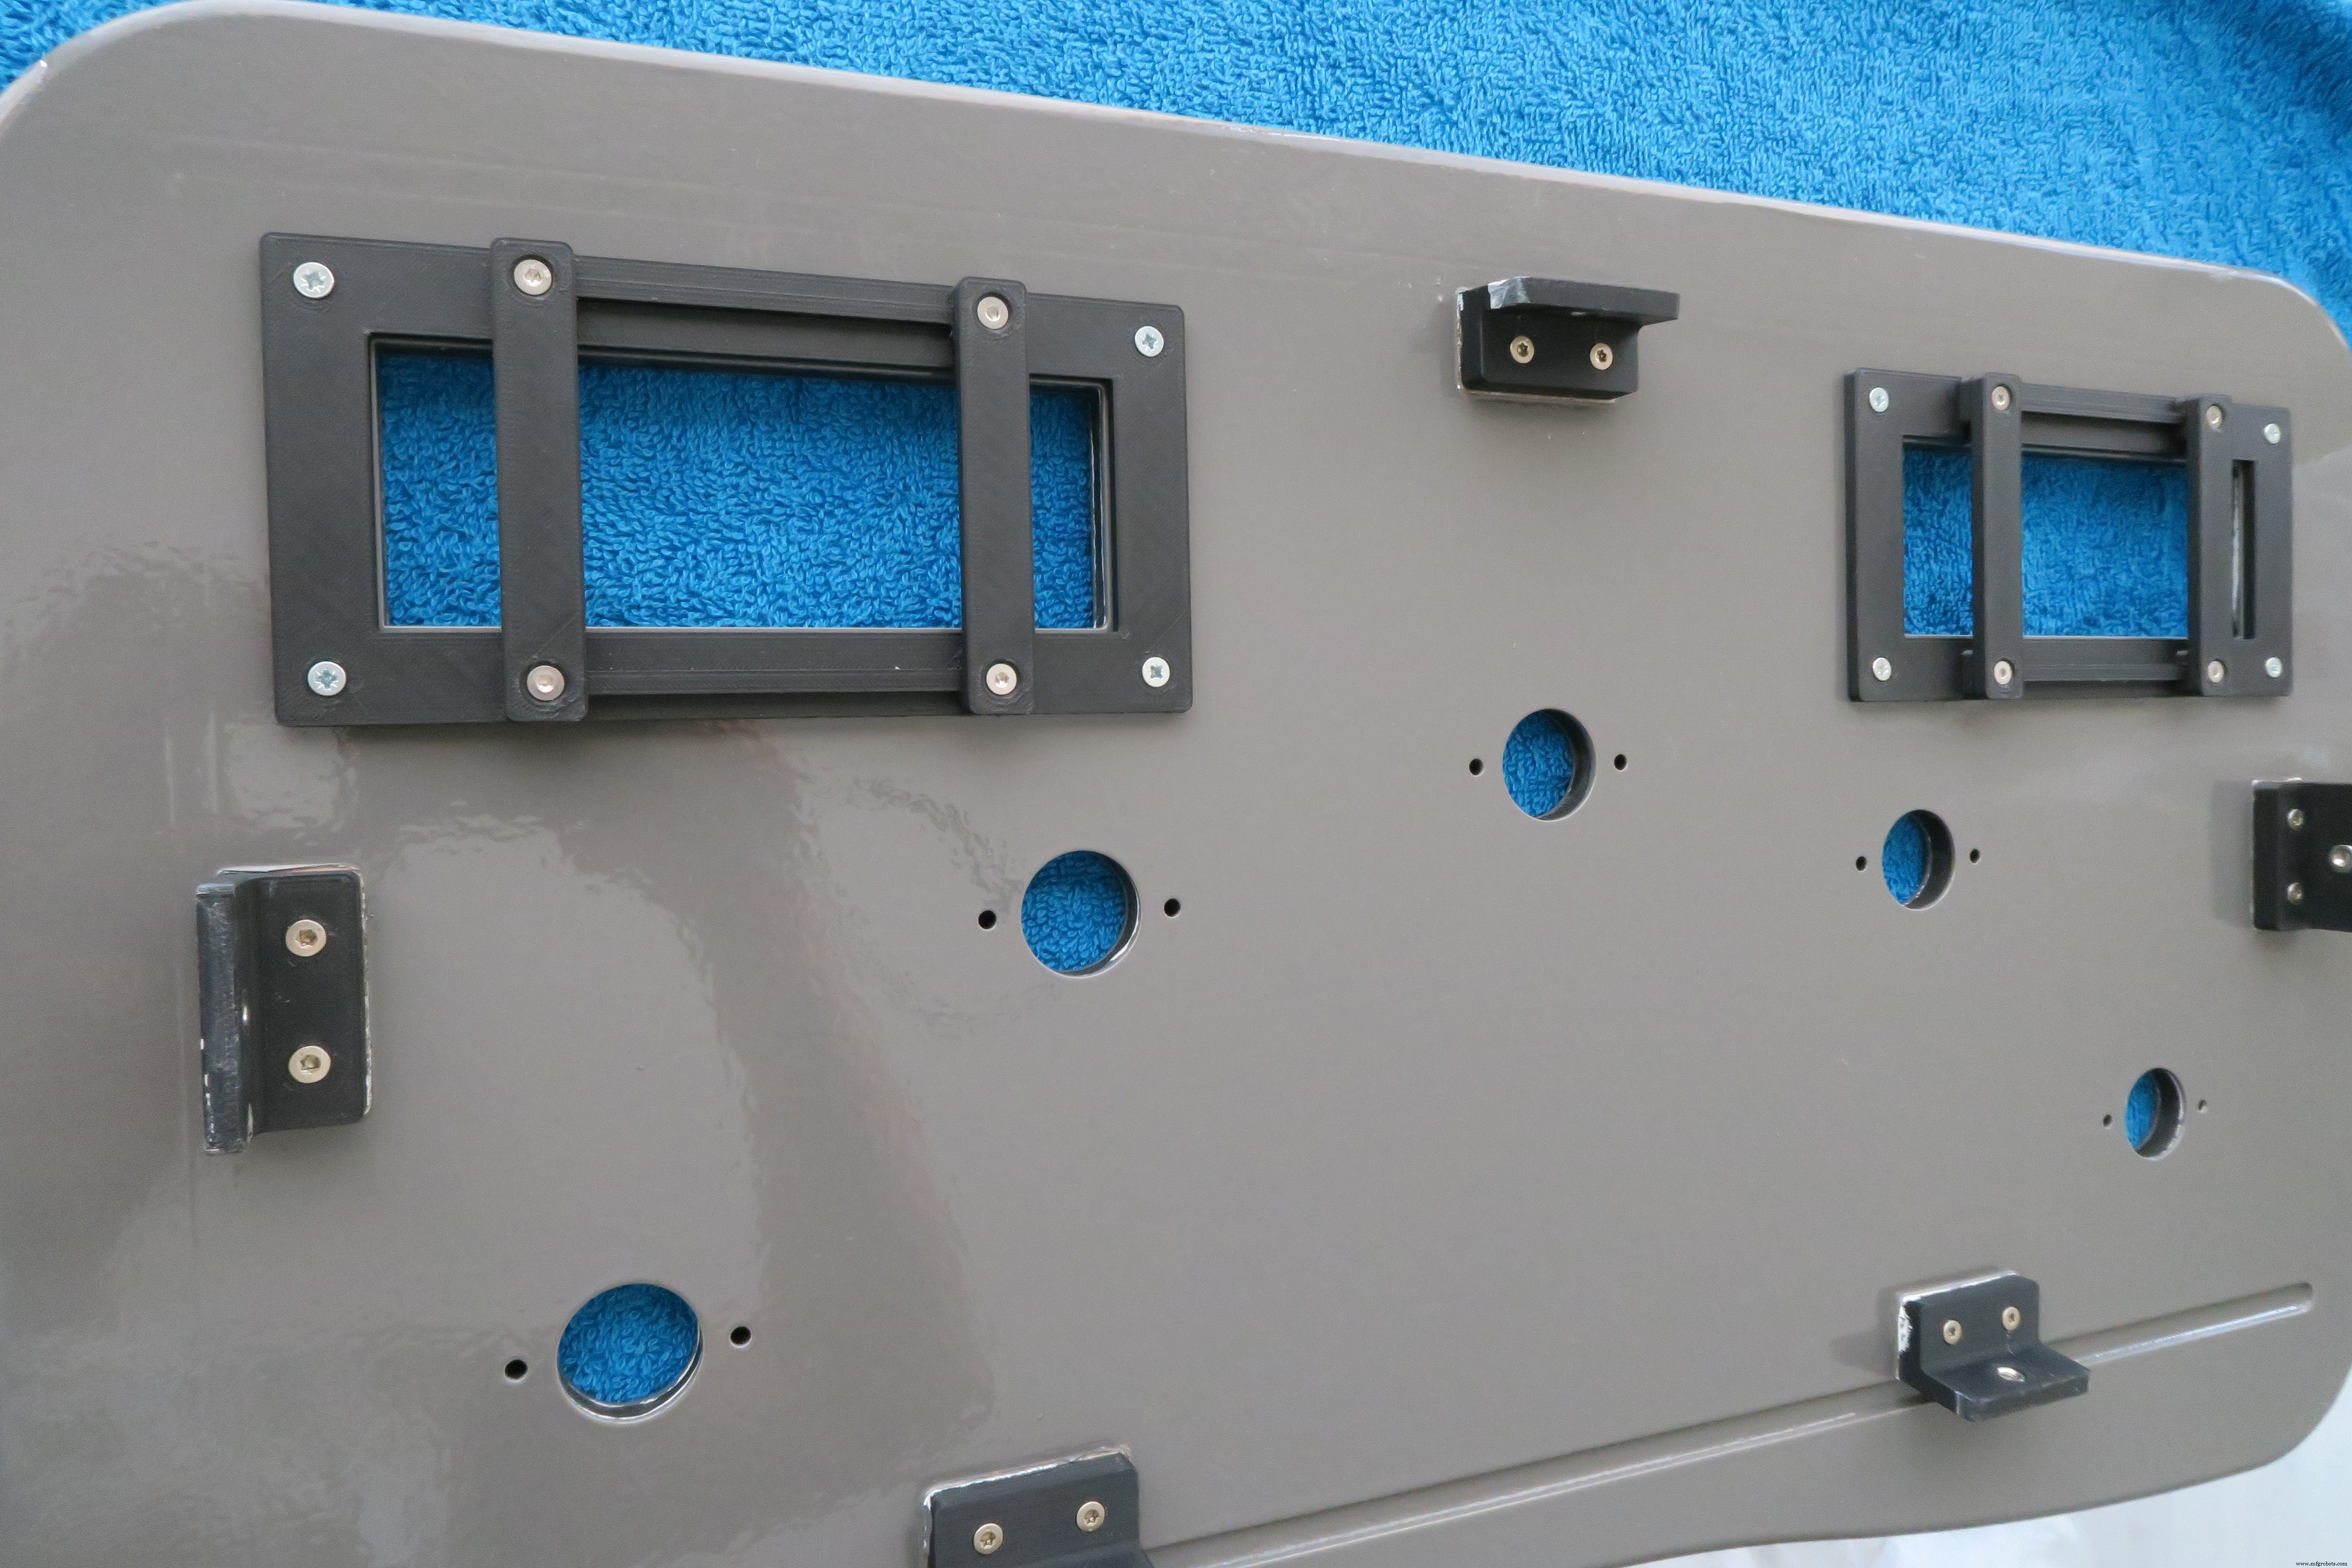
먼저 인클로저 조립부터 시작합니다.
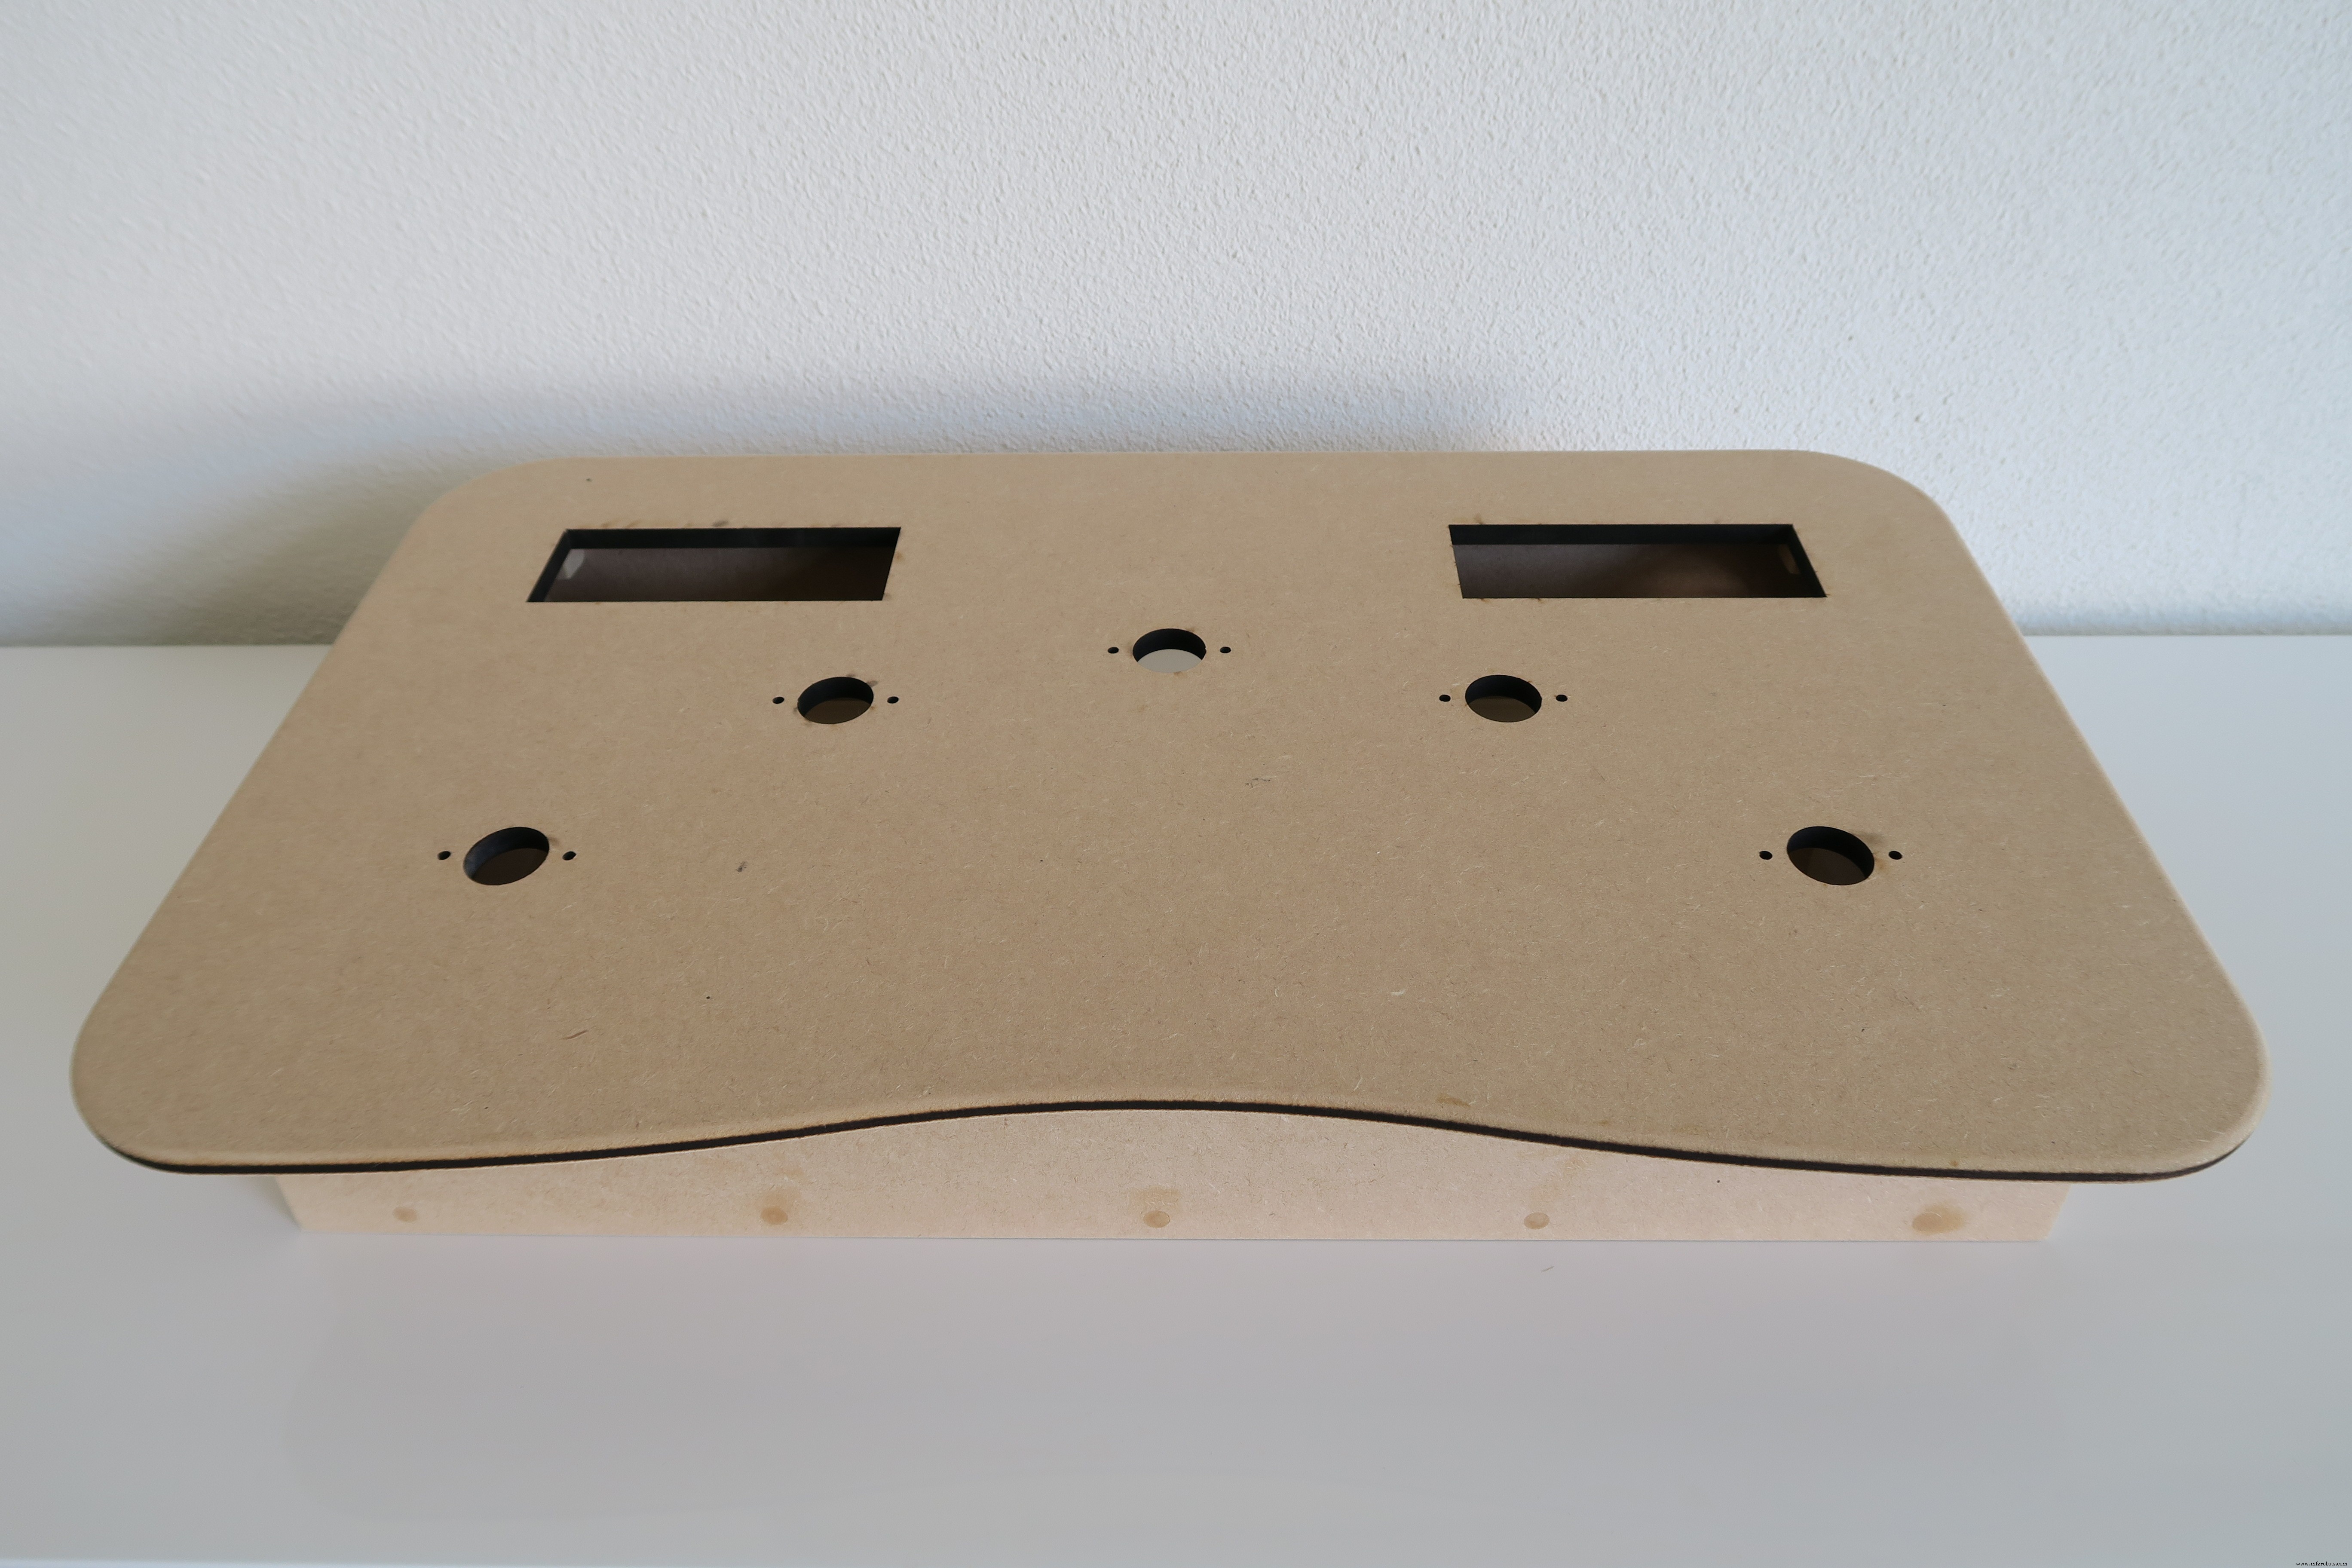
3D 프린팅된 마운팅 브래킷을 상단 커버에 장착합니다.
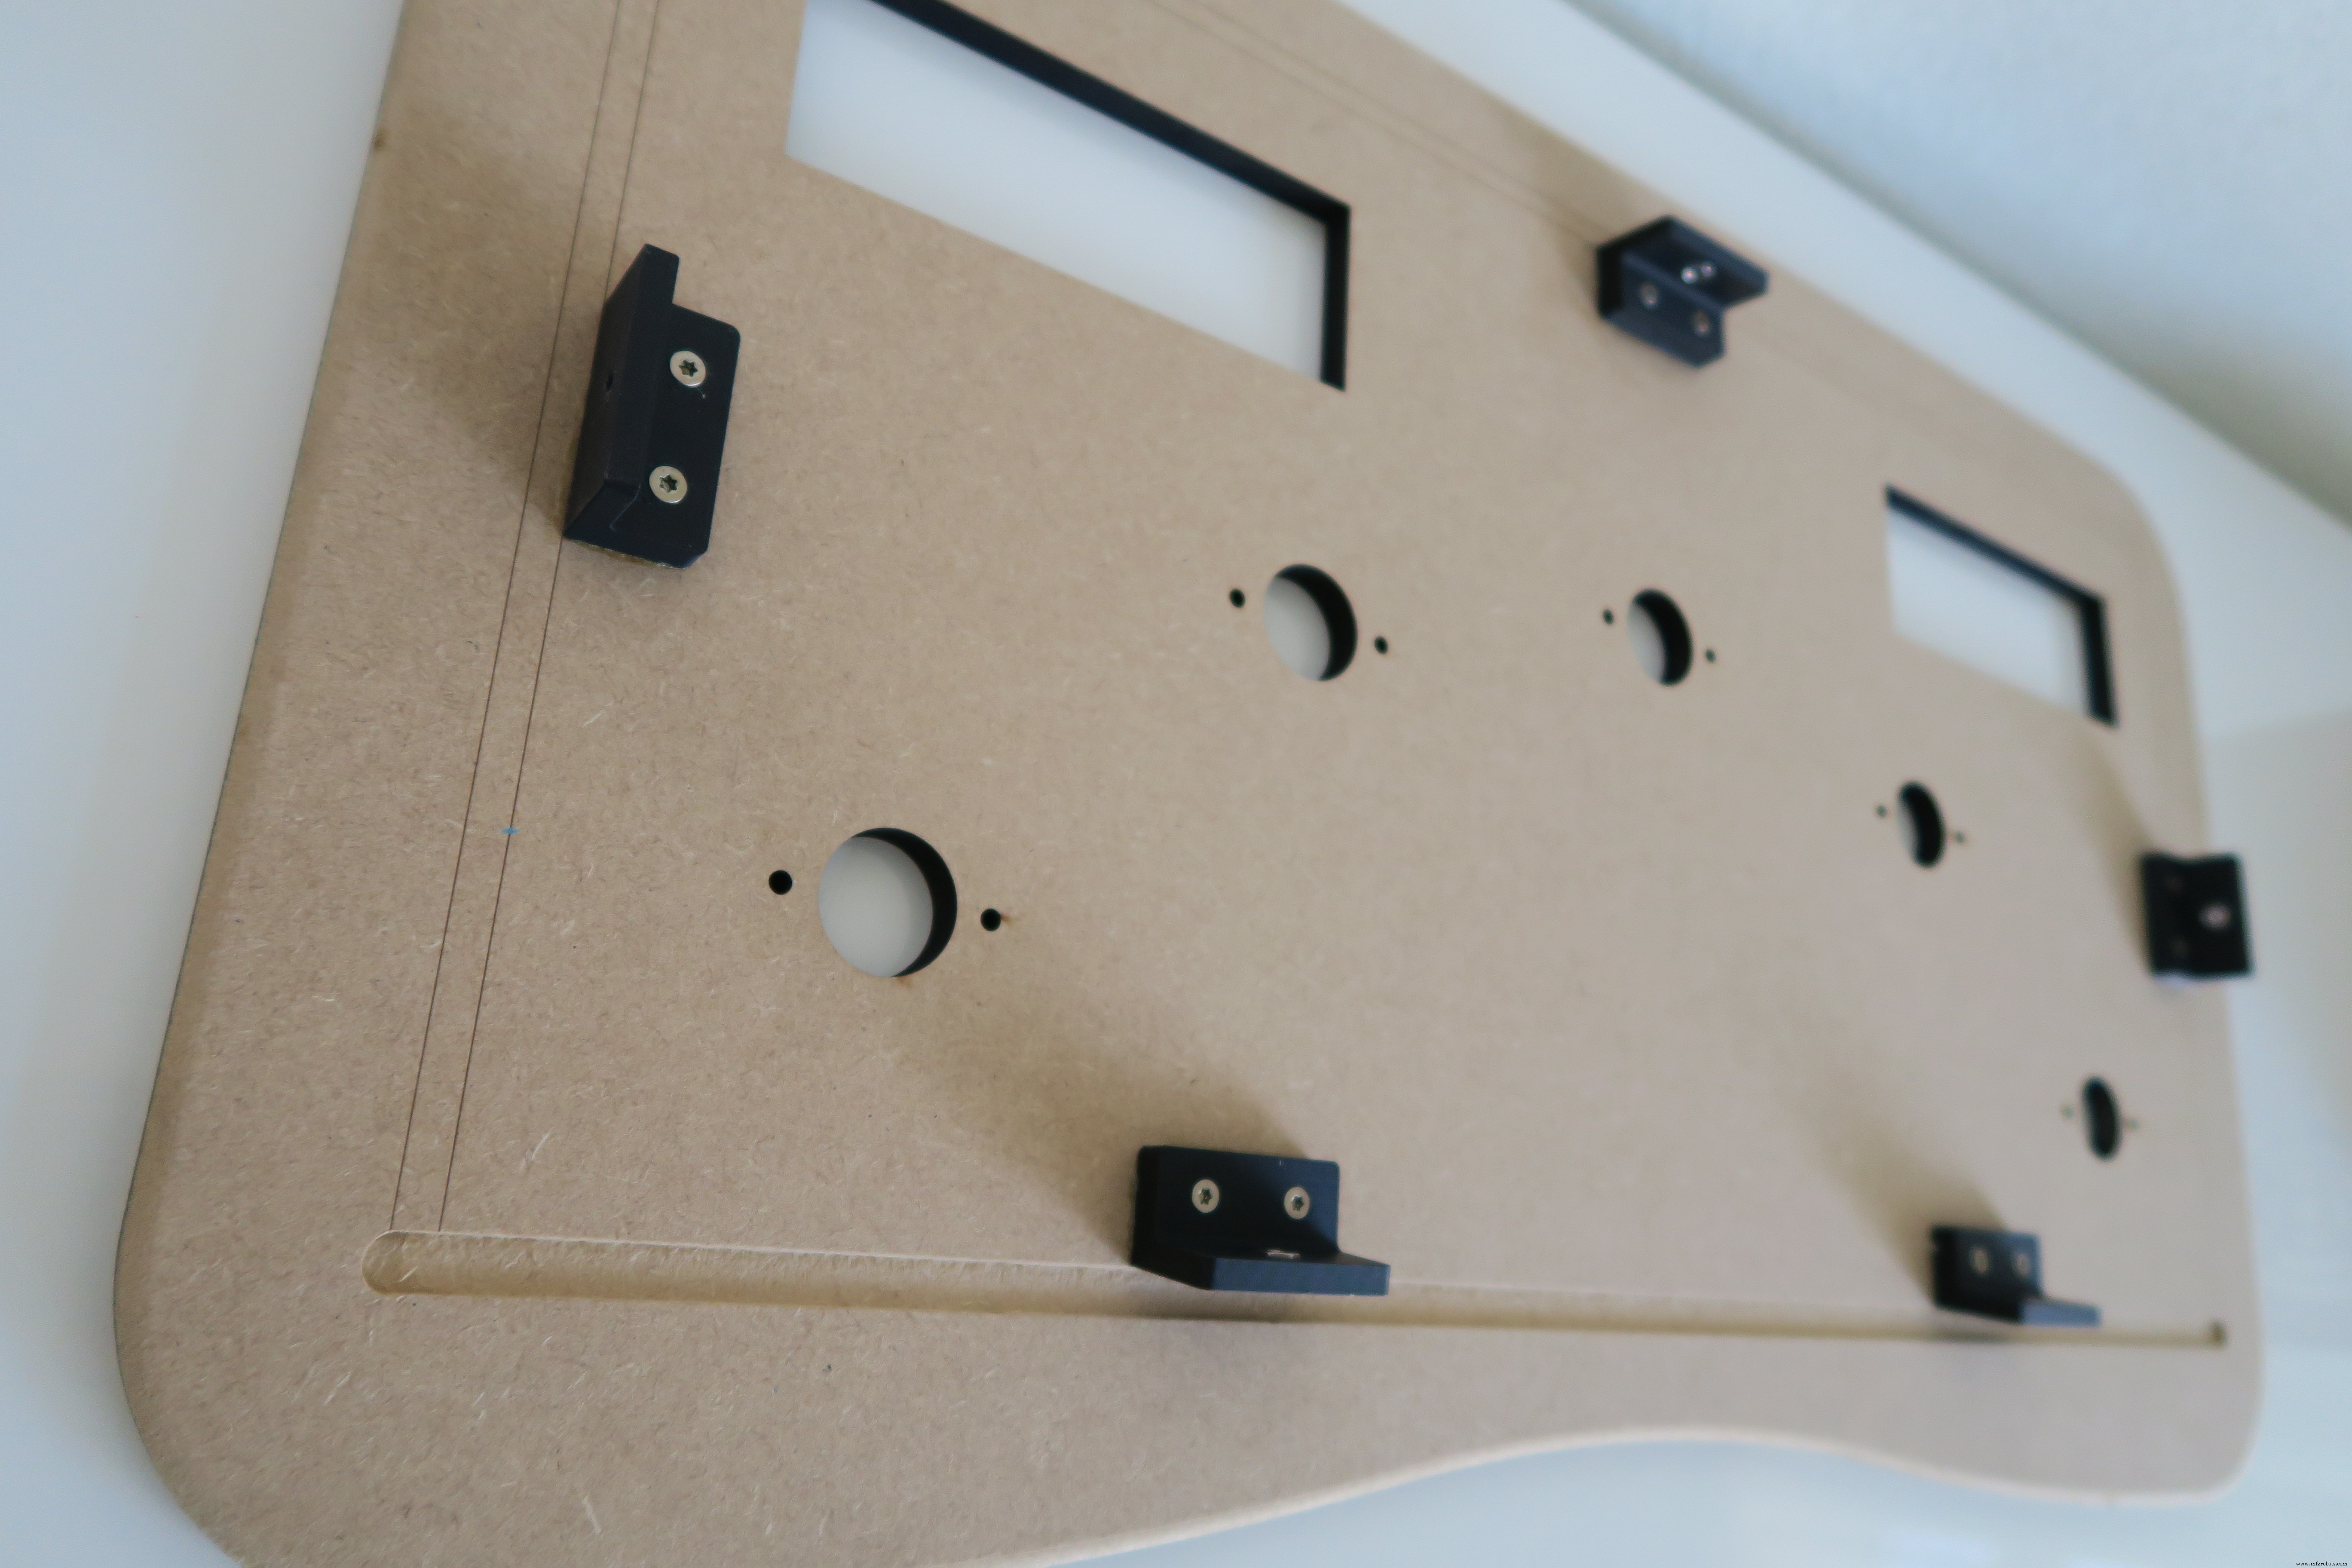
원하는 경우 인클로저를 페인트합니다.
다음으로 LED 디스플레이 마운트를 장착합니다. 마운트 아래에 볼트를 배치하는 것을 잊지 마십시오. 그렇지 않으면 수직 막대를 고정할 수 없습니다.
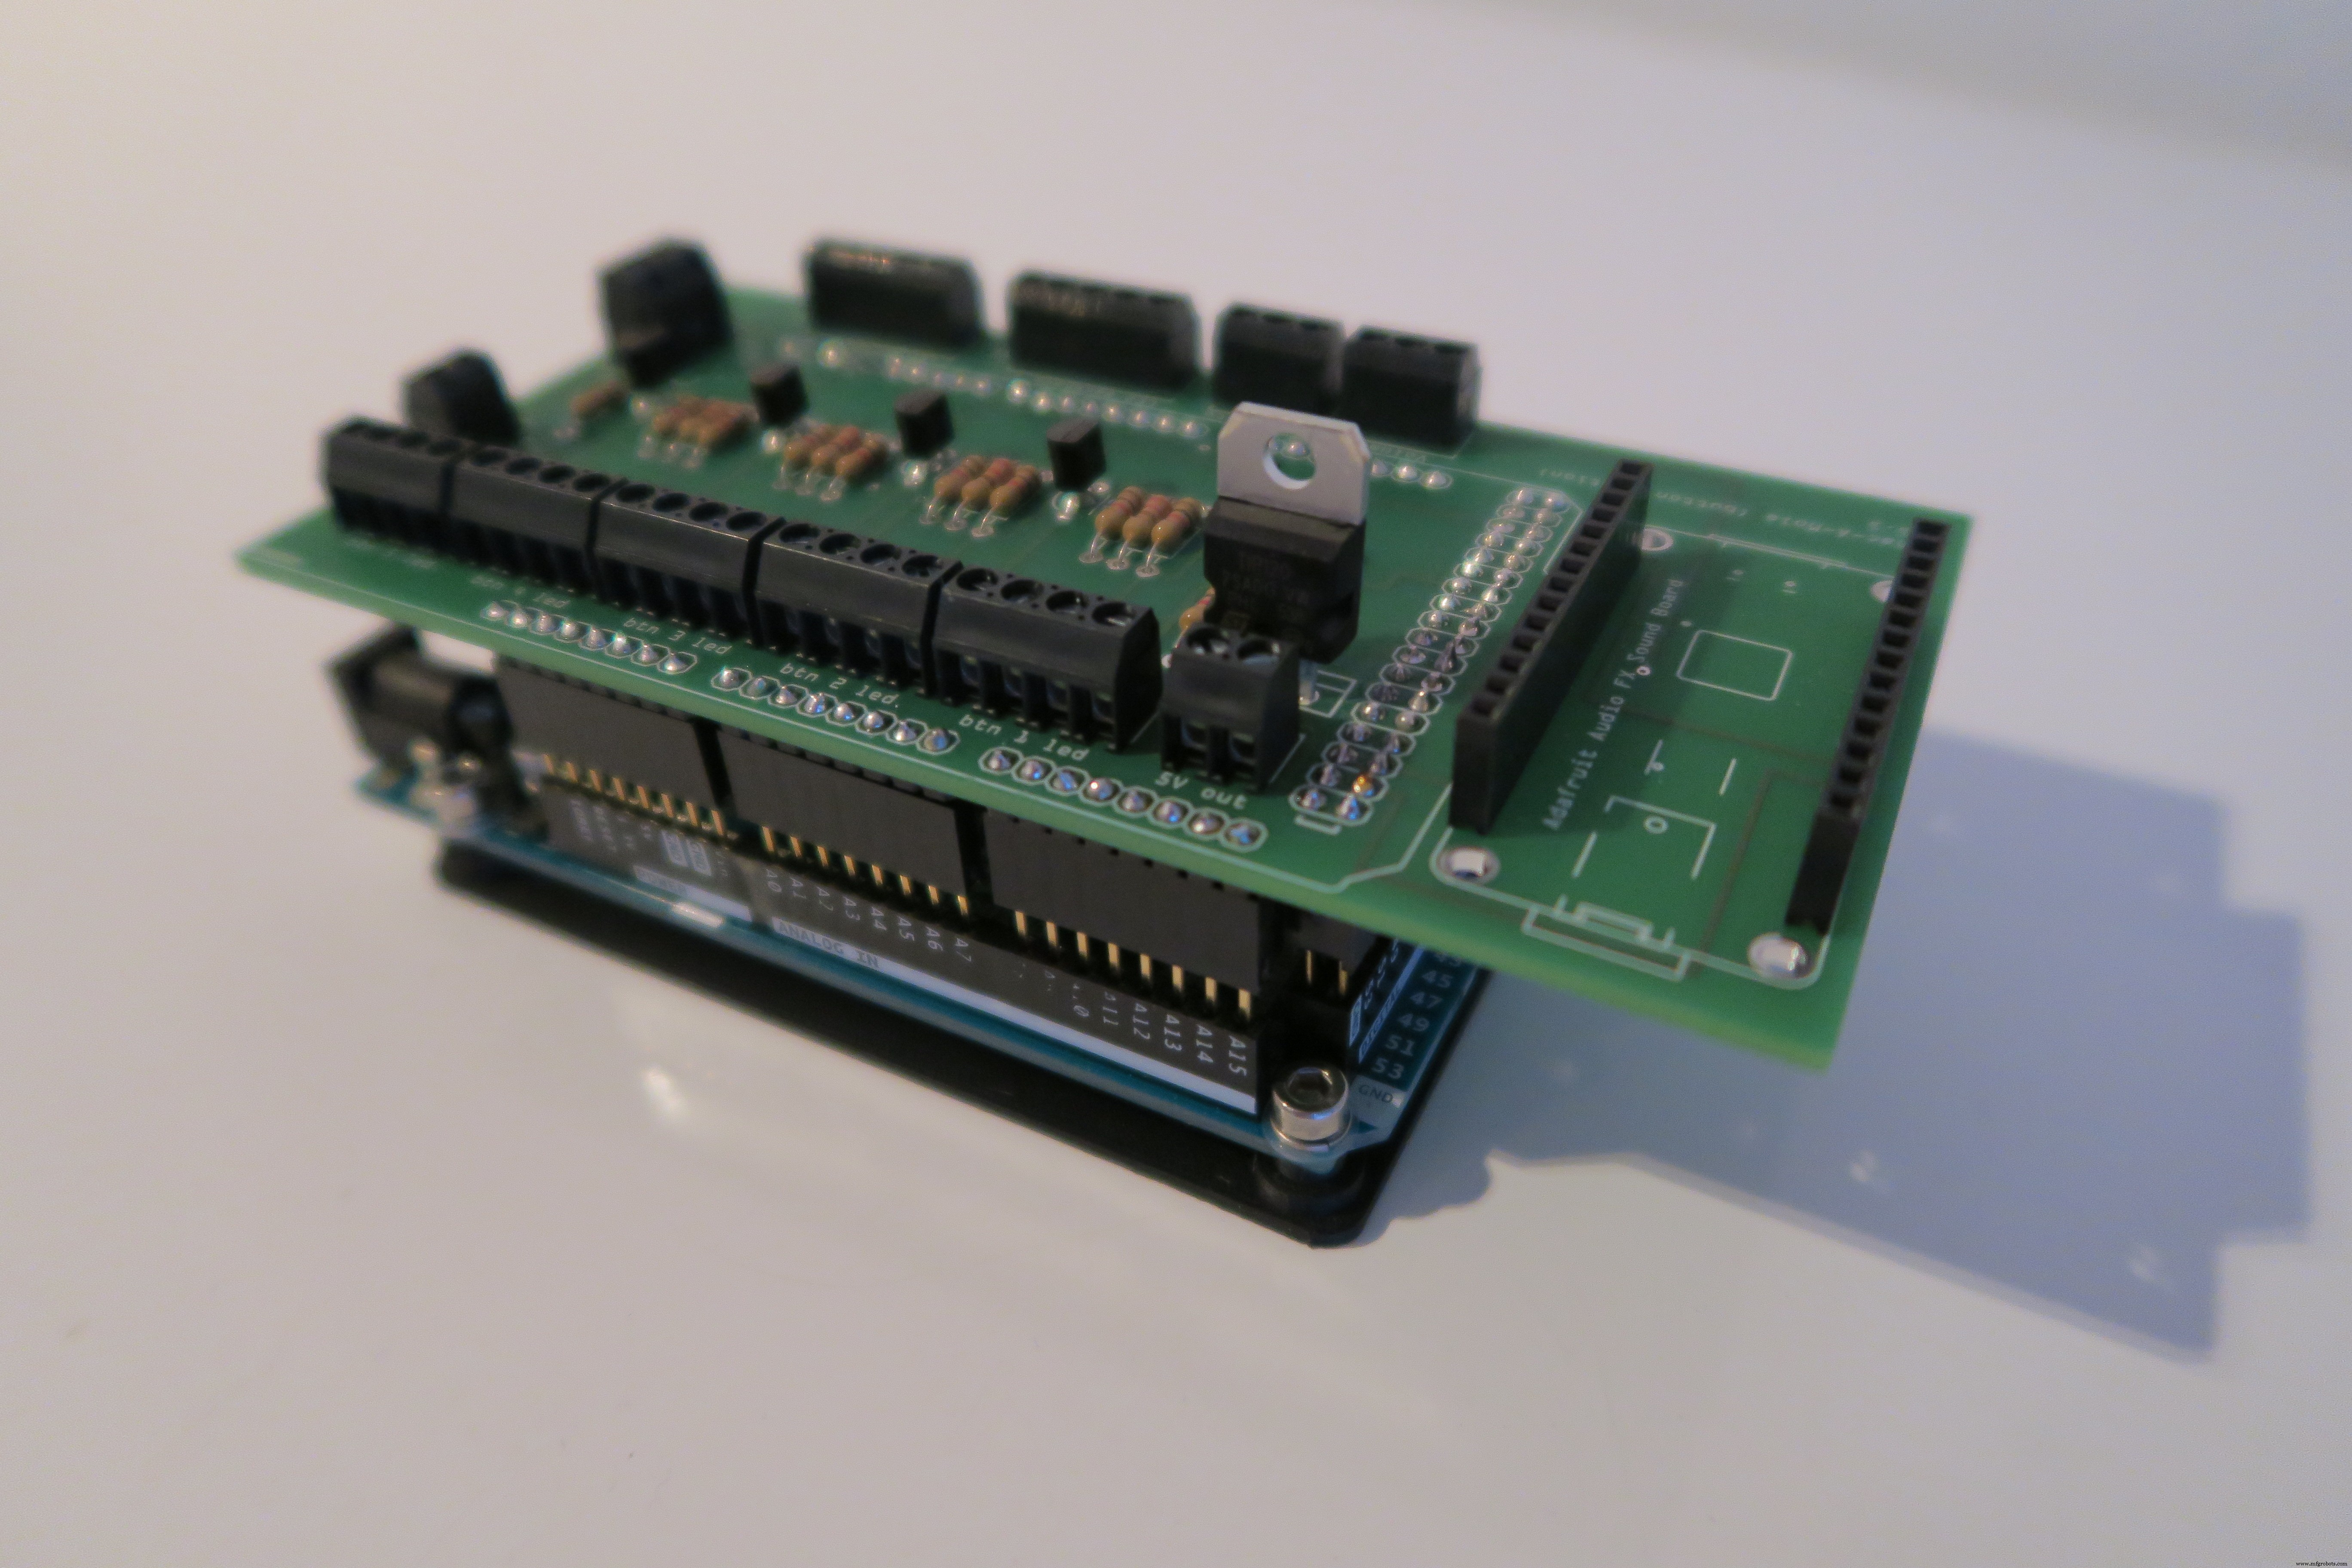
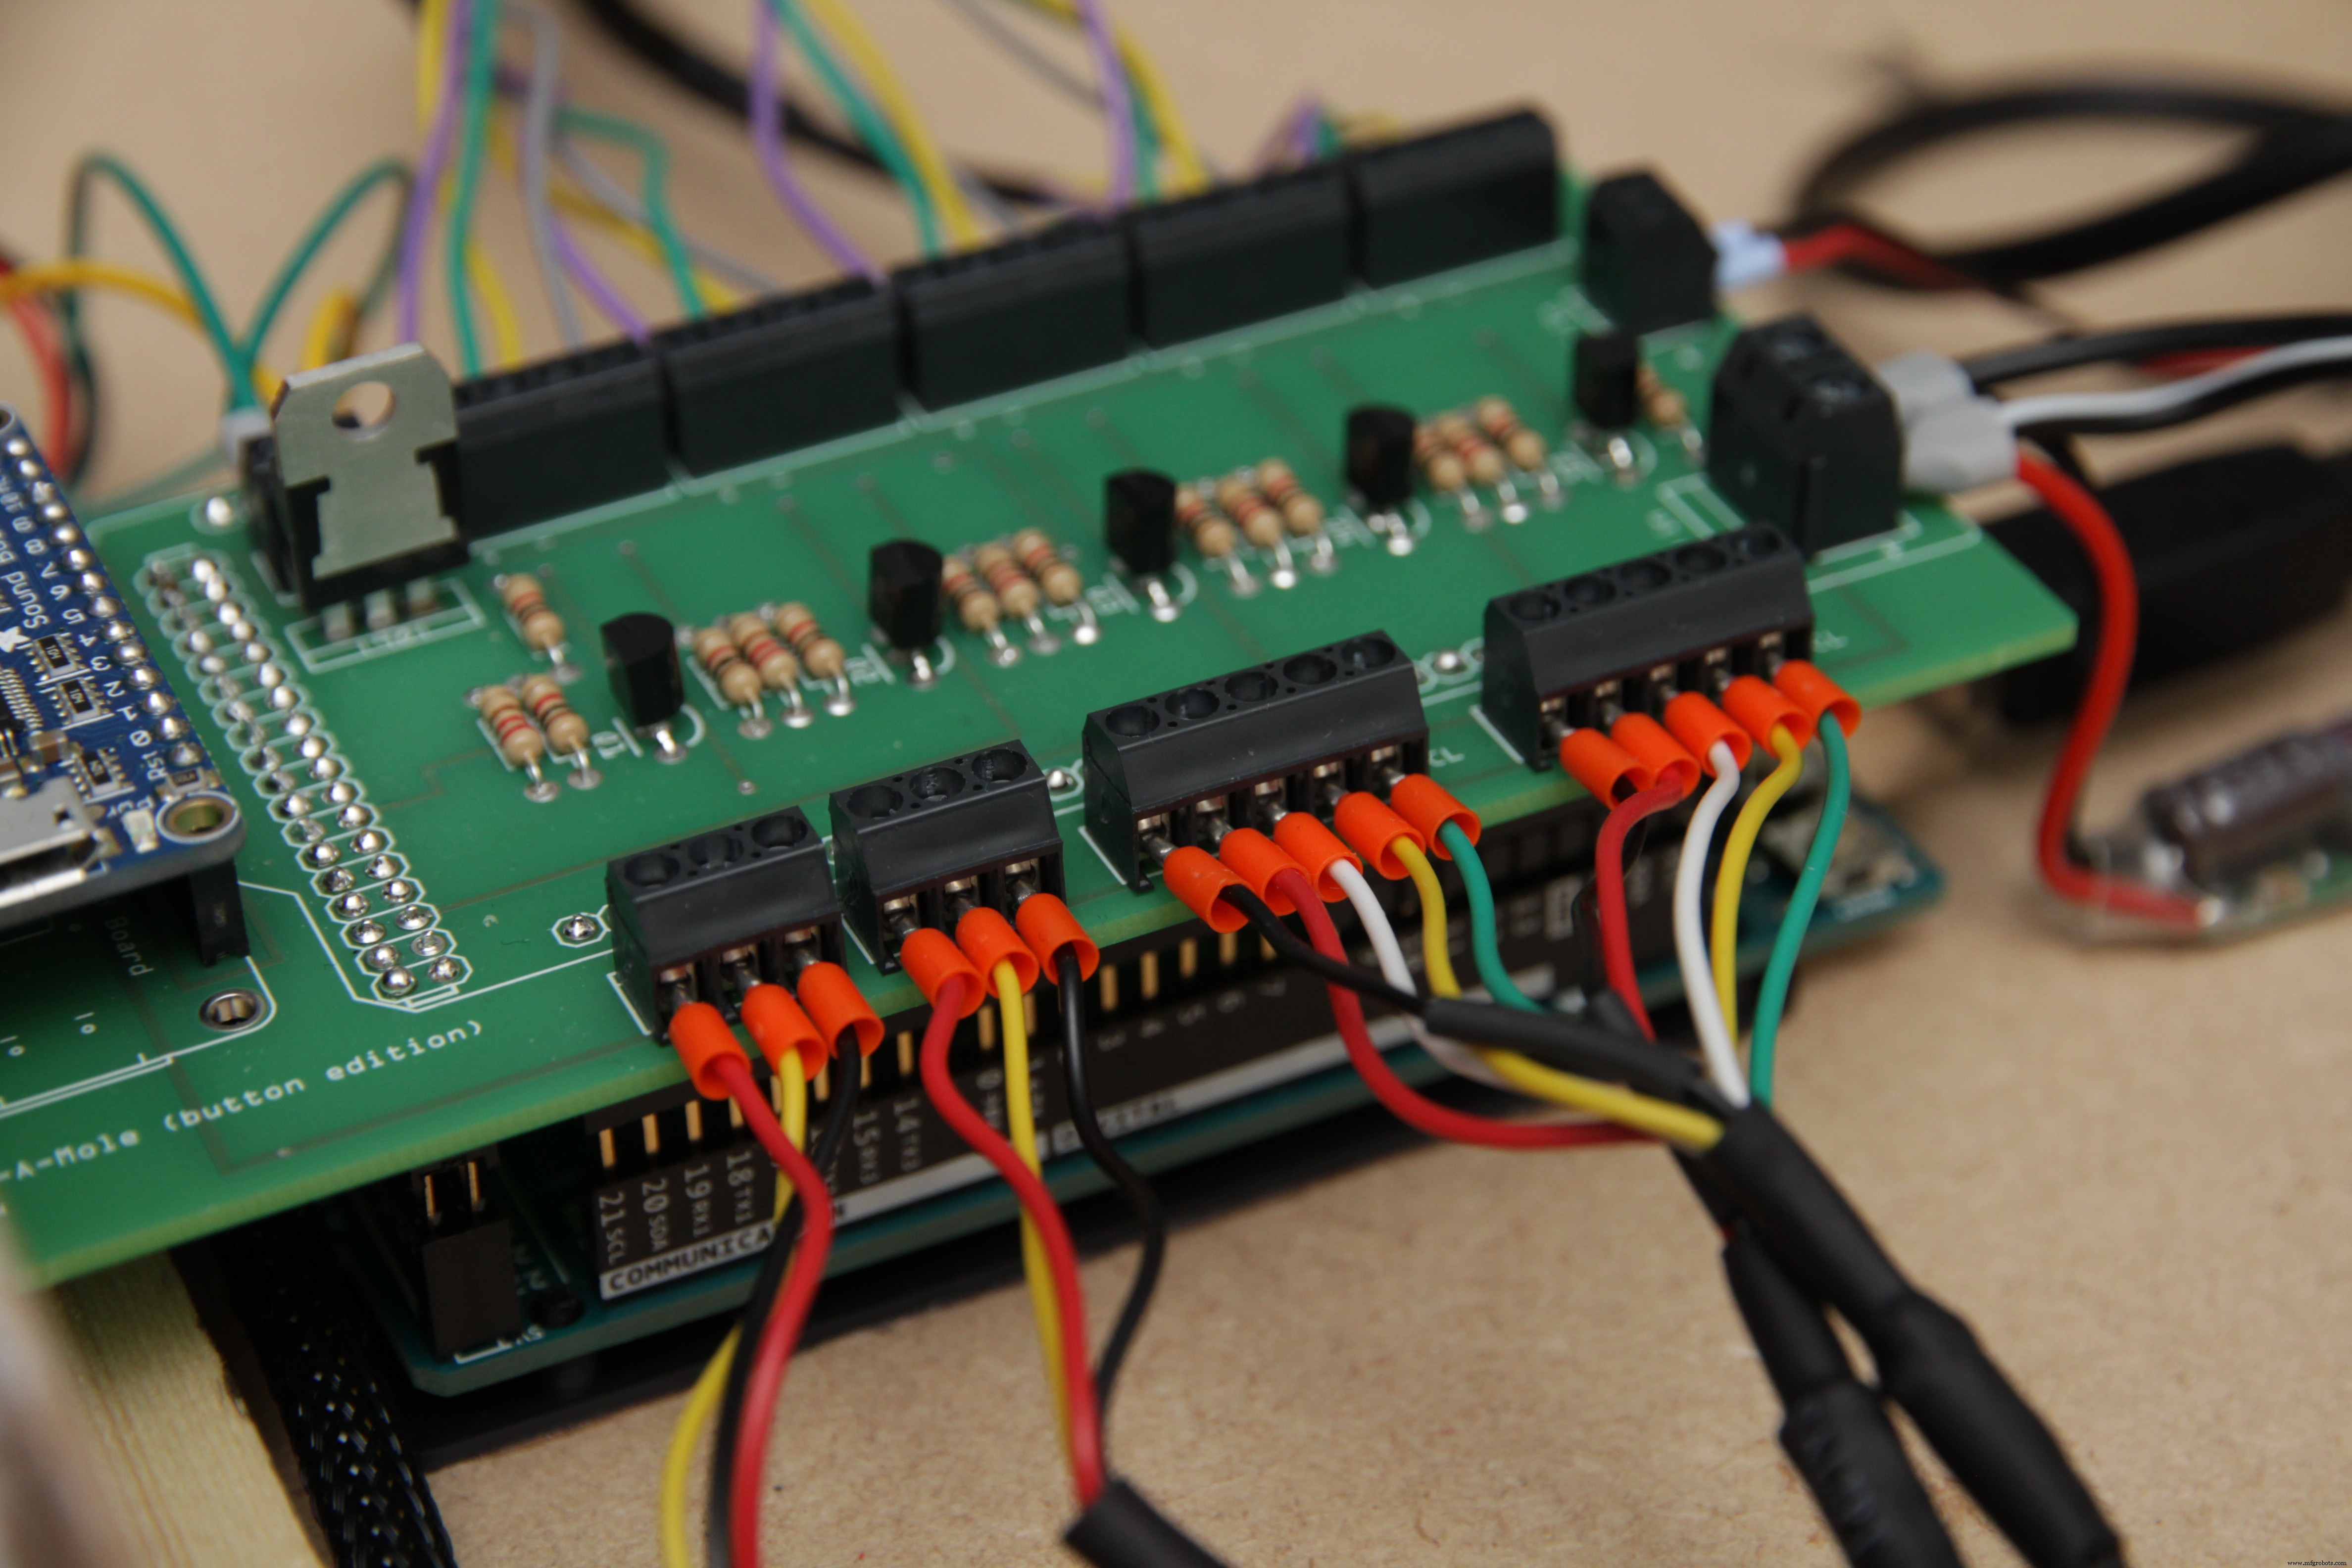
아두이노 쉴드를 조립합니다. 추가로 쌓을 수 있는 헤더 세트를 사용하여 쉴드와 Arduino 사이에 더 많은 공간이 있습니다.
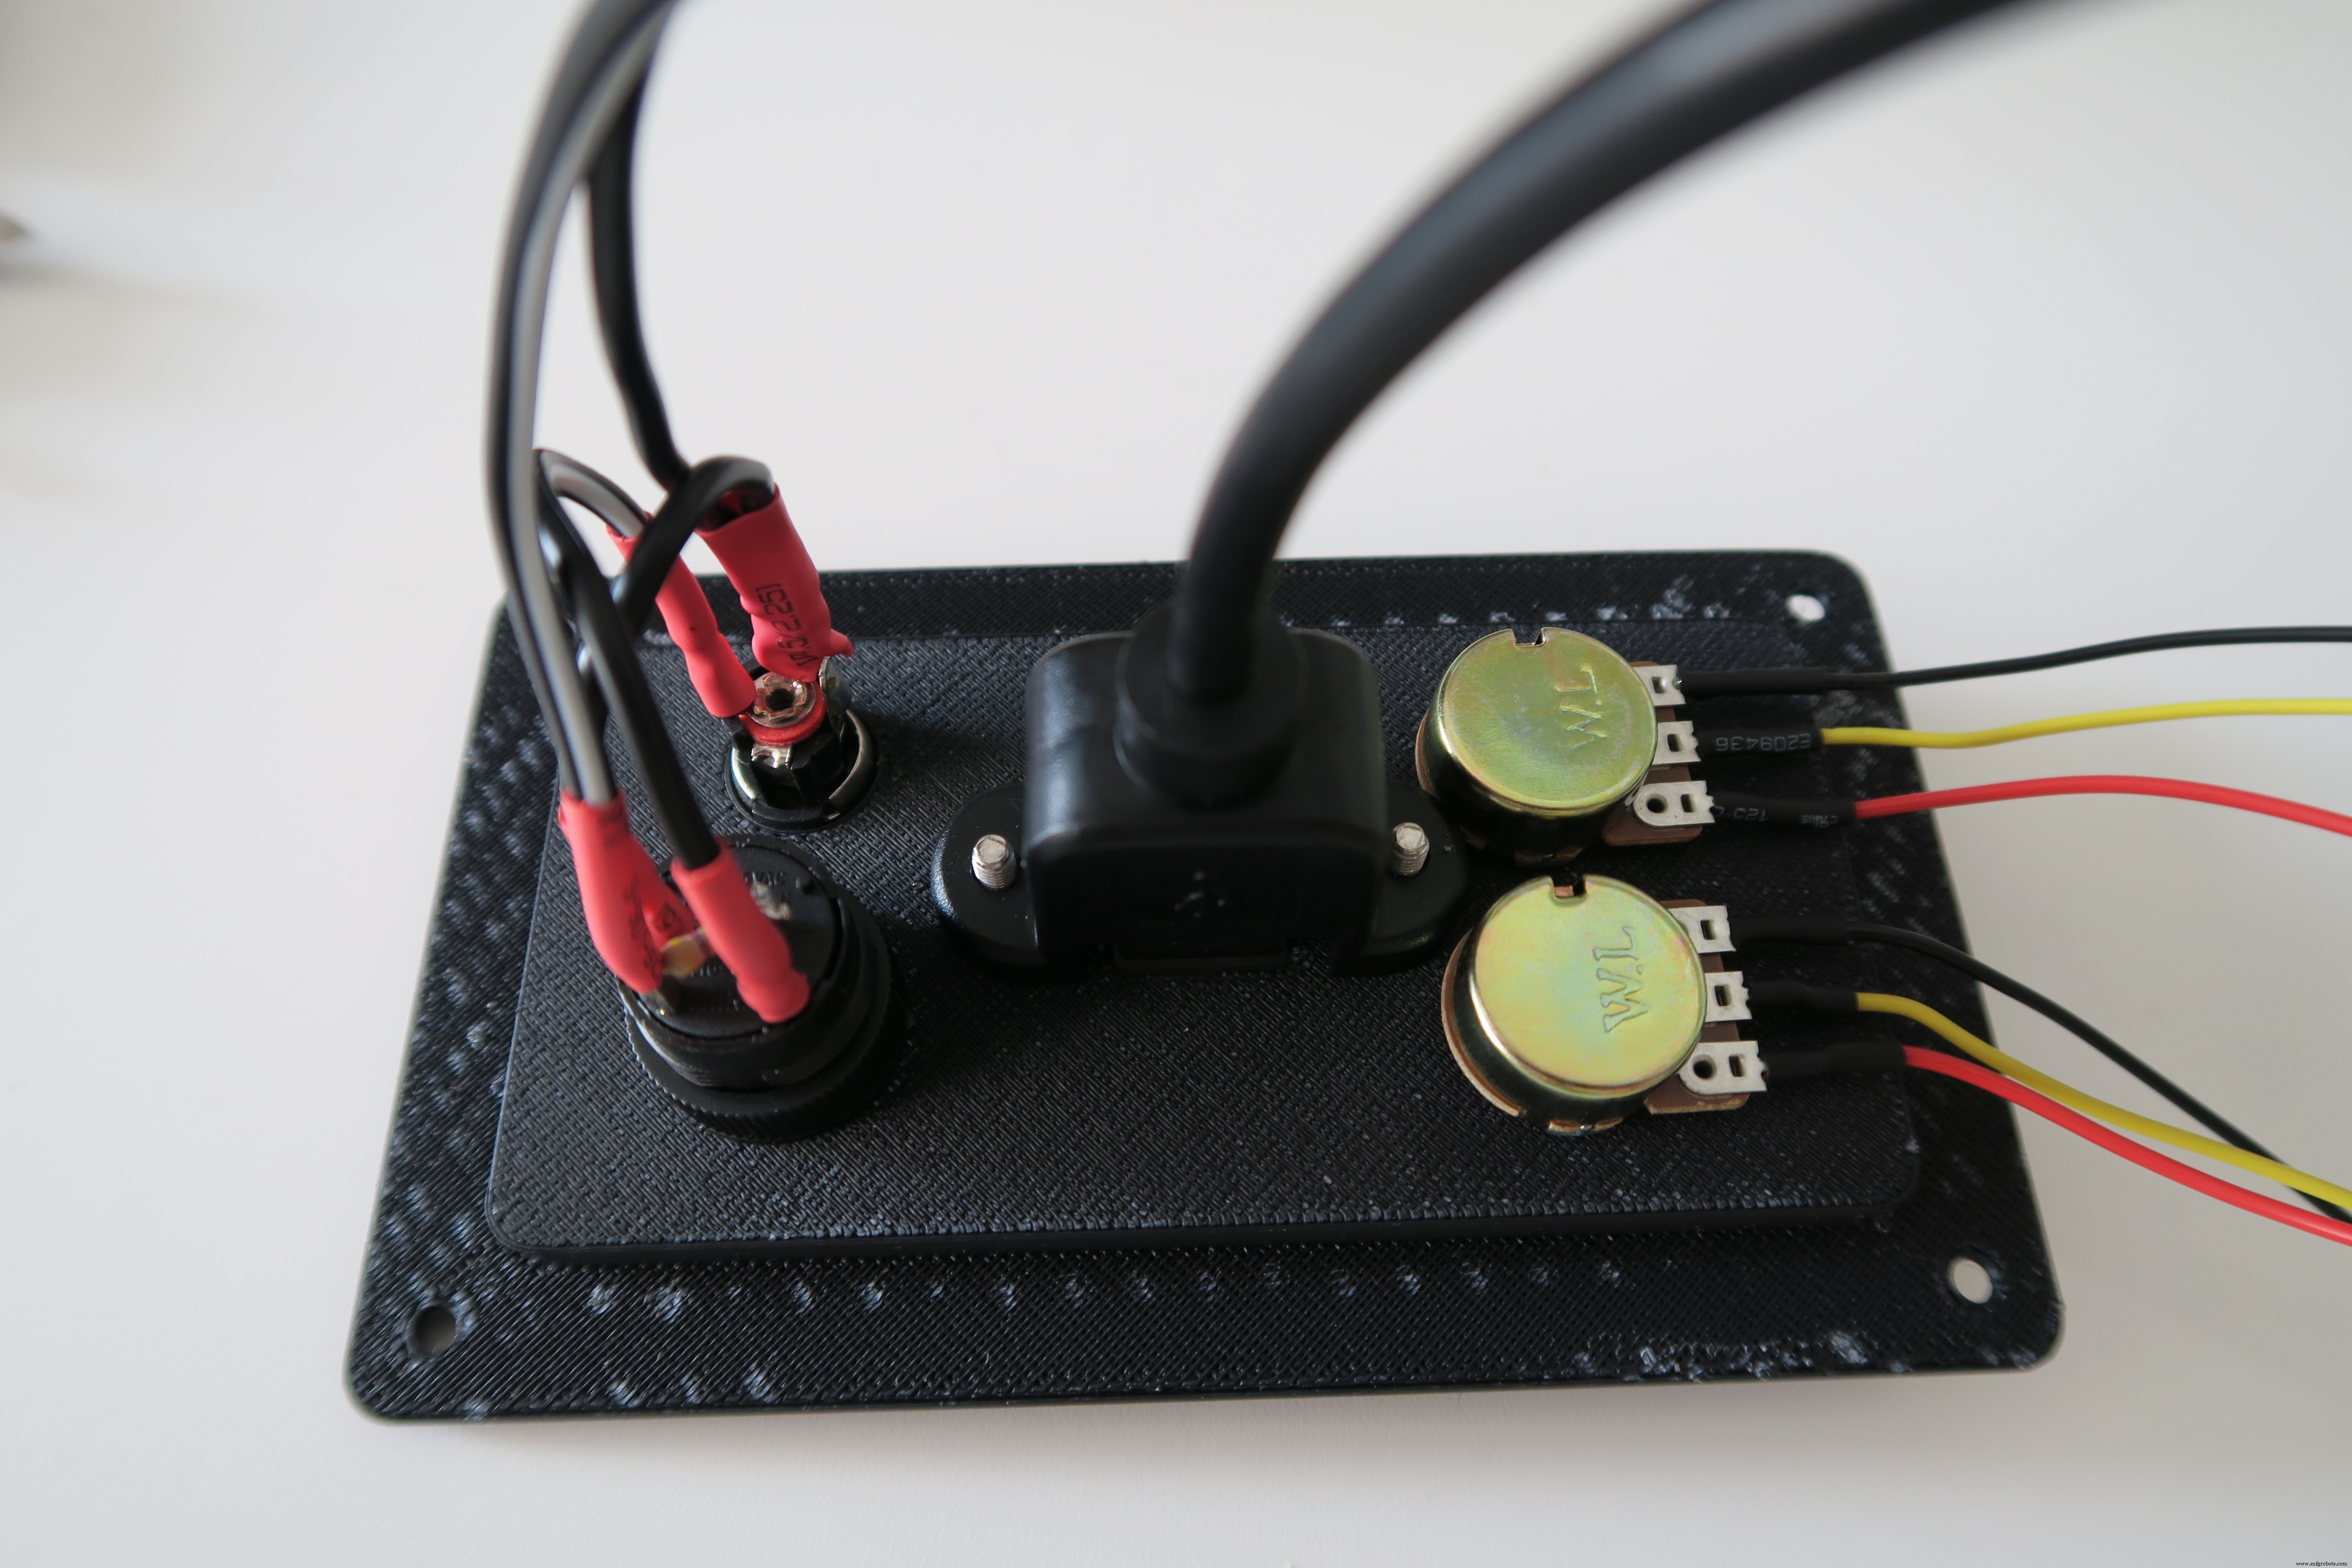
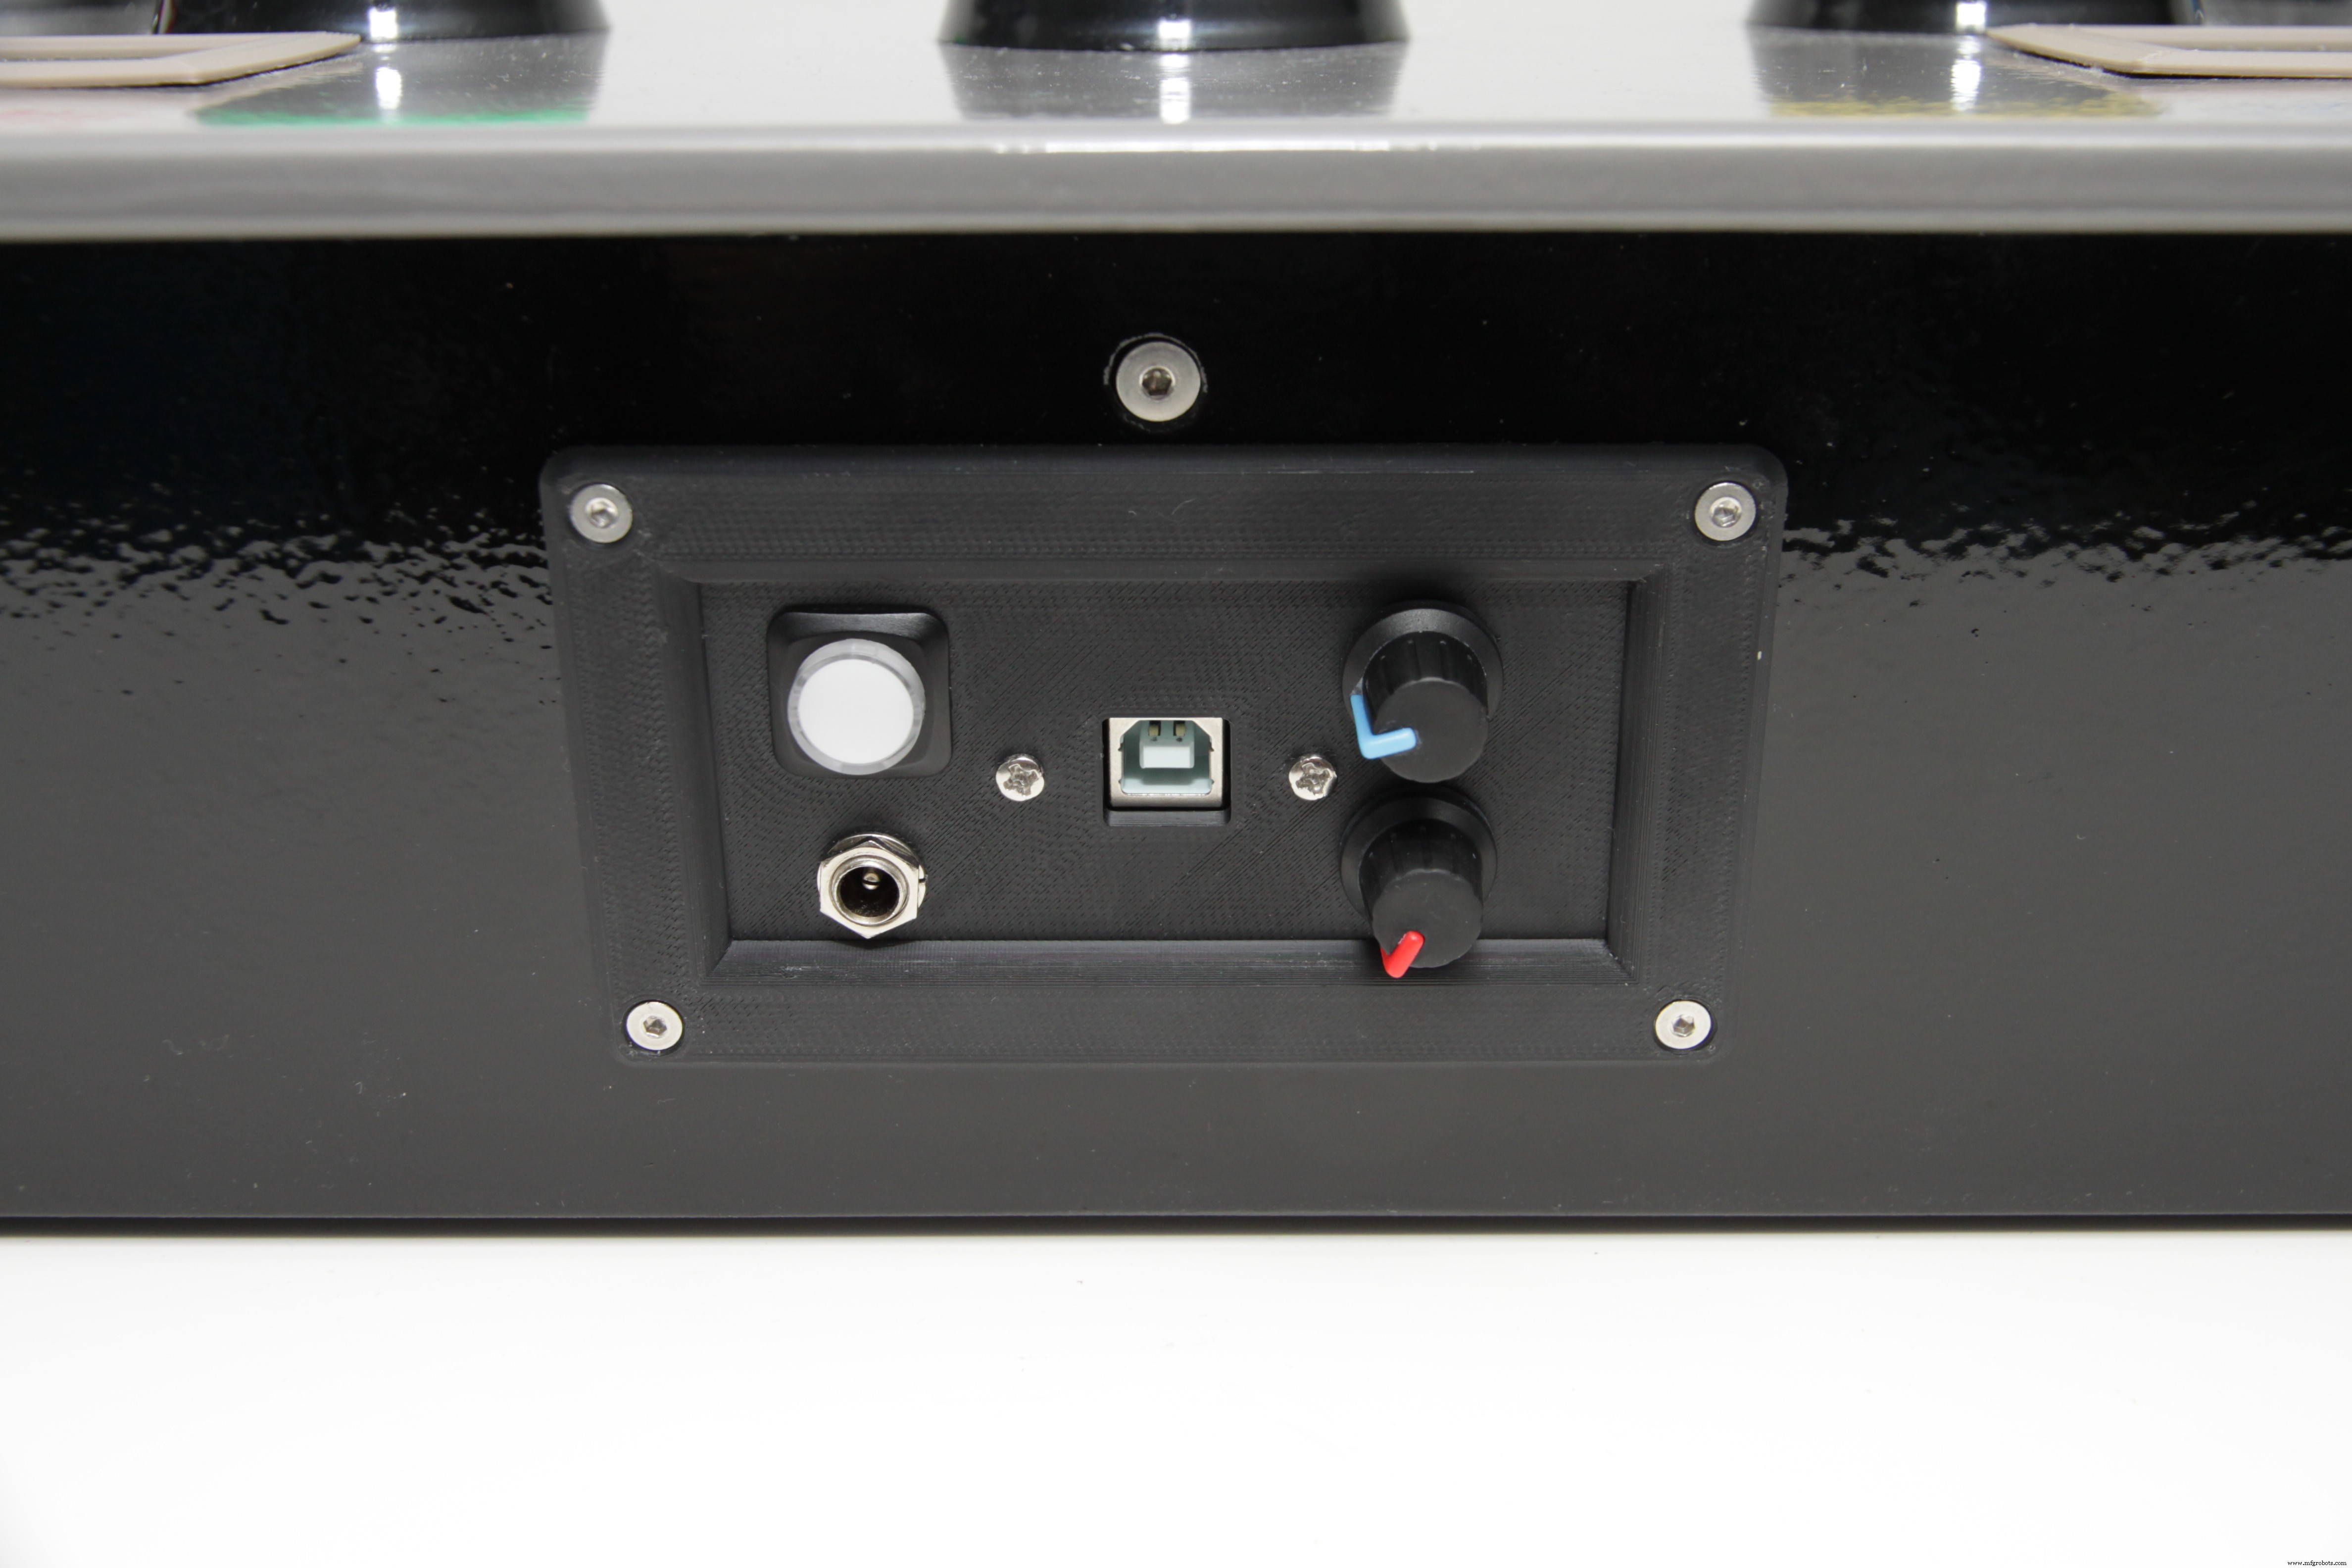
후면 제어판을 조립합니다.
상단 커버(버튼 및 LED 패널)를 조립합니다.
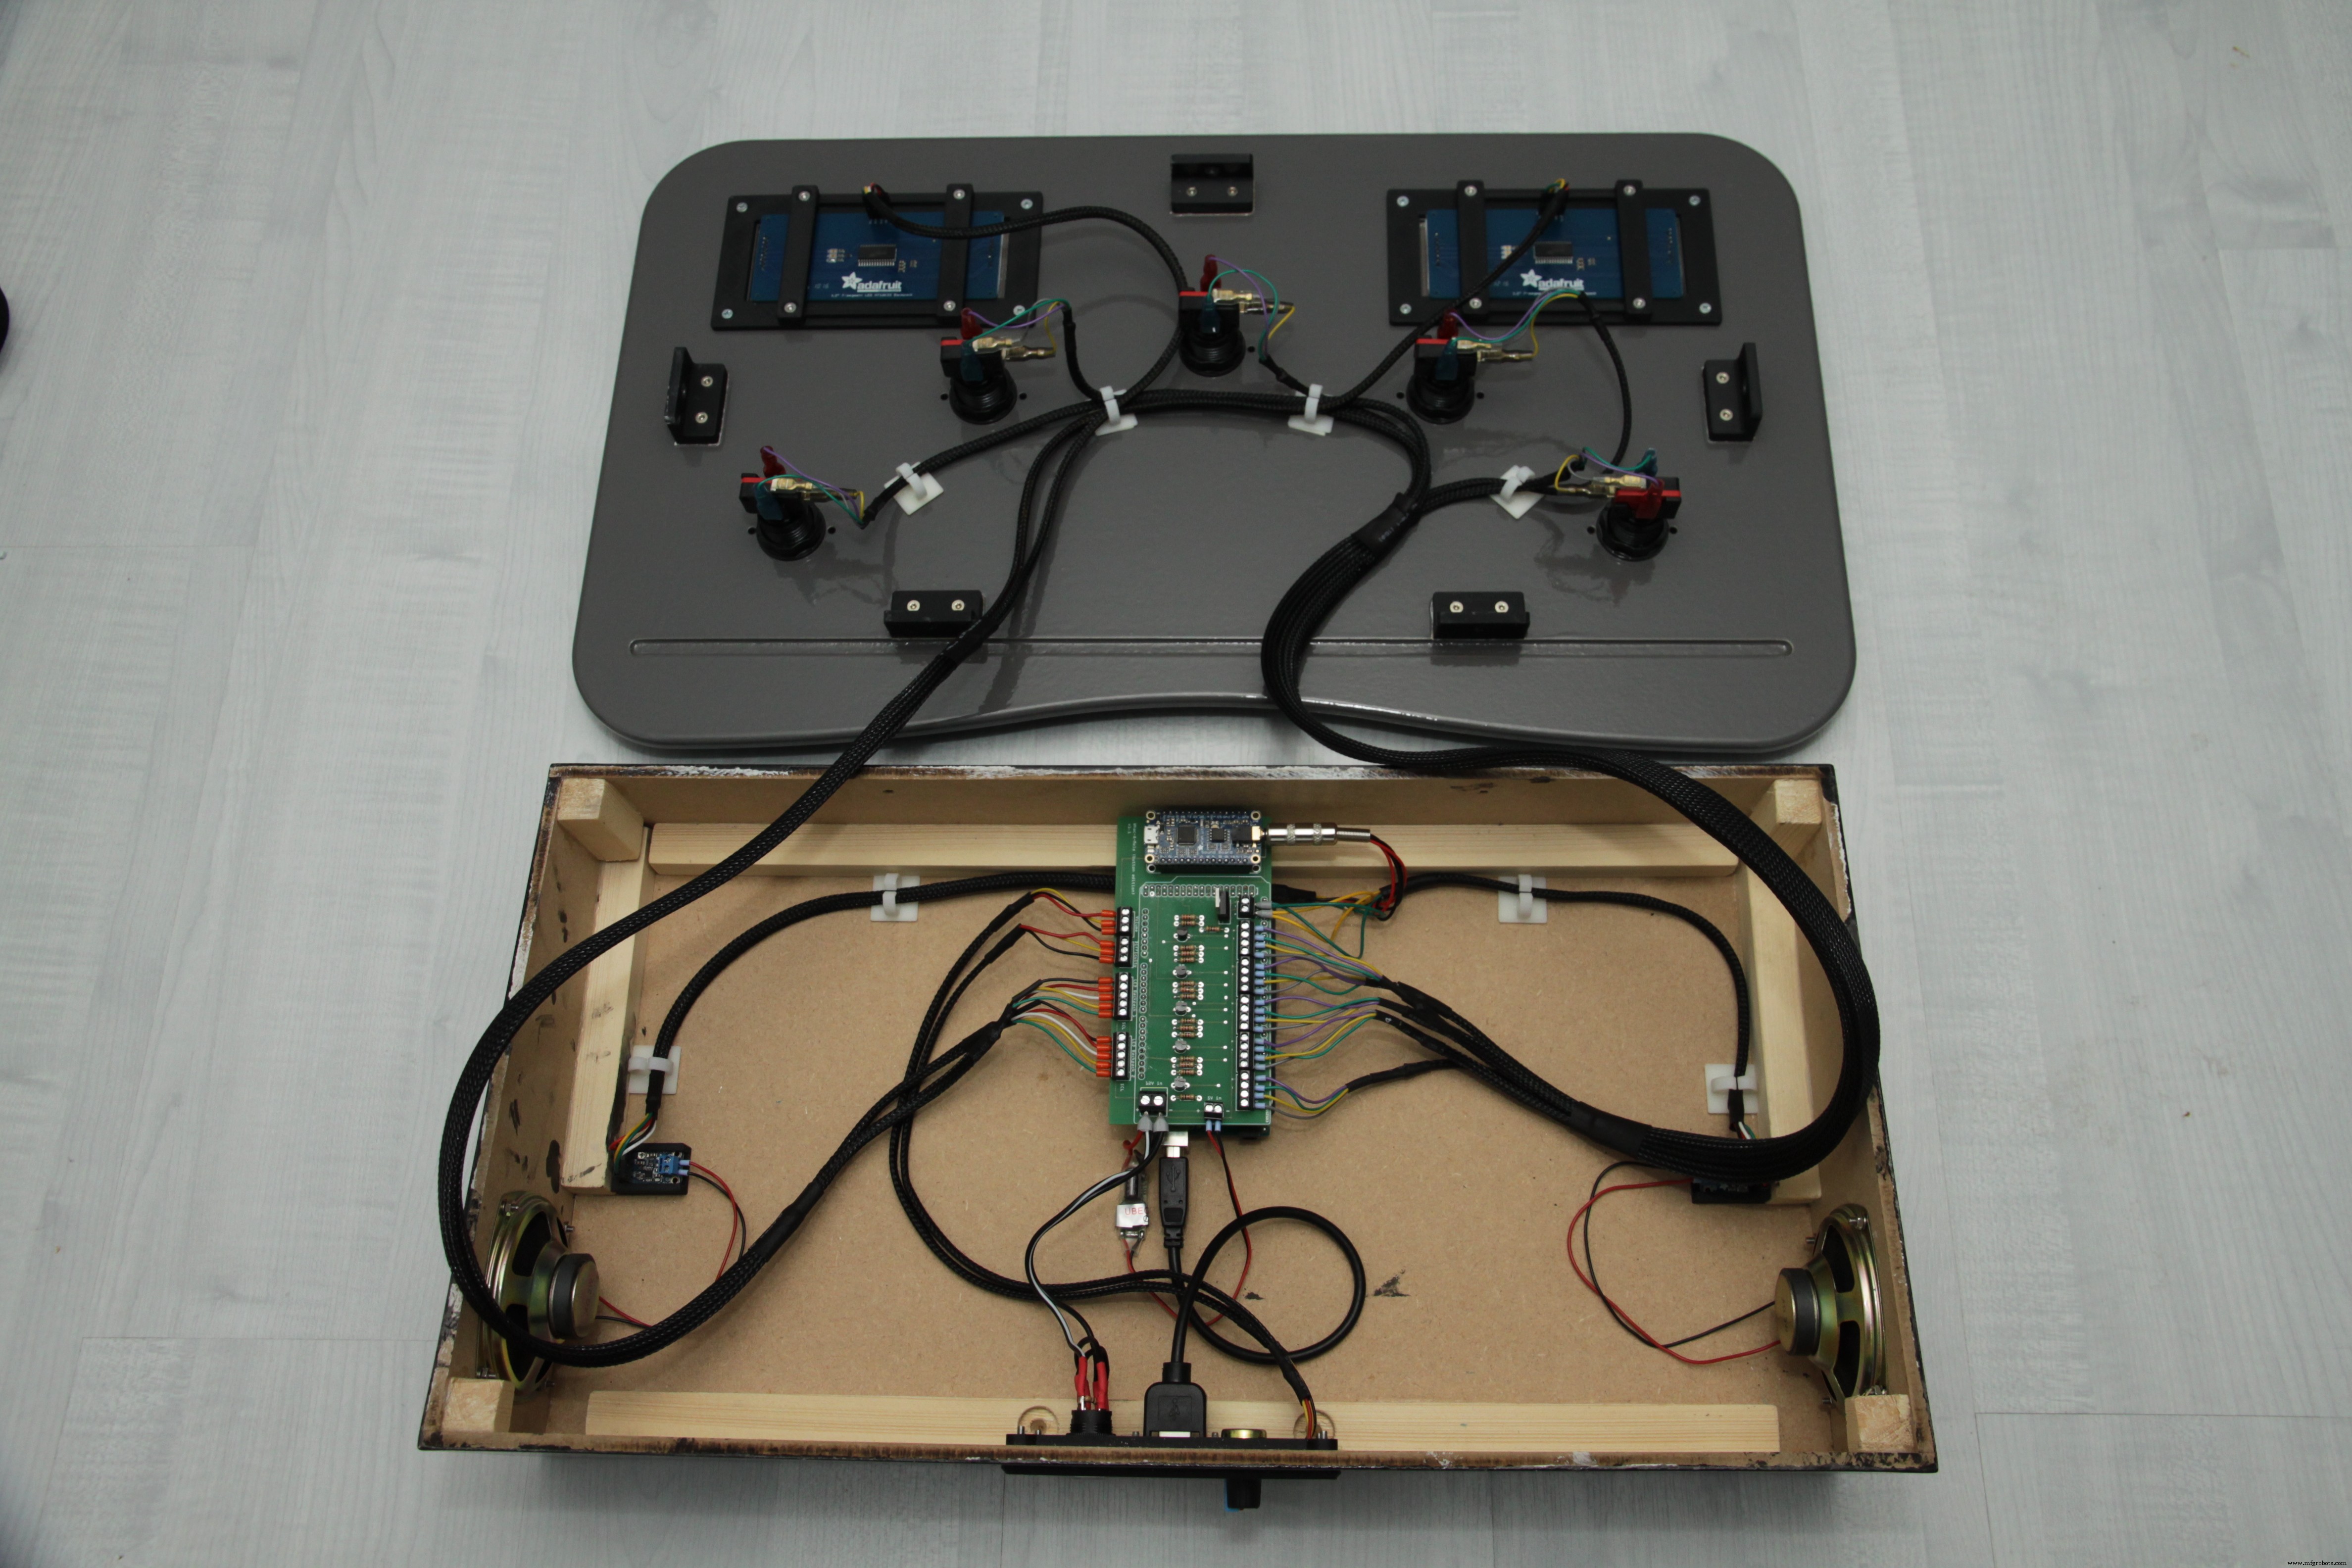
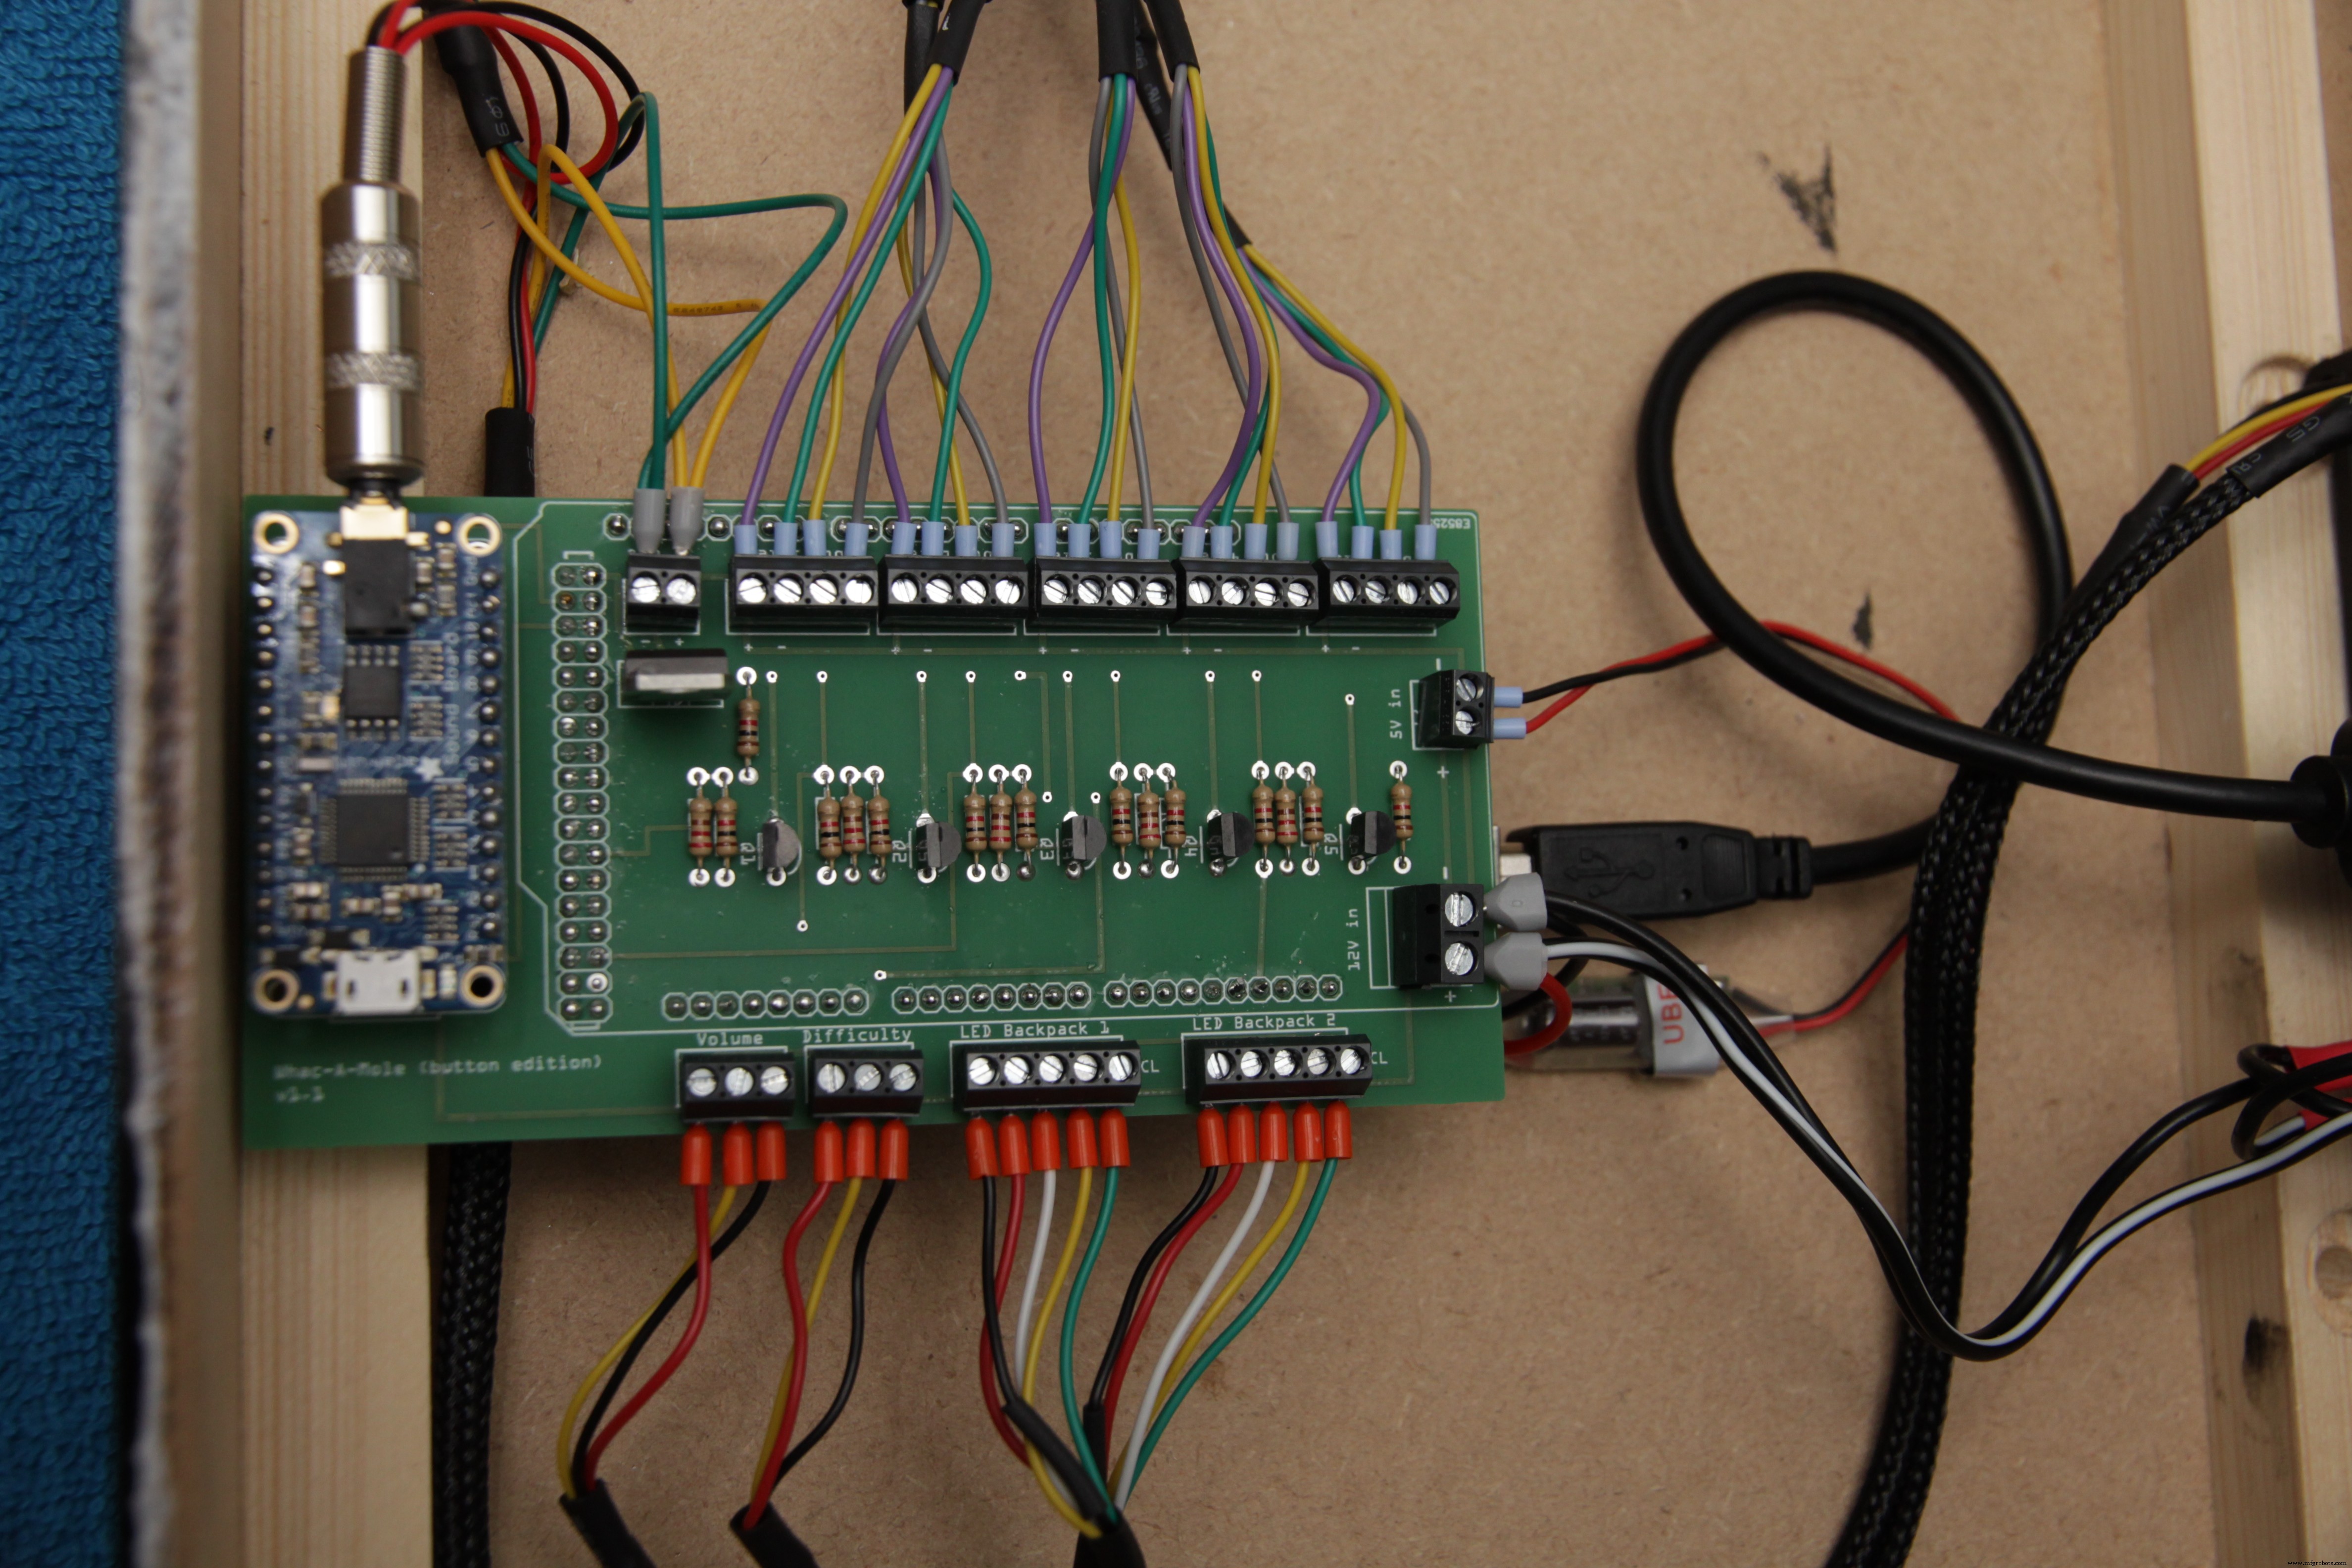
후면 제어판에는 2개의 전위차계 컨트롤이 포함되어 있습니다. 하나는 볼륨 조절용, 하나는 레벨 선택용입니다.
결론
완료되었습니다!
왼쪽 led 숫자 패널에서 선택한 레벨을 볼 수 있습니다. 레벨 1(쉬움)에서 10(미친)까지 선택할 수 있습니다. 오른쪽 led 숫자 패널에서 해당 레벨의 높은 점수를 볼 수 있습니다. 활성 게임 중에 왼쪽 숫자 패널에 현재 점수가 표시됩니다. 이제 녹색 버튼을 눌러 게임을 시작하십시오. 카운트다운이 끝나면 게임이 시작됩니다.
<섹션 클래스="섹션 컨테이너 섹션 축소 가능" id="코드">
/*Whac_A_Mole_v1.0.0By WT040*/#include "Wire.h#include "Adafruit_LEDBackpack.h#include "Adafruit_GFX.h"Adafruit_7segment matrix1 =Adafruit_7segment();Adafruit_7segment matrix Adafruit_7segment();#define debounceTime 10 //define potmeter controls#define potmeterVolume 0#define potmeterGameLevel 1//declare amp power pin#define ampPower 32//declare buttons#define btn1Pin 22#define btn2Pin 24#Pdefine btn2Pin#Pdefine 28#define btn5Pin 30byte btnArray[] ={ btn1Pin, btn2Pin, btn3Pin, btn4Pin, btn5Pin};#define btn1 0 // btn array 사용 시#define btn2 1 // btn array 사용 시#2define using the btn array#define btn4 3 // btn array 사용용#define btn5 4 // btn array 사용용 // leds 선언#define btnLed1Pin 9#define btnLed2Pin 10#define btnLed3Pin 11#define btnLedin btnLed 13바이트 btnLedArray[] ={ btnLed1Pin, btnLed2Pin, btnLed3Pin, btnLed4Pin, btnLed5Pin};#define btnLed1 0 // f or using the btn array#define btnLed2 1 // btn array 사용용#define btnLed3 2 // btn array 사용용#define btnLed4 3 // btn array 사용용#define btnLed5 4 // btn 어레이 사용용/ / 선언 오디오 FX 디지털 (Digitals)에 # 47 #은 fx10TriggerPin 49 # 정의 45 #은 fx9TriggerPin 정의 43 #은 fx8TriggerPin 정의 41 #은 fx7TriggerPin 정의 39 #은 fx6TriggerPin 정의 37 #은 fx5TriggerPin 정의 35 #은 fx4TriggerPin 정의 33 #은 fx3TriggerPin 정의 31 #은 fx2TriggerPin 정의 29 #은 fx1TriggerPin 정의 fx0TriggerPin 정의 바이트 fxVolumeArray [] ={fxVolUpPin, fxVolDnPin} # 정의 fx0Trigger 0 정의 fxVolUpPin 51 # 1 fxVolDnPin 53byte fxTriggerArray [] ={fx0TriggerPin, fx1TriggerPin, fx2TriggerPin, fx3TriggerPin, fx4TriggerPin, fx5TriggerPin, fx6TriggerPin, fx7TriggerPin, fx8TriggerPin, fx9TriggerPin, fx10TriggerPin} 정의 // btn array 사용용#define fx1Trigger 1 // btn array 사용용#define fx2Trigger 2 // btn array 사용용#define fx3Trigger 3 // btn array 사용용#define fx4Trigger 4 // b 사용용 tn array#define fx5Trigger 5 // btn array 사용용#define fx6Trigger 6 // btn array 사용용#define fx7Trigger 7 // btn array 사용용#define fx8Trigger 8 // btn array 사용용#define fx9Trigger 9 // btn array 사용용#define fx10Trigger 10 // btn array 사용용#define fxVolUp 0 // btn array 사용용#define fxVolDn 1 // btn 어레이 사용용signed int currentPlayingSound =-1;byte btnPressed[5 ], ledState[5]; // ledunsigned 긴 이전MillisLEDBlink =0을 깜박임; //점멸 led#define intervalLedBlink 750 ////게임 시작 순서 unsigned long previousMillisGameStarting =0;#define intervalCountDown 1000byte gameStartCountDown;////게임 단계 unsigned long previousMillisGameStep =0;int gameStepLength =0; //개별 스텝의 길이 gameStepBtn =0; //눌러야 하는 버튼 //int valPotmeterVolume =0;int volume =0;int realVolume =35; //adafruit fx 보드의 볼륨 int valPotmeterGameLevel =0;int gameLevel;int currentScore;int highScore;int highScoreAddr =1;byte activeBtn;bool debug; // 디버그 또는 notbyte 활성화 wackAMoleState; //게임 불 상태 SystemInitialized =false;#define stateUnknown 0#define waitForStart 1#define 시작 2#define running 3#define gameOver 4#define 중지 5void setup(){ Serial.begin(9600); // 앰프 전원 핀 초기화 pinMode(ampPower, OUTPUT); digitalWrite(ampPower, LOW); // btn 핀 초기화 for (int Pin =0; Pin <5; Pin++) { pinMode(btnArray[Pin], INPUT); } // btn led 핀 초기화 for (int Pin =0; Pin <5; Pin++) { pinMode(btnLedArray[Pin], OUTPUT); } // btn fx 핀 초기화 for (int Pin =0; Pin <11; Pin++) { pinMode(fxTriggerArray[Pin], OUTPUT); digitalWrite(fxTriggerArray[핀], 높음); } // btn fx 볼륨 핀 초기화 for (int Pin =0; Pin <2; Pin++) { pinMode(fxVolumeArray[Pin], OUTPUT); digitalWrite(fxVolumeArray[핀], 높음); } matrix1.begin(0x70); matrix2.begin(0x71); 동안 (!eeprom_is_ready()); // EEPROM이 준비될 때까지 기다립니다 cli(); 높은 점수 =eeprom_read_word((uint16_t*)(gameLevel * 2)); 세이(); matrix1.print(0); matrix1.writeDisplay(); matrix2.print(0); matrix2.writeDisplay(); initializeSystem();} 무효 루프(){ checkButtonInputs(); // 스위치를 확인할 때 현재 상태를 얻습니다. readVolumePotmeter(); if (wackAMoleState ==waitForStart) { playSound(fx0Trigger); if (btnPressed[btn4]) { wackAMoleState =시작; } readGameLevelPotmeter(); ledBlinkStart(); } if (wackAMoleState ==시작) { startGame(); } if (wackAMoleState ==실행 중) { playSound(fx1Trigger); checkNextGameStep(); }} 무효 checkNextGameStep() { 서명되지 않은 긴 currentMillisGameStep =millis(); 정수 양의 버튼 프레스 =0; for (int btn =0; btn <5; btn++) { if (btnPressed[btn]) { amountOfButtonPresses++; } } if (previousMillisGameStep ==0) { previousMillisGameStep =currentMillisGameStep; digitalWrite(btnLedArray[btnLed4], LOW); randomSeed(analogRead(2)); gameStepBtn =무작위(0, 5); gameStepLength =random(3000 / gameLevel, 5000 / gameLevel); digitalWrite(btnLedArray[gameStepBtn], HIGH); //새 버튼 조명 켜기 } if ((currentMillisGameStep - previousMillisGameStep>
=gameStepLength) || (amountOfButtonPresses> 1) || (amountOfButtonPresses ==1) &&!btnPressed[gameStepBtn]) { //게임 종료... playSound( fx2Trigger); wackAMoleState =게임 오버; 이전MillisGameStep =0; (int 카운터 =0; 카운터 <5; 카운터++) { analogWrite(btnLedArray[카운터], 255); } for (int 밝기 =255; 밝기> 0; 밝기--) { analogWrite(btnLedArray[btnLed1], 밝기); analogWrite(btnLedArray[btnLed2], 밝기); analogWrite(btnLedArray[btnLed3], 밝기); analogWrite(btnLedArray[btnLed4], 밝기); analogWrite(btnLedArray[btnLed5], 밝기); 지연(10); } analogWrite(btnLedArray[btnLed1], 0); analogWrite(btnLedArray[btnLed2], 0); analogWrite(btnLedArray[btnLed3], 0); analogWrite(btnLedArray[btnLed4], 0); analogWrite(btnLedArray[btnLed5], 0); Serial.println("게임 종료"); if (currentScore> highScore) { 동안 (!eeprom_is_ready()); // EEPROM이 준비될 때까지 기다립니다 cli(); eeprom_write_word((uint16_t*)(gameLevel * 2), 현재 점수); // 값을 EEPROM으로 초기화하자 sei(); } 정수 카운터 =0; { 지연(1); 체크버튼입력(); 카운터++; } while ((counter <1000) &&!btnPressed[btn1] &&!btnPressed[btn2 &&!btnPressed[btn3] &&!btnPressed[btn4] &&!btnPressed[btn5]] 행렬)/ .프린트(0); matrix1.writeDisplay(); wackAMoleState =대기 시작; } else if (btnPressed[gameStepBtn] &&(amountOfButtonPresses ==1)) { digitalWrite(btnLedArray[gameStepBtn], LOW); // led 이전 버튼 끄기 int counter =0; { 지연(1); 체크버튼입력(); 카운터++; } while ((counter <1000) &&btnPressed[gameStepBtn]);//버튼 해제를 기다립니다. previousMillisGameStep =currentMillisGameStep; 정수 tempStepBtn =0; do { tempStepBtn =random(0, 5); gameStepLength =random(3000 / gameLevel, 5000 / gameLevel); } 동안 (gameStepBtn ==tempStepBtn); gameStepBtn =tempStepBtn; digitalWrite(btnLedArray[gameStepBtn], HIGH); // 새 버튼 조명을 켭니다. currentScore++; matrix1.print(현재점수); matrix1.writeDisplay(); if (currentScore> highScore) { matrix2.print(currentScore); matrix2.writeDisplay(); } }}void ledBlinkStart() //지연 없이 led 깜박임{ unsigned long currentMillisLedBlink =millis(); if (currentMillisLedBlink - previousMillisLedBlink>=intervalLedBlink) { previousMillisLedBlink =currentMillisLedBlink; if (ledState[0] ==LOW) { ledState[0] =HIGH; } else { ledState[0] =낮음; } 디지털 쓰기(btnLedArray[btnLed4], ledState[0]); //green led/button }}void startGame() //게임 자체의 시작 시퀀스{ unsigned long currentMillisGameStarting =millis(); 디지털 쓰기(btnLedArray[btnLed4], 0); //녹색 LED 끄기/버튼 끄기 currentScore =0; if (gameStartCountDown ==0) { playSound(fx3Trigger); 이전MillisGameStarting =millis(); gameStartCountDown =4; 지연(300); matrix1.print(gameStartCountDown, DEC); matrix1.writeDisplay(); } if (currentMillisGameStarting - previousMillisGameStarting>=intervalCountDown) { previousMillisGameStarting =currentMillisGameStarting; if (gameStartCountDown> 0) { gameStartCountDown--; matrix1.print(gameStartCountDown, DEC); matrix1.writeDisplay(); if (gameStartCountDown ==0) { wackAMoleState =실행 중; } } }}void initializeSystem(){ //초기화 코드 추가... digitalWrite(btnLedArray[btnLed1], HIGH); 지연(75); 디지털 쓰기(btnLedArray[btnLed2], 높음); 지연(75); digitalWrite(btnLedArray[btnLed3], HIGH); 지연(75); 디지털 쓰기(btnLedArray[btnLed4], 높음); 지연(75); 디지털 쓰기(btnLedArray[btnLed5], 높음); 지연(1000); digitalWrite(btnLedArray[btnLed5], LOW); 지연(75); digitalWrite(btnLedArray[btnLed4], LOW); 지연(75); digitalWrite(btnLedArray[btnLed3], LOW); 지연(75); digitalWrite(btnLedArray[btnLed2], LOW); 지연(75); digitalWrite(btnLedArray[btnLed1], LOW); 지연(1000); 디버그 =참; wackAMoleState =대기 시작; 초기화 볼륨(); if (실제 볼륨> 0) { enableAmpPower(true); }}void checkButtonInputs() //버튼 변경 확인{ static byte previousstate[5]; 정적 바이트 현재 상태[5]; 정적 오래 지속; 바이트 인덱스; //debounce if ((lasttime + debounceTime)> millis()) { return; } 마지막 시간 =millis(); // for (index =0; index <5; index++) { currentstate[index] =digitalRead(btnArray[index]); // 버튼 읽기 if (currentstate[index] !=btnPressed[index]) { if ((btnPressed[index] ==HIGH) &&(currentstate[index] ==LOW)) { if (debug) { Serial.print ("버튼 해제:"); Serial.println(인덱스 + 1); } btnPressed[색인] =0; } if ((btnPressed[index] ==LOW) &&(currentstate[index] ==HIGH)) { if (debug) { Serial.print("버튼을 눌렀을 때:"); Serial.println(인덱스 + 1); } btnPressed[색인] =1; } } }} 무효 initVolume(){ valPotmeterVolume =(analogRead(potmeterVolume) / 30); if (actualVolume> valPotmeterVolume) { do { digitalWrite(fxVolumeArray[fxVolDn], LOW); 실제 볼륨--; 지연(20); digitalWrite(fxVolumeArray[fxVolDn], HIGH); 지연(20); } 동안(실제 볼륨> valPotmeterVolume); } else if (actualVolume valPotmeterVolume) { digitalWrite(fxVolumeArray[fxVolDn], LOW); 실제 볼륨--; 지연(40); digitalWrite(fxVolumeArray[fxVolDn], HIGH); if (실제 볼륨 ==0) { enableAmpPower(거짓); } } else if (actualVolume -1) { matrix2.print(highScore); } 그렇지 않으면 { matrix2.print(0); } matrix2.writeDisplay();} 무효 playSound(int sound){ if (currentPlayingSound !=sound) { for (int counter =0; counter <11; counter++) { digitalWrite(fxTriggerArray[counter], HIGH); } digitalWrite(fxTriggerArray[사운드], 낮음); currentPlayingSound =소리; }}무효 enableAmpPower(부울 상태){ digitalWrite(ampPower, 상태);} 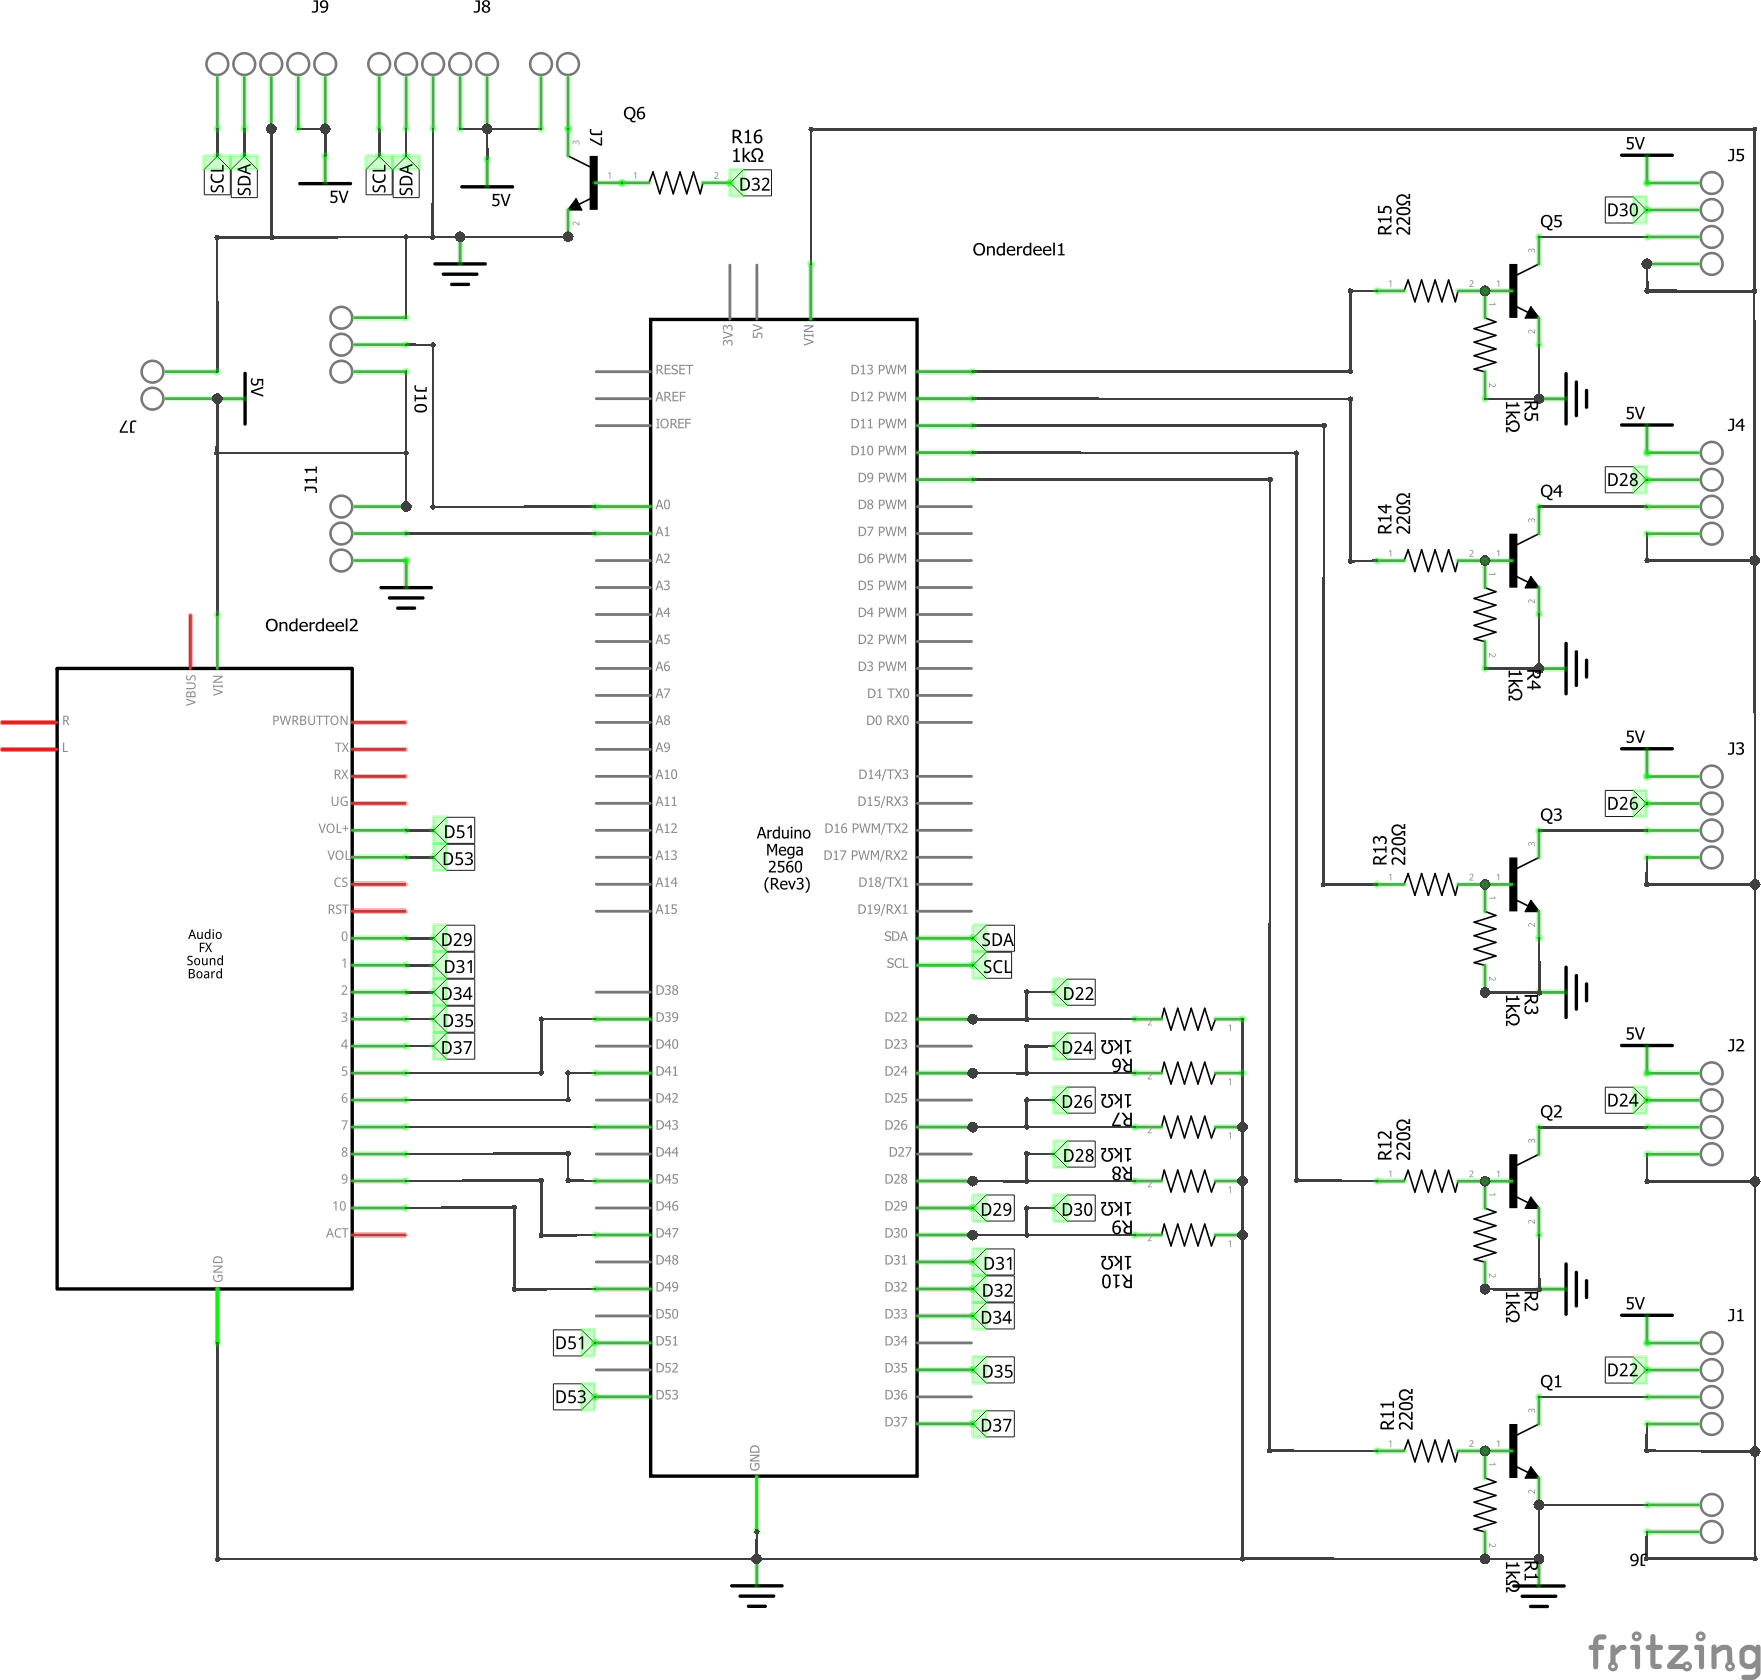
제조공정
구성품 및 소모품 Arduino Mega 2560 × 1 Adafruit 2핀 LCD 디스플레이 × 1 24V 전원 공급 장치 × 1 Adafruit 힘 센서 × 1 팝 범퍼 어셈블리 × 1 팝 범퍼 스위치 × 1 대상 스위치 × 1 롤오버 스위치 × 1 플리퍼 어셈블리 × 1 LED 램프 × 1 이 프로젝트 정보 Arduino 제어 핀
밀링 커터는 일반적으로 다중 날 도구입니다. 동시에 절삭에 참여하는 많은 날, 긴 절삭 날 및 높은 절삭 속도 때문에 생산성이 높습니다. 다양한 밀링 커터를 적용하여 평면, 홈, 계단 등을 처리할 수 있으며 기어, 나사산, 스플라인 샤프트 톱니 프로파일 및 다양한 성형 표면도 처리할 수 있습니다. 밀링 커터의 종류와 용도 밀링 커터의 유형은 톱니 구조에 따라 샤프 톱니 밀링 커터와 릴리프 톱니 밀링 커터로 나눌 수 있습니다. 치아의 상대 위치와 밀링 커터의 축에 따라 원통형 밀링 커터, 앵글 밀링 커터, 페이스 밀링 커터, 성형