

제조공정

산업 제조
<메인 클래스="사이트 메인" id="메인">
이 프로젝트에서는 Arduino 보안 및 경보 시스템을 만드는 방법을 배웁니다. 다음 비디오를 보거나 아래에 작성된 튜토리얼을 읽을 수 있습니다.
알람은 A 버튼을 누른 후 10초 후에 활성화됩니다. 물체를 감지하기 위해 초음파 센서를 사용하고 알람이 무언가를 감지하면 부저가 소리를 내기 시작합니다. 알람을 중지하려면 4자리 비밀번호를 삽입해야 합니다. 사전 설정된 비밀번호는 1234이지만 변경할 수도 있습니다.
<그림 클래스="aligncenter">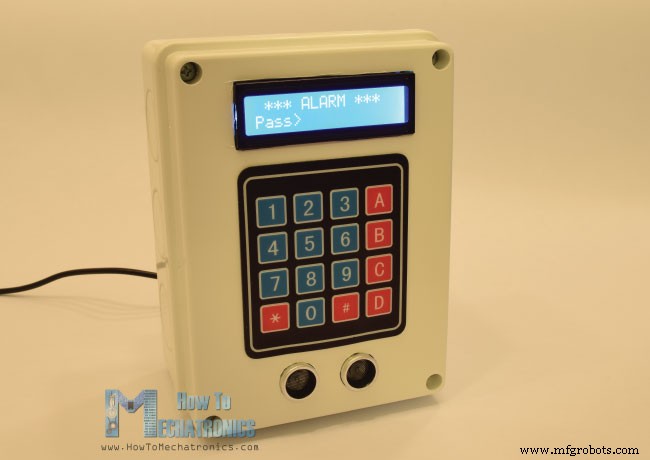
B 버튼을 눌러 암호 변경 메뉴로 들어갑니다. 계속하려면 현재 암호를 입력해야 하고 새 4자리 암호를 입력해야 합니다. 암호가 변경되면 다음에 알람을 활성화할 때 새 암호를 입력해야만 알람을 중지할 수 있습니다. 잘못된 비밀번호를 입력하면 다시 시도해야 한다는 메시지가 표시됩니다.
이제 이 프로젝트에 필요한 구성 요소를 살펴보겠습니다. 분명히 우리는 Arduino 보드, 초음파 센서, LCD 디스플레이, 부저 및 4×4 키패드가 필요합니다.
<그림 클래스="aligncenter">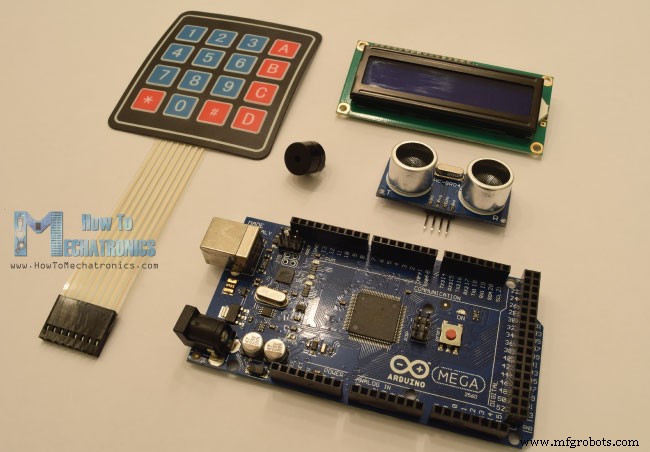
아래 링크에서 이 Arduino 프로젝트에 필요한 구성요소를 얻을 수 있습니다.
다음은 회로도입니다.
<그림 클래스="aligncenter">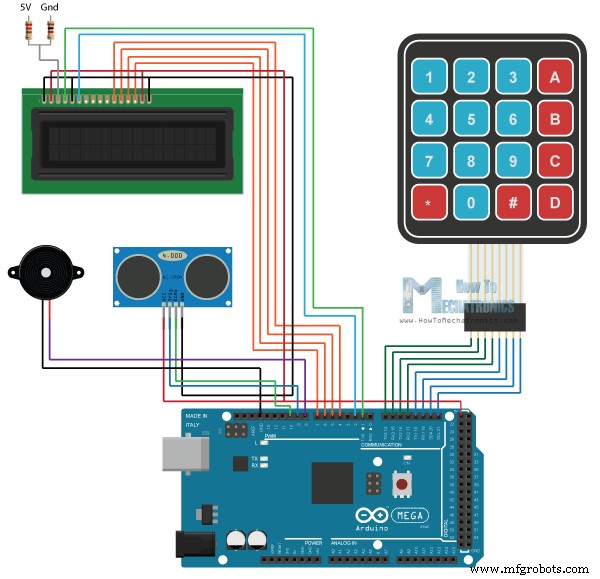
따라서 부저의 경우 단일 핀만 필요하지만 PWM 지원이 있는 핀 하나가 필요합니다. 4×4 키패드에는 8개의 핀이 있으며 그 중 4개는 행용이고 4개는 키패드의 열용입니다. 각 버튼은 실제로 누를 때 한 행과 열 사이를 단락시키는 푸시 버튼 스위치입니다.
<그림 클래스="aligncenter">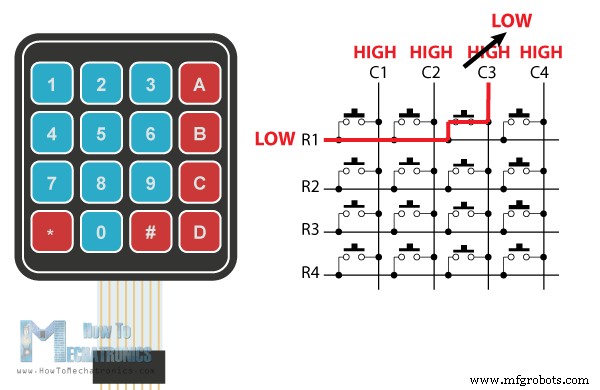
따라서 예를 들어 행 1 행을 낮게 설정하고 모든 열 행을 높게 설정하면 예를 들어 버튼 3을 누르면 두 행 사이의 단락으로 인해 열 3 행이 낮게 떨어지므로 이 경우 버튼 3이 눌렸다고 등록할 수 있습니다.
이 프로젝트의 다른 두 구성 요소인 초음파 센서와 LCD 디스플레이는 이전에 연결하고 사용하는 방법에 대한 자세한 자습서를 확인할 수 있습니다.
다음으로 아두이노 코드를 보자. 코드가 조금 더 길기 때문에 이해를 돕기 위해 프로그램의 소스 코드를 섹션별로 설명과 함께 게시하겠습니다. 그리고 이 기사의 마지막에 전체 소스 코드를 게시할 것입니다.
따라서 LCD용 표준 LiquidCrystal 라이브러리와 추가로 설치해야 하는 키패드 라이브러리를 포함해야 합니다. 그런 다음 부저와 초음파 센서의 핀을 정의하고, 프로그램에 필요한 몇 가지 변수를 정의하고, 키패드의 키를 정의하고, 키패드와 LCD에 대한 두 개의 객체를 생성해야 합니다.
#include <LiquidCrystal.h> // includes the LiquidCrystal Library
#include <Keypad.h>

#define buzzer 8
#define trigPin 9
#define echoPin 10

long duration;
int distance, initialDistance, currentDistance, i;
int screenOffMsg =0;
String password="1234";
String tempPassword;
boolean activated = false; // State of the alarm
boolean isActivated;
boolean activateAlarm = false;
boolean alarmActivated = false;
boolean enteredPassword; // State of the entered password to stop the alarm
boolean passChangeMode = false;
boolean passChanged = false;

const byte ROWS = 4; //four rows
const byte COLS = 4; //four columns
char keypressed;
//define the cymbols on the buttons of the keypads
char keyMap[ROWS][COLS] = {
  {'1','2','3','A'},
  {'4','5','6','B'},
  {'7','8','9','C'},
  {'*','0','#','D'}
};
byte rowPins[ROWS] = {14, 15, 16, 17}; //Row pinouts of the keypad
byte colPins[COLS] = {18, 19, 20, 21}; //Column pinouts of the keypad

Keypad myKeypad = Keypad( makeKeymap(keyMap), rowPins, colPins, ROWS, COLS);
LiquidCrystal lcd(1, 2, 4, 5, 6, 7); // Creates an LC object. Parameters: (rs, enable, d4, d5, d6, d7)

void setup() {
  lcd.begin(16,2);
  pinMode(buzzer, OUTPUT); // Set buzzer as an output
  pinMode(trigPin, OUTPUT); // Sets the trigPin as an Output
  pinMode(echoPin, INPUT); // Sets the echoPin as an Input
}Code language: Arduino (arduino)
설정 섹션에서는 LCD를 초기화하고 부저 및 초음파 센서의 핀 모드를 정의하기만 하면 됩니다.
루프 섹션에서는 먼저 알람이 활성화되었는지 여부를 확인합니다. 따라서 알람이 활성화되지 않은 경우 LCD에는 알람 활성화를 위한 A와 암호 변경을 위한 B의 두 가지 옵션을 제공하는 프로그램의 홈 화면이 표시됩니다. 그런 다음 myKeypad.getKey() 함수를 사용하여 키패드에서 어떤 버튼이 눌렸는지 읽고 그것이 버튼 A이면 부저가 200밀리초 소리를 생성하고 activateAlarm 변수가 true가 됩니다.
if (!alarmActivated) {
    if (screenOffMsg == 0 ){
      lcd.clear();
      lcd.setCursor(0,0);
      lcd.print("A - Activate");
      lcd.setCursor(0,1);
      lcd.print("B - Change Pass");
      screenOffMsg = 1;
    }
    keypressed = myKeypad.getKey();
     if (keypressed =='A'){        //If A is pressed, activate the alarm
      tone(buzzer, 1000, 200);
      activateAlarm = true;
    }Code language: Arduino (arduino)
이 경우 LCD에 "경보가 활성화됩니다"라는 메시지를 인쇄하고 while 루프를 사용하여 경보가 활성화되기 전에 9초를 카운트다운합니다. 그러면 "Alarm Activated"라는 메시지가 나타나고 알람 장치에서 반대쪽 물체까지의 초기 거리를 측정합니다.
if (activateAlarm) {
    lcd.clear();
    lcd.setCursor(0,0);
    lcd.print("Alarm will be");
    lcd.setCursor(0,1);
    lcd.print("activated in");

    int countdown = 9; // 9 seconds count down before activating the alarm
    while (countdown != 0) {
      lcd.setCursor(13,1);
      lcd.print(countdown);
      countdown--;
      tone(buzzer, 700, 100);
      delay(1000);
    }
    lcd.clear();
    lcd.setCursor(0,0);
    lcd.print("Alarm Activated!");
    initialDistance = getDistance();
    activateAlarm = false;
    alarmActivated = true;
  }Code language: Arduino (arduino)
따라서 다음 단계는 초음파 센서가 현재 측정된 거리가 초기 거리보다 작은지 여부를 지속적으로 확인하고 10cms 값으로 수정하는 것입니다. 사실이라면 센서와 알람 앞에 물체가 나타났음을 의미합니다. 활성화됩니다. tune() 함수는 부저를 활성화하고 enterPassword() 사용자 정의 함수가 호출됩니다.
if (alarmActivated == true){
      currentDistance = getDistance() + 10;
      if ( currentDistance < initialDistance) {
        tone(buzzer, 1000); // Send 1KHz sound signal
        lcd.clear();
        enterPassword();
      }
    }Code language: Arduino (arduino)
이 사용자 정의 기능은 알람이 활성화되었으며 알람을 중지하려면 암호를 입력해야 한다는 메시지를 인쇄합니다. 따라서 다음 while 루프를 사용하여 키패드의 버튼을 눌렀는지 여부를 지속적으로 확인하고 각 버튼 누름이 tempPassword 변수에 추가됩니다. 4자리 이상을 입력하거나 날카로운 버튼을 누르면 이전에 입력한 숫자가 지워져 처음부터 다시 입력할 수 있습니다.
void enterPassword() {
  int k=5;
  tempPassword = "";
  activated = true;
  lcd.clear();
  lcd.setCursor(0,0);
  lcd.print(" *** ALARM *** ");
  lcd.setCursor(0,1);
  lcd.print("Pass>");
      while(activated) {
      keypressed = myKeypad.getKey();
      if (keypressed != NO_KEY){
        if (keypressed == '0' || keypressed == '1' || keypressed == '2' || keypressed == '3' ||
            keypressed == '4' || keypressed == '5' || keypressed == '6' || keypressed == '7' ||
            keypressed == '8' || keypressed == '9' ) {
          tempPassword += keypressed;
          lcd.setCursor(k,1);
          lcd.print("*");
          k++;
        }
      }
      if (k > 9 || keypressed == '#') {
        tempPassword = "";
        k=5;
        lcd.clear();
        lcd.setCursor(0,0);
        lcd.print(" *** ALARM *** ");
        lcd.setCursor(0,1);
        lcd.print("Pass>");
      }
      if ( keypressed == '*') {
        if ( tempPassword == password ) {
          activated = false;
          alarmActivated = false;
          noTone(buzzer);
          screenOffMsg = 0;
        }
        else if (tempPassword != password) {
          lcd.setCursor(0,1);
          lcd.print("Wrong! Try Again");
          delay(2000);
          lcd.clear();
          lcd.setCursor(0,0);
          lcd.print(" *** ALARM *** ");
          lcd.setCursor(0,1);
          lcd.print("Pass>");
        }
      }
    }
}Code language: Arduino (arduino)
반면 별표 버튼을 누르면 현재 입력된 비밀번호가 원래 설정한 비밀번호와 동일한지 확인합니다. 그것이 사실이라면 알람이 비활성화되고 부저가 소리를 내지 않고 홈 화면으로 돌아갑니다. 하지만 비밀번호를 틀리면 “잘못! 다시 시도하십시오!" 가 나타나고 올바른 비밀번호를 다시 입력해야 합니다.
비밀번호 변경을 위해 유사한 방법을 사용합니다. 여기에 새 비밀번호를 설정하려면 먼저 현재 비밀번호를 입력해야 합니다.
else if (keypressed =='B') {
      lcd.clear();
      int i=1;
      tone(buzzer, 2000, 100);
      tempPassword = "";
      lcd.setCursor(0,0);
      lcd.print("Current Password");
      lcd.setCursor(0,1);
      lcd.print(">");
      passChangeMode = true;
      passChanged = true;
      while(passChanged) {
      keypressed = myKeypad.getKey();
      if (keypressed != NO_KEY){
        if (keypressed == '0' || keypressed == '1' || keypressed == '2' || keypressed == '3' ||
            keypressed == '4' || keypressed == '5' || keypressed == '6' || keypressed == '7' ||
            keypressed == '8' || keypressed == '9' ) {
         tempPassword += keypressed;
         lcd.setCursor(i,1);
         lcd.print("*");
         i++;
         tone(buzzer, 2000, 100);
        }
      }
      if (i > 5 || keypressed == '#') {
        tempPassword = "";
        i=1;
        lcd.clear();
        lcd.setCursor(0,0);
        lcd.print("Current Password");
        lcd.setCursor(0,1);
        lcd.print(">");
      }
      if ( keypressed == '*') {
        i=1;
        tone(buzzer, 2000, 100);
        if (password == tempPassword) {
          tempPassword="";
          lcd.clear();
          lcd.setCursor(0,0);
          lcd.print("Set New Password");
          lcd.setCursor(0,1);
          lcd.print(">");
          while(passChangeMode) {
            keypressed = myKeypad.getKey();
            if (keypressed != NO_KEY){
              if (keypressed == '0' || keypressed == '1' || keypressed == '2' || keypressed == '3' ||
                  keypressed == '4' || keypressed == '5' || keypressed == '6' || keypressed == '7' ||
                  keypressed == '8' || keypressed == '9' ) {
                tempPassword += keypressed;
                lcd.setCursor(i,1);
                lcd.print("*");
                i++;
                tone(buzzer, 2000, 100);
              }
            }
            if (i > 5 || keypressed == '#') {
              tempPassword = "";
              i=1;
              tone(buzzer, 2000, 100);
              lcd.clear();
              lcd.setCursor(0,0);
              lcd.print("Set New Password");
              lcd.setCursor(0,1);
              lcd.print(">");
            }
            if ( keypressed == '*') {
              i=1;
              tone(buzzer, 2000, 100);
              password = tempPassword;
              passChangeMode = false;
              passChanged = false;
              screenOffMsg = 0;
            }
          }
        }
      }
    }
}Code language: Arduino (arduino)/*
* Arduino Security and Alarm System
*
* by Dejan Nedelkovski,
* www.HowToMechatronics.com
*
*/
#include <LiquidCrystal.h> // includes the LiquidCrystal Library
#include <Keypad.h>
#define buzzer 8
#define trigPin 9
#define echoPin 10
long duration;
int distance, initialDistance, currentDistance, i;
int screenOffMsg =0;
String password="1234";
String tempPassword;
boolean activated = false; // State of the alarm
boolean isActivated;
boolean activateAlarm = false;
boolean alarmActivated = false;
boolean enteredPassword; // State of the entered password to stop the alarm
boolean passChangeMode = false;
boolean passChanged = false;
const byte ROWS = 4; //four rows
const byte COLS = 4; //four columns
char keypressed;
//define the cymbols on the buttons of the keypads
char keyMap[ROWS][COLS] = {
{'1','2','3','A'},
{'4','5','6','B'},
{'7','8','9','C'},
{'*','0','#','D'}
};
byte rowPins[ROWS] = {14, 15, 16, 17}; //Row pinouts of the keypad
byte colPins[COLS] = {18, 19, 20, 21}; //Column pinouts of the keypad
Keypad myKeypad = Keypad( makeKeymap(keyMap), rowPins, colPins, ROWS, COLS);
LiquidCrystal lcd(1, 2, 4, 5, 6, 7); // Creates an LC object. Parameters: (rs, enable, d4, d5, d6, d7)
void setup() {
lcd.begin(16,2);
pinMode(buzzer, OUTPUT); // Set buzzer as an output
pinMode(trigPin, OUTPUT); // Sets the trigPin as an Output
pinMode(echoPin, INPUT); // Sets the echoPin as an Input
}
void loop() {
if (activateAlarm) {
lcd.clear();
lcd.setCursor(0,0);
lcd.print("Alarm will be");
lcd.setCursor(0,1);
lcd.print("activated in");
int countdown = 9; // 9 seconds count down before activating the alarm
while (countdown != 0) {
lcd.setCursor(13,1);
lcd.print(countdown);
countdown--;
tone(buzzer, 700, 100);
delay(1000);
}
lcd.clear();
lcd.setCursor(0,0);
lcd.print("Alarm Activated!");
initialDistance = getDistance();
activateAlarm = false;
alarmActivated = true;
}
if (alarmActivated == true){
currentDistance = getDistance() + 10;
if ( currentDistance < initialDistance) {
tone(buzzer, 1000); // Send 1KHz sound signal
lcd.clear();
enterPassword();
}
}
if (!alarmActivated) {
if (screenOffMsg == 0 ){
lcd.clear();
lcd.setCursor(0,0);
lcd.print("A - Activate");
lcd.setCursor(0,1);
lcd.print("B - Change Pass");
screenOffMsg = 1;
}
keypressed = myKeypad.getKey();
if (keypressed =='A'){ //If A is pressed, activate the alarm
tone(buzzer, 1000, 200);
activateAlarm = true;
}
else if (keypressed =='B') {
lcd.clear();
int i=1;
tone(buzzer, 2000, 100);
tempPassword = "";
lcd.setCursor(0,0);
lcd.print("Current Password");
lcd.setCursor(0,1);
lcd.print(">");
passChangeMode = true;
passChanged = true;
while(passChanged) {
keypressed = myKeypad.getKey();
if (keypressed != NO_KEY){
if (keypressed == '0' || keypressed == '1' || keypressed == '2' || keypressed == '3' ||
keypressed == '4' || keypressed == '5' || keypressed == '6' || keypressed == '7' ||
keypressed == '8' || keypressed == '9' ) {
tempPassword += keypressed;
lcd.setCursor(i,1);
lcd.print("*");
i++;
tone(buzzer, 2000, 100);
}
}
if (i > 5 || keypressed == '#') {
tempPassword = "";
i=1;
lcd.clear();
lcd.setCursor(0,0);
lcd.print("Current Password");
lcd.setCursor(0,1);
lcd.print(">");
}
if ( keypressed == '*') {
i=1;
tone(buzzer, 2000, 100);
if (password == tempPassword) {
tempPassword="";
lcd.clear();
lcd.setCursor(0,0);
lcd.print("Set New Password");
lcd.setCursor(0,1);
lcd.print(">");
while(passChangeMode) {
keypressed = myKeypad.getKey();
if (keypressed != NO_KEY){
if (keypressed == '0' || keypressed == '1' || keypressed == '2' || keypressed == '3' ||
keypressed == '4' || keypressed == '5' || keypressed == '6' || keypressed == '7' ||
keypressed == '8' || keypressed == '9' ) {
tempPassword += keypressed;
lcd.setCursor(i,1);
lcd.print("*");
i++;
tone(buzzer, 2000, 100);
}
}
if (i > 5 || keypressed == '#') {
tempPassword = "";
i=1;
tone(buzzer, 2000, 100);
lcd.clear();
lcd.setCursor(0,0);
lcd.print("Set New Password");
lcd.setCursor(0,1);
lcd.print(">");
}
if ( keypressed == '*') {
i=1;
tone(buzzer, 2000, 100);
password = tempPassword;
passChangeMode = false;
passChanged = false;
screenOffMsg = 0;
}
}
}
}
}
}
}
}
void enterPassword() {
int k=5;
tempPassword = "";
activated = true;
lcd.clear();
lcd.setCursor(0,0);
lcd.print(" *** ALARM *** ");
lcd.setCursor(0,1);
lcd.print("Pass>");
while(activated) {
keypressed = myKeypad.getKey();
if (keypressed != NO_KEY){
if (keypressed == '0' || keypressed == '1' || keypressed == '2' || keypressed == '3' ||
keypressed == '4' || keypressed == '5' || keypressed == '6' || keypressed == '7' ||
keypressed == '8' || keypressed == '9' ) {
tempPassword += keypressed;
lcd.setCursor(k,1);
lcd.print("*");
k++;
}
}
if (k > 9 || keypressed == '#') {
tempPassword = "";
k=5;
lcd.clear();
lcd.setCursor(0,0);
lcd.print(" *** ALARM *** ");
lcd.setCursor(0,1);
lcd.print("Pass>");
}
if ( keypressed == '*') {
if ( tempPassword == password ) {
activated = false;
alarmActivated = false;
noTone(buzzer);
screenOffMsg = 0;
}
else if (tempPassword != password) {
lcd.setCursor(0,1);
lcd.print("Wrong! Try Again");
delay(2000);
lcd.clear();
lcd.setCursor(0,0);
lcd.print(" *** ALARM *** ");
lcd.setCursor(0,1);
lcd.print("Pass>");
}
}
}
}
// Custom function for the Ultrasonic sensor
long getDistance(){
//int i=10;
//while( i<=10 ) {
// Clears the trigPin
digitalWrite(trigPin, LOW);
delayMicroseconds(2);
// Sets the trigPin on HIGH state for 10 micro seconds
digitalWrite(trigPin, HIGH);
delayMicroseconds(10);
digitalWrite(trigPin, LOW);
// Reads the echoPin, returns the sound wave travel time in microseconds
duration = pulseIn(echoPin, HIGH);
// Calculating the distance
distance = duration*0.034/2;
//sumDistance += distance;
//}
//int averageDistance= sumDistance/10;
return distance;
}
Code language: Arduino (arduino)프로젝트를 마무리하기 위해 모든 구성 요소를 장착하고 함께 접촉하는 플라스틱 전기 상자를 사용했습니다.
<그림 클래스="aligncenter">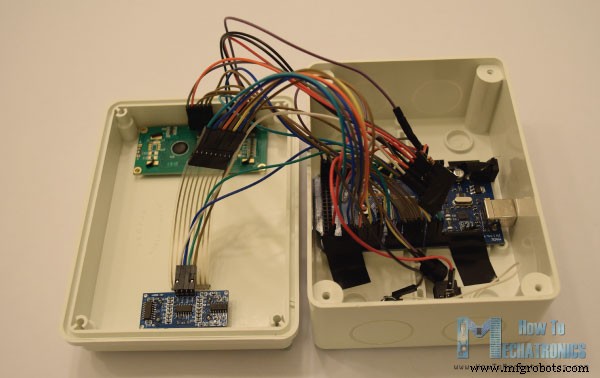
이상입니다. 이 프로젝트가 마음에 드셨기를 바라며 아래의 댓글 섹션에서 언제든지 질문하세요.
제조공정
이 프로젝트에서는 Arduino 터치 스크린 MP3 음악 플레이어와 알람 시계를 만드는 방법을 보여 드리겠습니다. 다음 비디오를 보거나 아래에 작성된 튜토리얼을 읽을 수 있습니다. 개요 홈 화면에는 큰 시계, 날짜 및 온도 정보, 뮤직 플레이어 및 알람 시계용 버튼 2개가 있습니다. 뮤직 플레이어에 들어가면 화면 중앙에 있는 큰 재생 버튼을 눌러 음악 재생을 시작할 수 있습니다. 바로 옆에는 이전 또는 다음 곡을 재생할 수 있는 두 개의 버튼이 더 있습니다. 이 버튼 위에는 노래 진행률 표시줄이 있고 화면 하단에는 볼
이 Arduino 자습서에서는 Arduino 보드와 처리 개발 환경을 사용하여 이 멋진 레이더를 만드는 방법을 보여 드리겠습니다. 자세한 내용은 다음 동영상을 보거나 아래에 작성된 튜토리얼을 참조하세요. 개요 이 Arduino 프로젝트에 필요한 것은 물체를 감지하기 위한 초음파 센서, 센서를 회전시키기 위한 작은 취미 생활자 서보 모터 및 이를 제어하기 위한 Arduino 보드뿐입니다. 다음 동영상을 보거나 아래에 작성된 튜토리얼을 읽을 수 있습니다.[/column] 이 Arduino 프로젝트에 필요한 구성요소 다음 사이트에서