착한 운전자에게 감사를 전하는 LED 사인 보드
부품 및 소모품
부품 수량
아두이노 MKR1000 1 SparkFun 블루투스 모뎀 - BlueSMiRF Silver 1 Adafruit 4채널 I2C 양방향 로직 레벨 컨버터 (BSS138) 1 Adafruit 플렉서블 DotStar 매트릭스 8x32 (256 RGB LED) 1 Adafruit 4핀 JST SM 플러그 + 리셉터클 케이블 세트 1 DC 2.1mm 배럴 커넥터 1 AC 파워 어댑터 5V @ 4A 1 수 헤더 4핀 (0.1인치) 1 브레드보드 1 프로젝트 박스 1 발틱 자작나무 합판 1/4" x 4.5" x 15" 1 목공용 양면 테이프 1" x 50' 1
필요 도구 및 기계
납땜 인두
글루건
포스너 비트 (구멍 뚫기용)
드릴
사포 (120 그릿)
앱 및 온라인 서비스
아두이노 IDE
Virtual Shield for Arduino
Adafruit DotStar
프로젝트 소개
운전 중 주변 운전자와 더 의미 있게 소통하고 싶어 만든 프로젝트입니다. 제임스 본드 영화에서 뒷유리에 텍스트를 표시하는 장면에서 영감을 얻었습니다. 손짓, 경적, 라이트 깜빡임보다 명확하게 메시지를 전달할 수 있습니다.
주요 구현 단계
1. MKR1000 작동시키기
사전 출시 보드라 문서가 부족했지만, 아두이노 포럼의 도움으로 컴포넌트들을 작동시켰습니다. 아두이노 IDE 1.6.9 hourly build와 필요한 라이브러리(Adafruit DotStar, DotStarMatrix, GFX, ArduinoJson, Virtual Shields)를 설치했습니다.
2. 전압 레벨 변환 주의
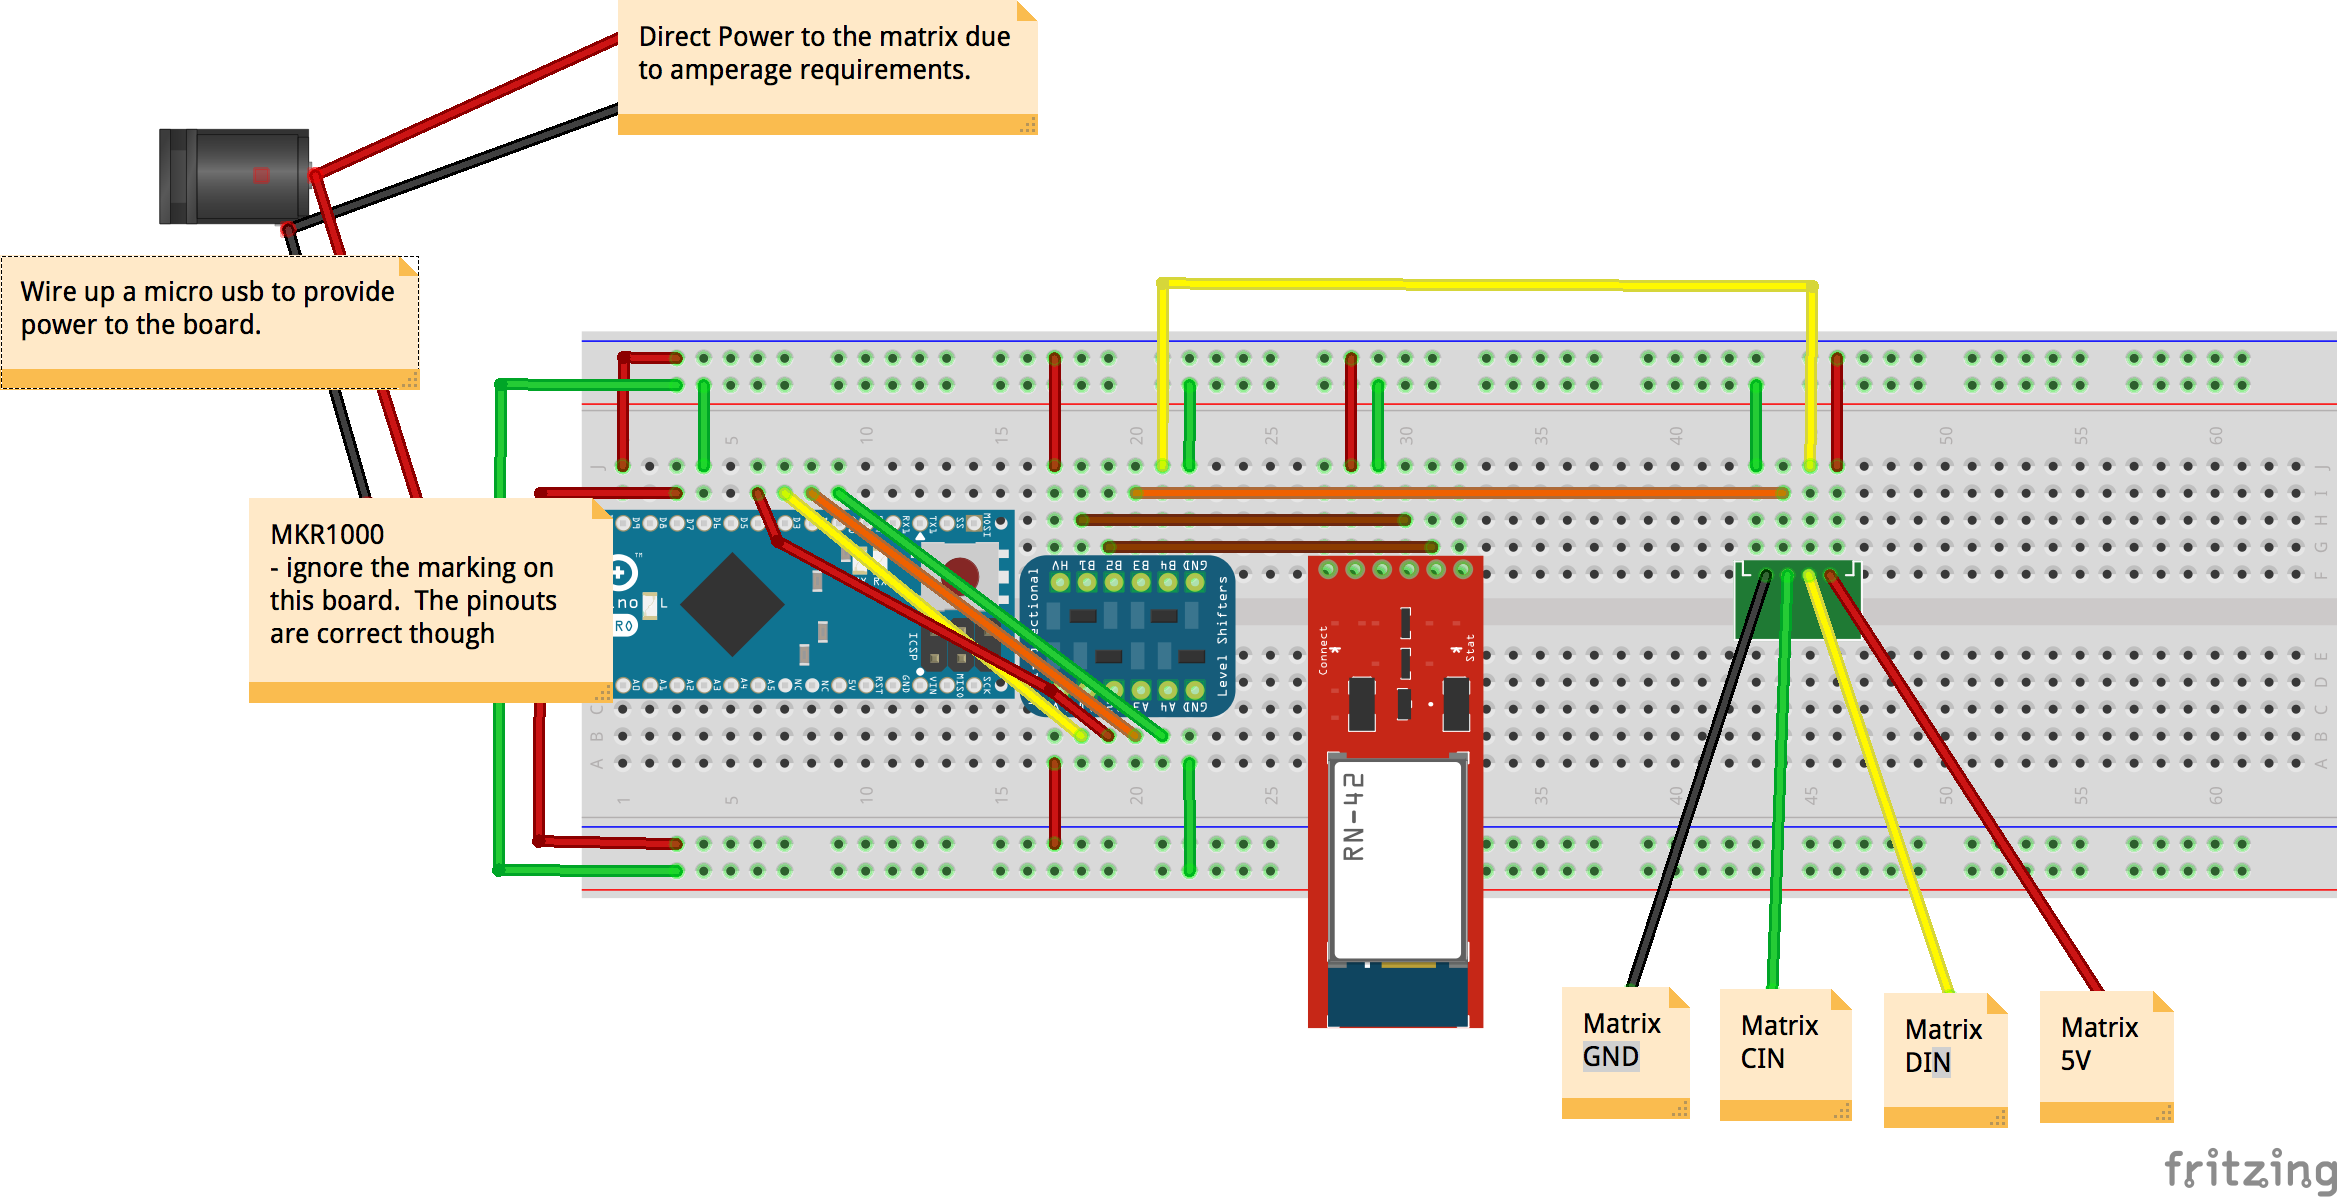
MKR1000은 3.3V 기반입니다. 블루투스 모듈과 DotStar 매트릭스는 5V 로직을 선호하므로 양방향 레벨 시프터(BSS138)를 사용해 안전하게 연결했습니다.
3. 개별 컴포넌트 테스트
DotStar 매트릭스: 헤더 핀 납땜 후 SPI 핀(SDA/SCL)에 연결, 매트릭스 테스트 예제 실행
블루투스 + Virtual Shield: GitHub 지침 따라 설정, TX/RX 핀은 14, 13번 사용
4. 코드 구조
주요 라이브러리 포함, 매트릭스 초기화, Virtual Shield 객체 생성, 버튼 UI 구성, 터치 이벤트 처리, 텍스트 스크롤 표시 함수 등으로 구성됩니다.
핵심 코드 발췌 (클릭하여 펼치기)
// 라이브러리 포함
#include <SPI.h>
#include <Adafruit_GFX.h>
#include <Adafruit_DotStarMatrix.h>
#include <Adafruit_DotStar.h>
#include <ArduinoJson.h>
#include <VirtualShield.h>
#include <Text.h>
#include <Graphics.h>
#include <Recognition.h>
#include <Colors.h>

// 매트릭스 초기화
Adafruit_DotStarMatrix matrix = Adafruit_DotStarMatrix(
  32, 8, DATAPIN, CLOCKPIN,
  DS_MATRIX_TOP + DS_MATRIX_LEFT + DS_MATRIX_COLUMNS + DS_MATRIX_ZIGZAG,
  DOTSTAR_GBR
);

// 색상 팔레트
const uint16_t colors[] = {
  matrix.Color(255, 0, 0), matrix.Color(0, 255, 0),
  matrix.Color(0, 0, 255), matrix.Color(255, 0, 255),
  matrix.Color(255, 0, 106), matrix.Color(255, 255, 255)
};

VirtualShield shield;
Graphics screen = Graphics(shield);
Recognition speech = Recognition(shield);

// 버튼 ID 저장 변수
int thanksId, welcomeId, turnLeftId, stoppingId;
int startingId, turnRightId, backoffId, calling911Id;

void setup() {
  matrix.begin();
  matrix.setTextWrap(false);
  matrix.setBrightness(40);
  matrix.setTextColor(colors[0]);
  DisplayText("Initializing...", 4, 10);

  shield.setOnRefresh(refresh);
  speech.setOnEvent(onSpeech);
  screen.setOnEvent(screenEvent);
  shield.begin(); // 블루투스 115200 보드레이트 가정
  DisplayText("Initializing...finished", 3, 10);
}

void loop() {
  shield.checkSensors(); // 이벤트 폴링
}

// 블루투스 연결 시 UI 재구성
void refresh(ShieldEvent* shieldEvent) {
  screen.clear(ARGB(123,86,204));
  thanksId = screen.addButton(10, 50, ". Thank you .");
  welcomeId = screen.addButton(10, 100, ". Welcome .");
  turnLeftId = screen.addButton(10, 150, ". Left .");
  stoppingId = screen.addButton(175, 50, ". Stopping .");
  startingId = screen.addButton(175, 100, ". Starting .");
  turnRightId = screen.addButton(175, 150, ". Right .");
  backoffId = screen.addButton(10, 225, ". Back Off .");
  calling911Id = screen.addButton(10, 290, ". Calling 911 .");
}

// 버튼 터치 이벤트 처리
void screenEvent(ShieldEvent* shieldEvent) {
  if(screen.isPressed(thanksId)) DisplayText("Thank You", 5, 100);
  if(screen.isPressed(welcomeId)) DisplayText("You're welcome", 2, 100);
  if(screen.isPressed(backoffId)) DisplayText("Please back off", 4, 100);
  if(screen.isPressed(stoppingId)) DisplayText("...stopping...", 0, 100);
  if(screen.isPressed(startingId)) DisplayText("...starting...", 1, 100);
  if(screen.isPressed(turnLeftId)) DisplayText("Turning LEFT", 3, 100);
  if(screen.isPressed(turnRightId)) DisplayText("Turning RIGHT", 3, 100);
  if(screen.isPressed(calling911Id)) DisplayText("Calling 911", 0, 100);
}

// 매트릭스에 텍스트 스크롤 표시
void DisplayText(String message, int colorIndex, int currDelay) {
  int x = matrix.width();
  int maxX = -1 * (message.length() * 6);
  matrix.setTextColor(colors[colorIndex]);
  while(x > maxX) {
    matrix.fillScreen(0);
    matrix.setCursor(x, 0);
    matrix.print(message);
    --x;
    matrix.show();
    delay(currDelay);
  }
}
5. 인클로저 제작
매트릭스 크기보다 큰 박스를 골라 자작나무 합판을 재단하고 포스너 비트로 구멍을 뚫었습니다. 양면 테이프로 박스를 고정하고 24시간 눌러 접착시켰습니다.
6. 전원 회로
최대 7.5A(전체 LED 점등 시) 필요하나 실제로는 훨씬 적게 소모합니다. 5V 4A 어댑터와 차량용 AC 인버터로 전원 공급. MKR1000용 별도 5V 월왓 어댑터도 준비했습니다.
7. 차량 부착
뒷유리에 흡착컵과 번지코드로 고정 예정이나 개선 필요.
코드
전체 코드: https://github.com/pulcher/mkr1000_challenge
회로도
MKR1000은 미출시 보드라 일반 마이크로컨트롤러로 대체 표시