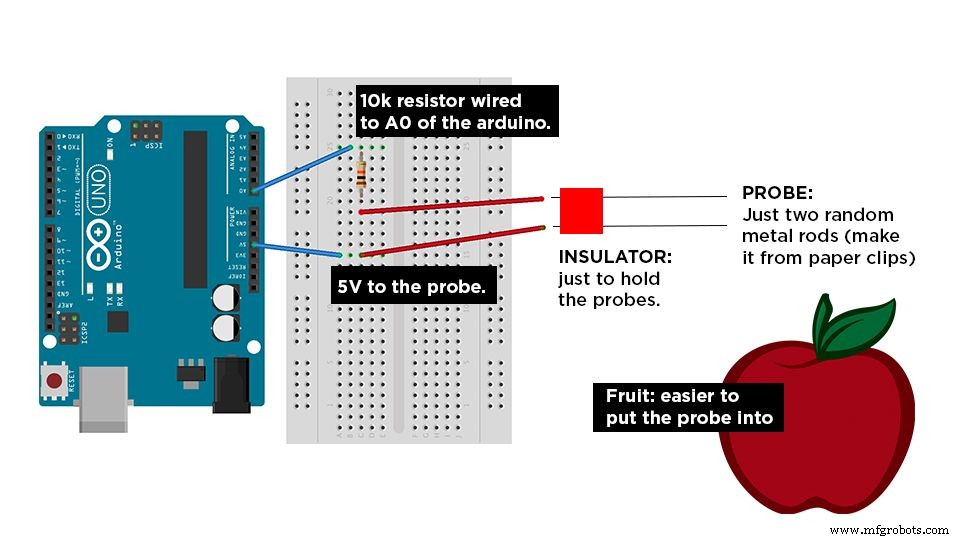
아두이노 프로젝트 아이디어 페이지에서 '저항 측정으로 음식 감지기'란 항목을 보고 흥미가 생겼습니다. 튜토리얼은 없었지만 오이를 암페어미터로 찌르는 사진을 보고 원리를 파악했죠. 아두이노 + 10kΩ 저항만 있으면 끝인 초간단 회로입니다. LCD 있으면 결과 표시용으로 추가.
1단계: 회로 구성
아두이노 A0 핀과 GND 사이에 10kΩ 저항 연결. 음식물은 A0와 5V 사이에 놓아 분압 회로 구성. 음식의 저항값에 따라 A0로 들어가는 전압이 변함.
2단계: 코드 작성 원리
시리얼 모니터로 여러 음식의 아날로그 읽기 값(0~1023) 측정해 범위 파악
측정값 범위를 if-else로 분류
음식 이름 시리얼/LCD 출력
아래 코드는 참고용. 직접 다양한 음식 테스트해 본인 데이터로 범위 잡는 게 정확합니다.
주의: 잘린 사과는 공기 접촉으로 화학적 변화가 생겨 저항값이 계속 변하더군요. 오이와 딸기는 꽤 안정적. 여러 음식 실험해 보고 가장 잘 되는 것 공유해 주세요!
코드
Arduino Food Detect
const int frootSense = 0;  // A0 핀
int frootResistance, high = 0, low = 1023;
int frootDetect;

#include <LiquidCrystal.h>  // LCD 없을 시 주석 처리해도 동작
LiquidCrystal lcd(12, 11, 5, 4, 3, 2);

void setup() {
  Serial.begin(9600);
  lcd.begin(16, 2);
  lcd.clear();
}

void loop() {
  lcd.clear();
  lcd.setCursor(0, 0);
  lcd.print("Food Detect:");
  lcd.setCursor(0, 1);

  frootResistance = analogRead(frootSense);
  Serial.print("Resistance: ");
  Serial.print(frootResistance);
  Serial.print("\n");

  if (frootResistance > 400 && frootResistance < 700) {
    Serial.print("Cucumber \n");
    lcd.print("Cucumber");
  } else if (frootResistance > 140 && frootResistance < 300) {
    Serial.print("Apple");
    lcd.print("Apple");
  } else {
    Serial.print("No Food \n");
    lcd.print("No Food");
  }
  delay(1000);
}