Arduino와 1Sheeld로 아마존 에코 스타일 스마트 스피커 만들기
부품 및 소모품
| 부품 |
수량 |
| Arduino 101 |
1 |
| 1Sheeld |
1 |
| 스틱 램프 |
1 |
| RGB LED 스트립 |
1 |
| 릴레이 보드 |
1 |
| Apple iPhone |
1 |
| 브레드보드 (일반) |
1 |
| USB-A to B 케이블 |
1 |
| 점퍼 와이어 (일반) |
30 |
| 범용 NPN 트랜지스터 |
3 |
필요 도구 및 기계
앱 및 온라인 서비스
프로젝트 소개
몇 달 전 친구 집을 방문했다가 그가 가진 Amazon Echo에 놀랐습니다. 음악 재생, 조명 제어, 뉴스/날씨 알림, 날짜/시간 확인 등 모든 것을 음성 명령만으로 수행했습니다.
그 순간 내 안의 메이커 정신이 "왜 내가 직접 만들지 않을까!"라고 외쳤습니다.
그날부터 Arduino 기반 Amazon Echo를 만들 수 있는 부품을 찾다가 놀라운 1Sheeld를 발견했습니다.
1Sheeld는 Arduino 플랫폼으로, 스마트폰의 센서와 기능을 활용해 Arduino 프로젝트에 적용할 수 있게 해줍니다. 기본적으로 Arduino 보드 위에 장착되는 하드웨어 실드로, 블루투스를 통해 안드로이드 앱과 통신하며 데이터 양방향 전송을 가능하게 합니다.
1Sheeld 시작 가이드를 참고하세요.
이 프로젝트에서는 1Sheeld의 40개 이상의 실드 중 5가지를 사용했습니다.

사용한 1Sheeld 실드
- 음성 인식 실드 (Voice Recognition Shield) - 음성 명령으로 전체 시스템 제어.
VoiceRecognition.start(); 한 줄로 활성화.
- 음악 플레이어 실드 (Music Player Shield) - 스마트폰 음악 플레이어 연동.
MusicPlayer.play();로 재생.
- 텍스트 투 스피치 실드 (Text to Speech Shield) - 사람 같은 상호작용 추가.
TextToSpeech.say("time in cairo is");로 응답.
- 시계 실드 (Clock Shield) - 실시간 시계 제공.
Clock.queryDateAndTime();로 현재 시간 획득.
- 인터넷 실드 (Internet Shield) - 가장 강력한 실드. OpenWeatherMap API로 날씨 정보 조회.
HttpRequest request1("/*API 주소*/");로 호출.


단계별 제작
1단계: 부품 준비
- Arduino 101 - $30.99
- 1Sheeld+ 보드 - $54.94
- iPhone - $155.5
- PVC 파이프 - $2
- LED 스트립 - $5
- 12V 파워 서플라이 - $7
- 릴레이 보드 - $3
- 점퍼 와이어 - $3
- NPN 트랜지스터 3개 - $1
2단계: PVC 파이프에 소리 구멍 뚫기
3단계: 검은색 스프레이로 도색
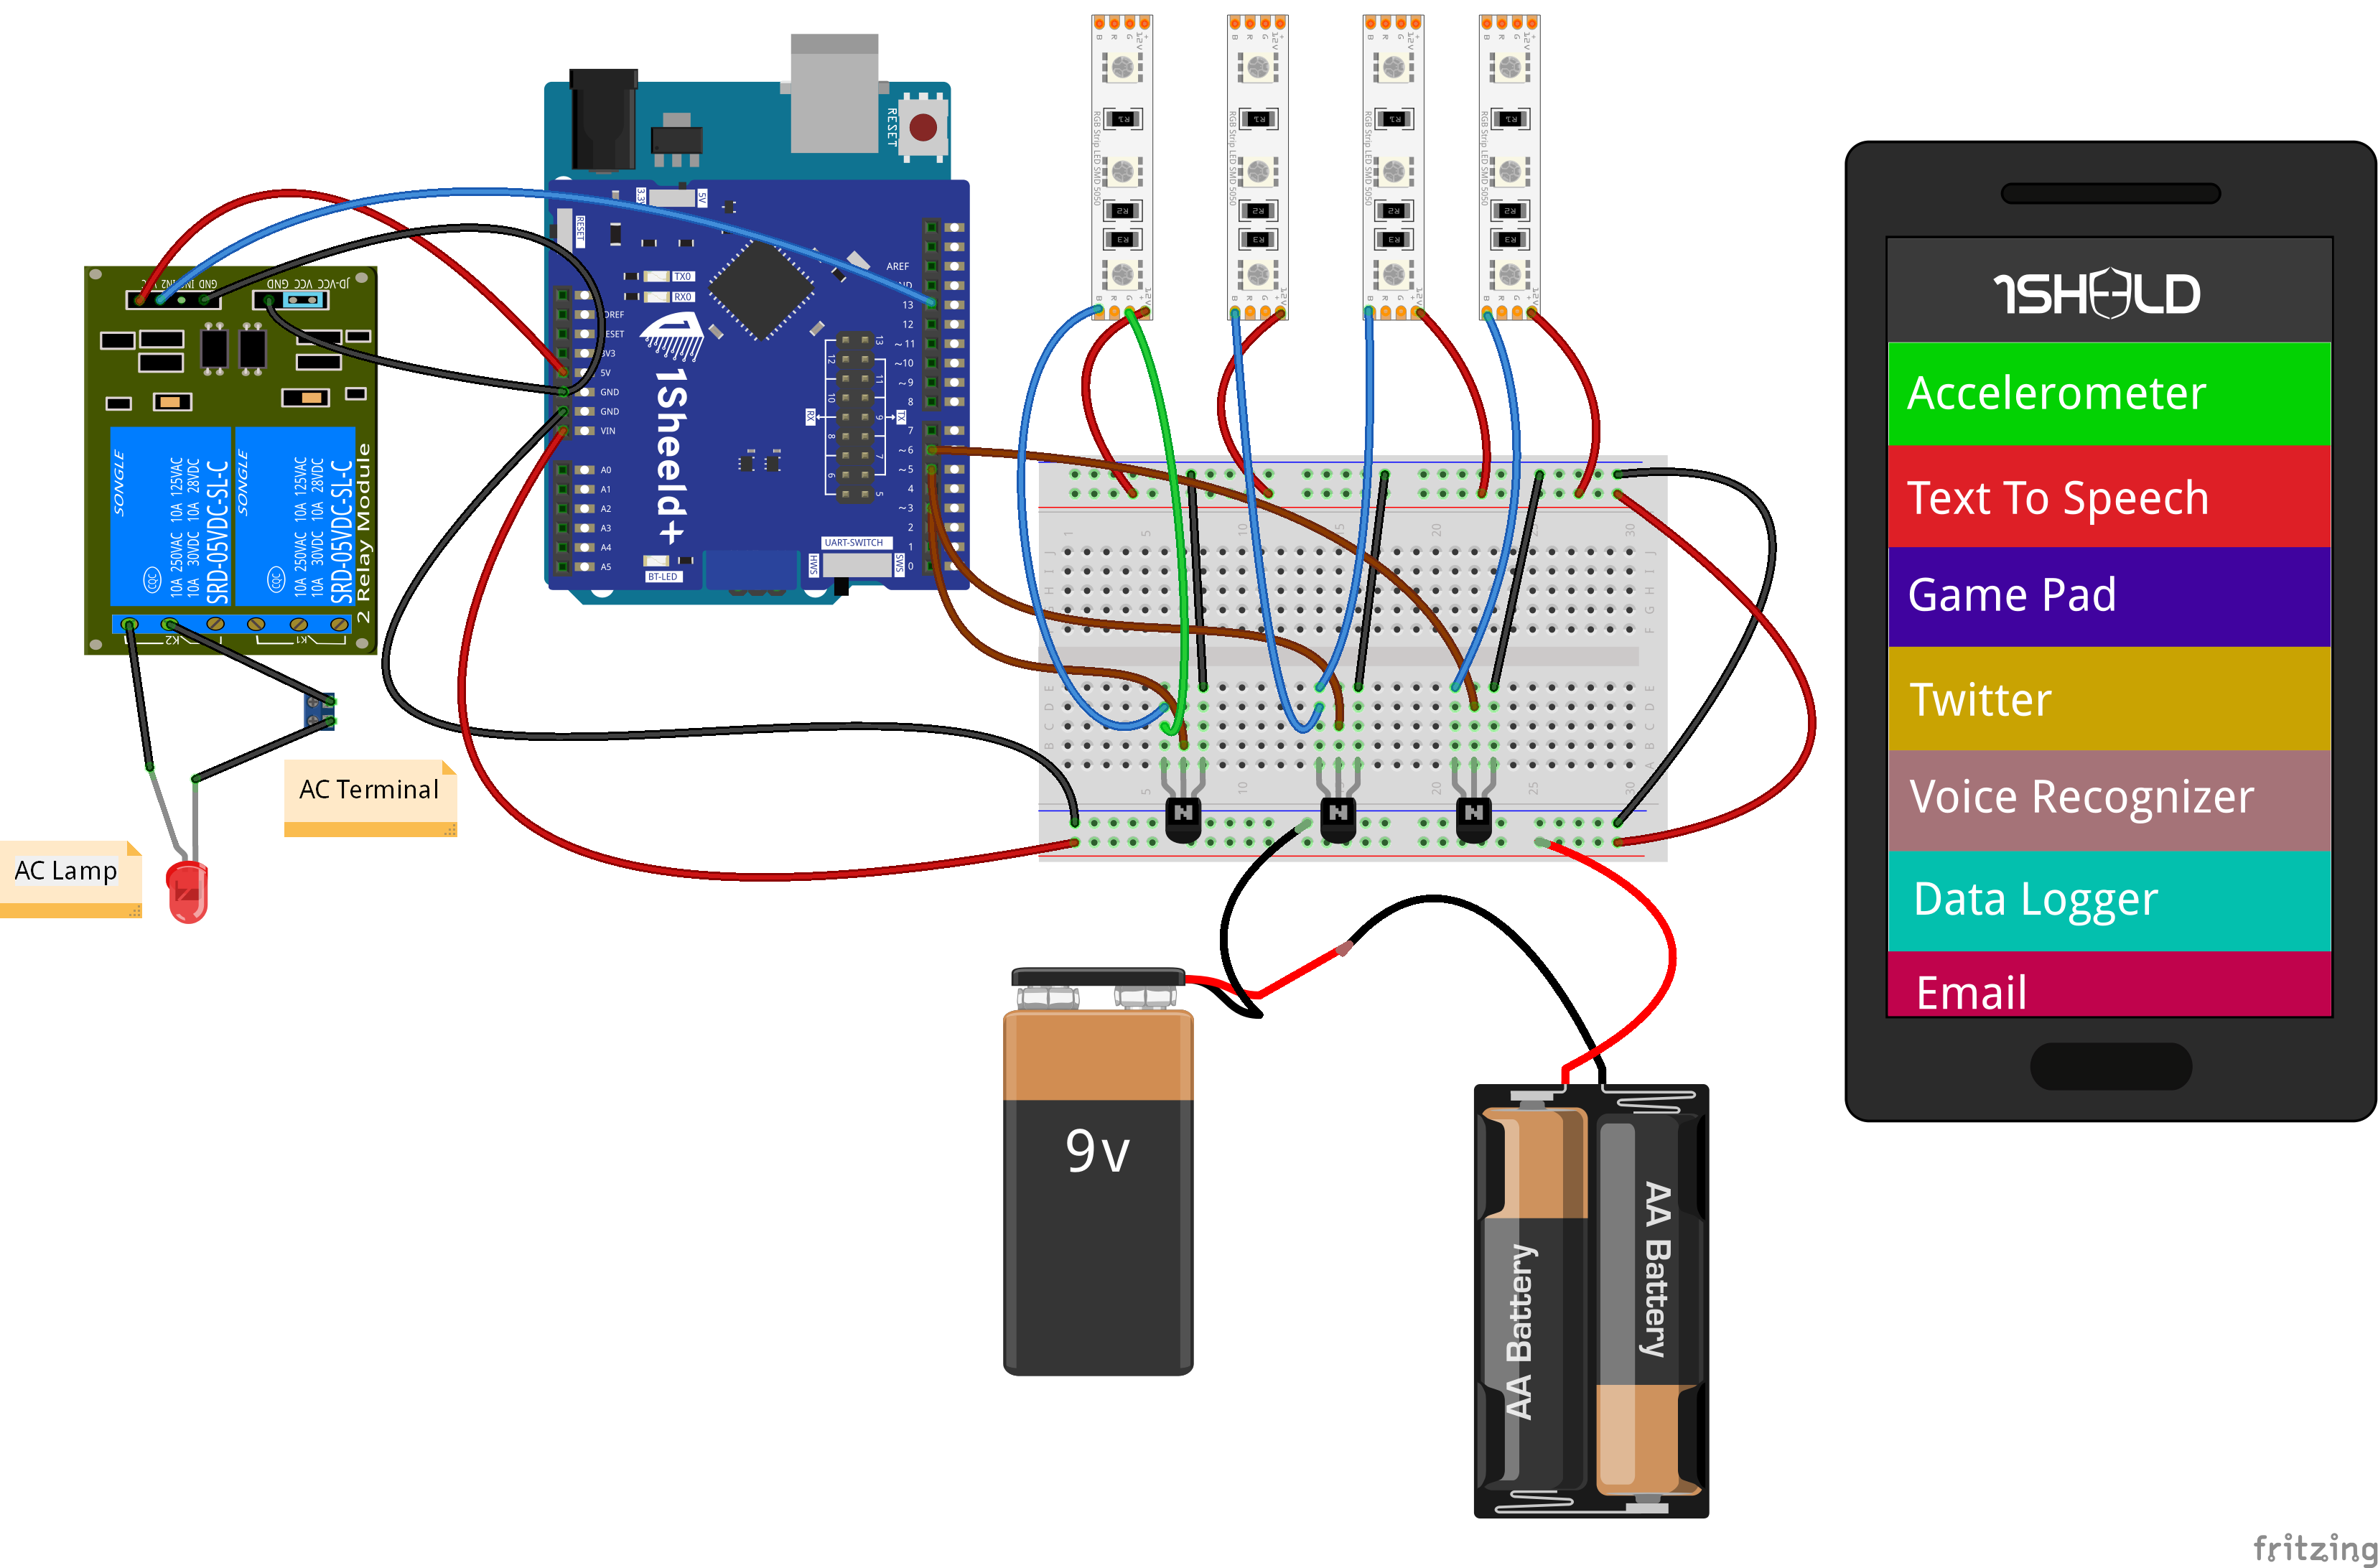
4단계: 배선
- LED 스트립을 트랜지스터와 파워 서플라이에 연결
- 램프를 릴레이 보드와 AC 단자에 연결
- 릴레이 보드와 LED 스트립을 코드에 따라 Arduino 101에 연결
- 모든 부품을 iPhone과 함께 PVC 파이프 내부에 장착
5단계: 1Sheeld 라이브러리 설정
Arduino IDE에서 Sketch → Include Library → Manage Libraries → "OneSheeld" 검색 → Install. 또는 여기서 라이브러리 다운로드 후 .zip 파일로 추가.
6단계: 1Sheeld 앱 설치
웹사이트 또는 Apple App Store / Google Play Store에서 1Sheeld 모바일 앱 다운로드.
7단계: 실드 접근 설정
1Sheeld 시작 가이드 따라 하기. 마지막에 다음 실드 선택:
- Voice Recognition
- Text to Speech
- Clock
- Internet
- Music Player
그리고 Multiple Shield 버튼 누르기.
코드
/* 라이브러리 크기 최적화를 위해 사용할 실드만 포함 */
#define CUSTOM_SETTINGS
#define INCLUDE_INTERNET_SHIELD
#define INCLUDE_VOICE_RECOGNIZER_SHIELD
#define INCLUDE_TEXT_TO_SPEECH_SHIELD
#define INCLUDE_MUSIC_PLAYER_SHIELD
#define INCLUDE_CLOCK_SHIELD

#include <OneSheeld.h>

unsigned long previousMillis = 0;
bool state = 0;

/* 카이로, 이집트 날씨 API 호출 */
HttpRequest request1("https://api.openweathermap.org/data/2.5/weather?q=Cairo,EG&appid=43d95b4cf5d0573e2dfe5186c160017a");

#define strip1 3
#define strip2 6
#define strip3 5
int lamp = 13;

int hour, minute;
char b[4], c[4];
String strh, strm, noon;

const char mainCommand[] = "alexa";
const char weatherCommand[] = "how is the weather today";
const char playCommand[] = "play music";
const char clockCommand[] = "what time is it";
const char stopCommand[] = "stop";
const char lightonCommand[] = "turn on the lights";
const char lightoffCommand[] = "turn off the lights";

void setup() {
  OneSheeld.begin();
  pinMode(strip1, OUTPUT);
  pinMode(strip2, OUTPUT);
  pinMode(strip3, OUTPUT);
  pinMode(lamp, OUTPUT);

  request1.setOnSuccess(&onSuccess1);
  request1.getResponse().setOnJsonReply(&onJsonReply1);
  VoiceRecognition.setOnNewCommand(&myFunction);
}

void loop() {
  unsigned long currentMillis = millis();
  if (currentMillis - previousMillis >= 5000) {
    previousMillis = currentMillis;
    Clock.queryDateAndTime();
    VoiceRecognition.start();
  }

  hour = Clock.getHours();
  minute = Clock.getMinutes();

  if (hour > 12) { hour -= 12; noon = "P M"; }
  else { noon = "A M"; }

  strh = String(hour);
  strm = String(minute);
  strh.toCharArray(b, 4);
  strm.toCharArray(c, 4);
}

void myFunction(char *commandSpoken) {
  if (!strcmp(mainCommand, VoiceRecognition.getLastCommand())) {
    alexon();
    MusicPlayer.setVolume(5);
    state = 1;
  }

  if (!strcmp(playCommand, VoiceRecognition.getLastCommand()) && state == 1) {
    alexoff();
    MusicPlayer.play();
    delay(10000);
    MusicPlayer.stop();
    state = 0;
  }
  else if (!strcmp(weatherCommand, VoiceRecognition.getLastCommand()) && state == 1) {
    alexoff();
    Internet.performGet(request1);
    OneSheeld.delay(5000);
    state = 0;
  }

  if (!strcmp(clockCommand, VoiceRecognition.getLastCommand()) && state == 1) {
    alexoff();
    TextToSpeech.say("time in cairo is");
    delay(1300);
    TextToSpeech.say(b);
    delay(600);
    TextToSpeech.say(c);
    delay(800);
    TextToSpeech.say(noon);
    delay(500);
    state = 0;
  }

  if (!strcmp(lightonCommand, VoiceRecognition.getLastCommand()) && state == 1) {
    alexoff();
    digitalWrite(lamp, HIGH);
    TextToSpeech.say("the lights turned on");
    delay(6000);
    state = 0;
  }
  else if (!strcmp(lightoffCommand, VoiceRecognition.getLastCommand()) && state == 1) {
    alexoff();
    digitalWrite(lamp, LOW);
    TextToSpeech.say("the lights turned off");
    delay(3000);
    state = 0;
  }
}

void onSuccess1(HttpResponse &response1) {
  response1["weather"][0]["main"].query();
  delay(200);
}

void onJsonReply1(JsonKeyChain &hell, char *output) {
  if (hell == request1.getResponse()["weather"][0]["main"]) {
    TextToSpeech.say("the weather today in cairo is");
    delay(2000);
    TextToSpeech.say(output);
  }
}

void alexon() {
  digitalWrite(strip1, HIGH); delay(200);
  digitalWrite(strip2, HIGH); delay(200);
  digitalWrite(strip3, HIGH);
}

void alexoff() {
  digitalWrite(strip1, LOW);
  digitalWrite(strip2, LOW);
  digitalWrite(strip3, LOW);
}
회로도