아두이노 로봇 프로젝트: 나만의 '상자 속 괴물' 만들기
부품 및 소모품
부품
수량
비고
나무 상자/크레이트
1
직접 제작 또는 구매
아두이노 우노 (Arduino UNO)
1
메인 컨트롤러
아다프루트 웨이브 쉴드 (Adafruit Wave Shield)
1
오디오 재생용
SainSmart 4채널 릴레이 모듈
1
모터, 조명, 연무기 제어
자동차 와이퍼 모터
1
뚜껑 개폐용 (12V, 고토크)
빨간 LED 크리스마스 라이트 (100구)
1
내부 조명 효과
연무기 (Smoke Machine)
1
연기 효과용
파워 앰프/스피커
1
사운드 출력용
프로젝트 개요
버전 4 업데이트 사항
아두이노 코드를 전면 재작성했습니다. 주요 변경 사항:
메인 루프를 상태 머신(State Machine) 방식으로 구현
모든 타이밍을 이벤트 기반(현재 시간 vs 이벤트 시간)으로 변경
프레임 의존적 타이밍 제거
메인 루프에서 delay() 함수 완전 제거
아두이노 IDE 연결 시 '포트 사용 중' 문제 해결
릴레이 연결 방식을 '상시 폐쇄(NC)'에서 '상시 개방(NO)'으로 변경 ★ 반드시 릴레이 배선 수정 필요 ★
상태 표시 LED 추가: 모션 감지 LED, 대기 LED, 일시정지 LED
액션 트리거 스위치 제거
빨간 조명과 연무기 작동 시간에 여분 시간 추가 기능 (뚜껑 바운스보다 길게 작동 가능)
주석 대폭 보강
최신 코드는 GitHub 저장소 에서 확인하세요.
몬스터 인 어 박스 (Monster In A Box)
할로윈 소품을 좋아해 작년 다양한 '상자 속 괴물' 제작 사례를 보고 직접 만들기로 했습니다. 컨셉은 간단합니다: 무언가 크고 무서운 괴물을 간신히 가두고 있는 듯한 상자를 만들어, 움직임·소리·빛·연기·놀라움으로 탈출 직전의 긴장감을 연출하는 것입니다.
상자 제작: 크기와 분위기
괴물이 들어갈 만큼 충분히 크고(약 90×75×75cm), 낡고 허술해 보여야 합니다. 중고 가게를 돌다 마음에 드는 게 없어 직접 제작했습니다. 홈디포에서 6피트 소나무 펜스 판재 15개를 구해 테이블 톱으로 재단하고, 18게이지 브래드 네일러로 조립했습니다. 하지만 모터 진동으로 브래드가 버티지 못해 나중에 1인치 드라이월 나사로 안쪽에서 보강했습니다.
목재 에이징은 홍차·식초·스틸울 반응을 이용했고, 온라인에서 찾거나 직접 만든 스텐실과 라벨로 장식했습니다.
두뇌: 아두이노 + 웨이브 쉴드 + 릴레이
상자는 '수면'과 '각성' 두 가지 상태를 가집니다.
수면 상태 : 비교적 조용하며 코골이와 낮으막한 으르렁거림만 재생각성 상태 : PIR 모션 센서 감지 시 괴물이 포효하고, 연기를 내뿜으며, 뚜껑이 격하게 들썩이고, 내부가 붉은 빛으로 빛남
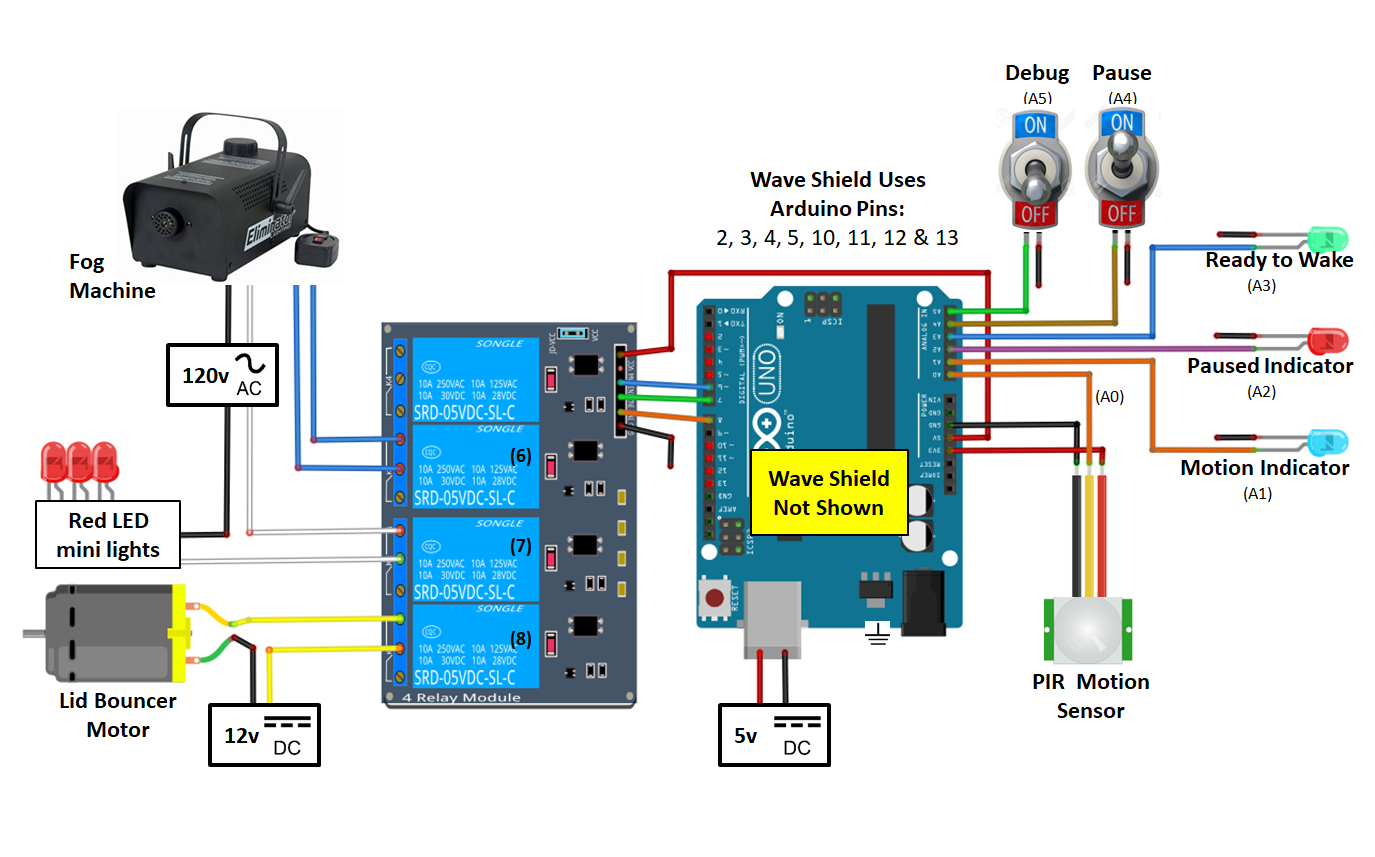
아두이노 우노가 웨이브 쉴드(수면/포효 사운드 저장)와 4채널 릴레이 모듈(모터, 빨간 LED, 연무기 제어)을 오케스트라 지휘하듯 제어합니다. 어린 아이들을 위해 일시정지 버튼도 추가했습니다.
뚜껑 개폐 메커니즘: 와이퍼 모터 + 캠(Cam)
공압 실린더나 회전 캠 방식 중 비용과 난이도를 고려해 캠 방식을 선택했습니다. 폐차장에서 15달러에 중고 와이퍼 모터를 구했습니다(12V 구동, 적절한 RPM, 높은 토크). 모터에 12인치 직경의 1/2인치 합판으로 만든 캠을 장착하고, 톱으로 무작위 너비·깊이의 '이빨'을 깎아 불규칙한 바운스 효과를 냈습니다. 뚜껑 아래에는 롤러(나일론 스페이서 + 캐리지 볼트)를 달아 캠 위를 굴러가게 했습니다. ATX 파워서플라이 12V 레일을 릴레이로 제어해 모터를 구동합니다. 롤러 위치를 세 번 조정 끝에 완벽하게 정렬되었습니다.
불꽃 숨결: 연기 & 빨간 조명
저가 400W 연무기는 본래 무선 리모컨 방식입니다. 수신기 내부 트리거 버튼 패드에 납땜해 릴레이 채널로 제어하도록 해킹했습니다. 진공청소기 호스를 연결해 뚜껑 바로 아래에서 연기 기둥이 나오게 했으며, 이는 시각적 효과뿐 아니라 내부 전자장치 결로 방지에도 도움이 됩니다.
빨간 LED 100구는 연장 코드를 잘라 릴레이 채널에 직렬 연결해 아두이노로 온/오프 제어합니다.
소리: 웨이브 쉴드 + 베이스 앰프
웨이브 쉴드의 3.5mm 출력 잭을 30W 베이스 기타 앰프에 연결했습니다. PC 스피커 등 어떤 앰프든 가능하지만, 저음이 잘 나오는 기기가 훨씬 박진감 넘칩니다.
체인 & 자물쇠로 사실감 더하기
할로윈 가게 플라스틱 체인과 3D 프린트 자물쇠로 상자를 감싸 분위기를 살렸습니다.
할로윈 당일 운용
상자를 마당에 놓고 PIR 센서를 인근 덤불에 숨겼습니다. 스피커 선을 길게 끌어 센서 위치를 실험해 1.5m 거리에서 작동하도록 튜닝했습니다. 어둠이 짙어지자 상자 디테일이 안 보여 스트로브 플라이트로 조명하니 효과가 극대화되었습니다. 아이들이 으르렁거리는 상자를 보고 호기심 혹은 공포로 다가오다 괴물이 깨어나면 비명·환호·박수가 터졌습니다. 대성공이었습니다.
개선 사항 (Enhancements)
쥐 모양 모션 센서 : 센서를 플라스틱 쥐 뱃속에 핫글루로 고정해 자연스럽게 위장. RJ11 폰 잭을 상자 후면에 달고 50피트 전화선으로 연결해 배선 정리.외부 일시정지 스위치 & 상태 LED : 메인 킬 스위치(파워 스트립)는 접근이 어려워 5V 신호용 일시정지 스위치와 '일시정지/대기/모션' LED를 후면 패널에 추가. 어린 아이 방문 시 즉시 정지 가능.체인 퀵 릴리즈 : 체인 끝에 검은색 스프링 카라비너를 케이블 타이로 묶고 상자 하단 모서리 아이볼트에 걸어 탈부착 쉽게 개선.
향후 계획
원격 제어(R/C) 추가: 원거리에서 일시정지/트리거 가능하게
뚜껑 위치 피드백: 캠 사이클 중 뚜껑이 열린 채로 멈추면 내부 전자장치가 노출되는 문제 해결
외부 스트로브 조명 아두이노 제어 연동
깃허브 저장소
최신 코드와 배선도: GitHub
소스 코드
메인 스케치 (Monster In A Box Sketch)
/* 웨이브 쉴드 사용 핀: 2,3,4,5,10,11,12,13
   13,12,11은 SD 카드 SPI 전용. 10은 SD CS, 2-5는 DAC 기본값.
   라이브러리 수정 없이는 변경 불가. 따라서 6,7,8,9 및 아날로그 핀(A0-A5, 디지털 14-20) 사용 가능. */
#include "MonsterSounds.h"

#define RESERVED_00 0  // Serial RX
#define RESERVED_01 1  // Serial TX
#define RESERVED_02 2  // Wave Shield
#define RESERVED_03 3  // Wave Shield
#define RESERVED_04 4  // Wave Shield
#define RESERVED_05 5  // Wave Shield
#define FOG_MACHINE 6  // 릴레이: 연무기
#define RED_LEDS    7  // 릴레이: 빨간 LED
#define LID_BOUNCER 8  // 릴레이: 뚜껑 모터
#define RESERVED_09 9  // 예비 릴레이
#define RESERVED_10 10 // Wave Shield
#define RESERVED_11 11 // Wave Shield
#define RESERVED_12 12 // Wave Shield
#define RESERVED_13 13 // Wave Shield
#define PIR_SENSOR  A0 // PIR 입력
#define MOTION_LED  A1 // 모션 감지 표시 LED
#define PAUSED_LED  A2 // 일시정지 표시 LED
#define READY_LED   A3 // 각성 대기 표시 LED
#define PAUSE_BUTTON A4 // 일시정지 버튼 (풀업)
#define DEBUG_BUTTON A5 // 디버그 버튼 (풀업)

// 효과 타이머 설정 (초 단위, 수정 가능)
#define WAKE_DELAY         30 // 각성 간 최소 간격(초)
#define WAKE_DELAY_DEBUG   10 // 디버그 모드 시 간격
#define SLEEP_SOUND_DELAY  1  // 수면 사운드 간격(초)
#define WAKE_MIN           3  // 최소 각성 지속(초)
#define WAKE_MAX           5  // 최대 각성 지속(초)
#define RED_LIGHT_EXTRA_TIME 1  // 빨간 조명 추가 시간(초)
#define SMOKE_EXTRA_TIME      2 // 연무기 추가 시간(초)

// 밀리초 변환 (수정 금지)
#define WAKE_DELAY_MILLIS         WAKE_DELAY * 1000
#define WAKE_DELAY_DEBUG_MILLIS   WAKE_DELAY_DEBUG * 1000
#define SLEEP_SOUND_DELAY_MILLIS  SLEEP_SOUND_DELAY * 1000
#define WAKE_MIN_MILLIS           WAKE_MIN * 1000
#define WAKE_MAX_MILLIS           WAKE_MAX * 1000
#define RED_LIGHT_EXTRA_TIME_MILLIS RED_LIGHT_EXTRA_TIME * 1000
#define SMOKE_EXTRA_TIME_MILLIS   SMOKE_EXTRA_TIME * 1000

MonsterSounds sounds;
static unsigned long timeSinceLastSnore = 0;
static unsigned long wakeAllowedTimer = 0;
static unsigned long lidBounceTimer = 0, lidBounceDuration = 0;
static unsigned long smokeTimer = 0, smokeDuration = 0;
static unsigned long redLightTimer = 0, redLightDuration = 0;

enum States {
  STATE_INITIALIZE,
  STATE_PAUSED,
  STATE_SLEEPING,
  STATE_READY_TO_WAKE,
  STATE_AWAKE
};
States state = STATE_INITIALIZE;

void setup() {
  Serial.begin(9600);
  pinMode(LID_BOUNCER, OUTPUT);
  pinMode(RED_LEDS, OUTPUT);
  pinMode(FOG_MACHINE, OUTPUT);
  pinMode(PAUSED_LED, OUTPUT);
  pinMode(MOTION_LED, OUTPUT);
  pinMode(READY_LED, OUTPUT);
  stopAllEffects();
  pinMode(PIR_SENSOR, INPUT);
  pinMode(PAUSE_BUTTON, INPUT_PULLUP);
  pinMode(DEBUG_BUTTON, INPUT_PULLUP);
  sounds.initialize();
  sounds.playSystemReady();
  delay(1000);
  Serial.println("\n*** System Ready ***\n");
}

void loop() {
  boolean pauseSwitchClosed = digitalRead(PAUSE_BUTTON) == LOW;
  boolean motionDetected = digitalRead(PIR_SENSOR) == HIGH;
  digitalWrite(MOTION_LED, digitalRead(PIR_SENSOR));

  switch (state) {
    case STATE_INITIALIZE:
      if (pauseSwitchClosed) goToPause(); else goToSleep();
      break;
    case STATE_PAUSED:
      if (!pauseSwitchClosed) { goToSleep(); digitalWrite(PAUSED_LED, LOW); }
      else digitalWrite(PAUSED_LED, HIGH);
      break;
    case STATE_SLEEPING:
      if (pauseSwitchClosed) goToPause();
      else if (isAllowedToWake()) goToReadyToWake();
      else processSleeping();
      break;
    case STATE_READY_TO_WAKE:
      if (pauseSwitchClosed) { goToPause(); digitalWrite(READY_LED, LOW); }
      else if (motionDetected) { goToAwake(); digitalWrite(READY_LED, LOW); }
      else processSleeping();
      break;
    case STATE_AWAKE:
      if (pauseSwitchClosed) goToPause();
      else if (processAwakeAnimation()) goToSleep();
      break;
    default: Serial.println("UNKNOWN STATE"); break;
  }
}

// 상태 전이 함수들
inline void goToPause() {
  Serial.println("PAUSED");
  state = STATE_PAUSED;
  stopAllEffects();
  sounds.stopAll();
}
inline void goToSleep() {
  Serial.println("GOING TO SLEEP");
  state = STATE_SLEEPING;
  wakeAllowedTimer = millis();
}
inline void goToReadyToWake() {
  Serial.println("READY TO WAKE");
  state = STATE_READY_TO_WAKE;
}
inline void goToAwake() {
  Serial.println("AWAKE");
  state = STATE_AWAKE;
  wakeMonster();
}

// 수면 처리: 코골이 재생
inline void processSleeping() {
  if ((millis() - timeSinceLastSnore) > SLEEP_SOUND_DELAY_MILLIS) {
    sounds.playSnore();
    timeSinceLastSnore = millis();
  }
}

// 각성 허용 여부 판단 (최소 수면 시간 경과 + 디버그 스위치 고려)
inline boolean isAllowedToWake() {
  boolean isDebug = digitalRead(DEBUG_BUTTON) == LOW;
  unsigned long requiredDelay = isDebug ? WAKE_DELAY_DEBUG_MILLIS : WAKE_DELAY_MILLIS;
  boolean allowed = (millis() - wakeAllowedTimer) > requiredDelay;
  if (allowed) digitalWrite(READY_LED, HIGH);
  return allowed;
}

// 괴물 깨우기: 효과 시작 + 포효 사운드
void wakeMonster() {
  int activityDuration = random(WAKE_MIN_MILLIS, WAKE_MAX_MILLIS);
  Serial.print(" wake duration: "); Serial.print(activityDuration); Serial.println(" ms");
  bounceLid(activityDuration);
  flashRedLight(activityDuration + RED_LIGHT_EXTRA_TIME_MILLIS);
  activateSmoke(activityDuration + SMOKE_EXTRA_TIME_MILLIS);
  sounds.playRoar();
}

// 각성 애니메이션 진행 관리 (매 루프 호출, 모두 끝나면 true 반환)
boolean processAwakeAnimation() {
  printTimersToLog();
  boolean done1 = false, done2 = false, done3 = false;
  if (millis() - lidBounceTimer > lidBounceDuration) { bounceLid(0); done1 = true; }
  if (millis() - redLightTimer > redLightDuration) { flashRedLight(0); done2 = true; }
  if (millis() - smokeTimer > smokeDuration) { activateSmoke(0); done3 = true; }
  return done1 && done2 && done3;
}

// 개별 효과 제어 (duration=0 이면 정지)
inline void bounceLid(unsigned long duration) {
  if (duration <= 0) { energizeRelay(LID_BOUNCER); lidBounceDuration = 0; }
  else { de_energizeRelay(LID_BOUNCER); lidBounceTimer = millis(); lidBounceDuration = duration; }
}
inline void flashRedLight(unsigned long duration) {
  if (duration <= 0) { energizeRelay(RED_LEDS); redLightDuration = 0; }
  else { de_energizeRelay(RED_LEDS); redLightTimer = millis(); redLightDuration = duration; }
}
inline void activateSmoke(unsigned long duration) {
  if (duration <= 0) { energizeRelay(FOG_MACHINE); smokeDuration = 0; }
  else { de_energizeRelay(FOG_MACHINE); smokeTimer = millis(); smokeDuration = duration; }
}
inline void stopAllEffects() {
  bounceLid(0); flashRedLight(0); activateSmoke(0);
}

// 디버그용 타이머 로그 출력 (1초마다)
inline void printTimersToLog() {
  static unsigned long timeofLastTimerLog = 0;
  if (millis() - timeofLastTimerLog >= 1000) {
    Serial.print(" lid: "); Serial.print((millis()-lidBounceTimer) > lidBounceDuration ? 0 : (lidBounceDuration-(millis()-lidBounceTimer)));
    Serial.print(" lights: "); Serial.print((millis()-redLightTimer) > redLightDuration ? 0 : (redLightDuration-(millis()-redLightTimer)));
    Serial.print(" smoke: "); Serial.println((millis()-smokeTimer) > smokeDuration ? 0 : (smokeDuration-(millis()-smokeTimer)));
    timeofLastTimerLog = millis();
  }
}

// 릴레이 제어: 상시 개방(NO) 기준
// energizeRelay = HIGH -> NO 단자 열림 (회로 차단)
// de_energizeRelay = LOW -> NO 단자 닫힘 (회로 연결)
inline void energizeRelay(int channel) { digitalWrite(channel, HIGH); }
inline void de_energizeRelay(int channel) { digitalWrite(channel, LOW); }
MonsterSounds.h
/* 아두이노 핀 참고: 13,12,11=SD SPI, 10=SD CS, 2-5=DAC 기본.
   수정하려면 라이브러리 소스(PORTD 등 하드웨어 핀 명시) 변경 필요.
   따라서 6,7,8,9, A0-A5(디지털 14-20) 사용 가능. */
#include
#include
#include
#include

static const char roar0[] = "ROAR0000.wav";
static const char roar1[] = "ROAR0001.wav";
static const char roar2[] = "ROAR0002.wav";
static const char * const roarSounds[] = {roar0, roar1, roar2};

static const char sleep0[] = "SNORE000.wav";
static const char sleep1[] = "SNORE001.wav";
static const char sleep2[] = "SNORE002.wav";
static const char * const sleepSounds[] = {sleep0, sleep1, sleep2};

int previousRoarSound = -1;

class MonsterSounds {
private:
  SdReader card;
  FatVolume vol;
  FatReader root;
  FatReader file;
  WaveHC wave;
  void playfile(char *name);
public:
  void initialize();
  void playSystemReady();
  void playRoar();
  void playSnore();
  void stopAll();
};
MonsterSounds.ino
void MonsterSounds::initialize() {
  Serial.println("Initializing Sounds...");
  if(!card.init()) Serial.println(F("Card init. failed!"));
  if(!vol.init(card)) Serial.println(F("No partition!"));
  if(!root.openRoot(vol)) Serial.println(F("Couldn't open dir"));
  Serial.println(F("Files found:"));
  root.ls();
  randomSeed(analogRead(0));
}
void MonsterSounds::playSystemReady() { this->playfile("WELCOME0.WAV"); }
void MonsterSounds::playRoar() {
  int index = random(3);
  while (index == previousRoarSound) index = random(3);
  previousRoarSound = index;
  this->playfile(roarSounds[index]);
}
void MonsterSounds::playSnore() {
  if (!wave.isplaying) { // 기존 소리 재생 중이면 코골이 재생 안 함
    int index = random(3);
    this->playfile(sleepSounds[index]);
  }
}
void MonsterSounds::stopAll() { wave.stop(); }

void MonsterSounds::playfile(char *name) {
  PgmPrint("Playing sound: "); Serial.println(name);
  if (wave.isplaying) wave.stop();
  if (!file.open(root, name)) { PgmPrintln("File not found "); return; }
  if (!wave.create(file)) { PgmPrintln("Not a valid WAV"); return; }
  wave.play();
}
회로도